- Linux Mint Recovery Menu
- Enable Grub Menu on Linux Mint
- Reboot: The grub boot menu will appear the next time you start
- Choose the second entry “Advanced options for Linux Mint 20”.
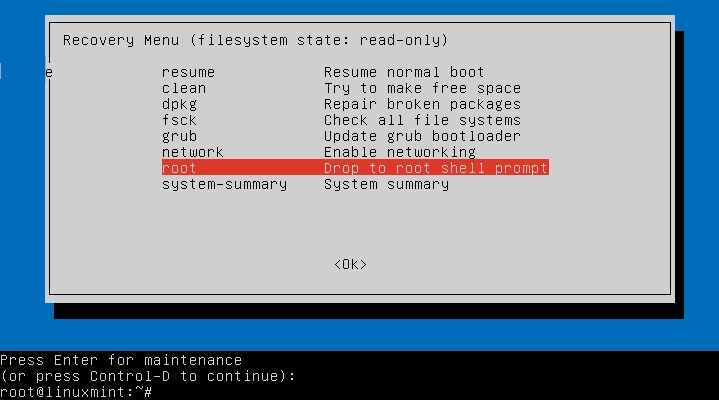
- The recovery menu with repair options and the root shell appears promptly.
- Choose “Drop to root shell prompt” that opens the Single Mode Console.
- Recovery Mode (Single Mode)
- root password forgotten
- sudo rulebook plugin could not be initialized
- Hard drive has no free space
- Linux Mint Recovery Mode or Advanced Boot Options
- Step 1: Why the mode is important
- Step 2: Start Linux Mint with Advanced boot options
- Step 3: Recovery mode in Linux Mint
- Linux: Как зайти в Recovery Mode (Режим восстановления)
- Загрузка в режим восстановления через меню Grub
- Ручная правка загрузчика Grub для загрузки в режим восстановления
- Использование режима восстановления
- Lost Password
- Recovery Mode
- Chroot from Live ISO
- Forgotten username
Linux Mint Recovery Menu
If Linux Mint is installed on the computer and no other operating systems are available, the Grub Boot menu is hidden by default. In order to get the Grub menu at startup, the right Shift key has to be pressed after switching on, unfortunately this does not work with virtual machines, here you have to set up the Grub menu persistently.
Enable Grub Menu on Linux Mint
If the Grub menu should appear at each start to get the recovery menu for system repairs, or to pass kernel parameters, edit the file 90_custom.cfg as root:
First become root with sudo su –
$ vi /etc/default/grub.d/90_custom.cfgand add the following lines:
GRUB_TIMEOUT="5" GRUB_TIMEOUT_STYLE="menu"If the file 90_custom.cfg does not exist, simply create it with an editor of your choice.
After editing, run the following command:
Reboot:
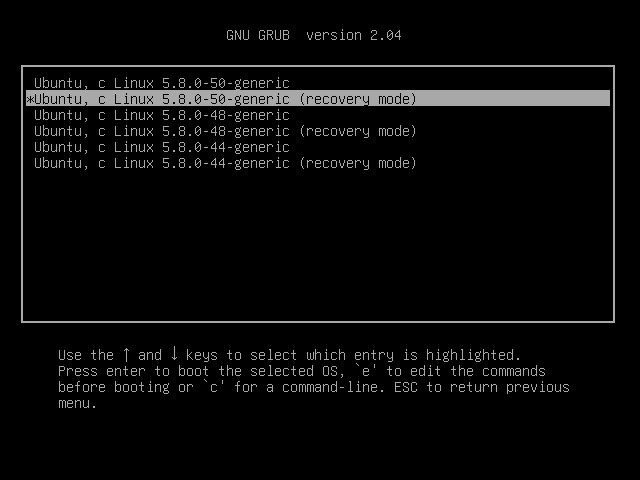
The grub boot menu will appear the next time you start
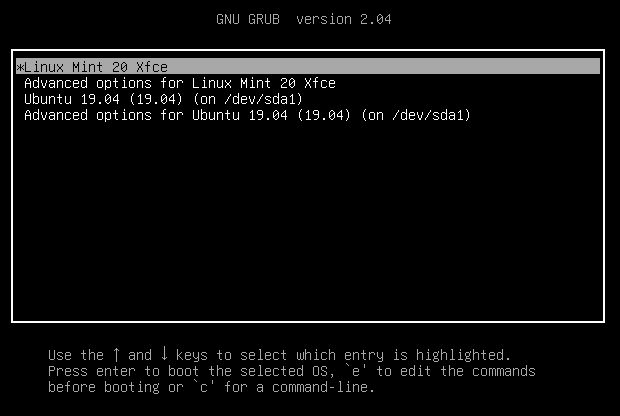
Choose the second entry “Advanced options for Linux Mint 20”.
The recovery menu with repair options and the root shell appears promptly.
Choose “Drop to root shell prompt” that opens the Single Mode Console.
Recovery Mode (Single Mode)
Enter in maintenance console. Here you are root and have write permissions on the file system. The single-user runlevel is the lowest operating state for maintenance, in which only system resources such as hard drives or file systems are active.
root password forgotten
Here are some of the most self-inflicted errors. If the root password has been forgotten, a new one can now be assigned.
root@localhost:# passwd rootsudo rulebook plugin could not be initialized
Improper changes to the sudoers file may result in errors.
$ sudo visudo >>> /etc/sudoers: syntax error near line 24 If sudo is no longer possible in the standard runlevel and you have locked out yourself as root, sudo can be restored.
Before /etc/sudoers can be changed, the file must be given write permission.
$ chmod u+w /etc/sudoers && vi /etc/sudoers
After editing, sudoers must be protected again.
Here is the sudoers original file of Linux Mint 20 in case it has been changed to unusable.
Note! Changes should always only be made with visudo.
# This file MUST be edited with the 'visudo' command as root. # Please consider adding local content in /etc/sudoers.d/ instead of Directly modifying this file. # See the man page for details on how to write a sudoers file. # Defaults env_reset Defaults mail_badpass Defaults secure_path="/usr/local/sbin:/usr/local/bin:/usr/sbin:/usr/bin:/sbin:/bin:/snap/bin" Host alias specification User alias specification Cmnd alias specification User privilege specification root ALL=(ALL:ALL) ALL Members of the admin group may gain root privileges %admin ALL=(ALL) ALL Allow members of group sudo to execute any command %sudo ALL=(ALL:ALL) ALL See sudoers(5) for more information on "#include" directives: #includedir /etc/sudoers.d
Hard drive has no free space
If there is no more free disk space, the logs can no longer be saved, which leads to system downtime, here the space allocation can be checked in the Single User Mode Console to create free space again.
$ tree -ah /var/log -L 1 $ tree --you -d -shaC | grep -Ev '[^ ]( ** )
If the tree command does not exist on the system, one of the following (disk usage) commands can help.
$ sudo du -hc --max-depth=0 /var $ sudo du -ah /var | sort -n -r | head -n 5 $ sudo du /home -Sh | sort -rh | head -5
Click on a star to rate it!
Average rating 4 / 5. Vote count: 8
No votes so far! Be the first to rate this post.
We are sorry that this post was not useful for you!
Tell us how we can improve this post?
Linux Mint Recovery Mode or Advanced Boot Options
In this article we will see how boot Linux Mint into Recovery Mode or Advanced Boot Options if it fails to start normally.
Step 1: Why the mode is important
The mode is very useful and I was able to solve multiple critical issues during the years and saved important information for me. Several basic features and services are included into Recovery Mode. You will be logged in as a root user which allows you to fix and repair broken packages and the system as a whole.
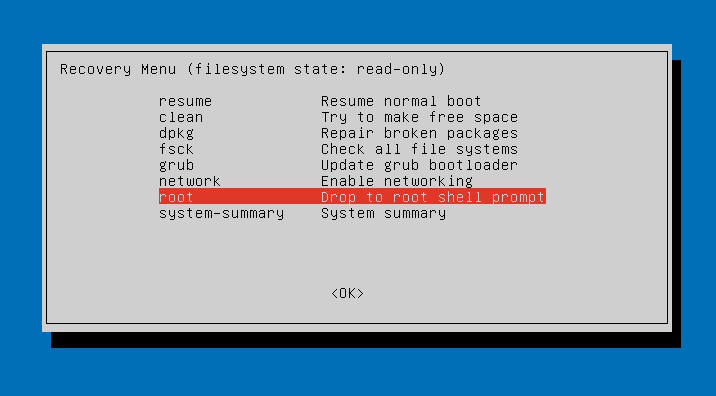
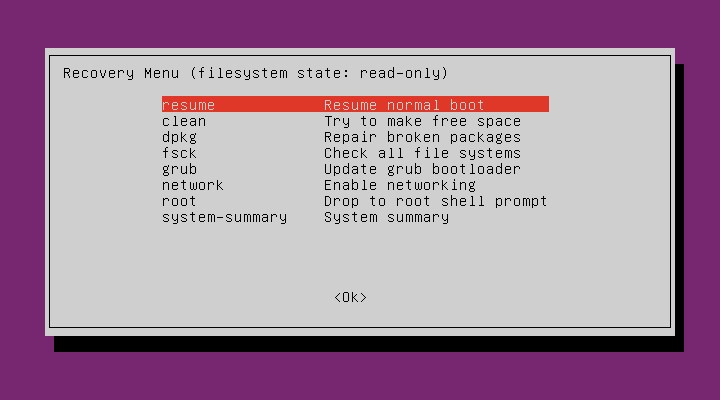
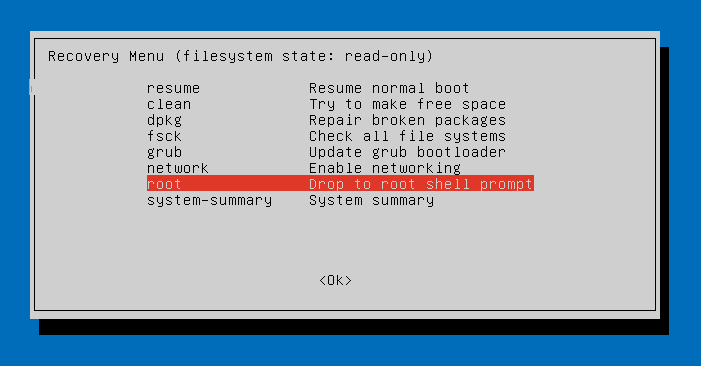
Several options are available in Linux Mint Recovery mode:
- resume - Resume normal boot
- clean - Try to make free space
- dpkg - Repair broken packages
- fsck - Check all file systems
- grup - Update grup bootloader
- network - Enable networking
- root - Drop to root shell prompt
- system-summary - System summary
Step 2: Start Linux Mint with Advanced boot options
In order to start Linux Mint in Recovery mode you need to follow next steps:
- Power on the computer
- Wait the UEFI/BIOS to load - usually the logo of the manufacturer is shown
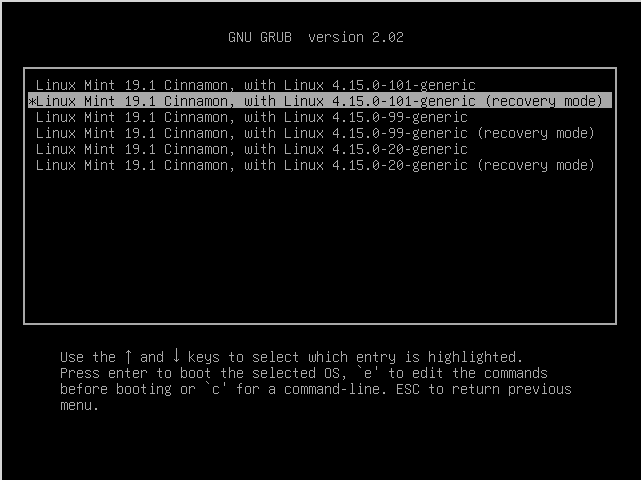
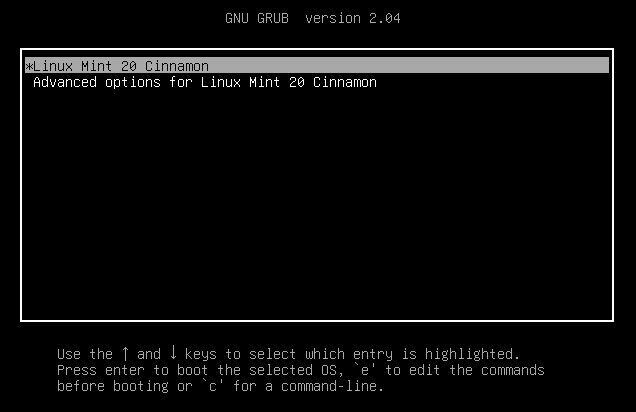
- Keep and Hold - Shift until you see the GNU GRUB menu (Advanced Options For Linux Mint 20 Cinnamon):

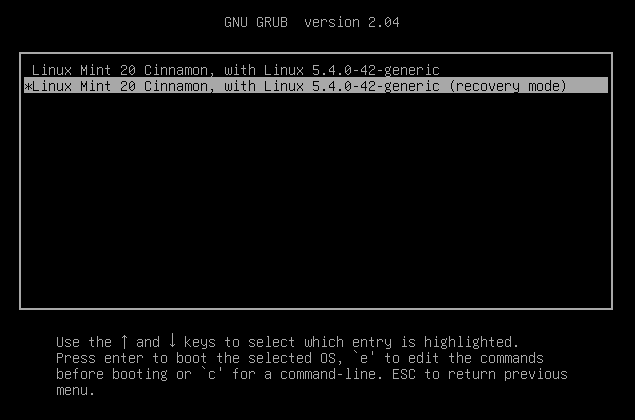
- Select a line with your prefered kernel version and Advanced options - this line will end with - (recovery mode)
Linux Mint 19.1 Cinnamon, with Linux 4.15.0-101-generic (recovery mode)
Note: The root partition is mounted as read-only. To mount it read/write, enter the command
Step 3: Recovery mode in Linux Mint
Once the selected kernel and mode are loaded you will see a window like the one below.
Below you can find the explanation for some of the available options:
- clean: Attempts to make free space on your file system. If your storage is full and this is causing some sort of problem, this can help free up space.
- dpkg: Repairs broken software packages. If a package failed to install properly and your system doesn’t work because of it, this may help.
- fsck: Performs a file system check, which scans the computer’s file systems for errors and automatically fixes them. It’s a bit like chkdsk on Windows.
- grub: Updates the GRUB boot loader. If you could use the GRUB boot loader to get to this menu, this option probably won’t help.
network: Enable networking, which is disabled by default in recovery mode. - root: Leaves the menu and goes to a root shell prompt. From here, you can mount the file system in write-mode and run commands that may help fix problems with the system. You should only do this if you know what you’re doing — it’s a way to fix the problem by hand if you know how.
If you are interested in fixing Linux Mint problem you can check these two articles:
By using SoftHints - Python, Linux, Pandas , you agree to our Cookie Policy.
Linux: Как зайти в Recovery Mode (Режим восстановления)

Режим восстановления - это особый режим загрузки операционной системы Linux, который предназначен для решения проблем с загрузкой и работой системы в штатном режиме. Специально для этого, в режиме восстановления загружается и работает минимум необходимых сервисов (например, по умолчанию не работает сеть, звук и т. д.), и вся работа происходит в консольном режиме. По сути, данный режим является своеобразным аналогом "безопасного режима" из Windows.
Загрузка в режим восстановления через меню Grub
Во всех современных дистрибутивах, для загрузки в режим восстановления Linux, необходимо перезагрузить компьютер и выбрать соответствующий раздел меню Grub. Для дистрибутивов Linux, таких как Debian, Linux Mint, Ubuntu и многих других, алгоритм загрузки в режим восстановления следующий:
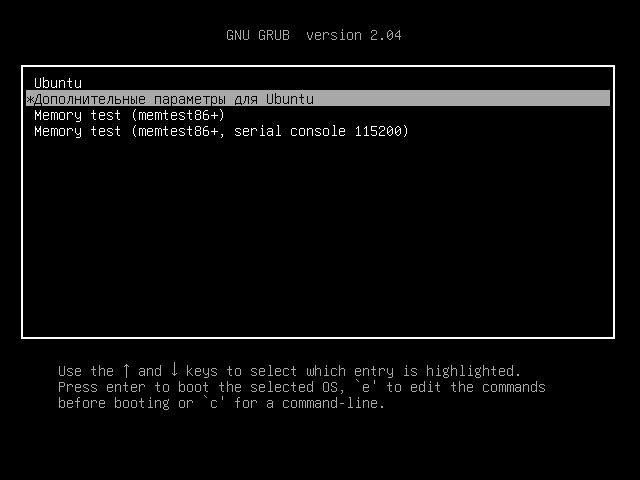
- Перезагружаем компьютер, и ждем загрузки меню Grub. Если меню Grub не отображается, то следует снова перезагрузить компьютер, и многократно нажать на клавишу ESC после прохождения загрузки BIOS.
- В меню загрузчика Grub, выбираем пункт "Дополнительные параметры для . ".
- Здесь выбираем строку, которая содержит надпись "(recovery mode)". Если таких строк несколько - скорее всего там отображаются варианты загрузки с разными версиями ядра. В таком случае, лучше выбрать строку с наиболее свежей версией ядра.
- После этого начнется загрузка Linux в режиме восстановления.
Ручная правка загрузчика Grub для загрузки в режим восстановления
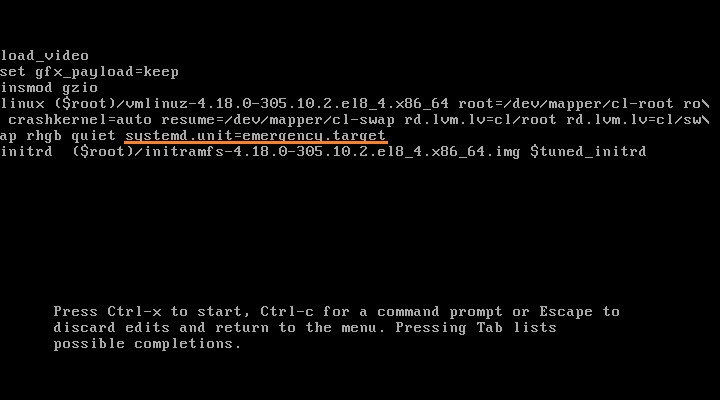
Однако, может случится и так, что в меню Grub отсутствует пункт загрузки в режиме восстановления. В таком случае, придется самостоятельно изменить параметры загрузки Grub. Для этого:
- В меню Grub выбираем строку, соответствующую загрузке Linux в нормальном режиме (должна быть самой первой в списке), и нажимаем клавишу e .
- Откроется редактирование параметров загрузки дистрибутива Linux. Здесь нужно найти строку, начинающуюся с linux , после чего перейти в её конец - сделать это проще всего с помощью клавиши End или комбинации клавиш Ctrl + E . Затем, в эту строку следует вписать вписать systemd.unit=emergency.target .
- После этого нажать комбинацию Ctrl + X для загрузки системы - и если предыдущая команда была написано верно и в нужном месте, то система загрузится в режим восстановления.
Использование режима восстановления
В дистрибутивах Linux, построенных на основе Debian (Linux Mint, Ubuntu и т. д.), после завершения загрузки режима восстановления загрузится окно, в котором будет предложен список действий на выбор.
Разберем каждый из этих пунктов:
- resume - выйти из режима восстановления и продолжить нормальную загрузку системы.
- clean - автоматическая очистка накопителя, может быть полезна при отсутствии свободного места на жестком диске.
- dpkg - исправление ошибок в пакетах dpkg (может потребоваться включение сети).
- failsafeX* - включение графической оболочки
- fsck - проверка на наличие ошибок смонтированных файловых систем.
- grub - обновление конфигурации загрузчика grub.
- network - включить работу сети.
- root - перейти к консоли, запущенной под пользователем root. Для выполнения различных консольных команд в режиме восстановления, следует выбрать именно этот пункт.
- system-summary - общая информация о системе.
Lost Password
If your disk is encrypted it is not possible to reset the password. If your home directory is encrypted changing your login password won’t help. Unless you made a backup of your encryption passphrase it is not possible to access the files.
If you forgot your password, and neither your partition nor your home directory are encrypted, there are two ways to reset it:
Recovery Mode
Boot up the computer, and after the BIOS screen, hold down the left Shift key to force the boot menu to show up:
On some computers you might need to press the Escape key instead.
Select the second entry from the top, the one that starts with Advanced options .
Then on the next screen, select the second entry again, the one that ends with (recovery mode) .
Linux Mint will then starts in recovery mode and present this menu:
Select root to get a root prompt and press Enter.
Use the passwd command to reset your password. Say your username is joe , type:
Chroot from Live ISO
Boot up the computer from the live ISO.
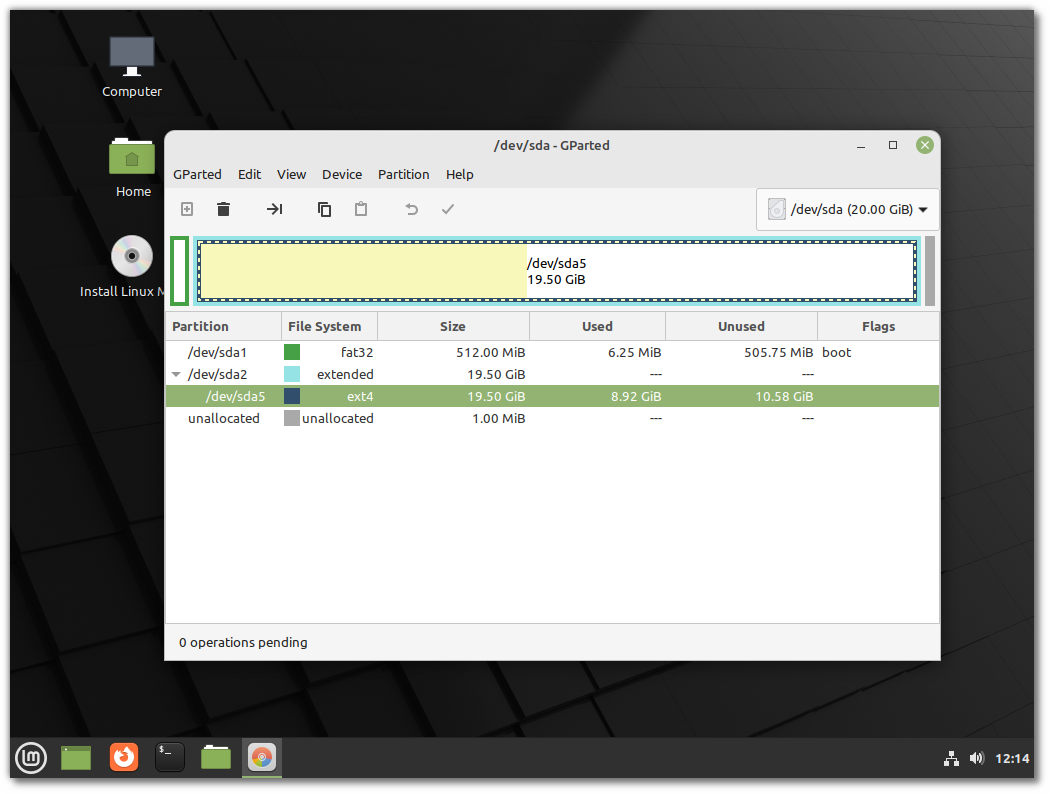
Once in the live session launch Gparted from the applications menu.
Identify your Linux Mint partition (usually a large ext4 partition). In the example above the Linux Mint partition is /dev/sda5 .
Open a terminal and type the following commands:
mkdir hdd sudo mount /dev/sda5 hdd sudo chroot hdd mount -o remount,rw / passwd joe
Replace /dev/sda5 with your Mint partition and joe with your username.
Forgotten username
If you can’t remember your username type the following command, either in the chroot prompt or the recovery mode prompt:
This command lists the directories in /home which usually corresponds to the list of usernames on the OS.
© Copyright 2020, Linux Mint Revision 92937742 .
Versions latest Downloads pdf html epub On Read the Docs Project Home Builds Free document hosting provided by Read the Docs.