- What is Root User in Linux? [A Complete Guide]
- What is a Root User?
- Difference Between a Root User and a Non-Root User
- How to Create a Root User?
- Method 01: Creating Root User from GUI
- Method 02: Creating a Root User from the Command Prompt
- System Management Operations Exclusive to Root User
- Example 1: Installing Any Package in the System
- Example 2: Changing Permission of a File
- Example 3: Accessing Any File of the System
- Conclusion
- Who Is Root? Why Does Root Exist?
- What is root?
- Gaining Access to root Permissions
- What is Root Account in Linux
- Short History
- How do I become a Root User on Linux?
- What is the Sudo Group?
- Back to the Root User
What is Root User in Linux? [A Complete Guide]
The root user is one of the most vital parts of the system administration of the Linux operating system. Moreover, this user can affect the whole system by performing any task. In a multiuser system, the root users control the activity of other users. In this article, I will demonstrate a complete overview of what is root user in Linux.
What is a Root User?
The root user is the super user or administrator who has full access to all the system files, directories, and commands of the Linux operating system. This user can do any task which can change the security and stability of the whole system.
Difference Between a Root User and a Non-Root User
A root user is a user having superpowers who can perform all the administrative tasks (i.e. package installing, user removing, accessing any files or directories and many more) that can affect the whole system. On the other hand, a non-root user having limited privileges can not perform such administrative tasks that can affect the system.
How to Create a Root User?
In Linux, various ways are available to create a root user. Any user with root privileges can add a new root user in Linux from both the graphical user interface and the command line. Both of them are outlined below.
Method 01: Creating Root User from GUI
In the following section, I will create a root user from GUI(Graphical User Interface). To do so, follow the below procedures. Steps to follow: ➊ Find the view application button on the left corner of your home screen and left-click on it. ➋ After that type settings in the search bar, then the Settings application will appear. After that Click on the Settings application.
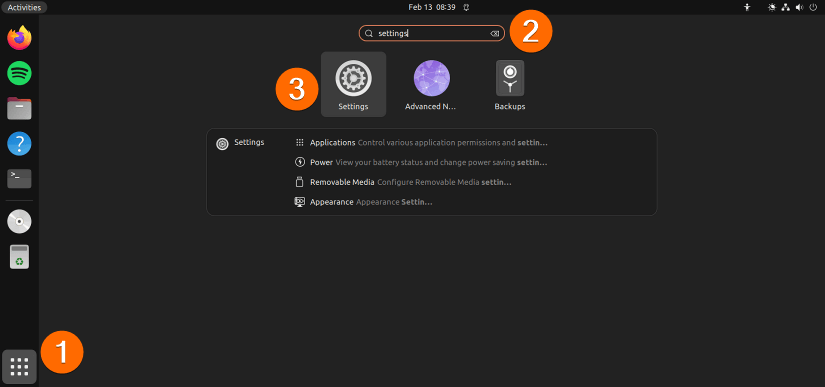 ➌ Then, type users on the search bar, by doing so, an option named Users will appear. Now, click on this Users option.
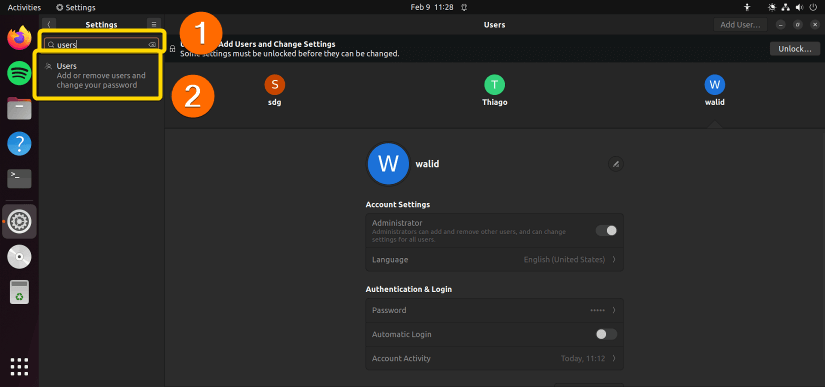 ➍ Now, click on the Unlock option which is in the top right corner of the Users window.
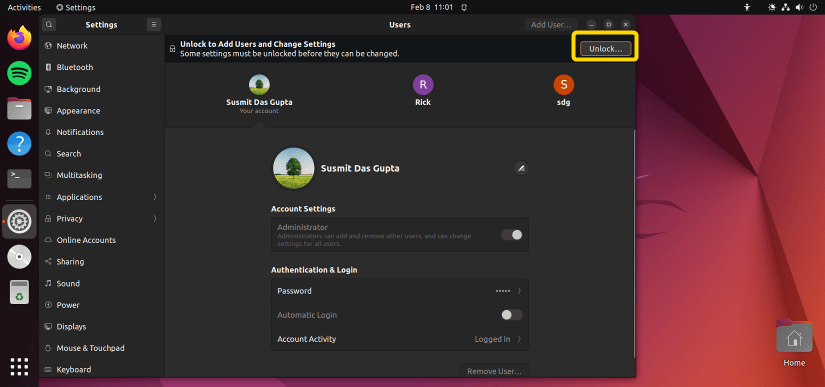 ➎ It will open a new prompt to authenticate the current root user. You have to put the password of the current root user and then click on the Authenticate option.
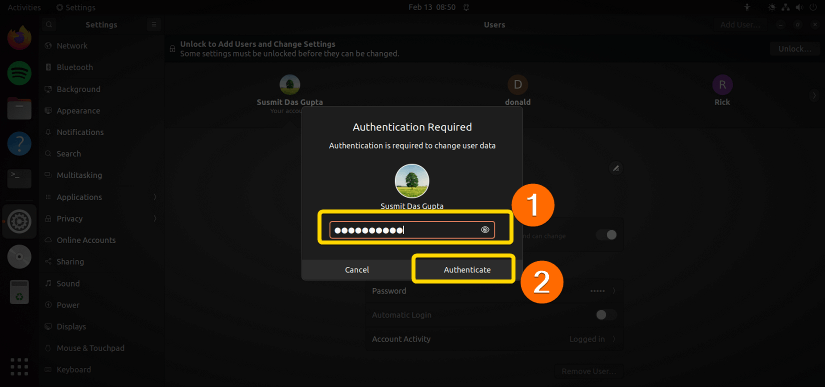 ➏ After that, a new option named Add User.. will appear on the top right corner of the Users window. Click on the Add User.. option.
 ➐ Then, a new Add User prompt will appear. You have to click on the Administrator option and then fill up the all pieces of information like Full Name, Username, and Password. Then finally, click on the Add option.
 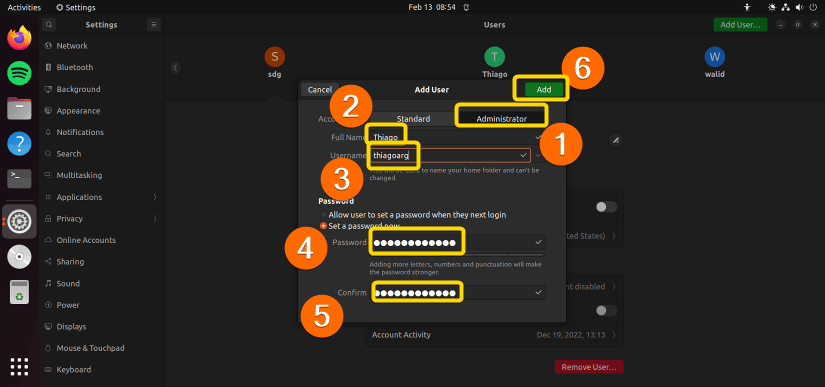 Output: In the following image, you can see I have created a new root user named Thiago.
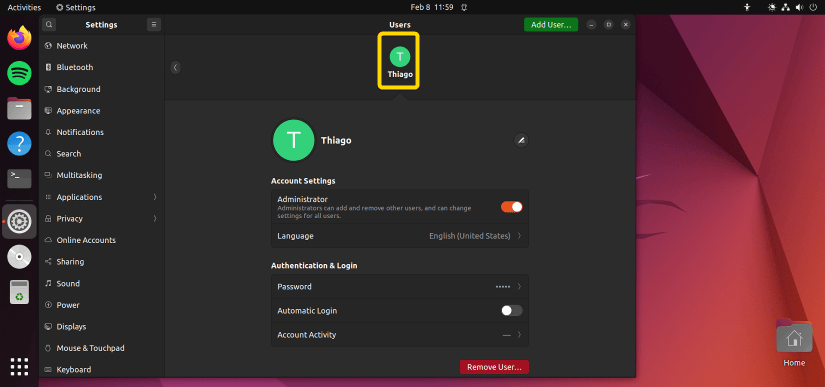
Method 02: Creating a Root User from the Command Prompt
Here, I will create a root user from the command prompt. To do so, follow the below procedures. Steps to follow: ➊ Open the Ubuntu terminal. ➋ Then, type the following command then press ENTER button to create a new user named Donald.
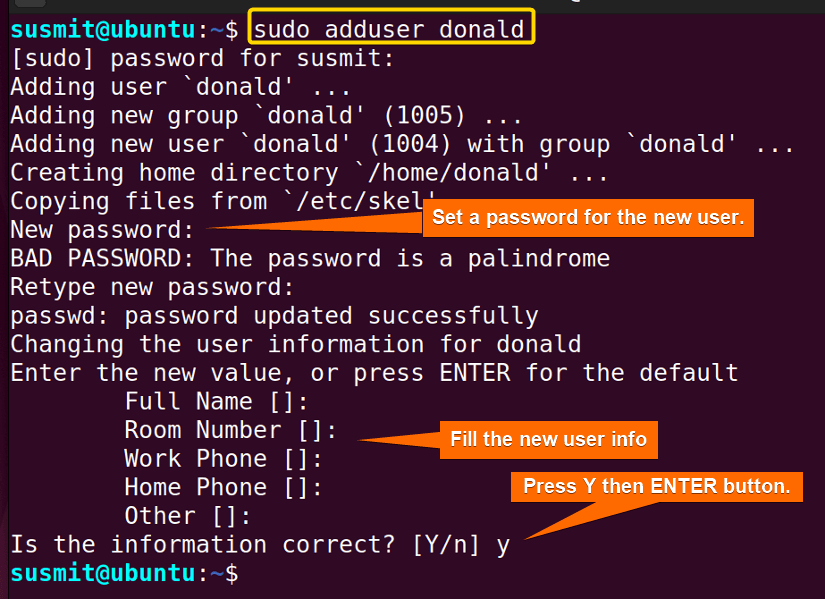
➌ After creating a user named donald, copy the following command in the terminal and then press ENTER to add the donald user to the sudo group.
sudo usermod -aG sudo donald
➍ To check the group of the new root user named donald, type the following command and press ENTER.
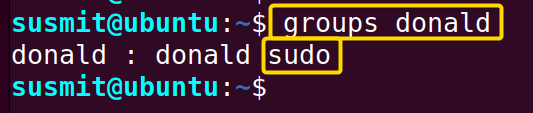
Output: The new user named donald belongs to the sudo group, this means that donald is a root user.
System Management Operations Exclusive to Root User
A root user in Linux can do all kinds of administrative tasks(i.e. package installing, user removing, accessing any files or directories and many more). In the following section, I have illustrated a few o the administrative tasks that only a root user can do.
Example 1: Installing Any Package in the System
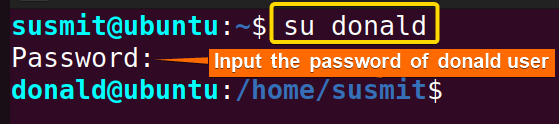
Only root users in Linux can install/remove packages in the system. Here, I will install the nano package with the root user named donald. To achieve so, follow the below procedures. Steps to follow: ➊ At first open the ubuntu terminal and type the following command to switch the user to the new root user named donald.
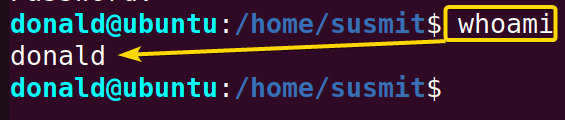
➋ To check the current user, type the following command and press ENTER.
➌ Then, copy the following command in the command prompt and press ENTER.
Note: The sudo command can only be used by a root user in Linux. Since donald is a root user, it can readily use the sudo command.
Example 2: Changing Permission of a File
A root user can alter the permission of any file and directory. Here, I will switch my current user to donald who is a root user. Then, I will change the writing permission of the Music directory. To do the task, follow the procedures given below. Steps to follow: ➊ At first, open the Ubuntu terminal. ➋ Then, type the following commands to the terminal and then press ENTER to check the permission information of all the files and directories inside the current directory.
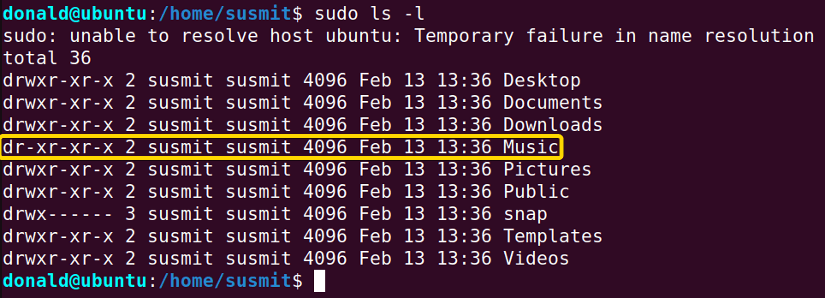
➌ Now, copy the following image to the terminal and then press ENTER to allow the writing permission of Music Directory for all(other, owner, and group).

➍ Then, type the following commands to the terminal and then press ENTER to check the permission information of all the files and directories inside the current directory.
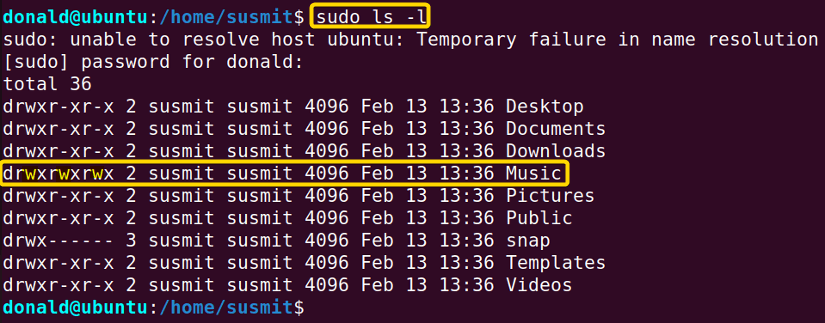
Output: The following image shows that as a root user (donald), I have altered the permission of the desired directory.
Example 3: Accessing Any File of the System
As a non-root user, you can not access the root or any other files. But as a root user, you can access the root or any other files. Here, I will first try to access the /root directory as the sdg user which is not a root user. Then, I will try to access the /root directory as the donald user who is a root user. To do so, follow the below procedures. Steps to follow: ➊ At first, open the Ubuntu terminal. ➋ After that, copy the following command on the terminal to switch the user to donald who is a root user.
➌ Next, tap the ENTER button. ➍ Then, type the following command on the command prompt to access the /root directory as the donald user who is a root user.
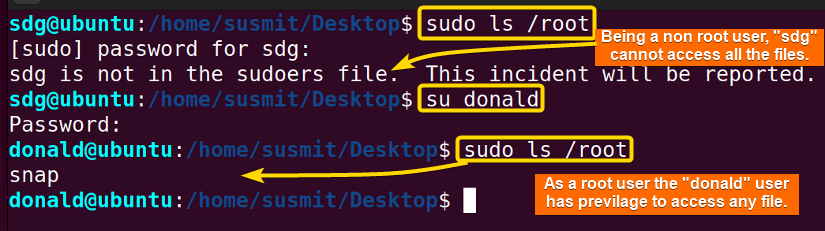
➎ Now, press the ENTER button. Output: The following image shows that the non-root user named sdg can not access the /root directory but the root user named donald can access the /root directory.
Conclusion
- What is Sudo in Linux [A Detailed Review]
- What is Root Partition in Linux? [A Complete Guide]
- What is Root Directory in Linux? [The Ultimate Guide]
- What is Root Access in Linux [With Practical Examples]
Who Is Root? Why Does Root Exist?
Have you ever wondered why there is a special account named root in Linux? Do you know what are the recommended best practices to use this account? Are you aware of the scenarios where it must be used and those where it doesn’t? If you answered “yes” to one or more of these questions, keep reading.
In this post we will provide a reference with information about the root account that you will want to keep handy.
What is root?
To begin, let us keep in mind that the hierarchy of directories in Unix-like operating systems has been designed as a tree-like structure. The starting point is a special directory represented by a forward slash (/) with all other directories initially branching off from it. Since this is analogous to an actual tree, / is called the root directory.
In the following image we can see the output of:
which illustrates the analogy between / and the root of a tree.

Although the reasons behind the naming of the root account are not quite clear, it is likely due to the fact that root is the only account having write permissions inside / .
Additionally, root has access to all files and commands in any Unix-like operating system and it is often referred to as the superuser for that reason.
On a side note, the root directory (/) must not be confused with /root , which is the home directory of the root user. In fact, /root is a subdirectory of / .
Gaining Access to root Permissions
When we talk about root (or superuser) privileges, we refer to the permissions that such account has on the system. These privileges include (but are not limited to) the ability to modify the system and to grant other users certain access permissions to its resources.
The reckless use of this power can lead to system corruption at best and total failure at worst. That is why the following guidelines are accepted as best practices when it comes to accessing the privileges of the root account:
Initially, use the root account to run visudo. Use that command to edit /etc/sudoers to grant the minimum superuser privileges that a given account (e.g. supervisor) needs.
Moving forward, login as supervisor and use sudo to perform user management tasks. You will notice that attempting to perform other tasks that require superuser permissions (removing packages, for example) should fail.
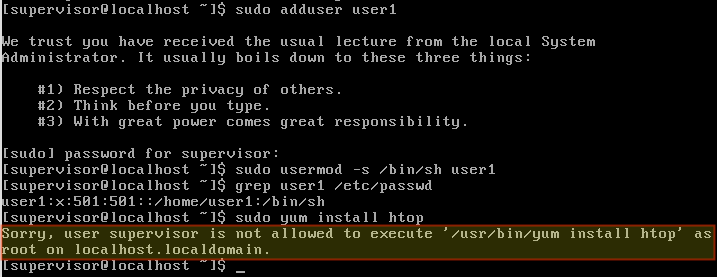
Repeat the above two steps whenever needed, and once done, use the exit command to return to your unprivileged account immediately.
At this point you should ask yourself, Are the any other tasks that pop up on a periodic basis that need superuser privileges? If so, grant the necessary permissions in /etc/sudoers either for a given account or group, and continue avoiding the use of the root account at the extent possible.
Summary
This post can serve as a reference for the proper use of the root account in a Unix-like operating system. Feel free to add it to your bookmarks and return as many times as you want!
As always, drop us a note using the comment form below if you have any questions or suggestions about this article. We look forward to hearing from you!
What is Root Account in Linux
The root account, or root user, has the highest privilege over the system, having complete control over it.
They can easily install any program with the highest privilege, create a user account, assign permissions, and give different privileges to users’ accounts.
Short History
The root account is created by the system administrator who sets up the system or server.
The default user ID for the root user in most Linux distributions is 0.
How do I become a Root User on Linux?
To log into the system as the root user, you need to use “root” as the username and the password that the system administrator used while setting up the system or server.
However, it is not recommended to directly access a Linux system with a root user; instead, create a normal account and add him to the sudo group.
What is the Sudo Group?
The sudo group exists in most Linux systems and holds root level privileges. If you add your normal user to this group, you will have access to those root level privileges.
Only the root user or a user with sudo access can add a normal user to the sudo group.
Once the normal user is added to the sudo group, they can easily execute any command with the highest privileges by adding sudo in front of each command.
$ sudo apt updateAfter that, they will require the current user’s password to execute the command.
$ sudo apt update [sudo] password for linuxtldr: Back to the Root User
Having access to the system as the root user lets some applications or packages act smartly (referring to malware) to get system access without user awareness.
In those cases, it is recommended to create an application profile by using a program like SELinux or AppArmor for Red Hat or Ubuntu.
That’s all for now. If you have any suggestions for adding more to this article, do let us know in the comment section.