- sftp-server(8) — Linux man page
- See Also
- History
- Руководство по установке SFTP сервера на Linux
- Что такое SFTP?
- Установка SFTP-сервера на Linux
- Этап 1: Создание групп, пользователей, каталогов
- Этап 2: Настройка sshd_config
- Этап 3: Перезагрузите службу
- Доступ к SFTP через командную строку Linux
- Примеры команд SFTP
- How to Setup SFTP Server in Ubuntu
- How to install SFTP server in Ubuntu
- How to create an SFTP user account
- How to create a directory for file transfers
- How to configure SSH daemon
- How to verify the restriction configurations
- How to login SFTP server using command line
- How to login SFTP server using GUI
- How to Remove SFTP server
- Conclusion
- About the author
- Hammad Zahid
sftp-server(8) — Linux man page
sftp-server is a program that speaks the server side of SFTP protocol to stdout and expects client requests from stdin. sftp-server is not intended to be called directly, but from sshd(8) using the Subsystem option.
Command-line flags to sftp-server should be specified in the Subsystem declaration. See sshd_config(5) for more information.
Specifies the facility code that is used when logging messages from sftp-server. The possible values are: DAEMON, USER, AUTH, LOCAL0, LOCAL1, LOCAL2, LOCAL3, LOCAL4, LOCAL5, LOCAL6, LOCAL7. The default is AUTH.
-l log_level
Specifies which messages will be logged by sftp-server. The possible values are: QUIET, FATAL, ERROR, INFO, VERBOSE, DEBUG, DEBUG1, DEBUG2, and DEBUG3. INFO and VERBOSE log transactions that sftp-server performs on behalf of the client. DEBUG and DEBUG1 are equivalent. DEBUG2 and DEBUG3 each specify higher levels of debugging output. The default is ERROR.
-u umask
Sets an explicit umask(2) to be applied to newly-created files and directories, instead of the user’s default mask.
For logging to work, sftp-server must be able to access /dev/log. Use of sftp-server in a chroot configuration therefore requires that syslogd(8) establish a logging socket inside the chroot directory.
See Also
T. Ylonen and S. Lehtinen, SSH File Transfer Protocol, draft-ietf-secsh-filexfer-00.txt, January 2001, work in progressmaterial.
History
sftp-server first appeared in OpenBSD 2.8.
Руководство по установке SFTP сервера на Linux
![]()
Привет, друг! Мы подготовили удобную инструкцию по установке и настройке SFTP-сервера Linux.

Что такое SFTP?
SFTP — это безопасный протокол передачи файлов — «Secure SHell» File Transfer Protocol. То есть это версия FTP, которая для безопасности поверх использует SSH. FTP делает то же самое, но без шифрования, поэтому использовать SFTP предпочтительнее.
Установка SFTP-сервера на Linux
Чтобы выполнить эти шаги, вам нужно иметь права sudo. SFTP прост в установке, но сначала необходимо установить OpenSSH со стороны сервера и SSH-пакет со стороны клиента.
Чтобы установить OpenSSH на сервер, используйте следующую команду:
sudo apt install openssh-server [Ubuntu/Debian] sudo yum –y install openssh-server openssh-clients [CentOS/RHEL]
Вам также понадобится SSH на компьютере, с которого вы хотите получать доступ к серверу SFTP.
sudo apt install ssh [Ubuntu/Debian]
Теперь все готово для настройки SFTP.
Этап 1: Создание групп, пользователей, каталогов
Для безопасного использования SFTP, лучше всего создать группы и пользователей, которые будут использовать только эту службу.
Создадим группу с названием sftpg, при помощи комыды groupadd :
Далее создадим пользователя seenisftp, и добавим его в группу.
sudo useradd -g sftpg seenisftp sudo passwd seenisftp
В команде useradd параметр -g указывает группе, какого пользователя нужно добавить.
Предположим, что вы хотите использовать каталог /data/ в качестве корневого для sftp, а /data/USERNAME — для каждого пользователя. Поэтому, когда пользователи входят через sftp, они должны будут оказаться в каталоге /data/USERNAME . Также создадим ограничение при котором пользователи смогут читать файлы из этого каталога, но загружать их смогут только в каталог uploads .
Cоздадим каталоги и изменим их доступ:
sudo mkdir -p /data/seenisftp/upload sudo chown -R root.sftpg /data/seenisftp sudo chown -R seenisftp.sftpg /data/seenisftp/upload
Важно: убедитесь, что владелец /data/USERNAME и есть root, это обязательно для изменения корневого каталога в SFTP
Этап 2: Настройка sshd_config
Далее нужно настроить сервер так, чтобы когда пользователь, из группы sftpg, входил в систему, он попадал в sftp вместо обычной оболочки, в которую попадает через ssh. Добавьте следующий фрагмент кода в файл /etc/ssh/sshd_config :
Match Group sftpg ChrootDirectory /data/%u ForceCommand internal-sftp
ChrootDirectory позволяет создать необходимый каталог в качестве корневого узла ( / каталог) в дереве каталогов. Вошедший в систему пользователь не сможет увидеть ничего выше этого каталога и это не даст ему получить доступ к файлам других пользователей. %u — это escape код для заполнения его текущим именем пользователяm, во время входа в систему.
Этап 3: Перезагрузите службу
Чтобы выполнить внесенные в sshd_config изменения, перезапустите службу:
sudo systemctl restart sshd
Доступ к SFTP через командную строку Linux
Заходите в SFTP также как в SSH:
Примеры команд SFTP
COMMAND [SOURCE] [DESTINATION]
Параметрами могут быть либо локальные, либо удаленные системные пути.
- GET — загрузка содержимого с удаленного сервера в локальную систему.
PUT ~/Pictures/picture2.jpg uploads/
How to Setup SFTP Server in Ubuntu
![]()
SFTP is the acronym of “Secure File Transfer Protocol” which is used to transfer files from one place to another place using the internet and it works similarly to FTP (File Text Protocol), but the difference in both of them is that SFTP also ensures the privacy of the file using SSH service, which secures the data of the file by encrypting it, so no one can access the data.
Though it has the advantage that it encrypts the data and transfers it to the destination location more securely, it has a disadvantage as well; on reaching the destination location, any user can access it. So to make it more secure, we should restrict the other users to access it, other than the allowed users.
In this article, we will discuss how to install SFTP in Ubuntu, if it is not already installed, and how to set it up by using the simple commands of Ubuntu.
How to install SFTP server in Ubuntu
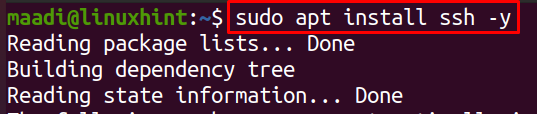
SFTP server is usually installed in Ubuntu by default, but if it is not already installed, one can install SSH by using the simple commands of Ubuntu. Because SFTP uses the SSH server, so to check the SFTP server is already installed or not we will run the below-mentioned command:

The output is shows, SSH is not installed in our Ubuntu, to install it, run the following command of Ubuntu:
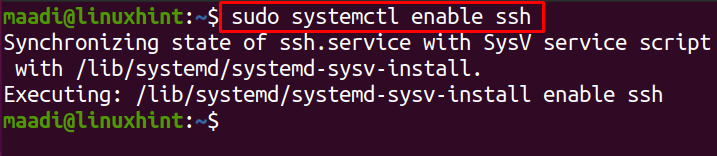
Once it is installed, we will enable it using the systemctl command:
Now, again using the systemctl command, start it:

To verify the installation of ssh checks its status using the systemctl command:
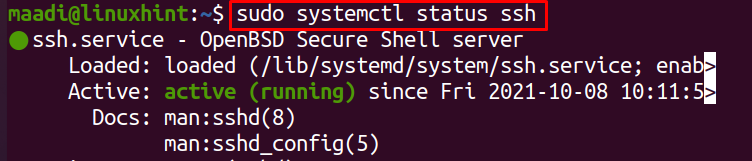
The running status of SSH shows it has been installed successfully.
How to create an SFTP user account
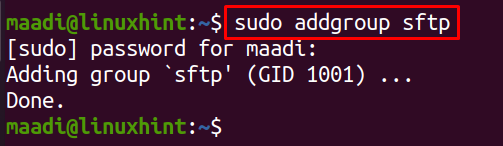
We can either create users directly or by creating a group of SFTP and then create users to give them access to the SFTP. To create a group, for example, we name it “sftp”, you can name it according to your choice, execute the following in a terminal:
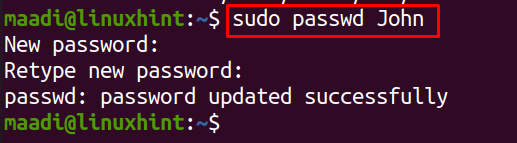
To create a user, “John”, you can rename “John” with your own username, run the following command:

For the verification of newly user-created, execute:

To add a password for this new user, run:
To move user, “John” to the group “sftp” run the command:

To verify that the user, John, has been added to the group,sftp, run the statement:

How to create a directory for file transfers
To understand how to restrict access to a directory for other users, we will create a directory “Document” in path /var/sftp which will be owned by root. Then only the “John” user which we have created can access this directory and upload files in it.
To do so, first, we will create a directory of “Document” using the mkdir command:

Allow the root, to recognize the owner of /var/sftp:

Grant write permissions of this directory to the same directory, and allow other users to read-only:

Now grant the permissions of the Document to the user John:

How to configure SSH daemon
Once the installation is completed, we will open the configuration file of the SSH server with any editor and configure it. In this configuration, we are restricting the user, John, to the directory /var/sftp, and also none of the other users can access this directory. We are using a nano text editor to configure it so we will run the following command:

Once the file opened, type the following text in it:
ChrootDirectory / var / sftp

When the file is opened, at the bottom you will see the text “Subsystem sftp /usr/lib/openssh/sftp-server”, write those lines after this line. The explanation of these five lines are:
- Match User tells the SSH to implement these changes on the mentioned user, in our case, it is “John”
- ChrootDirectory ensures the user will not have access to any other directory except that whose part is being provided, in our case it is “/var/sftp”
- AllowTcpForwarding and X11Forwarding will enable or disable the port tunneling and X11forwarding, in our case, both are being disabled by typing “no”
- ForceCommand ensure the SSH run the SFTP server only after the login
Once the changes are made, save the changes by pressing CTRL+S, and then terminate the editor by pressing CTRL+X.
To apply these new changes, restart the SSH server using:

How to verify the restriction configurations
To verify the restriction configurations, we will try to access the files using the normal SSH command:
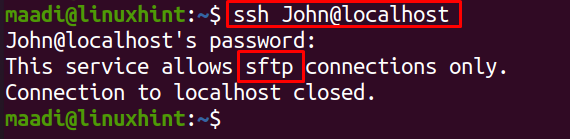
The output is showing that John cannot be accessed by any other SSH.
How to login SFTP server using command line
We can log in to the user protected by the SFTP server in the command line by the use of loop address which is by default 127.0.0.1, once the command has been executed it will ask for the password set for the user:
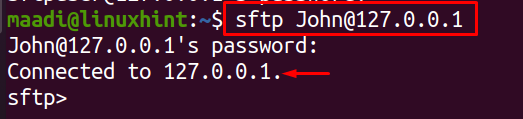
It has been connected to the SFTP server. List down the directories of this user using the ls command:
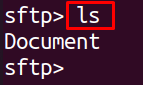
The output showing the directory, Document which was restricted for this user. Now, this user cannot access any other directory other than this one.
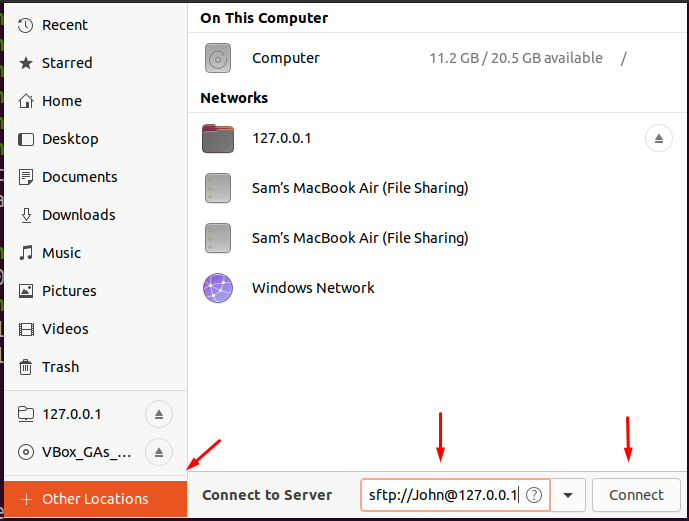
How to login SFTP server using GUI
We can also access SFTP using the GUI mode, simply go to the home folder, choose other locations, type sftp://John@127.0.0.1 and click on the connect.
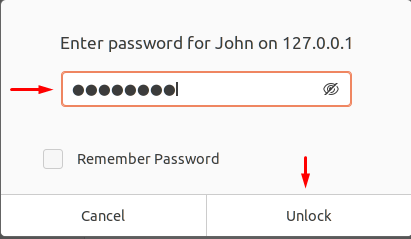
It will ask the password of the user, type the password, and click on Unlock:
Finally, It will open the directory:

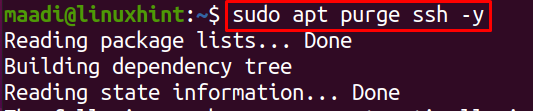
How to Remove SFTP server
To remove or uninstall the SFTP server, just remove the ssh by using the command:
Conclusion
SFTP server encrypts the file and transfers it to the destinations, and decodes the file there to communicate the data safely. Safety is necessary for transferring files as sometimes files contain sensitive pieces of information which should only be delivered to the authorized person, this can be done with the help of SFTP. In this article, we have learned how to install SFTP if it is not installed by default in Ubuntu, then we learned how to create a user of SFTP directly or with the help of the group. We also learned the feature of restricting the files to only selected users as well as restricting the user to that particular file so that the user cannot move to any other directory. Finally, we learned how to remove the ssh server from Ubuntu 20.04.
About the author
Hammad Zahid
I’m an Engineering graduate and my passion for IT has brought me to Linux. Now here I’m learning and sharing my knowledge with the world.