- How to use SSH Key authentication in Linux
- Why use SSH keys
- How to create SSH keys
- What’s the difference between private and public keys
- How to add SSH keys to a remote computer
- ssh-copy-id
- scp
- Append with cat
- Copy-paste
- GUI
- SSH key log in
- How to disable password login and allow only the SSH key login
- How to use SSH keys for password-less login
- How to use SSH authentication agent
- Conclusion
- What is SSH Key? How To Generate SSH Key in Linux?
- How To Generate SSH Kyes (RSA)?
- Generating the Key Pair
- Store the Keys and Passphrase
- Copy the Public Key
- Verify SSH is working well
- Conclusion
How to use SSH Key authentication in Linux
SSH keys provide a simple and yet extremely secure way to connect to a remote computer or a server. In this post, you will learn:
To securely test this SSH configuration, I recommend trying these settings in VirtualBox first.

Why use SSH keys
The short answer is SSH keys are more difficult to crack.
If you read my previous post where I explained how to install and use SSH, you know that SSH can be safely used with a password. But to be secure, you need to use a long and complex password. Nevertheless, many passwords still can be cracked with a brute-force attack.
On the other hand, SSH keys are much more complex than any password, and the need for two matching keys, a private and public, make it almost impossible to crack your SSH connection. So, by using SSH keys you will have the highest level of security on your server or a remote computer.
How to create SSH keys
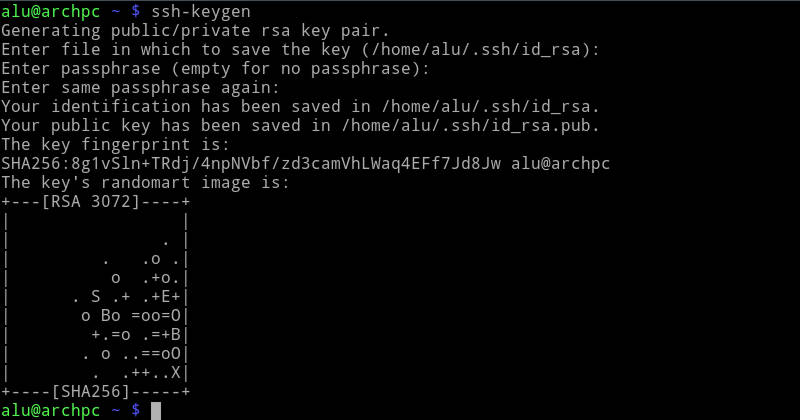
The program will ask you where to place the key and how to name it. By default, SSH keys are located in /home/username/.ssh/ . You will also need to create a password for this key. For a passwordless log in, you can leave the password field empty and press enter.
If you get a warning that a key already exists, do not overwrite it because you will lose your current key and thus you won’t be able to authenticate to the SSH connection you use the current key for. You can simply rename the key.
You can find your newly created keys in ~/.ssh folder:
What’s the difference between private and public keys
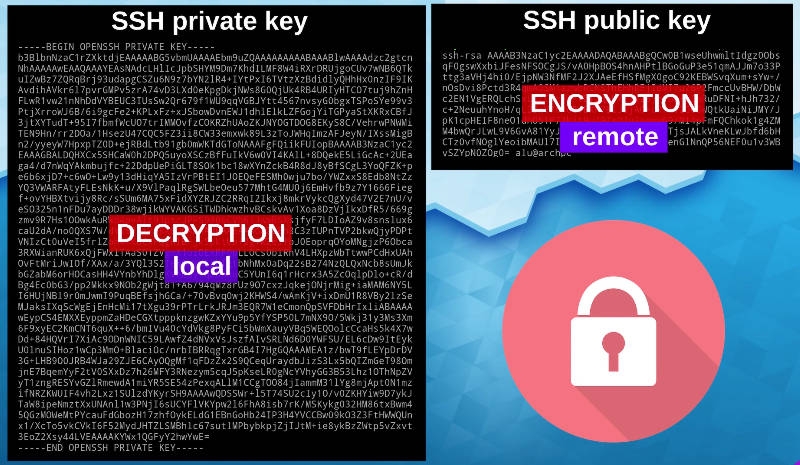
I recommend using SSH keys not only because they are more complex than any password, but also because SSH key pair provides a cryptographic locking mechanism. You need both keys for authentication.
The public key, which name ends with .pub , is used for encryption. And it is stored on a remote computer. While the private key, is the key you keep on your local computer and you use it to decrypt the information encrypted with the public key.
I will not go into detail of cryptography because I am not an expert in cryptography. But in simple words, a public key encrypts the message of the remote server and the private key decrypts it and allow you to connect.
How to add SSH keys to a remote computer
To enable SSH key encryption, you need to place a generated public key to the remote computer. There are different ways to do that. I will show you all the possibilities and you chose the most suitable for you.
ssh-copy-id
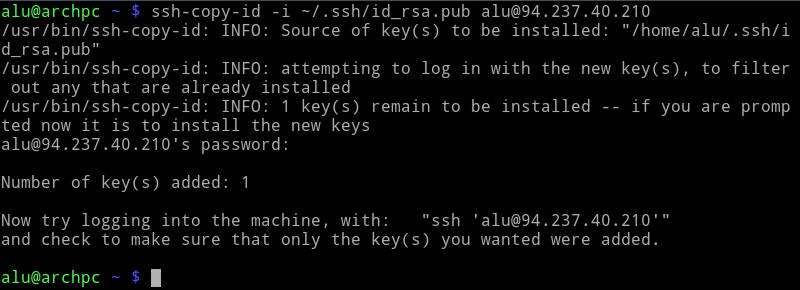
The simplest one is to use ssh-copy-id:
ssh-copy-id -i ~/.ssh/id_rsa.pub username@serveraddress It will copy your public key to the authorized_keys file in ~/.ssh folder of the remote computer.
scp
You can also use the scp command I showed in the previous post on SSH:
scp ~/.ssh/id_rsa.pub username@serveraddress:~/.ssh/authorized_keys Append with cat
If you already use SSH keys on the remote computer, you should not use the scp command, because it will overwrite existing authorized keys. Instead, you need to append the public key to the authorized keys file with this pipe:
cat ~/.ssh/id_rsa.pub | ssh username@serveraddress "cat >> ~/.ssh/authorized_keys" I showed how to use Linux pipes in this YouTube video.
Copy-paste
The best way to see what happens when you copy the public SSH key to the remote server is to copy and paste the public key by hand.
I recommend you to watch the video at the beginning of this post as it shows it much better than I can describe in words. However, if you keep reading, you simply need to copy the content of the public key in your local computer:
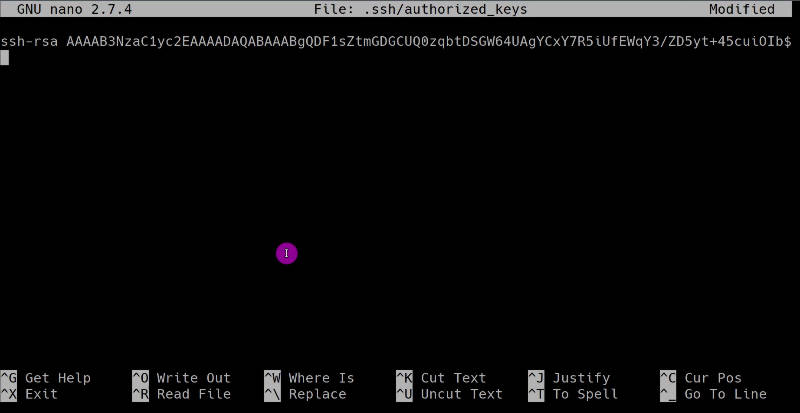
Log in to the remote server, open the file ~/.ssh/authorized_keys with any text editor, and paste the copied public key there:
This is similar to what happens when you run ssh-copy-id , scp , cat from above.
So, you can manually copy-paste the public key, but it is not recommended because you may accidentally change the key content and your key pair won’t work.
GUI
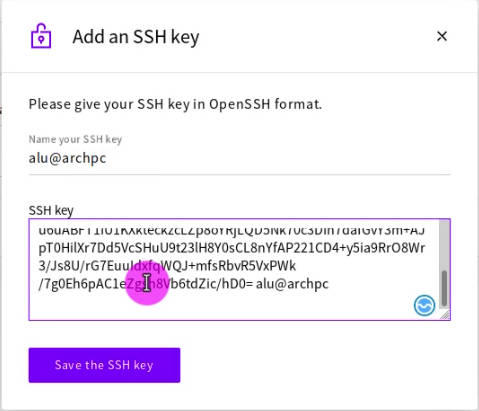
Sometimes when you use virtual private servers, you can add SSH keys during server deployment with a graphical interface in your dashboard:
SSH key log in
So, after you added a public key, try to log in to the remote server. Instead of your regular password, you will need to type your key passphrase:
And you will be connected with an extremely high level of encryption.
How to disable password login and allow only the SSH key login
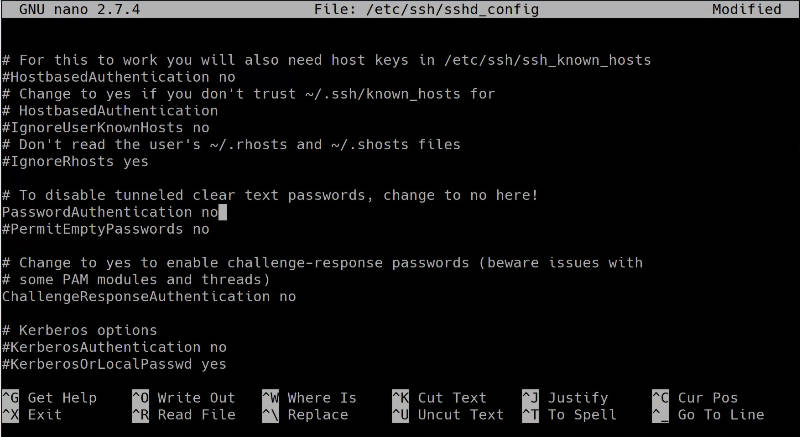
After you added an SSH key, it is advised to disable the password-based login and keep only the SSH key login. Otherwise, SSH keys become useless.
To that end, open the SSH config file on the remote server:
sudo nano /etc/ssh/sshd_config Search for PasswordAuthentication and disable it:
If you use Nano editor, you can use the shortcuts:
After you have done that, restart the ssh server:
sudo systemctl restart ssh From now on, you have to use your SSH key passphrase only and you won’t be able to login with your user password. Also, when you try to login from an account that doesn’t have a matching private key for description, you will see the error Permission denied (publickey).
Now, your system is pretty secure. There are some additional security measures you can apply and I will show them in the next post. So, Subscribe for Blog Updates and you won’t miss them. But adding an SSH key and disabling password-based login is one of the most important security measures you could do.
Note, if you delete your private key somehow, you will lose access to the server. So, always backup your private keys to a secure place.
How to use SSH keys for password-less login
You can also use SSH keys for password-less login. To do that, you simply leave the passphrase empty when you generate the keys. So, you will only need a private key to log in. When you try to log in, you will log in without a request for a passphrase:
I know many users like this approach because it is a lazy way. But it is also less secure! if anyone gets your private key, they will get access to your server. Whereas if your key is password protected, they would also need to decrypt the key file. So, I show it as an option, but I do not recommend it. Instead, I would like to show you another sort of password-less login but a secure one. It uses the SSH authentication agent.
How to use SSH authentication agent
The SSH authentication agent allows you to enter your private key passphrase once and it will save it for the whole login session.
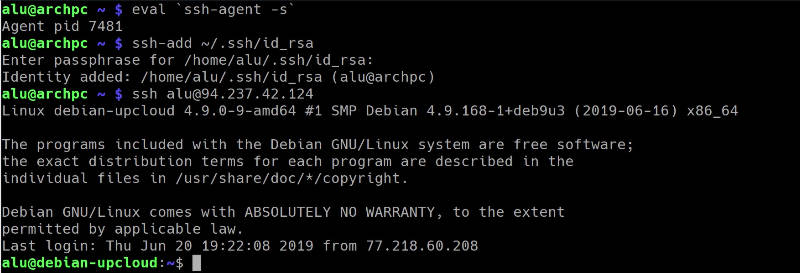
You need to start the SSH agent and add the key:
eval `ssh-agent -s` ssh-add ~/.ssh/id_rsa You will need to enter the passphrase of the key only once when you add the key to the agent. The SSH agent will keep the key decrypted in memory until you log out. So, if you try to log in to your server, you will log in without entering a passphrase and you can do that as many times as you need.
If you have several SSH keys and you need to use them with different servers, you need to create file ~/.ssh/config and pair your keys and servers with Host and IdentityFile :
# global options User alu # to make all ssh clients store keys in the agent AddKeysToAgent yes Host 94.237.42.124 IdentitiesOnly yes IdentityFile ~/.ssh/id_rsa_vps Host github.com IdentitiesOnly yes IdentityFile ~/.ssh/id_rsa_github I find the SSH authentication agent particularly useful when I use SSH keys with Github. If I push commits several times per day, it gets really annoying to type the passphrase every time. Luckily, I do not have to do that thanks to the SSH agent.
Conclusion
I hope you will start using SSH keys if you have not yet. I also hope you have learned something new about using SSH keys even if you used SSH keys before. Thank you for reading.
Average Linux UserFollow I am the founder of the Average Linux User project, which is a hobby I work on at night. During the day I am a scientist who uses computers to analyze genetic data.
What is SSH Key? How To Generate SSH Key in Linux?
SSH is short for Secure Shell. Secure Shell is a network protocol that provides administrators with a secure way (with encryption) to access a remote computer. it allows an administrator to log into virtual space server with an SSH key instead of a typical password. This eliminates the usual weakness of cracking passwords since SSHs almost can not be deciphered or cracked. So how exactly does this work? Let’s find out in this tutorial.
SSH works using a key pair; the public key and the private key. The private key is kept on the computer you log in from, while the public key is stored in the .ssh/authorized_keys file on all the computers you want to log into. The public key stored on the server you wish to unlock and by matching the private pair, you are able to unlock the system. This process is called the Public Key Authentication and as I mentioned earlier, provides more security than a password.
How To Generate SSH Kyes (RSA)?
There are two different forms of SSH key pairs, either the “RSA” (Rivest-Shamir-Adleman) or the “DSA” (“Digital Signature Algorithm”) keys. Over the years, the RSA has proven to be more secure and is the only recommended choice for new keys. As a result, SSH and RSA are used interchangeably.
Let us follow the following steps to generate RSA keys –
Generating the Key Pair
We will begin by creating our key pair. This will be done on the client computer or your personal computer. The ssh-keygen utility will be used. Enter the following command in terminal to create the Key pair.
Store the Keys and Passphrase
You will be prompted for a location to save the keys and provide a passphrase for the keys. This passphrase will protect your private key while it’s stored on the hard drive. You may not enter a passphrase but It is advisable that you choose to enter one. This is partly because your key pair is only safe as long as it is unavailable to others. By adding a passphrase to your key pair, people who happen to attain your private key will need to crack your passcode before they can have access to your accounts. The only issue a few have had with the passphrase is the added step of logging into your accounts. Your key files (2) will be created in $HOME/.ssh/ directory if you happen to accept the defaults. Your private key in $HOME/.ssh/id_rsa.pub and your private key in $HOME/.ssh/id_rsa.
Copy the Public Key
The next step is to place the public key on your server so that you can use SSH key authentication to log in. You can transfer your RSA key by entering the following command from your own computer.
Where username and host should be replaced by your username and the name of the computer you’re transferring your key to.
Verify SSH is working well
A prompt requiring your passphrase will be presented. Enter your passphrase, and provided host is configured to allow key-based logins, you should then be logged in as usual.
Conclusion
I hope this simple tutorial effectively introduces you to Secure Shell also known as SSH and how to generate and use them. Share your thoughts and comments with us in the comments below. Also if you need any help while creating the SSH key, let me know them in the comment section below.
