- What is SUID and how to set SUID in Linux/Unix?
- What is SUID and how to set it in Linux?
- Linux permissions: SUID, SGID, and sticky bit
- Career advice
- Symbolic method
- Numeric method
- Special permission explained
- user + s (pecial)
- group + s (pecial)
- Great Linux resources
- other + t (sticky)
- Setting special permissions
- Summary
- Использование SETUID, SETGID и Sticky bit для расширенной настройки прав доступа в операционных системах Linux
- Коротко о правах доступа в Linux
- Настройка Setuid
- Настройка Setgid
- Настройка Sticky Bit
- Удаление специальных битов разрешений
- Вывод
What is SUID and how to set SUID in Linux/Unix?
There are some other special permission apart from the normal file permissions read, write and execute which we set with chmod and chown commands. They are SUID, SGID, Sticky Bit, ACL’s, SUDO, SELinux for granular file/folder management by Linux administrator. Today we will see
1) What is SUID?2) How to set SUID?3) Where to use SUID?
What is SUID and how to set it in Linux?
SUID (Set owner User ID up on execution) is a special type of file permissions given to a file. Normally in Linux/Unix when a program runs, it inherits access permissions from the logged in user. SUID is defined as giving temporary permissions to a user to run a program/file with the permissions of the file owner rather that the user who runs it. In simple words users will get file owner’s permissions as well as owner UID and GID when executing a file/program/command.
The above sentence is a tricky one and should be explained in-depth with examples.
Linux permissions: SUID, SGID, and sticky bit
Getting permissions in Linux can sometimes be a ‘sticky’ situation. Learn how to set the appropriate permissions, even in special circumstances.

Linux permissions are a concept that every user becomes intimately familiar with early on in their development. We need to execute scripts, modify files, and run processes in order to administer systems effectively, but what happens when we see Permission denied? Do you know why we see this message? If you know the cause of the problem, do you know how to implement the solution?
Career advice
I will give a quick explanation of the various ways to calculate permissions, and then we will focus on the special permissions within Linux. If you want an in-depth look at the chmod command, check out this article from Sudoer Shashank Hegde, Linux permissions: An introduction to chmod.
The TL;DR is that there are two main ways of assigning permissions.
Symbolic method
The symbolic method uses the following syntax:
[tcarrigan@server ~]$ chmod WhoWhatWhich file | directory- Who — represents identities: u,g,o,a (user, group, other, all)
- What — represents actions: +, -, = (add, remove, set exact)
- Which — represents access levels: r, w, x (read, write, execute)
An example of this is if I want to add the read and write permissions to a file named test.txt for user and group, I use the following command:
[tcarrigan@server ~]$ chmod ug+rw test.txtFull disclosure, this is not my preferred method of assigning permissions, and if you would like more information around this method, I recommend your nearest search engine.
Numeric method
The numeric method is, in my experience, the best way to learn and practice permissions. It is based on the following syntax:
[tcarrigan@server ~]$ chmod ### file | directory
Here, from left to right, the character # represents an access level. There are three access levels—user, group, and others. To determine what each digit is, we use the following:
- Start at 0
- If the read permission should be set, add 4
- If the write permission should be set, add 2
- If the execute permission should be set, add 1
This is calculated on a per access level basis. Let’s interpret this permissions example:
The permissions are represented as 650. How did I arrive at those numbers?
To put this into the command syntax, it looks like this:
[tcarrigan@server ~]$ chmod 650 test.txtNow that you understand the basics of permission calculation in Linux, let’s look at the special permissions included in the OS.
Special permission explained
Special permissions make up a fourth access level in addition to user, group, and other. Special permissions allow for additional privileges over the standard permission sets (as the name suggests). There is a special permission option for each access level discussed previously. Let’s take a look at each one individually, beginning with Set UID:
user + s (pecial)
Commonly noted as SUID, the special permission for the user access level has a single function: A file with SUID always executes as the user who owns the file, regardless of the user passing the command. If the file owner doesn’t have execute permissions, then use an uppercase S here.
Now, to see this in a practical light, let’s look at the /usr/bin/passwd command. This command, by default, has the SUID permission set:
[tcarrigan@server ~]$ ls -l /usr/bin/passwd -rwsr-xr-x. 1 root root 33544 Dec 13 2019 /usr/bin/passwdNote the s where x would usually indicate execute permissions for the user.
group + s (pecial)
Commonly noted as SGID, this special permission has a couple of functions:
- If set on a file, it allows the file to be executed as the group that owns the file (similar to SUID)
- If set on a directory, any files created in the directory will have their group ownership set to that of the directory owner
[tcarrigan@server article_submissions]$ ls -l total 0 drwxrws---. 2 tcarrigan tcarrigan 69 Apr 7 11:31 my_articlesGreat Linux resources
This permission set is noted by a lowercase s where the x would normally indicate execute privileges for the group. It is also especially useful for directories that are often used in collaborative efforts between members of a group. Any member of the group can access any new file. This applies to the execution of files, as well. SGID is very powerful when utilized properly.
As noted previously for SUID, if the owning group does not have execute permissions, then an uppercase S is used.
other + t (sticky)
The last special permission has been dubbed the «sticky bit.» This permission does not affect individual files. However, at the directory level, it restricts file deletion. Only the owner (and root) of a file can remove the file within that directory. A common example of this is the /tmp directory:
[tcarrigan@server article_submissions]$ ls -ld /tmp/ drwxrwxrwt. 15 root root 4096 Sep 22 15:28 /tmp/The permission set is noted by the lowercase t, where the x would normally indicate the execute privilege.
Setting special permissions
To set special permissions on a file or directory, you can utilize either of the two methods outlined for standard permissions above: Symbolic or numerical.
Let’s assume that we want to set SGID on the directory community_content .
To do this using the symbolic method, we do the following:
[tcarrigan@server article_submissions]$ chmod g+s community_content/Using the numerical method, we need to pass a fourth, preceding digit in our chmod command. The digit used is calculated similarly to the standard permission digits:
[tcarrigan@server ~]$ chmod X### file | directoryWhere X is the special permissions digit.
Here is the command to set SGID on community_content using the numerical method:
[tcarrigan@server article_submissions]$ chmod 2770 community_content/ [tcarrigan@server article_submissions]$ ls -ld community_content/ drwxrws---. 2 tcarrigan tcarrigan 113 Apr 7 11:32 community_content/Summary
In closing, permissions are fundamentally important to being an effective Linux administrator. There are two defined ways to set permissions using the chmod command: Symbolic and numerical. We examined the syntax and calculations required for both methods. We also considered the special permissions and their role in the system. Now that you understand permissions and the underlying concepts, you can solve the ever-annoying Permission denied error when it tries to impede your work.
Использование SETUID, SETGID и Sticky bit для расширенной настройки прав доступа в операционных системах Linux
В этой статье мы расскажем, как использовать специальные биты разрешений в операционных системах Linux.
Речь пойдет о трех битах – Setuid, Setgid и Sticky Bit. Это специальные типы разрешений позволяют задавать расширенные права доступа на файлы или каталоги.
Статья будет полезна пользователям и администраторам, которые уже знакомы с настройкой базовых прав в операционных системах Linux. Итак, давайте преступим.
Коротко о правах доступа в Linux
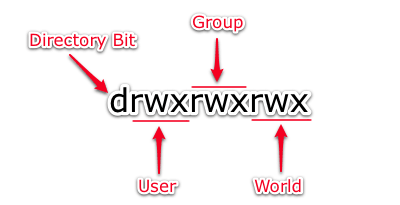
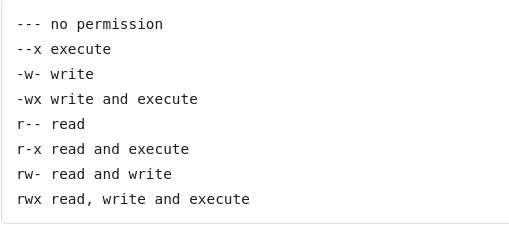
В операционных системах Linux используются 3 базовых права доступа – на чтение (read), запись (write) и исполнение (execute). Соответственно, права назначаются пользователю (user), группе (group) и всем остальным (world). Рассмотрим их символьные обозначения:
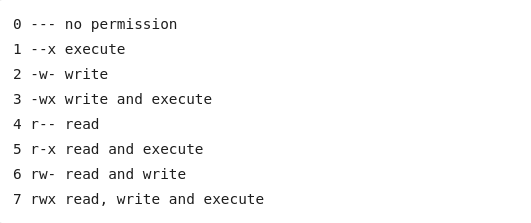
В случае числового обозначения прав доступа используются цифры от 0 до 7, где каждая цифра соответствует определенному набору прав доступа:
Настройка Setuid
Setuid – это бит разрешения, который позволяет пользователю запускать исполняемый файл с правами владельца этого файла. Другими словами, использование этого бита позволяет нам поднять привилегии пользователя в случае, если это необходимо. Классический пример использования этого бита в операционной системе это команда sudo.
root@ruvds-hrc [~]# which sudo /usr/bin/sudo root@ruvds-hrc [~]# ls -l /usr/bin/sudo -rwsr-xr-x 1 root root 125308 Feb 20 14:15 /usr/bin/sudoКак мы видим на месте, где обычно установлен классический бит x (на исполнение), у нас выставлен специальный бит s. Это позволяет обычному пользователю системы выполнять команды с повышенными привилегиями без необходимости входа в систему как root, разумеется зная пароль пользователя root.
Установка бита setuid не представляет сложности. Для этого используется команда:
Рассмотрим на примере. Создадим файл с именем myfile, а затем проверим его разрешения с помощью команды ls -l.
root@ruvds-hrc [~]# touch myfile root@ruvds-hrc [~]# ls -l myfile -rw-rw-r-- 1 test test 0 Mar 25 17:59 myfileКак видим, файл не имеет разрешений на выполнение для пользователя, группы и остальных. Добавим бит setuid:
root@ruvds-hrc [~]# chmod u+s myfile root@ruvds-hrc [~]# ls -l myfile -rw-rw-r-- 1 test test 0 Mar 25 12:00 myfileОбратим внимание, что вместо ожидаемой буквы «s», видим заглавную «S». Почему? Это случается, если setuid установлен, но сам владелец файла не имеет прав на его выполнение. Добавим это разрешение с помощью команды chmod u + x.
root@ruvds-hrc [~]# chmod u+x myfile root@ruvds-hrc [~]# ls -l total 0 -rwSrw-r-- 1 test test 0 Mar 25 12:59 myfileНастройка Setgid
Принцип работы Setgid очень похож на setuid с отличием, что файл будет запускаться пользователем от имени группы, которая владеет файлом. Иллюстрирует работу этого бита команда crontab: .
root@ruvds-hrc [~]# which crontab /usr/bin/crontab root@ruvds-hrc [~]# ls -l /usr/bin/crontab -rwxr-sr-x 1 root crontab 34021 Feb 12 2017 /usr/bin/crontabТеперь перейдем к настройке этого бита. Аналогично setuid, бит setgid выставляется с помощью команды chmod g + s .
Рассмотрим на примере создания нового файл с именем myfile2.
root@ruvds-hrc [~]# touch myfile2 root@ruvds-hrc [~]# ls -l myfile2 -rw-rw-r-- 1 test test 0 Mar 25 19:25 myfile2Выполним команду chmod g + s и посмотрим результаты.
root@ruvds-hrc [~]# chmod g+s myfile2 root@ruvds-hrc [~]# ls -l myfile2 -rw-rwSr-- 1 test test 0 Mar 25 19:25 myfile2Как разобрались выше, меняем заглавную « S » путем выдачи прав на исполнение группе-владельцу:
root@ruvds-hrc [~]# chmod g+x myfile2 root@ruvds-hrc [~]# ls -l total 0 -rwsrw-r-- 1 test test 0 Mar 25 19:25 myfile -rw-rwsr-- 1 test test 0 Mar 25 19:25 myfile2Настройка Sticky Bit
Последний специальный бит разрешения – это Sticky Bit . В случае, если этот бит установлен для папки, то файлы в этой папке могут быть удалены только их владельцем. Пример использования этого бита в операционной системе это системная папка /tmp . Эта папка разрешена на запись любому пользователю, но удалять файлы в ней могут только пользователи, являющиеся владельцами этих файлов.
root@ruvds-hrc [~]# ls -ld /tmp drwxrwxrwt 8 root root 4096 Mar 25 10:22 /tmpСимвол «t» указывает, что на папку установлен Sticky Bit.
Удаление специальных битов разрешений
Удаляем эти биты также командой chmod, только вместо « + » используем « – » .
root@ruvds-hrc[~]# chmod u-s myfile root@ruvds-hrc[~]# chmod g-s dir1 root@ruvds-hrc[~]# chmod -t dir2Вывод
Мы разобрали что из себя представляют специальные биты разрешений Setuid, Setgid и Sticky bit в операционных системах Linux и как ими пользоваться на практике. Умение использовать эти биты позволит вам произвести более гибкую настройку прав доступа к ресурсам вашего сервера.