- How to configure TFTP server in Linux
- TFTP
- Server
- tftp-hpa
- URL rewriting
- Debugging
- atftp
- uftpd
- dnsmasq
- Client
- tftp-hpa
- atftp
- curl
- How to install tftp server on Debian 11
- Installing TFTP server and client:
- Configuring the TFTP server:
- Upload and Download files using TFTP:
- TFTP vs FTP vs SFTP:
- Conclusion:
- About the author
- David Adams
How to configure TFTP server in Linux
About TFTP from wiki page
Trivial File Transfer Protocol (TFTP) is a simple, lockstep, File Transfer Protocol which allows a client to get a file from or put a file onto a remote host. One of its primary uses is in the early stages of nodes booting from a local area network. TFTP has been used for this application because it is very simple to implement.
As explained above we use TFTP server mostly for performing PXE netboot on client nodes within the network.
Manually install tftp rpm on your linux distribution. This can be done depending upon your distribution.
On RHEL system you must have an active subscription to RHN or you can configure a local offline repository using which «yum» package manager can install the provided rpm and it’s dependencies.
On RedHat and CentOS you can use » yum install tftp «, while on SuSE distro you can use » zypper install tftp »
Once you have successfully installed tftp rpm follow the below steps
# rpm -qa | grep tftp tftp-0.48-101.31.27Create the directiry which you plan on using for TFTP share
NOTE: I will change permission of my tftp dir to 777 as I am going to demonstrate my server by uploading few files which will be done as ‘nobody’ user so I would need fill access to my tftp directory. Generally if you just plan on using it for PXE environment then 644 permission is more than enough.
Make the necessary changes to your tftp config file as below
# vi /etc/xinetd.d/tftp # default: off # description: tftp service is provided primarily for booting or when a # router need an upgrade. Most sites run this only on machines acting as # "boot servers". service tftp < socket_type = dgram protocol = udp wait = yes flags = IPv4Save and exit the file
Restart the xinetd services# /etc/init.d/xinetd restart Shutting down xinetd: (waiting for all children to terminate) done Starting INET services. (xinetd) doneLet us test our tftp server
For this example I am going to use my Onboard Administrator from my HPE enclosure and will attempt to upload supportdump from the OA to my tftp server (192.169.32.10)Login to OA CLI using Puttylogin as: HPadmin ----------------------------------------------------------------------------- WARNING: This is a private system. Do not attempt to login unless you are an authorized user. Any authorized or unauthorized access and use may be moni- tored and can result in criminal or civil prosecution under applicable law. ----------------------------------------------------------------------------- Firmware Version: 4.50 Built: 07/24/2015 @ 04:06 OA Bay Number: 1 OA Role: Active HPadmin@10.43.21.136's password: HP BladeSystem Onboard Administrator (C) Copyright 2006-2015 Hewlett-Packard Development Company, L.P. Type 'HELP' to display a list of valid commands. Bangalore1-01-01> upload SUPPORTDUMP tftp://192.169.32.10/log1 Starting background task to collect debug data. Return status will be displayed when it is done. You can continue working during this process or log off. Bangalore1-01-01> Successfully uploaded fileLet us go back and check our tftp server if the files are successfully uploaded
cc01-nds-ins:/tftpboot # ll total 624 -rw-rw-rw- 1 nobody nobody 605352 Sep 13 16:16 log1Well looks like our TFTP server is working as expected.
TFTP
The Trivial File Transfer Protocol (TFTP) provides a minimalistic means for transferring files. It is generally used as a part of PXE booting or for updating configuration and firmware on devices which have limited memory such as routers, IP phones and printers.
Server
There are several TFTP server implementations, some of which are listed below.
Note: Make sure not to start different TFTP implementations at the same time. They will fail with an error got more than one socket , because only one may listen to the default TFTP port 69 .
tftp-hpa
To modify service parameters edit /etc/conf.d/tftpd .
URL rewriting
This server includes a useful URL rewriting feature via the --map-file option ( --mapfile in some versions). It allows requests to be altered via regular expressions so the files on the server do not have to match the view the client sees, and different files can be returned to different clients even if they request the same file.
Configure a map by adding --map-file /etc/tftpd.map to /etc/conf.d/tftpd and creating a file such as this:
# Add the remote IP address as a folder on the front of all requests. r ^ \i/This example file will result in each TFTP request being prefixed with the remote IP address. For example if the machine at 192.168.0.1 requests "boot.bin" and the TFTP server root is /srv/tftp then the file /srv/tftp/192.168.0.1/boot.bin will be returned (or /srv/tftp/::ffff:192.168.0.1/boot.bin if the server is listening on an IPv6 port).
The available map file options are documented in in.tftpd(8) § FILENAME REMAPPING .
Debugging
The --verbosity 5 option can be used to turn on all debugging messages. This is very useful for diagnosing why a machine will not successfully boot from the network, as the debug messages list all requests for files, whether rewrite rules were used, where the files were read from on the filesystem and whether the request was successful or not.
It is not possible to log messages to stdout/stderr, as only syslog is supported. This means the messages can be viewed with journalctl or similar.
atftp
To modify service parameters edit /etc/conf.d/atftpd .
uftpd
uftpd AUR is a simple (T)FTP server that can be run from the command line:
# uftpd -n -o ftp=0,tftp=69 /tmp/tftpThe option -o ftp=0 disables the FTP server and only runs TFTP. The server runs in read-only mode by default and passing -o writable allows clients to put files on the server. The -o tftp=69 is redundant in the case of default port, but shows a way to select a different one.
dnsmasq
Client
tftp-hpa
Install tftp-hpa and then tftp your day away!
atftp
The package atftp contains both a server and a client with interactive and batch mode. The client binary is atftp and supports both getting and putting files.
curl
Standard curl has an ability to connect to a TFTP server and upload a file via:
$ curl -o DESTINATION tftp://HOST/fileWhere file is relative to the TFTP root directory.
- This page was last edited on 27 June 2022, at 23:24.
- Content is available under GNU Free Documentation License 1.3 or later unless otherwise noted.
- Privacy policy
- About ArchWiki
- Disclaimers
How to install tftp server on Debian 11
![]()
This tutorial explains how to set up a TFTP (Trivial File Transfer Protocol) server on Debian 11 and Linux-based distributions.
Before starting, let’s open the tftp port (69) using UFW (Uncomplicated Firewall), as shown in the following image.
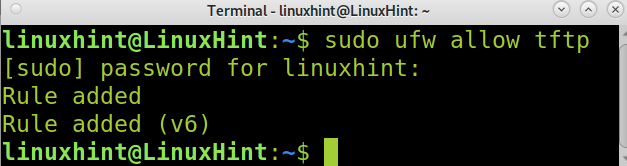
Once the port is open, we can proceed with the TFTP installation.
Installing TFTP server and client:
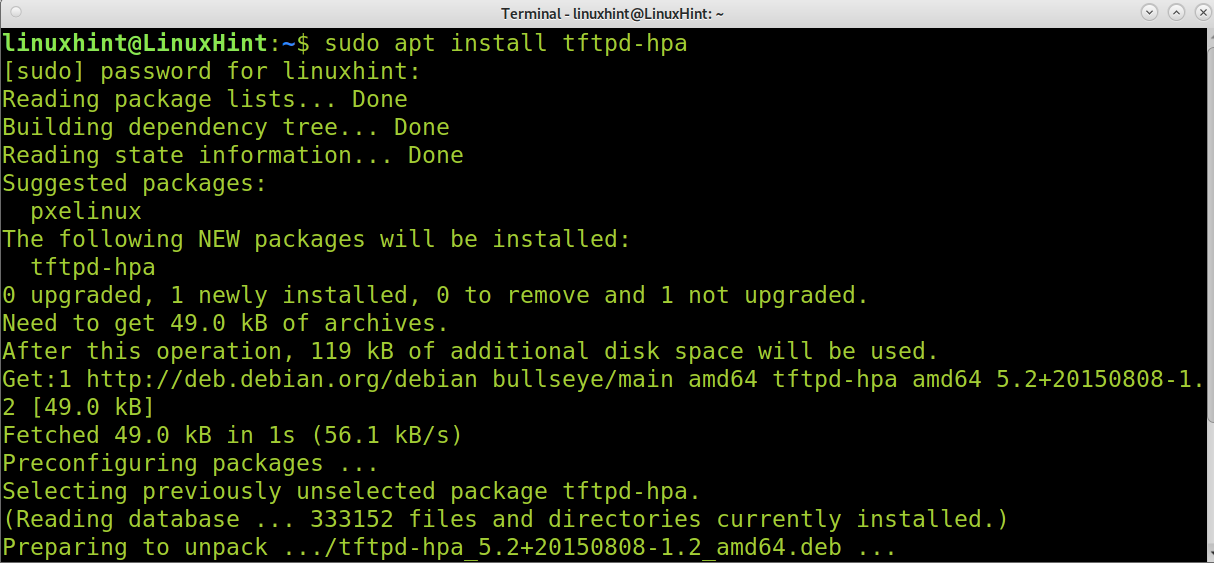
To begin installing the TFTP service, use apt as shown in the screenshot below.
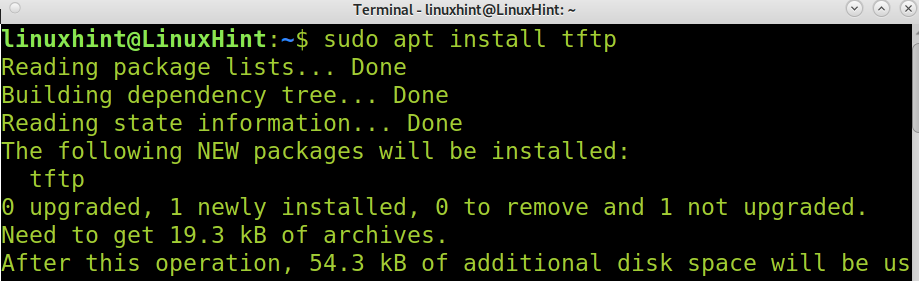
As said, the previous command installed the TFTP service. To install the TFTP client using apt, run the following command.
Configuring the TFTP server:
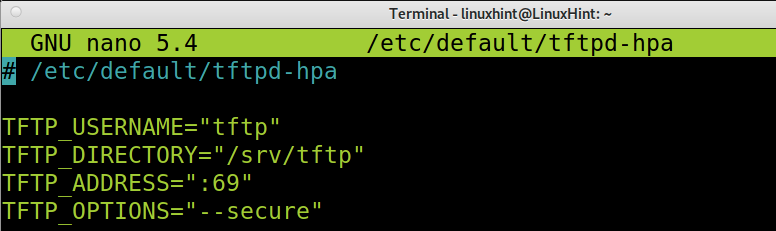
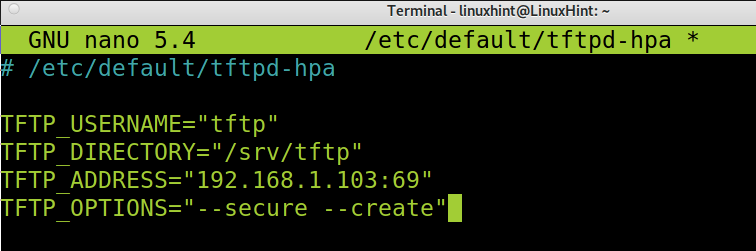
Once the TFTP server is installed, you need to configure it. The TFTP configuration file is located at /etc/default/tftpd-hpa. You can edit the configuration file using nano, as shown in the example below. On debian, run the following command.

The default configuration file seems like the image below where:
- TFTP_USERNAME: Here, you can specify the TFTP user; the default user is tftp.
- TFTP_DIRECTORY: Here, you can specify the TFTP directory to upload or download files from. By default, the directory /srv/tftp is created; you can leave it or define a new one (in such case, you’ll need to create it using the mkdir command).
- TFTP_ADDRESS: Here, you specify the TFTP IP address and port, which by default for TFTP is port 69
- TFTP_OPTIONS: Here, you can specify options; we’ll add the needed option to upload files to the TFTP server in our following examples.
In the screenshot below, you can see I only edited TFTP_ADDRESS to define the server IP and TFTP_OPTIONS to allow uploading files by adding the —create option.
After editing the configuration file, exit saving changes (For nano, press Ctrl+X and Y)
As you can see, the default tftp directory is where files are stored in /srv/ftp. On Debian 11, this directory is created by default when installing tftp. You can create a different one if needed. But you’ll need to change the user and group ownership to allow the defined user in the configuration file (By default, the tftp user) to store files inside.
To change the directory ownership to the tftp user, use the chown command as shown below.

Once reconfigured, restart the tftp service; you can do it using systemctl, as shown in the following example.

Upload and Download files using TFTP:
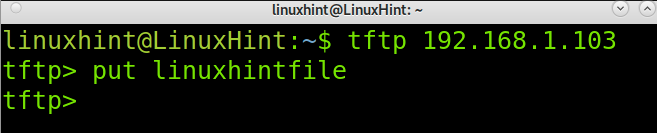
To connect to a TFTP server, just run tftp followed by the server IP address as shown in the following screenshot, in which tftp is used to connect to the server with IP address 192.168.1.103.
Once connected, to upload a file, you can use the put command followed by the file name you want to upload. In the example below, the file named linuxhintfile is uploaded to the server with IP address 192.168.1.103.
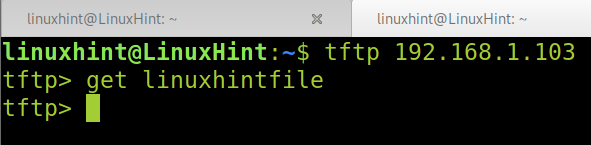
To download files, use the get command followed by the file name you want to download, as shown in the image below.
TFTP vs FTP vs SFTP:
Unlike FTP and SFTP, TFTP works under the UDP protocol; it is a faster but less secure and flexible alternative. TFTP doesn’t allow authentication, and users can’t modify files. Even the regular FTP protocol (Port 21) is the safest alternative. TFTP is mainly used for network boot processes and is almost unused.
The TFTP server doesn’t allow to show the TFTP directory content; users must know the file name they want to download.
Conclusion:
As you can see, the main advantage of the TFTP protocol is the simplicity of implementing it. Any Linux user level can easily set up a TFTP server. It is important to remember that TFTP is an unsafe implementation, and SFTP must be considered the main alternative to transfer files and filter unwanted access. Users must remember to open port 69 to allow TFTP traffic; this can be achieved using Iptables or UFW, as shown in the first step of this article.
You can get additional information on TFTP at https://linux.die.net/man/1/tftp.
I hope this tutorial explaining how to install a TFTP server on Debian 11 was useful. Keep following Linux Hint for additional Linux tips and tutorials.
About the author
David Adams
David Adams is a System Admin and writer that is focused on open source technologies, security software, and computer systems.