- Kernel tracing with trace-cmd
- Install trace-cmd
- List available tracers
- Enable the function tracer
- View the trace output
- Tweak tracing to increase depth
- Trace kernel module-related functions
- Trace specific functions
- View the recorded trace
- Trace a specific PID
- Run some activity on the shell
- Give it a try
- Analyze the Linux kernel with ftrace
- Understanding system calls on Linux with strace
- traceroute command in Linux with Examples
- How to Trace Program Execution Using Linux Strace Command
- Linux strace command
- Installation
Kernel tracing with trace-cmd

In my previous article, I explained how to use ftrace to trace kernel functions. Using ftrace by writing and reading from files can get tedious, so I used a wrapper around it to run commands with options to enable and disable tracing, set filters, view output, clear output, and more.
The trace-cmd command is a utility that helps you do just this. In this article, I use trace-cmd to perform the same tasks I did in my ftrace article. Since I refer back to that article frequently, I recommend you read it before you read this one.
Install trace-cmd
I run the commands in this article as the root user.
The ftrace mechanism is built into the kernel, and you can verify it is enabled with:
# mount | grep tracefs none on /sys/kernel/tracing type tracefs (rw,relatime,seclabel)However, you need to install the trace-cmd utility manually.
List available tracers
When using ftrace , you must view a file’s contents to see what tracers are available. But with trace-cmd , you can get this information with:
# trace-cmd list -t hwlat blk mmiotrace function_graph wakeup_dl wakeup_rt wakeup function nopEnable the function tracer
In my earlier article, I used two tracers, and I’ll do the same here. Enable your first tracer, function , with:
$ trace-cmd start -p function plugin 'function'View the trace output
Once the tracer is enabled, you can view the output by using the show arguments. This shows only the first 20 lines to keep the example short (see my earlier article for an explanation of the output):
# trace-cmd show | head -20 ## tracer: function # # entries-in-buffer/entries-written: 410142/3380032 #P:8 # # _-----=> irqs-off # / _----=> need-resched # | / _---=> hardirq/softirq # || / _--=> preempt-depth # ||| / delay # TASK-PID CPU# |||| TIMESTAMP FUNCTION # | | | |||| | | gdbus-2606 [004] ..s. 10520.538759: __msecs_to_jiffies Stop tracing and clear the buffer
Tracing continues to run in the background, and you can keep viewing the output using show .
To stop tracing, run trace-cmd with the stop argument:
To clear the buffer, run it with the clear argument:
Enable the function_graph tracer
Enable the second tracer, function_graph , by running:
# trace-cmd start -p function_graph plugin 'function_graph'
Once again, view the output using the show argument. As expected, the output is slightly different from the first trace output. This time it includes a function calls chain:
# trace-cmd show | head -20 ## tracer: function_graph # # CPU DURATION FUNCTION CALLS # | | | | | | | 4) 0.079 us | > /* rcu_all_qs */ 4) 0.327 us | > /* __cond_resched */ 4) 0.081 us | rcu_read_unlock_strict(); 4) | __cond_resched() < 4) 0.078 us | rcu_all_qs(); 4) 0.243 us | >4) 0.080 us | rcu_read_unlock_strict(); 4) | __cond_resched() < 4) 0.078 us | rcu_all_qs(); 4) 0.241 us | >4) 0.080 us | rcu_read_unlock_strict(); 4) | __cond_resched() < 4) 0.079 us | rcu_all_qs(); 4) 0.235 us | >4) 0.095 us | rcu_read_unlock_strict(); 4) | __cond_resched()
Use the stop and clear commands to stop tracing and clear the buffer:
# trace-cmd stop # trace-cmd clear
Tweak tracing to increase depth
If you want to see more depth in the function calls, you can tweak the tracer:
# trace-cmd start -p function_graph --max-graph-depth 5 plugin 'function_graph'
Now when you compare this output with what you saw before, you should see more nested function calls:
# trace-cmd show | head -20 ## tracer: function_graph # # CPU DURATION FUNCTION CALLS # | | | | | | | 6) | __fget_light() < 6) 0.804 us | __fget_files(); 6) 2.708 us | >6) 3.650 us | > /* __fdget */ 6) 0.547 us | eventfd_poll(); 6) 0.535 us | fput(); 6) | __fdget() < 6) | __fget_light() < 6) 0.946 us | __fget_files(); 6) 1.895 us | >6) 2.849 us | > 6) | sock_poll() < 6) 0.651 us | unix_poll(); 6) 1.905 us | >6) 0.475 us | fput(); 6) | __fdget()
Learn available functions to trace
If you want to trace only certain functions and ignore the rest, you need to know the exact function names. You can get them with the list argument followed by -f . This example searches for the common kernel function kmalloc , which is used to allocate memory in the kernel:
# trace-cmd list -f | grep kmalloc bpf_map_kmalloc_node mempool_kmalloc __traceiter_kmalloc __traceiter_kmalloc_node kmalloc_slab kmalloc_order kmalloc_order_trace kmalloc_large_node __kmalloc __kmalloc_track_caller __kmalloc_node __kmalloc_node_track_caller [. ]
Here's the total count of functions available on my test system:
# trace-cmd list -f | wc -l 63165
Trace kernel module-related functions
You can also trace functions related to a specific kernel module. Imagine you want to trace kvm kernel module-related functions. Ensure the module is loaded:
# lsmod | grep kvm_intel kvm_intel 335872 0 kvm 987136 1 kvm_intel
Run trace-cmd again with the list argument, and from the output, grep for lines that end in ] . This will filter out the kernel modules. Then grep the kernel module kvm_intel , and you should see all the functions related to that kernel module:
# trace-cmd list -f | grep ]$ | grep kvm_intel vmx_can_emulate_instruction [kvm_intel] vmx_update_emulated_instruction [kvm_intel] vmx_setup_uret_msr [kvm_intel] vmx_set_identity_map_addr [kvm_intel] handle_machine_check [kvm_intel] handle_triple_fault [kvm_intel] vmx_patch_hypercall [kvm_intel] [. ] vmx_dump_dtsel [kvm_intel] vmx_dump_sel [kvm_intel]
Trace specific functions
Now that you know how to find functions of interest, put that knowledge to work with an example. As in the earlier article, try to trace filesystem-related functions. The filesystem I had on my test system was ext4 .
This procedure is slightly different; instead of start , you run the command with the record argument followed by the "pattern" of the functions you want to trace. You also need to specify the tracer you want; in this case, that's function_graph . The command continues recording the trace until you stop it with Ctrl+C. So after a few seconds, hit Ctrl+C to stop tracing:
# trace-cmd list -f | grep ^ext4_ # trace-cmd record -l ext4_* -p function_graph plugin 'function_graph' Hit Ctrl^C to stop recording ^C CPU0 data recorded at offset=0x856000 8192 bytes in size [. ]
View the recorded trace
To view the trace you recorded earlier, run the command with the report argument. From the output, it's clear that the filter worked, and you see only the ext4-related function trace:
# trace-cmd report | head -20 [. ] cpus=8 trace-cmd-12697 [000] 11303.928103: funcgraph_entry: | ext4_show_options() < trace-cmd-12697 [000] 11303.928104: funcgraph_entry: 0.187 us | ext4_get_dummy_policy(); trace-cmd-12697 [000] 11303.928105: funcgraph_exit: 1.583 us | >trace-cmd-12697 [000] 11303.928122: funcgraph_entry: | ext4_create() < trace-cmd-12697 [000] 11303.928122: funcgraph_entry: | ext4_alloc_inode() < trace-cmd-12697 [000] 11303.928123: funcgraph_entry: 0.101 us | ext4_es_init_tree(); trace-cmd-12697 [000] 11303.928123: funcgraph_entry: 0.083 us | ext4_init_pending_tree(); trace-cmd-12697 [000] 11303.928123: funcgraph_entry: 0.141 us | ext4_fc_init_inode(); trace-cmd-12697 [000] 11303.928123: funcgraph_exit: 0.931 us | >trace-cmd-12697 [000] 11303.928124: funcgraph_entry: 0.081 us | ext4_get_dummy_policy(); trace-cmd-12697 [000] 11303.928124: funcgraph_entry: 0.133 us | ext4_get_group_desc(); trace-cmd-12697 [000] 11303.928124: funcgraph_entry: 0.115 us | ext4_free_inodes_count(); trace-cmd-12697 [000] 11303.928124: funcgraph_entry: 0.114 us | ext4_get_group_desc();
Trace a specific PID
Say you want to trace functions related to a specific persistent identifier (PID). Open another terminal and note the PID of the running shell:
Run the record command again and pass the PID using the -P option. This time, let the terminal run (i.e., do not press Ctrl+C yet):
# trace-cmd record -P 10885 -p function_graph plugin 'function_graph' Hit Ctrl^C to stop recording
Run some activity on the shell
Move back to the other terminal where you had a shell running with a specific PID and run any command, e.g., ls to list files:
# ls Temp-9b61f280-fdc1-4512-9211-5c60f764d702 tracker-extract-3-files.1000 v8-compile-cache-1000 [. ]
Move back to the terminal where you enabled tracing and hit Ctrl+C to stop tracing:
# trace-cmd record -P 10885 -p function_graph plugin 'function_graph' Hit Ctrl^C to stop recording ^C CPU1 data recorded at offset=0x856000 618496 bytes in size [. ]
In the trace's output, you can see the PID and the Bash shell on the left and the function calls related to it on the right. This can be pretty handy to narrow down your tracing:
# trace-cmd report | head -20 cpus=8 -0 [001] 11555.380581: funcgraph_entry: | switch_mm_irqs_off() < -0 [001] 11555.380583: funcgraph_entry: 1.703 us | load_new_mm_cr3(); -0 [001] 11555.380586: funcgraph_entry: 0.493 us | switch_ldt(); -0 [001] 11555.380587: funcgraph_exit: 7.235 us | > bash-10885 [001] 11555.380589: funcgraph_entry: 1.046 us | finish_task_switch.isra.0(); bash-10885 [001] 11555.380591: funcgraph_entry: | __fdget() < bash-10885 [001] 11555.380592: funcgraph_entry: 2.036 us | __fget_light(); bash-10885 [001] 11555.380594: funcgraph_exit: 3.256 us | >bash-10885 [001] 11555.380595: funcgraph_entry: | tty_poll() < bash-10885 [001] 11555.380597: funcgraph_entry: | tty_ldisc_ref_wait() < bash-10885 [001] 11555.380598: funcgraph_entry: | ldsem_down_read() < bash-10885 [001] 11555.380598: funcgraph_entry: | __cond_resched()
Give it a try
These brief examples show how using trace-cmd instead of the underlying ftrace mechanism is both easy to use and rich in features, including many I didn't cover here. To learn more and get better at it, consult its man page and try out its other useful commands.

Analyze the Linux kernel with ftrace
Ftrace is a great way to learn more about the internal workings of the Linux kernel.
Understanding system calls on Linux with strace
Trace the thin layer between user processes and the Linux kernel with strace.
traceroute command in Linux with Examples
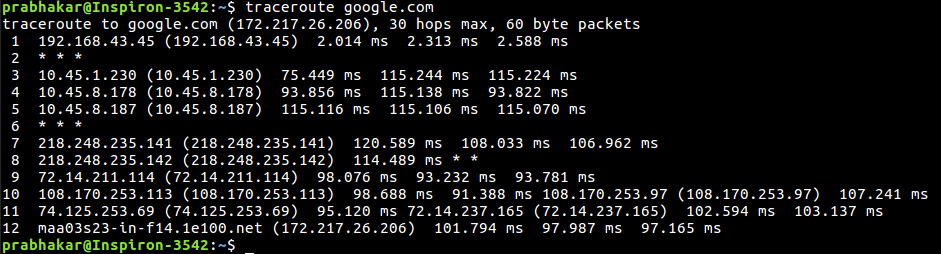
traceroute command in Linux prints the route that a packet takes to reach the host. This command is useful when you want to know about the route and about all the hops that a packet takes. Below image depicts how traceroute command is used to reach the Google(172.217.26.206) host from the local machine and it also prints detail about all the hops that it visits in between.

The first column corresponds to the hop count. The second column represents the address of that hop and after that, you see three space-separated time in milliseconds. traceroute command sends three packets to the hop and each of the time refers to the time taken by the packet to reach the hop.
traceroute [options] host_Address [pathlength]
-4 Option: Use ip version 4 i.e. use IPv4 Syntax:
-6 Option: Use ip version 6 i.e. use IPv6 Syntax:
-F Option: Do not fragment packet. Syntax:
-f first_ttl Option: Start from the first_ttl hop (instead from 1). Syntax:
$ traceroute -f 10 google.com
-g gate Option: Route the packet through gate. Syntax:
$ traceroute -g 192.168.43.45 google.com
-m max_ttl Option: Set the max number of hops for the packet to reach the destination.Default value is 30. Syntax:
-n Option: Do not resolve IP addresses to their domain names. Syntax:
-p port Option: Set the destination port to use. Default is 33434. Syntax:
$traceroute -p 20292 google.com
-q nqueries Option: Set the number of probes per each hop. Default is 3. Syntax:
packetlen Option: The full packet length. Default len is 60 byte packets. Syntax:
–help: Display help messages and exit. Syntax:
How to Trace Program Execution Using Linux Strace Command
More often than not, when programmers and system administrators are trying to debug or troubleshoot issues with their compiled binaries and packages, you will, at some point, encounter errors, program crashes and exit status that will undoubtedly whack your brain out if you can’t find what's causing the problem.
In this tutorial, we learn about strace command in Linux with usage examples.
Linux strace command
Strace is a diagnostics and debugging tool in Linux systems that is used to record and intercept system call names called by a running process and the signals which are received by the said running process. It can become a handy bug-isolation tool as well.
Strace, as a powerful tool, is mainly used to debug, troubleshoot and analyze how an application, program or binary file interacts with your Linux system. So if you are having trouble with your program or your compiled binary, you can use strace to check where the problem is being detected and which specific system call is being targeted.
The strace command can be used by non-root users as well in its basic usage. This versatility gives you in the user space the option to check non-privileged executables that just need to be examined without affecting system-wide changes.
strace [-ACdffhikqqrtttTvVwxxyyzZ] [-I n] [-b execve] [-e expr]. [-O overhead] [-S sortby] [-U columns] [-a column] [-o file] [-s strsize] [-X format] [-P path]. [-p pid]. [--seccomp-bpf]
Installation
In more recent Linux distros, strace is already pre-installed. However, if you find out that it has not yet been installed, you can execute the following commands based on your Linux distros:
For Debian / Ubuntu
For Redhat / CentOS stream
For Arch Linux