- How to Get Root Permission for an Android Wi-Fi Tether
- How to Grant Root Permissions Using Superuser by ChainsDD
- Step 1
- Step 2
- Step 3
- How to Grant Root Permissions Using Superuser by ClockworkMod
- Step 1
- Step 2
- Step 3
- Step 4
- How to Grant Root Permissions Using SuperSU by Chainfire
- Step 1
- Step 2
- Step 3
- Step 4
- Step 5
- Tethering и Reverse tethering
- Tethering
- Reverse tethering
- Заключение
- How To Tether To Your Android Phone with WiFi Tether
- Installing the WiFi Tether App
- Enable Security Features
- Connect Other Devices with Wi-Fi Tether
- Final Considerations
How to Get Root Permission for an Android Wi-Fi Tether
Gaining administrative access to your mobile device and authorizing applications to do the same is a form of vertical privilege escalation. In the case of the Android operating system, these privileges are known as «root» or «superuser» rights. Rooted Android devices generally include a superuser app for the purpose of granting and revoking root access permissions to specific apps. A superuser app can be downloaded via the Google Play store if your device does not already include one (see links in Resources). Grant root permission to your Wi-Fi tether app using a superuser app on your rooted Android mobile device.
How to Grant Root Permissions Using Superuser by ChainsDD
Step 1
Open the «Superuser» app on your Android device.
Step 2
Scroll down the «Apps» tab and tap the name of the Wi-Fi tether app. You may need to open the app first if it is not listed yet in Superuser.
Step 3
Tap «Allow» when prompted to with the Superuser Request. Check the box next to «Remember» if you want your device to remember the changes you make to the app’s permissions.
How to Grant Root Permissions Using Superuser by ClockworkMod
Step 1
Open ClockworkMod’s «Superuser» app on your mobile device.
Step 2
Scroll through the list of apps and tap the name of the Wi-Fi tether app you want to grant root permissions to. You may need to open the app first if you do not see it listed in Superuser’s app list.
Step 3
Tap one of the radio buttons on the Superuser Request screen. For example, tapping «Remember Choice Forever» will remember your app’s permissions unless you manually change this setting later.
Step 4
Tap the «Allow» button to save changes to the app’s permissions.
How to Grant Root Permissions Using SuperSU by Chainfire
Step 1
Open the «SuperSU» app by Chainfire on your Android mobile device.
Step 2
Scroll down the «Apps» tab and locate the Wi-Fi tether app you wish to grant root permission to. If the app is not listed, you may need to open the app first in order for it to appear in the SuperSU apps list.
Step 3
Tap the name of an app to edit its access permissions.
Step 4
Tap the drop-down menu next to «Access,» and then tap «Grant.» Tapping «Prompt» will require you to grant permission to the app each time it is used.
Step 5
Tap the «Save» button to finish granting root access to the app.
Tethering и Reverse tethering
Эта статья будет посвящена вариантам передачи интернет трафика на устройство под управлением платформы Android, а также способам передачи интернет трафика в обратном направлении (от Android устройства). Эти понятия принято называть Reverse tethering и Tethering соответственно. Если со вторым дела обстоят хорошо (есть как стандартные, так и 3rd Party решения), то о первом нужно говорить отдельно и осуществлять подробный разбор. Но, все по порядку.
Сразу же подчеркну: устаревшие, неактуальные, опасные решения рассматриваться не будут!
Все технологии рассматриваются только с точки зрения Tethering. Здесь не будет подробного описания каждой из них, только степень применимости к освещаемой проблеме. 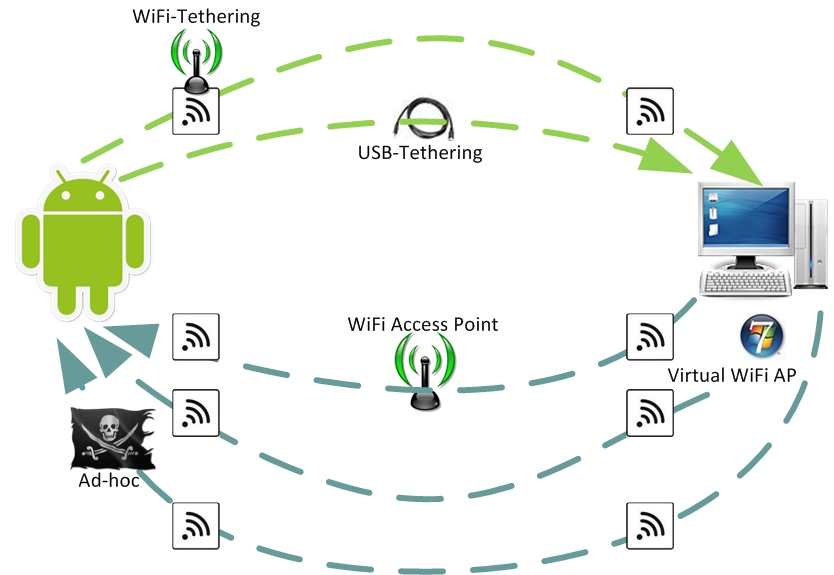
Tethering
Стандартные решения
С появлением версии Android 2.2 стали возможны 2 технологии: USB-Tethering и WiFi-Tethering.
USB-Tethering
Для подключения необходим стандартный кабель Android-USB.
Включается в Настройки->Беспроводные сети->Режим модема->USB-модем.
После подключения Android устройства к приемнику (ноутбук, настольный компьютер. ) с помощью кабеля происходит запрос на включение USB-Tethering. После положительного ответа пользователя становится возможным использование интернет трафика Android устройства на приемнике.
Большим плюсом данного подхода является возможность подключения Android устройства к WiFi Точке Доступа и разделение этого подключения по USB каналу.
Из минусов стоит отметить необходимость держать Android устройство в непосредственной близости с приемником и ограниченность только одним приемником.
WiFi-Tethering
Для подключения необходим WiFi-адаптер на приемнике.
Если ранее приходилось использовать android-wifi-tether, требовавшую Root, то теперь, с появлением Android 2.2, это делается стандартными средствами.
Включается в Настройки->Беспроводные сети->Режим модема->Точка доступа Wi-Fi.
После включения данной функции Android устройство становится Wi-Fi точкой доступа, к которой могут подключаться другие устройства.
Большим минусом является невозможность одновременного получения и раздачи интернет трафика Android устройством через WiFi, т.е. Android устройство становится 3G модемом для приемника.
3rd Party
EasyTether
Для подключения необходим либо стандартный кабель Android-USB, либо WiFi-адаптер на приемнике.
Позволяет подключить Android устройство к приемнику и осуществить Tethering.
Необходима установка приложения как на Android устройство, так и на приемник.
Не имеет смысла после появления Android 2.2, но, в свое время, очень гибкий и полезный инструмент.
Reverse tethering
Перейдем к самому интересному месту статьи.
Т.к. четко структурированной информации по данному вопросу очень мало, я считаю очень важным донести факты, касательно текущей ситуации до сведения интернет-сообщества.
На данный момент Reverse tethering, как таковой, стандартными средствами еще не реализован. Нет, так же, и 3rd Party продуктов, позволяющих без специальной настройки произвести Reverse tethering. Но, внимательный читатель уже заметил фразу «специальная настройка». Этим мы и займемся. От банального к более сложному.
В основе некоторых предложенных решений будет лежать широко известный механизм разделения интернет трафика, который в данной статье мы рассматривать не будем. Статей, описывающих этот механизм, множество. Что действительно интересно — варианты соединения Android устройства и источника.
Стандартные решения
WiFI Точка Доступа
Самый очевидный вариант решения.
Высокая скорость, средняя территориальная доступность, для честных людей — еще и некоторые денежные затраты.
Но не всегда есть под рукой точка доступа. Тогда…
2G/3G
На сегодняшний день зона покрытия еще не стабильна, цены сильно завышены, скорость средняя.
Перспективы хорошие, но доступно не всем. Ладно, остается последняя надежда.
Ad-hoc
Перед нами стоит компьютер (источник), подключенный к сети интернет через стандартный сетевой кабель — витую пару. У него есть WiFi-адаптер, который мы используем для подключения к Android устройству. Такое подключение называется Ad-hoc.
Однако такое подключение на сегодняшний день для Android устройств недоступно, хотя в саму платформу Android такая возможность заложена.
Настоятельно прошу всех проголосовать за исправление данной недоработки на официальной странице ошибки. Достаточно поставить звездочку в левом верхнем углу. Спасибо.
Нестандартные решения
Виртуальная WiFI Точка Доступа
В Windows 7 появилась возможность создавать виртуальную WiFI Точку Доступа.
Это позволяет подключить Android устройство к источнику без применения реальной WiFI Точки Доступа.
Для упрощения процедуры была создана программа Сonnectify.
Очевидный минус — не все хотят работать (нет возможности установить) Windows 7.
Ad-hoc
Есть возможность создания Ad-hoc подключения вручную. Но только при использовании Root.
В файле /system/etc/wifi/tiwlan.ini правим:
WiFiAdhoc = 1
dot11DesiredSSID = HTCG1Default
dot11DesiredBSSType = 0
Тем самым вы создаете одно подключение Ad-hoc.
Подробности вы можете поискать сами, т.к. я строго не рекомендую пользоваться данным методом.
Ad-hoc — перепрошивка
Существует неофициальный патч, который включает возможность находить и подключаться к Ad-hoc сетям, помечая их *. Опять же — на свой страх и риск.
USB
Есть возможность настройки USB подключения вручную. Только при использовании Root.
Инструкция написана понятно и легко.
Заключение
Android платформа предоставляет ряд возможностей получения интернет трафика на устройства, однако далеко не так просто как хотелось бы. Местами, как вы могли убедиться, это даже опасно. Наиболее простым решением является покупка портативной WiFI Точки Доступа и ожидание решения проблемы с Ad-hoc подключением.
How To Tether To Your Android Phone with WiFi Tether
WiFi Tether is an app for rooted Android phones that lets you use your phone as a wireless hotspot. This allows users to bypass carriers’ built-in Wi-Fi hotspot software, which is especially helpful on phones that come with unreliable hotspot apps, such as the HTC Thunderbolt.
Installing the WiFi Tether App
- Open your phone’s Settings app and select the Applications menu. Be sure to check ‘Unknown Sources.’
- Get WiFi Tether by visiting this Google Code page on your Android phone and download the app by clicking on the downloads tab at the top of the page.
- Using Root Explorer, go to your downloads folder and tap the downloaded file. It will be in the downloads folder of your phone’s storage card.
- Tap the file name to install it. It will ask if you are sure.
Enable Security Features
Start the app by tapping its icon. Before you turn on the tethering feature do the following:
- Go to Menu and Settings from within the app and place a check mark in the Enable Wi-Fi Encryption option.
- Below the Encryption option is an option that says Change Passphrase. Tap it and enter a good password that has both random letters and numbers.
- Tap OK and you now have encryption turned on.
- OPTIONAL: You can also change the SSID and if you really want some extra security hide the SSID. If you hide your SSID, then you will have to manually enter it on the other devices when you connect to the Internet through the phone.
- Now scroll down to Enable Access-Control and make sure a check mark is placed in the box.
Now back out of the settings screen to the main screen of the app.
Connect Other Devices with Wi-Fi Tether
- Tap the big WiFi icon in the center of the screen. It will turn yellow and a pop up tells you it is starting tethering.
- On your laptop (or other WiFi device) try to connect to the phone’s access point by using the WiFi connection software on your computer or other WiFi device. In Windows, look for the WiFi symbol on the bottom-right of your screen. On Macs, click the WiFi symbol on the top-right of your screen.
- If you hid the SSID in the above steps, then you will have to manually enter it each time you connect a WiFi device.
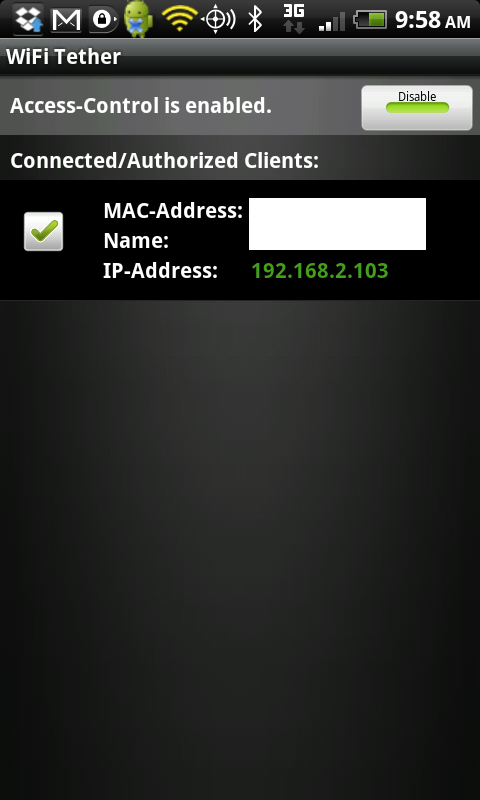
Once your device is connected to the phone’s hotspot, you will have to grant access by doing the following:
- Tap Menu and Access Control from within the app.
- The devices listed will be those that are trying to connect to your phone. Make sure the Access-Control at the top says enabled.
- Tap the device you want to connect to the phone and it will now be allowed to use the Internet connection of the phone.
Final Considerations
This app is no longer available in the Market. Google gave into the wishes of the wireless carriers who want Android users to pay a premium for tethering. This app will allow you to bypass paying this restriction, but we are not condoning such activity. If you use it, you should still pay for tethering service or you might find yourself violating your carrier’s terms. If such activity is detected you could be forced to sign up and pay after the fact..
The best reason for using this app is that it works better than the built-in software on some phones. On the HTC Thunderbolt, WiFi Tether actually serves its stated purpose, while the built-in app is unreliable. The problem almost caused me to return my HTC Thunderbolt.
There are a couple of nice extras in the app, including a battery thermometer. There’s also a bandwidth meter that keeps tabs on how much data been used by connected devices, which can help prevent you from exceeding bandwidth caps.