- How do I install kernel header files?
- Case of Obsolete kernel package
- How to install kernel headers on Debian
- Installing kernel headers on Debian 11:
- What is the Linux kernel?
- What are Linux Kernel Headers?
- Conclusion:
- About the author
- David Adams
- How to Install Kernel Headers in Ubuntu and Debian
- Install Kernel Headers in Ubuntu and Debian
- How does Ubuntu define which linux-headers-* will be installed alongside linux-headers-generic?
- How to install kernel headers on Linux
- Install Kernel Headers on Debian, Ubuntu or Linux Mint
- Install Kernel Headers on Fedora, CentOS or RHEL
- Support Xmodulo
How do I install kernel header files?
You should be able to install the kernel header files for the currently running kernel by running the following in a terminal:
sudo apt-get install linux-headers-$(uname -r) In general, the kernel header packages are named linux-header-* where «*» indicates the version & variant (generic, server, etc.).
hey thanks but could you tell me what does generic, server, etc means i want to write (kernel driver)
This won’t install the headers for future updates automatically and you’ll have to re-run this command every time. Therefore, it’s recommended to install the metapackage instead, as described in another answer.
sudo apt-get install linux-headers-generic if you are on a Desktop installation. The apt-get will solve the dependencies and install the correct version of kernel headers.
In Debian Wheezy I get the error message «Package linux-headers-generic is not available, but is referred to by another package. [. ] E: Package ‘linux-headers-generic’ has no installation candidate»
@IQAndreas the linux-headers-generic package is ubuntu specific. On Debian you should use sudo apt-get install linux-headers-$(uname -r)
I have linux-headers-generic installed on 18.04 but still don’t have the headers for the newest and current kernel version. Maybe it’s just a bug with this version, I’ve compiled kernel modules in earlier versions so I must’ve had the correct headers back then.
Case of Obsolete kernel package
This should cover another problem when: the currently running kernel is obsolete, meaning it’s not in the repository anymore neither its headers. So the best thing to do is to update the kernel to last version in the repository.
linux-generic is a meta package to keep current version of the kernel & its headers:
sudo apt-get update sudo apt-get install linux-generic Note: Depending on your Ubuntu edition, See if you need linux-lowlatency (Ubuntu Studio), linux-signed-generic or linux-virtual .
How to install kernel headers on Debian
![]()
All instructions in this tutorial are also useful for other Debian-based Linux distributions such as Ubuntu.
Installing kernel headers on Debian 11:
First, update the information on your software using apt, as shown in the example below.
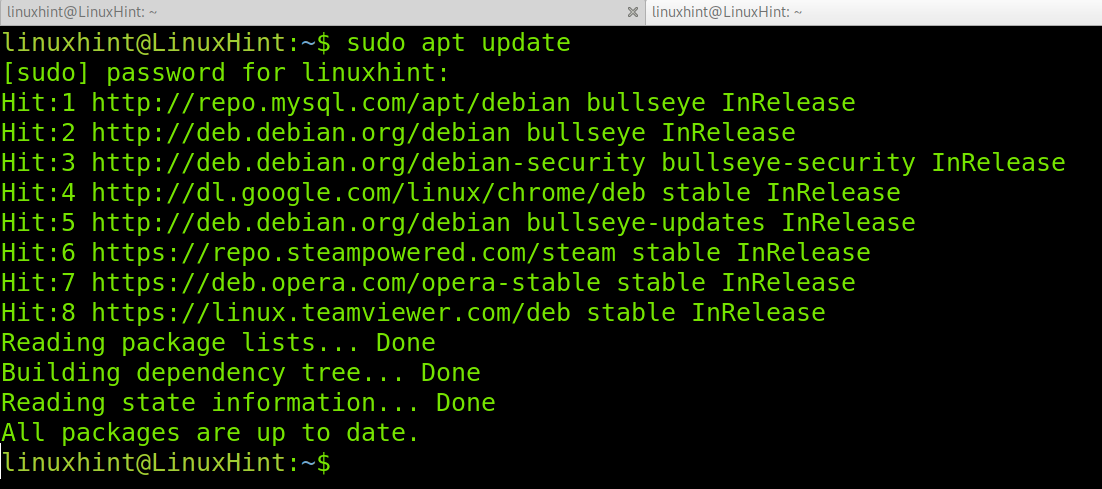
Check for available Linux kernel headers by running the following command.
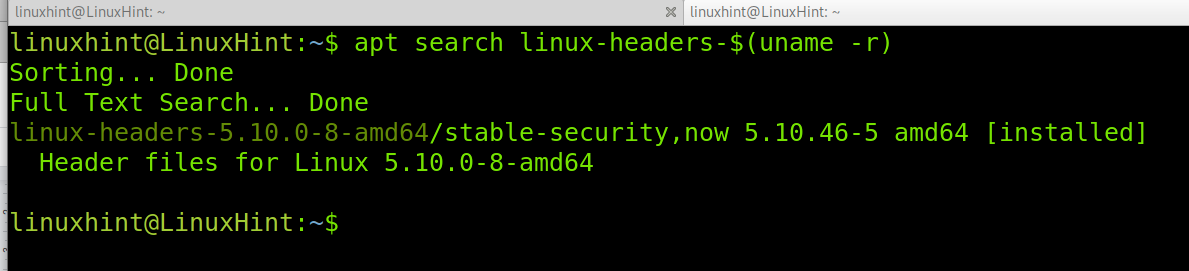
For a different simple way to list available headers, run the command below.
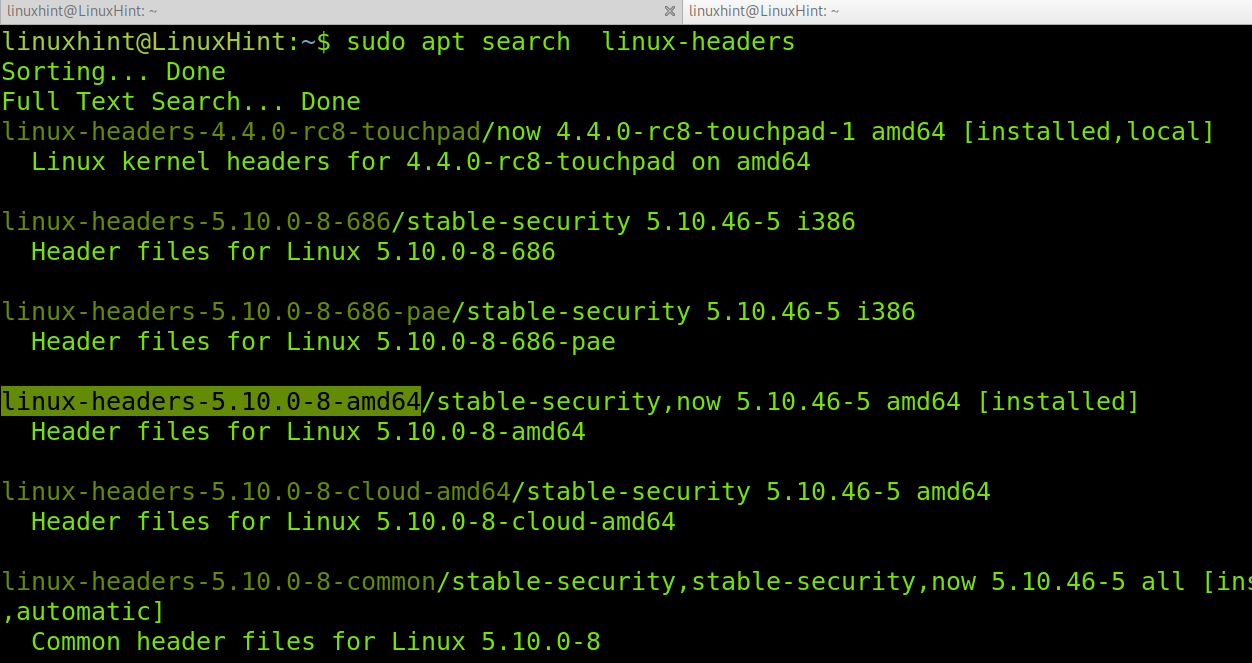
To install the Linux kernel headers, run the command shown in the screenshot below.
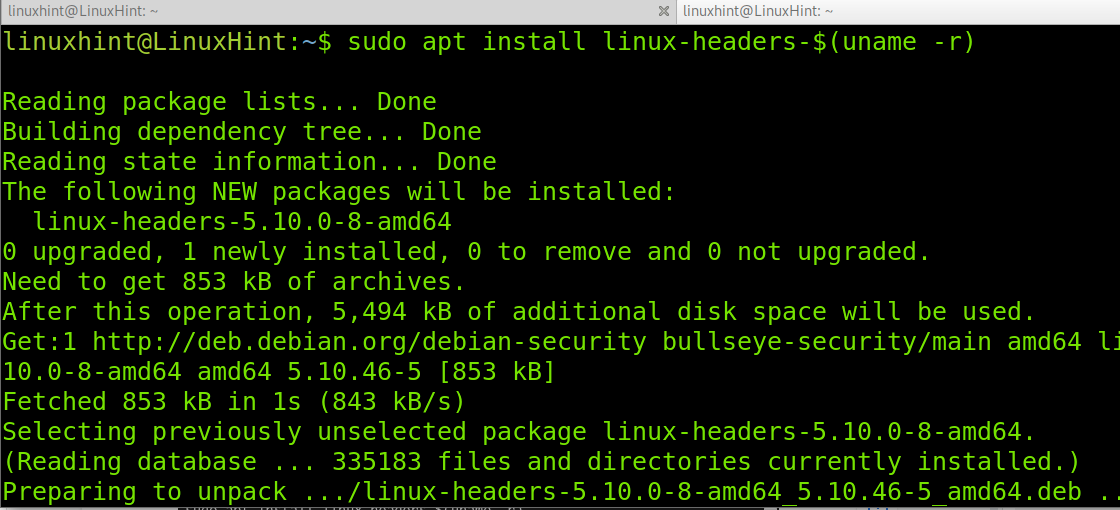
Using Debian 11 x64 or using the second method to find the header, you can also run the following command.

In my case, the headers were installed in the previous example, so the output says it’s already properly installed.
What is the Linux kernel?
Some experts say the kernel is the core component of an Operating System; others disagree and say the kernel is not part of the OS but a vital component needed by any OS. The function of the kernel is to manage the device resources for them to interact with the operating system and applications. We can think about the kernel as a translator allowing communication between the hardware and the software. In order to manage resources properly, the kernel has full privileges. In some cases, the installed kernel may lack the proper code to allow the hardware and software interaction; that’s when we need to install kernel headers.
What are Linux Kernel Headers?
Linux kernel headers are components usually used to compile drivers and loadable modules adding support to the kernel. For this purpose, kernel headers include C headers with functions and structures needed to compile modules. Thanks to kernel headers, modules or drivers can interact with the kernel. It is important to clarify the kernel headers are part of the kernel, despite being distributed separately.
Dealing with kernel headers is easier than dealing with whole kernel sources. If you are looking for drivers for a device, you’ll use kernel headers, while to rebuild the whole kernel, you will need whole kernel sources. By default, some Linux distributions, including Debian, include the kernel headers to be used if needed (this tutorial assumes you discarded or removed the headers). If all your hardware works properly, you probably won’t need to deal with kernel headers.
Conclusion:
As you can see, installing Linux kernel headers on Debian or Ubuntu is pretty easy. Any Linux-level user should know the function of kernel headers and how to install them. Users must pay attention to the kernel headers they download that are compatible with their system, not only the architecture but also the version.
Thank you for reading this tutorial explaining how to install kernel headers on Debian. Keep following Linux Hint for additional Linux tips and tutorials.
About the author
David Adams
David Adams is a System Admin and writer that is focused on open source technologies, security software, and computer systems.
How to Install Kernel Headers in Ubuntu and Debian
In our last article, we have explained how to install kernel headers in CentOS 7. Kernel Headers contain the C header files for the Linux kernel, which offers the various function and structure definitions required when compiling any code that interfaces with the kernel, such as kernel modules or device drivers and some user programs.
It is very important to note that the kernel headers package you install should match with the currently installed kernel version on your system. If your kernel version ships with the default distribution installation or you have upgraded your Kernel using dpkg or apt package manager from the Ubuntu or Debian base repositories, then you must install matching kernel headers using package manager only. And if you’ve compiled kernel from sources, you must also install kernel headers from sources.
In this article, we will explain how to install Kernel Headers in Ubuntu and Debian Linux distributions using default package manager.
Install Kernel Headers in Ubuntu and Debian
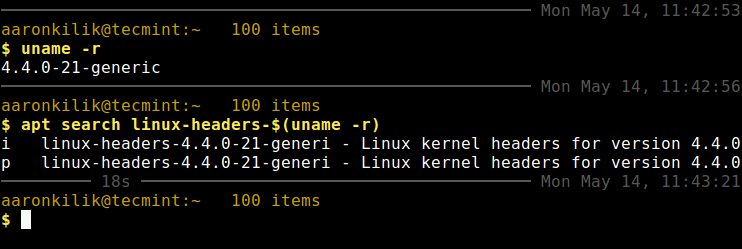
First check your installed kernel version as well as kernel header package that matches your kernel version using following commands.
$ uname -r $ apt search linux-headers-$(uname -r)
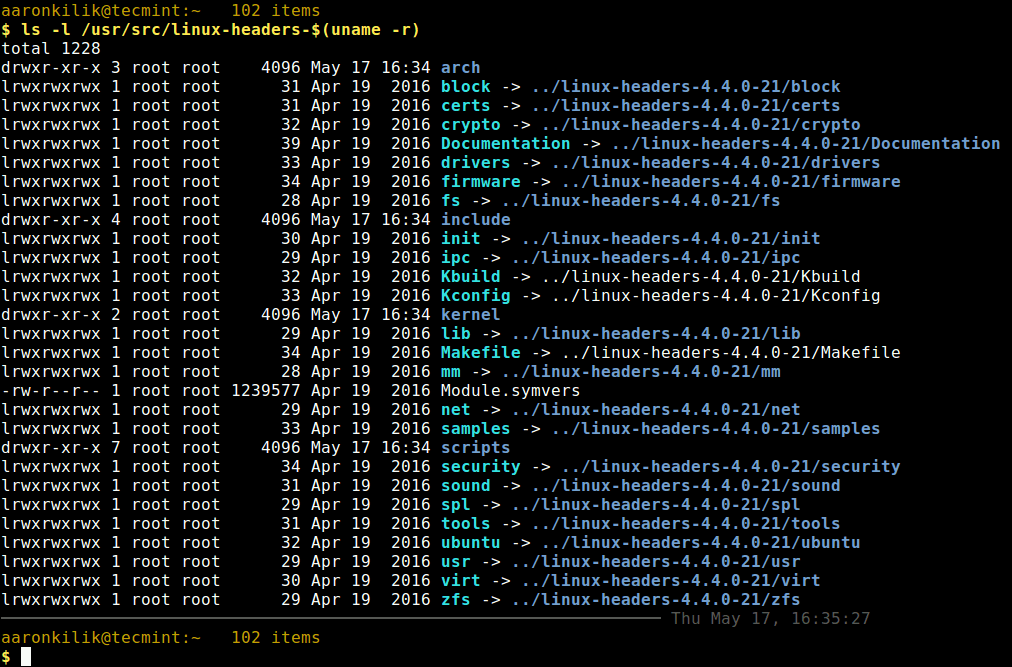
On Debian, Ubuntu and their derivatives, all kernel header files can be found under /usr/src directory. You can check if the matching kernel headers for your kernel version are already installed on your system using the following command.
$ ls -l /usr/src/linux-headers-$(uname -r)

From the above output, it’s clear that the matching kernel header directory doesn’t exist, meaning the package is not yet installed.
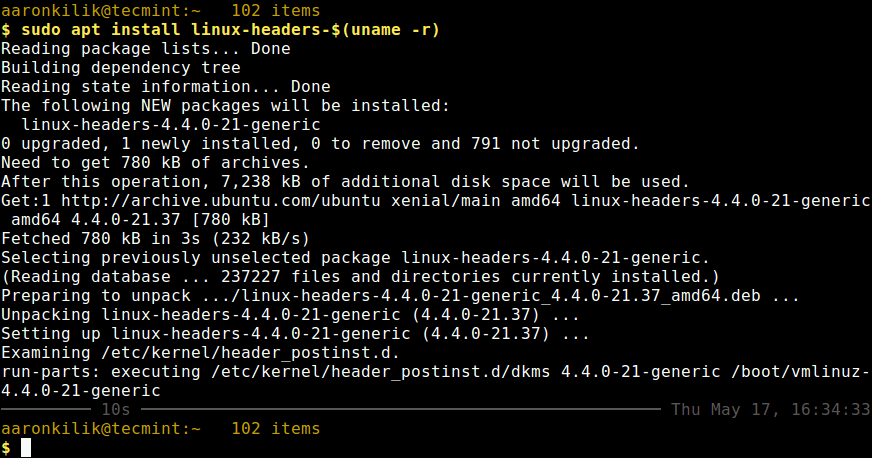
Before you can install the appropriate kernel headers, update your packages index, in order to grab information about the latest package releases, using the following command.
Then run the following command that follows to install the Linux Kernel headers package for your kernel version.
$ sudo apt install linux-headers-$(uname -r)
Next, check if the matching kernel headers have been installed on your system using the following command
$ ls -l /usr/src/linux-headers-$(uname -r)
That’s all! In this article, we have explained how to install kernel headers in Ubuntu and Debian Linux and other distributions in the Debian family tree.
Always keep in mind that to compile a kernel module, you will need the Linux kernel headers. If you have any quires, or thoughts to share, use the comment form below to reach us.
How does Ubuntu define which linux-headers-* will be installed alongside linux-headers-generic?
While upgrading from 22.10 to 23.04, I ran into this bug which made the system unbootable because the newest kernel 6.2.0-20 has not been installed correctly. I used the GRUB startup menu to define an older kernel (apparently, 5.19.0-41 is the only one available «behind» the newest 6.2.0-20 ), so now I run on this older kernel. To cleanup my system I tried to apt remove linux-headers-6.2.0-20 and all other 6.2.0-20 -related headers of the new and broken kernel, but this was not possible because the unspecific linux-headers-generic depended on those packages. So I also removed linux-headers-generic with the plan to re-install it once I removed the problematic headers. I manually purged all of those new headers until the list was pretty much empty (I left linux-libc-dev:amd64 because it seemed this was not causing problems):
$ sudo dpkg -l | grep "6.2.0-20" pi linux-headers-6.2.0-20 6.2.0-20.20 all Header files related to Linux kernel version 6.2.0 rc linux-image-6.2.0-20-generic 6.2.0-20.20 amd64 Signed kernel image generic ii linux-libc-dev:amd64 6.2.0-20.20 amd64 Linux Kernel Headers for development rc linux-modules-6.2.0-20-generic 6.2.0-20.20 amd64 Linux kernel extra modules for version 6.2.0 on 64 bit x86 SMP rc linux-modules-extra-6.2.0-20-generic 6.2.0-20.20 amd64 Linux kernel extra modules for version 6.2.0 on 64 bit x86 SMP But now, when apt install linux-headers-generic it will still try to install the newest headers alongside it:
$ sudo apt install linux-headers-generic Die folgenden zusätzlichen Pakete werden installiert: linux-headers-6.2.0-20 linux-headers-6.2.0-20-generic Now I wonder, how does the system determine that it will install a newer kernel when installing the general linux-headers-generic and can I somehow reset this to the older kernel?
How to install kernel headers on Linux
Question: I need to install kernel headers to install a device driver for my kernel. What is a proper way to install matching kernel headers on [insert your Linux distro]?
When you compile a device driver a custom kernel module, you need to have kernel header files installed on your Linux system. Kernel headers are needed also when you build a userspace application which links directly against the kernel. When you install kernel headers in such cases, you must make sure to kernel headers are exactly matched with the kernel version of your system (e.g., 3.13.0-24-generic).
If your kernel is the default version that comes with the distribution, or you upgraded it using the default package manager (e.g., apt-get , aptitude or yum ) from base repositories, you can install matching kernel headers using the package manager as well. On the other hand, if you downloaded the kernel source and compiled it manually, you can install matching kernel headers by using make command.
Here we assume that your kernel comes from base repositories of your Linux distribution, and see how we can install matching kernel headers.
Install Kernel Headers on Debian, Ubuntu or Linux Mint
Assuming that you did not manually compile the kernel, you can install matching kernel headers using apt-get command.
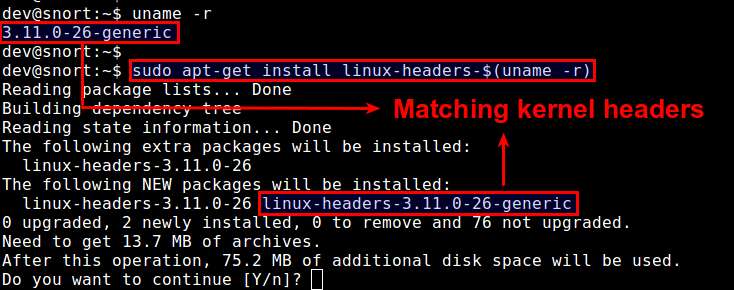
First, check if matching kernel headers are already available on your system using dpkg-query command.
$ dpkg-query -s linux-headers-$(uname -r)
dpkg-query: package 'linux-headers-3.11.0-26-generic' is not installed and no information is available
Go ahead and install matching kernel headers as follows.
$ sudo apt-get install linux-headers-$(uname -r)
Verify that matching kernel headers are successfully installed.
$ dpkg-query -s linux-headers-$(uname -r)
Package: linux-headers-3.11.0-26-generic Status: install ok installed
The default location of kernel headers on Debian, Ubuntu or Linux Mint is /usr/src .
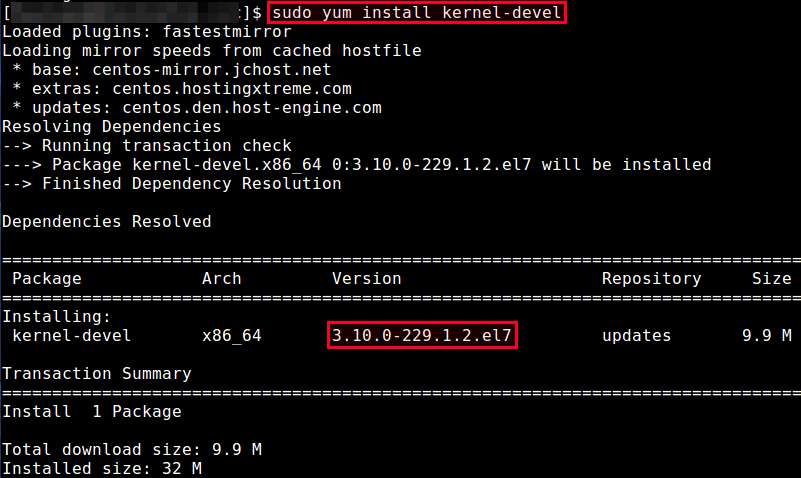
Install Kernel Headers on Fedora, CentOS or RHEL
If you did not manually upgrade the kernel, you can install matching kernel headers using yum command.
First, check if matching kernel headers are already installed on your system. The default location of kernel header files is /usr/src/kernels/ .
If no matching kernel headers are found in that directory, go ahead and install kernel headers with yum command as follows.
$ sudo yum install kernel-devel
If the kernel header files installed by the above command do not match with your current kernel, this is because your kernel is outdated. In this case, update the installed kernel to the latest by running the following command. This will install the matching kernel automatically. You will need to reboot after updating the kernel.
Now verify that matching kernel headers are installed by running:
arch firmware ipc Makefile samples System.map vmlinux.id block fs Kconfig mm scripts tools crypto include kernel Module.symvers security usr drivers init lib net sound virt
Support Xmodulo
This website is made possible by minimal ads and your gracious donation via PayPal or credit card
Please note that this article is published by Xmodulo.com under a Creative Commons Attribution-ShareAlike 3.0 Unported License. If you would like to use the whole or any part of this article, you need to cite this web page at Xmodulo.com as the original source.