- Transfer files over Wi-Fi Direct on Android
- Step 1. Connect two phones via Wi-Fi Direct
- Step 2. Send and receive files via Wi-Fi Direct
- Wi-Fi Direct file transfer apps
- Share files without Wi-Fi Direct on Android
- Transfer Files over Wi-Fi Between PCs / PC and Phone
- Part 1: Transfer Files from PC to PC over Wi-Fi
- Part 2: Transfer Files from PC to Phone over Wi-Fi
- Part 3: Frequently Asked Questions
Transfer files over Wi-Fi Direct on Android
Wifi direct is a new technology that can help us transfer files wirelessly in a way similar to Bluetooth, but in blazing fast speed, much faster than Bluetooth. Like Bluetooth, Wifi direct has the same “discover, pair and send” functionality. However Wi-fi direct is not as universal as Bluetooth at this moment. Some devices may not be Wi-Fi direct enabled. In this demo, we will use a Samsung Galaxy phone and a Huawei smartphone, with Wi-Fi direct available on both of them. No third-party apps required. Also note that both devices must be in the same physical location but Internet connection is not required.
Step 1. Connect two phones via Wi-Fi Direct
There seems to be some difference in how it is implemented on different devices. Generally speaking, you can go to Settings > Wi-Fi, touch the toggle to turn on Wi-Fi on your Android phone, then activate Wi-Fi Direct. You can think of WiFi Direct as a sort of Bluetooth over Wi-Fi, or file transfer over Wi-fi. You need to enable Wi-Fi on the phone before you can turn on Wi-Fi Direct.
On Huawei mobile phone, you can find the Wi-Fi Direct option at the bottom of the screen where all the Wi-fi networks are listed. Touch Wi-Fi direct to scan for available devices nearby.

On my Samsung Galaxy mobile, turn on Wi-Fi from Settings, touch the More menu (three vertical dots) at the top right corner, then choose Wi-Fi Direct from the drop-down menu to activate Wi-Fi Direct on Samsung phone. Your phone will then search for other Wi-fi direct ready devices.
Touch the mobile phone name in the Available Devices to send a connection invitation to that phone. Go to the other Android phone to accept the invitation and connect the two Android mobile phones through Wi-Fi Direct.
When a phone is connected via WiFi direct, you can find its status in the Available Devices changes from Available to Connected. You are now ready to initiate file transfer between the two phones through Wi-Fi direct.
Step 2. Send and receive files via Wi-Fi Direct
Wi-Fi Direct is usually implemented in the Share or Action menu on Android phones, same place you choose Bluetooth, Email and other options to send files. You can select photos, videos from the Gallery app, then tap Share > Wi-Fi Direct, then select a Wi-Fi Direct connected device to share the selected photos, videos. You can select any file(s) from the files manager on your phone to send them through Wi-Fi Direct.

On the receiving device, you may receive a Wi-Fi Direct Incoming Files notification. When you get this notice, confirm you want these files. The files may also be received automatically without the confirm on some devices.
Different Android phones may save the files received through Wi-Fi Direct to different path or folder on the phone. On my Samsung phone, the default Download folder receives all the incoming file transfer via Wi-Fi direct; on my Huawei phone, a new folder name Wi-Fi Direct was created to store all files and documents received via Wi-Fi Direct.
Wi-Fi Direct file transfer apps
We have noticed that for data sharing between two Huawe phones, there’s no need for third-party transfer apps. Wi-Fi Direct allows you to directly transfer data between Huawei devices. If you want to share files across different phones, like Huawei, Samsung, Xiaomi, Nexus, Tecno mobile, you need to use a third-party file transfer or manager app. You may refer to this guide to setup and use Wi-Fi Direct on Android phone for more details.
Share files without Wi-Fi Direct on Android
There are many other ways you can transfer files between Android phones without Wi-Fi Direct. You can connect two Android phones via Bluetooth, then exchange between them via Bluetooth. Email is a good way to share files across different devices. Many third-party apps, such as AirDroid, SHAREit, Send Anywhere, ES File Explorer, Xender, allow us to send files across various devices wirelessly without any fee.
Transfer Files over Wi-Fi Between PCs / PC and Phone

Wi-Fi file transfer has gained popularity as a file transfer method because it is fast and doesn’t require wired connections or any external storage device. Only a local area connection is enough for the purpose, and the PC should be connected to the local area network via LAN cable or a Wi-Fi adapter.
Here, we’ll see a few simple methods to transfer files via Wi-Fi. The first part contains the process to transfer files from PC to PC over Wi-Fi, and the second part includes methods to transfer files from PC to phone over Wi-Fi.
Part 1: Transfer Files from PC to PC over Wi-Fi
Method 1: Using Nearby Sharing on Windows 10/11
The Nearby Sharing feature on Windows 10 and 11 allows users to transfer files via Wi-Fi from PC to PC connected to the same network.
Using Nearby sharing is easy, but it requires doing some settings before you can transfer files via Wi-Fi. The settings need to be done on both systems and are given below:
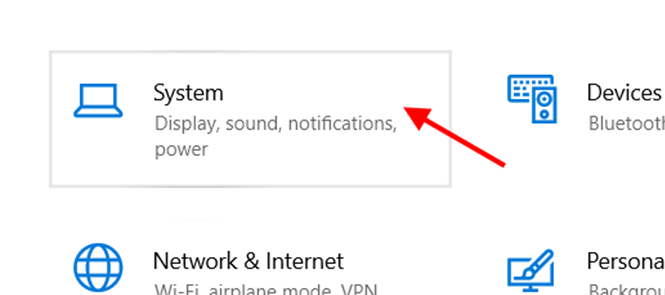
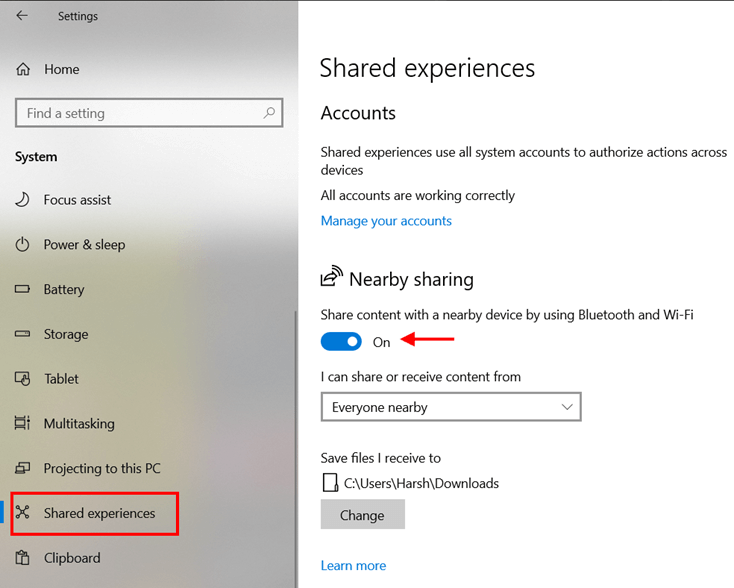
- On the next window, click on “Shared Experience” and turn ON the “Nearby Sharing” option from the right-side panel.
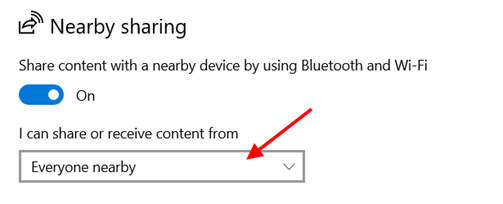
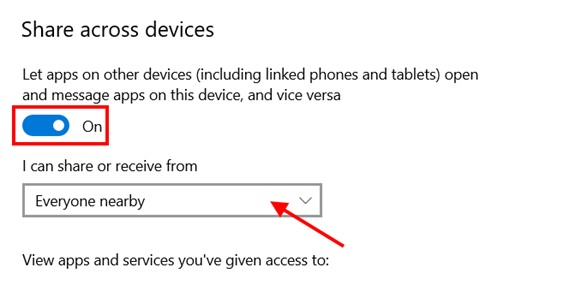
- Now, scroll down some more on the same window and turn ON the “Share across devices” option. Then, select “Everyone nearby” from the dropdown menu just below it.
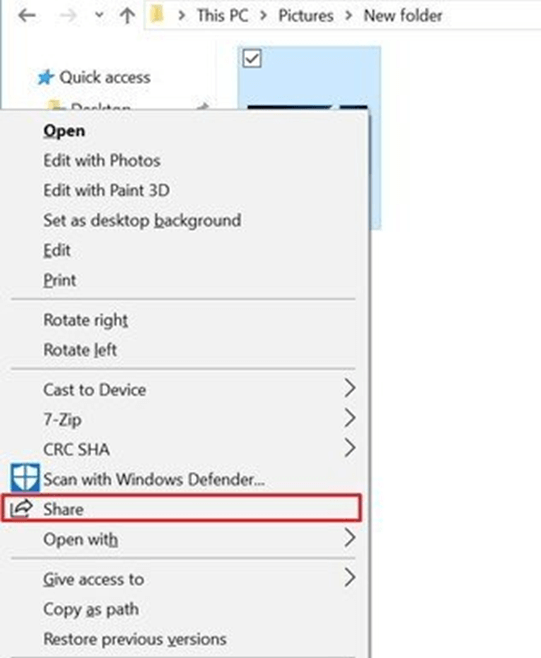
- On the PC from which you want to share something, go to the file location, and right-click on the file. Now, select the “Share” option.
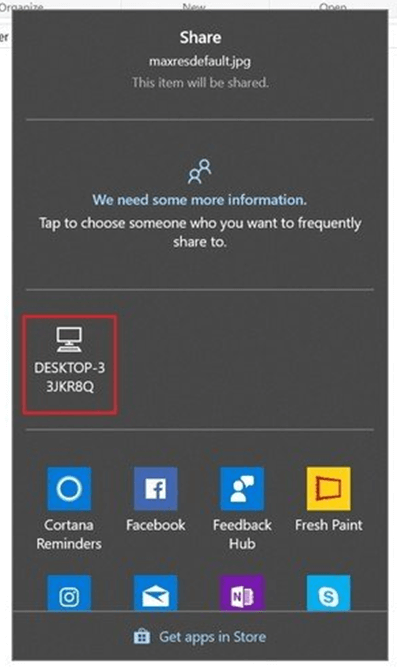
- From the pop-up window, click on the PC icon of the recipient computer to transfer the file via Wi-Fi.
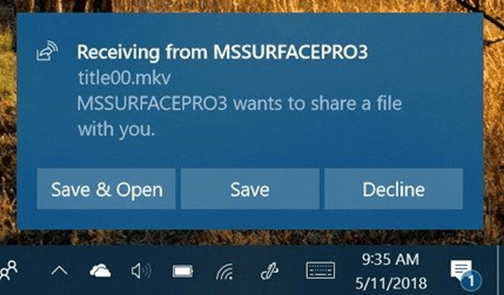
- The recipient PC will ask for permission to “Save” or “Decline” the transfer. Click “Save” to start the transfer.
- Open the Control Panel and click on the “Network and Internet” option.
- Select “Network and Sharing Center” and click on “Change advanced sharing settings” from the left panel.
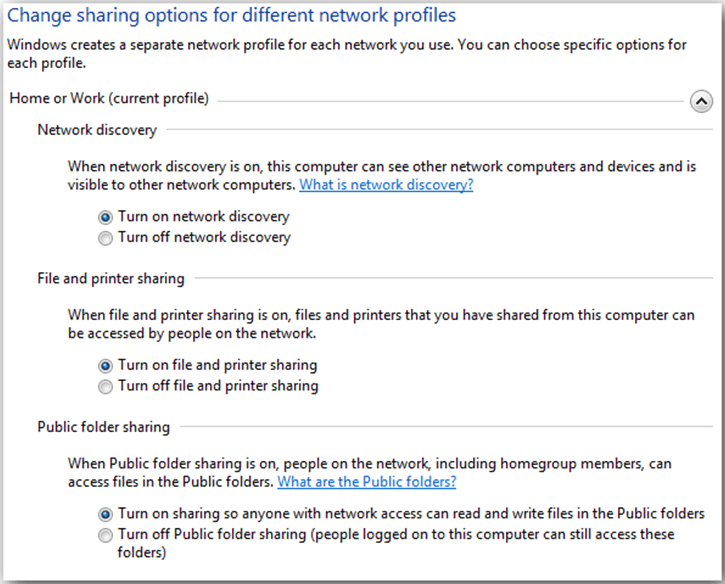
- In the “File and Printer Sharing” section of the Public Network, turn ON File and Printer Sharing and click “Save Changes.” (You can turn ON password-protected sharing from here so that no one other than the recipient can connect to your PC.)
- Right-click on the folder you want to share, select the “Give Access to” option, and click on “Specific people.”
- From the new pop-up window, select the recipient’s system from the list or choose “Everyone” from the dropdown menu.
- Click on “Share” to start sharing the contents of that folder to another system on the same network. You can copy and paste anything you want to share inside that folder, and it’ll be accessible from the recipient’s computer.
- (Optional) Go to the app’s “Settings” option and set an “Access Password” to make secure transfers on public networks.
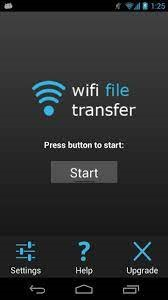
- On the main screen of the app, click on “Start.”
- Now, type the web address or URL shown on the app screen on a desktop browser window and press “Enter.”
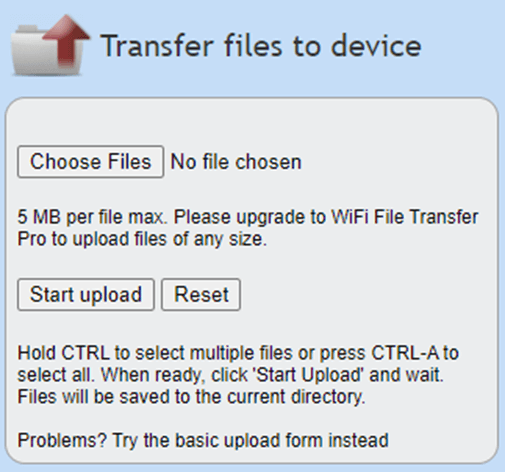
- Click on the “Choose Files” option and select the items you want to transfer over Wi-Fi. Also, you can select the folder where you want to save the items by navigating to it from the left side phone storage navigator.
- Now, click on “Start Upload” and let it finish. Then, you’ll be able to access the stuff from your phone.
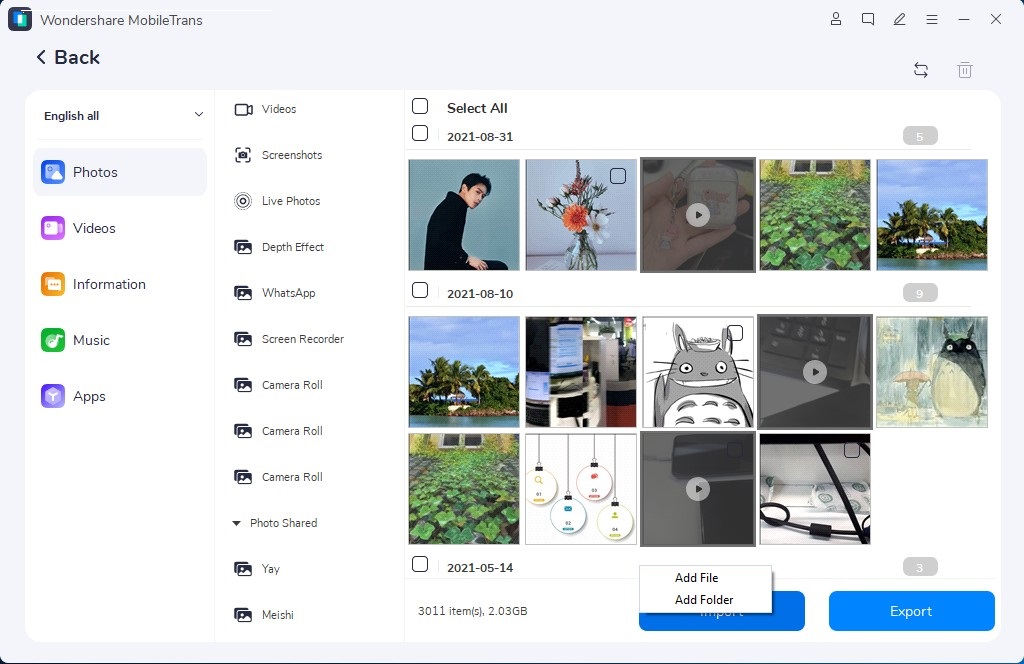
- Download and Install the MobileTrans app on your computer. Now, launch it and select the “File Transfer” option from the main menu. Plugin your phone into the computer via a USB cable, and it will be detected by the app automatically.
- Now, click on the “Import to Phone” option shown on the screen. Press the “Import” button at the bottom to start selecting the items from your PC, which you want to transfer to your phone. You can preview the data you chose on the screen and add or remove items from there.
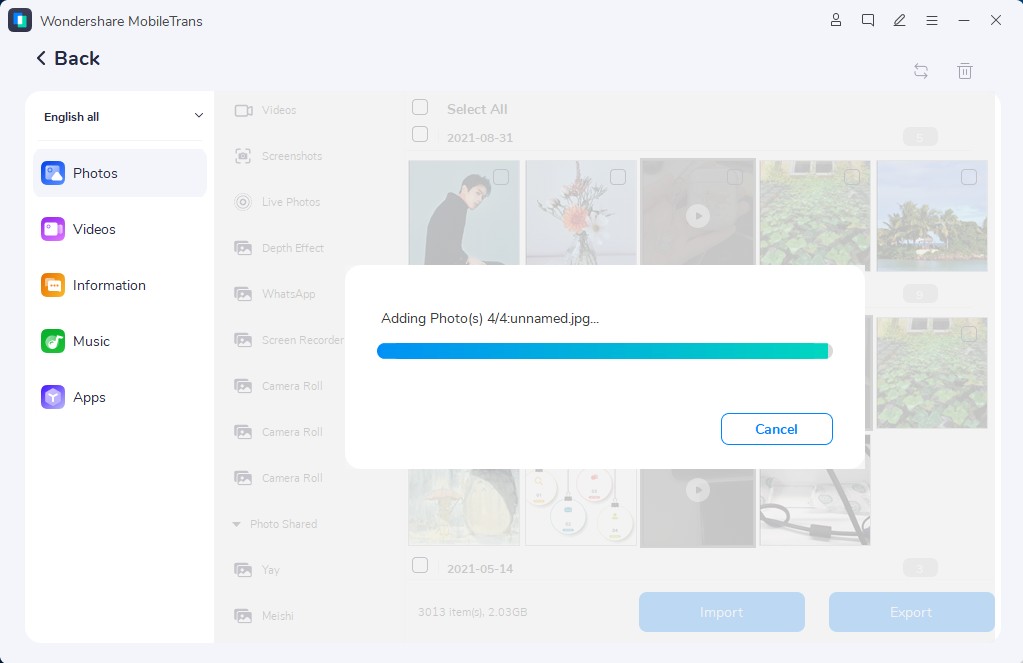
- After the selection is complete, just press the “Import” button to start importing stuff to your phone. Wait for the transfer to complete (or cancel it if you want by pressing the “Cancel” button).
- MobileTrans is the one-stop solution for transferring files or messages from phone to phone or PC to phone, phone to PC, or taking backup and restoring your phone data.
- It supports the transfer of files of various formats and protects your privacy.
- It is compatible with both Windows and Mac on desktop and Android and iOS on phones.
- Also, as I noted earlier, USB transfer is always faster and more secure than Wi-Fi transfer.
Select “Everyone nearby” from the dropdown menu just below the toggle button.
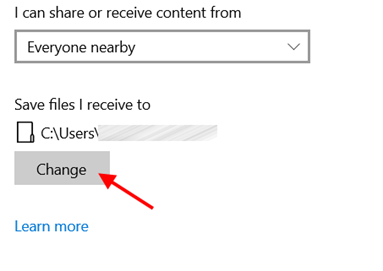
Now, select the location of saving received files from the option below the dropdown menu.
Now let’s see how to transfer files via Wi-Fi using Nearby sharing:
The file will be saved to the location you had set before.
Method 2: Using File and Printer Sharing on Windows 7/XP
Nearby sharing is a great feature; however, it isn’t available on older versions of Windows like 7 or XP. But there is a feature called File and Printer Sharing, which can transfer files via Wi-Fi from PC to PC.
Here also, some settings are required before using the file transfer. They are given below:
Now, you need to share files so that the recipient PC can access them. The steps to do this are as follows:
Part 2: Transfer Files from PC to Phone over Wi-Fi
Method 1: Using Wi-Fi File Transfer application
Wi-Fi File Transfer is a free-to-use application that can be used to transfer files to a phone over Wi-Fi. First, you need to install the application on your Android phone. To install it, visit the Google Play Store and type “Wi-Fi File Transfer” in the search box. Click install and wait till the process is finished.
Steps to transfer files to phone over Wi-Fi using Wi-Fi File Transfer app:
A web page will open where you can see all the folders and files in your phone’s storage.
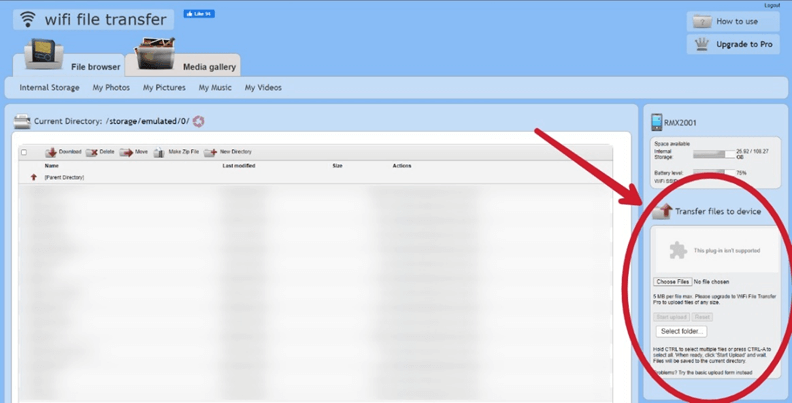
Now, locate the “Transfer Files to Device” section on the right, as shown above.
Method 2: Using Wondershare MobileTrans
Wondershare MobileTrans is an application that can transfer data from PC to phone via USB cable with total privacy.
NOTE: Transferring data over Wi-Fi is not always secure, especially on public Wi-Fi networks. Even on home / private networks, there might be chances of packet sniffers or hackers trying to steal your data since you’re connected to the internet while transferring data. Wi-Fi share can also lead to data loss or corruption during transfer.
The steps to transfer files to your phone from your PC are as follows:

Once the transfer is complete, you’ll receive a notification from the app, and you can remove your phone from the PC and access the transferred stuff.
Why Wondershare MobileTrans?
Wi-Fi transfer is best in the case of PC to PC file transfer. For PC to phone file transfer, Wi-Fi sharing can be used if there are no USB cables available or if the file is tiny. But it is always recommended to perform data transfers via wires to avoid any data loss or theft. Also, a wire transfer is the fastest method to transfer large files, and it provides more security than Wi-Fi.
Part 3: Frequently Asked Questions
1. What’s the difference between Wi-Fi and Wi-Fi Direct?
Wi-Fi is accessing internet connection wirelessly with the help of a Wireless Access Point, usually created by a Wi-Fi router. On the other hand, Wi-Fi Direct is a system by which two devices can establish a direct connection with each other (similar to Bluetooth but faster) and can communicate or share media directly. You don’t need a router or an internet connection to use Wi-Fi Direct.
2. Can I transfer files using Wi-Fi Direct?
Wi-Fi Direct can be used to share or transfer files between two devices directly without requiring a wireless network or the internet. It works like Bluetooth, but it provides a transfer speed similar to that of Wi-Fi.
3. Can I Transfer files between Android phones with Wi-Fi?
Yes, there are many third-party apps available that can be used to transfer files between Android phones over Wi-Fi. Small-sized files can be shared via Bluetooth, whereas large files can be transferred via a Wi-Fi file transfer application.
4. What to do if transferring files via Wi-Fi is slow?
If transferring via Wi-Fi is slow, a wired connection can be used because it is always faster and more stable than a Wi-Fi connection. In that case, MobileTrans is your best choice.