- Wifi access point esp32
- Advanced configuration
- Application examples
- Use the STATION and AP mode at the same time
- MicroPython: ESP32/ESP8266 Access Point (AP)
- Prerequisites
- ESP32/ESP8266 Station and Access Point
- ESP32/ESP8266 MicroPython Access Point (AP) for Web Server
- Customize the SSID and Password
- Setting an Access Point with MicroPython
- Socket Server
- Connecting to the Access Point (AP)
- Wrapping Up
Wifi access point esp32
Don’t forget to import the WiFi.h module with #include .
If the chosen password is less than 8 characters, the compiler will return an error. The password must be at least 8 to 63 characters long.
Terminal output
[*] Creating AP [+] AP Created with IP Gateway 192.168.4.1
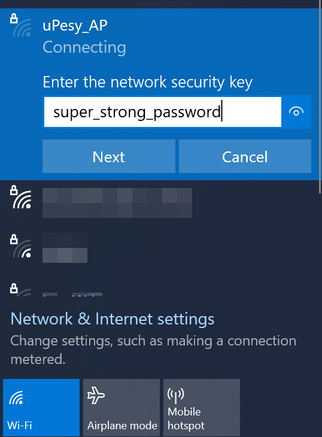
You can then connect to the Wi-Fi network by entering the password. In this example, it’s a computer on Windows 10 that will connect to ESP32.
You can also create an open Wi-Fi network by setting NULL for the password :
#include const char* ssid = "uPesy_AP"; const char* password = NULL; void setup() Serial.begin(115200); Serial.println("\n[*] Creating AP"); WiFi.mode(WIFI_AP); WiFi.softAP(ssid, password); Serial.print("[+] AP Created with IP Gateway "); Serial.println(WiFi.softAPIP()); > void loop()<>
The access point appears as an open network :

The IP displayed in the terminal corresponds to the router’s local IP on the new WiFi network.
The access point can also be further customized by specifying the WiFi channel used (more information on the WiFi channels is available on Wikipedia ), the visibility or not of the network, as well as the maximum number of devices that can be connected at the same time.
#include const char* ssid = "uPesy_AP"; // SSID Name const char* password = "super_strong_password"; // SSID Password - Set to NULL to have an open AP const int channel = 10; // WiFi Channel number between 1 and 13 const bool hide_SSID = false; // To disable SSID broadcast -> SSID will not appear in a basic WiFi scan const int max_connection = 2; // Maximum simultaneous connected clients on the AP void setup() Serial.begin(115200); Serial.println("\n[*] Creating AP"); WiFi.mode(WIFI_AP); WiFi.softAP(ssid, password, channel, hide_SSID, max_connection); Serial.print("[+] AP Created with IP Gateway "); Serial.println(WiFi.softAPIP()); > void loop()<>
Once connected to the WiFi network from a device, one can then ping the router, in this case, the ESP32 in the Windows command prompt with:

We have our local WiFi router on an ESP32 on which we can add several devices (computer, phone, ESP32, Raspberry Pi …)
Advanced configuration
The IP address 192.168.4.1 of the access point can be modified, as well as the gateway’s IP address and the subnet mask. You must use the WiFi.softAPConfig() function before creating the access point via WiFi.softAP() . The function WiFi.softAPConfig(local_ip, gateway, subnet) accepts the following parameters
- IPAddress local_ip is the local IP address of our access point in the newly created network
- IPAddress gateway is the IP address of the gateway. In our case, it will be the same as the local IP.
- subnet the subnet mask of the network created by the ESP32, usually 255.255.255.0
For example, to have a Wi-Fi access point with a local IP 192.168.0.1 with a subnet mask of 255.255.255.0 , the code would be :
#include const char* ssid = "uPesy_AP"; const char* password = "super_strong_password"; IPAddress local_ip(192,168,0,1); IPAddress gateway(192,168,0,1); IPAddress subnet(255,255,255,0); void setup() Serial.begin(115200); Serial.println("\n[*] Creating AP"); WiFi.mode(WIFI_AP); WiFi.softAPConfig(local_ip, gateway, subnet); WiFi.softAP(ssid, password); Serial.print("[+] AP Created with IP Gateway "); Serial.println(WiFi.softAPIP()); > void loop()<>
Terminal output
[*] Creating AP [+] AP Created with IP Gateway 192.168.0.1
Application examples
An example displays a list of devices connected to the ESP32 with their MAC and local IP addresses. It is a simplified version of the one you can have on a typical WiFi router.
#include #include "esp_wifi.h" const char* ssid = "uPesy_AP"; // SSID Name const char* password = "super_strong_password"; // SSID Password - Set to NULL to have an open AP const int channel = 10; // WiFi Channel number between 1 and 13 const bool hide_SSID = false; // To disable SSID broadcast -> SSID will not appear in a basic WiFi scan const int max_connection = 2; // Maximum simultaneous connected clients on the AP void display_connected_devices() wifi_sta_list_t wifi_sta_list; tcpip_adapter_sta_list_t adapter_sta_list; esp_wifi_ap_get_sta_list(&wifi_sta_list); tcpip_adapter_get_sta_list(&wifi_sta_list, &adapter_sta_list); if (adapter_sta_list.num > 0) Serial.println("-----------"); for (uint8_t i = 0; i adapter_sta_list.num; i++) tcpip_adapter_sta_info_t station = adapter_sta_list.sta[i]; Serial.print((String)"[+] Device " + i + " | MAC : "); Serial.printf("%02X:%02X:%02X:%02X:%02X:%02X", station.mac[0], station.mac[1], station.mac[2], station.mac[3], station.mac[4], station.mac[5]); Serial.println((String) " | IP " + ip4addr_ntoa(&(station.ip))); > > void setup() Serial.begin(115200); Serial.println("\n[*] Creating AP"); WiFi.mode(WIFI_AP); WiFi.softAP(ssid, password, channel, hide_SSID, max_connection); Serial.print("[+] AP Created with IP Gateway "); Serial.println(WiFi.softAPIP()); > void loop() display_connected_devices(); delay(5000); >
Terminal output
[+] Device 0 | MAC : 44:E2:42:08:D7:11 | IP 192.168.4.2 [+] Device 1 | MAC : 00:0A:F7:42:42:42 | IP 192.168.4.3 ----------- [+] Device 0 | MAC : 44:E2:42:08:D7:11 | IP 192.168.4.2 [+] Device 1 | MAC : 00:0A:F7:42:42:42 | IP 192.168.4.3
Alternatively, some devices could be prevented from connecting by filtering MAC addresses. For example, only allow the ESP32 to connect to it. Indeed, the esp_wifi_deauth_sta(int device_id) function can be used by specifying the device number you want to remove.
The solution of the first person who will send me an example of a code that allows filtering the MAC addresses on the WIFI router created by the ESP32 will be published here!
Use the STATION and AP mode at the same time
It is possible to have the ESP32 working with the STATION and AP modes at the same time. That is to say that the ESP32 is connected to a classic WiFi router (STATION mode) with also a WiFi access point activated (AP mode). This mode is called WIFI_AP_STA .
There is a separate network interface for each mode. Since the interfaces are independent, they each have a different IP address.

One of the possible applications is to connect to the Internet the local WiFi network created by the ESP32 in Soft AP mode.

The Arduino code mixes both the management of the STATION mode and the AP mode. The code is relatively simple when you already use the two modes separately:
- We use the WiFi mode WIFI_AP_STA
- We create our local WiFi access point (Soft AP)
- Then we connect to the classic WiFi router
Here is an example that allows you to have the two modes at the same time:
#include const char* wifi_network_ssid = "Lounge"; const char* wifi_network_password = "cupcakes"; const char *soft_ap_ssid = "uPesy_AP"; const char *soft_ap_password = NULL; void setup() Serial.begin(115200); WiFi.mode(WIFI_AP_STA); Serial.println("\n[*] Creating ESP32 AP"); WiFi.softAP(soft_ap_ssid, soft_ap_password); Serial.print("[+] AP Created with IP Gateway "); Serial.println(WiFi.softAPIP()); WiFi.begin(wifi_network_ssid, wifi_network_password); Serial.println("\n[*] Connecting to WiFi Network"); while(WiFi.status() != WL_CONNECTED) Serial.print("."); delay(100); > Serial.print("\n[+] Connected to the WiFi network with local IP : "); Serial.println(WiFi.localIP()); > void loop() <>
Terminal output
[*] Creating ESP32 AP [+] AP Created with IP Gateway 192.168.4.1 [*] Connecting to WiFi Network . [+] Connected to the WiFi network with local IP: 192.168.85.37
Don’t mix up the credentials:
- wifi_network refers to the credentials of the classic WiFi router (AT&T, Verizon, Xfinity)
- soft_ap is the credential of the access point that we will create with the ESP32. You will have to enter this password on the devices that want to connect to the ESP32.
MicroPython: ESP32/ESP8266 Access Point (AP)
Learn how to set your ESP32 or ESP8266 boards as an Access Point (AP) using MicroPython firmware. This allows you to connect directly to your ESP boards via Wi-Fi without a wireless router.

Use the following snippet to set your ESP32 or ESP8266 as an access point using MicroPython:
ap = network.WLAN(network.AP_IF) ap.active(True) ap.config(essid=ssid, password=password)Prerequisites
To follow this tutorial you need MicroPython firmware installed in your ESP32 or ESP8266 boards. You also need an IDE to write and upload the code to your board. We suggest using Thonny IDE or uPyCraft IDE:
ESP32/ESP8266 Station and Access Point
In most of our web server projects with MicroPython, we connect the ESP32 or the ESP8266 to a wireless router. In this configuration, we can access the ESP board through the local network.
In this scenario, the router acts as an access point and the ESP boards are set as a station. So, you need to be connected to your router (local network) to control the ESP32 or ESP8266.

In some cases, this might not be the best configuration (when you don’t have a router nearby). But if you set the ESP boards as an access point (hotspot), you can be connected to them using any device with Wi-Fi capabilities without the need to connect to your router.
Basically, when you set the ESP32 or ESP8266 as an access point you create its own Wi‑Fi network and nearby Wi-Fi devices (stations) can connect to it (like your smartphone or your computer).

In this tutorial, we’ll show you how to set the ESP32 and ESP8266 as an access point in your web server projects. This way, you don’t need to be connected to a router to control them.
Because the ESP doesn’t connect further to a wired network (like your router), it is called soft-AP (soft Access Point).
This means that if you try to load libraries or use firmware from the internet, it will not work. It also doesn’t work if you try to make HTTP requests to services on the internet like publishing sensor readings to the cloud.
ESP32/ESP8266 MicroPython Access Point (AP) for Web Server
For demonstration purposes, we’ll create a simple “Hello, World! web server. To learn more about how to create a web server with the ESP32 or ESP8266, you can read the following tutorial:
Copy the following code to your boot.py file and upload it to your board.
# Complete project details at https://RandomNerdTutorials.com try: import usocket as socket except: import socket import network import esp esp.osdebug(None) import gc gc.collect() ssid = 'MicroPython-AP' password = '123456789' ap = network.WLAN(network.AP_IF) ap.active(True) ap.config(essid=ssid, password=password) while ap.active() == False: pass print('Connection successful') print(ap.ifconfig()) def web_page(): html = """ Hello, World!
""" return html s = socket.socket(socket.AF_INET, socket.SOCK_STREAM) s.bind(('', 80)) s.listen(5) while True: conn, addr = s.accept() print('Got a connection from %s' % str(addr)) request = conn.recv(1024) print('Content = %s' % str(request)) response = web_page() conn.send(response) conn.close() Customize the SSID and Password
You need to define a SSID name and a password to your access point. In this example, we’re setting the SSID name to MicroPython-AP , but you can modify the name to whatever you want. The password is 123456789 , but you can also modify it.
ssid = 'MicroPython-AP' password = '123456789'Setting an Access Point with MicroPython
Then, create an access point using the following line of code:
ap = network.WLAN(network.AP_IF)Activate the access point:
Configure the access point with the ssid and password you’ve defined earlier:
ap.config(essid=ssid, password=password)The following lines print the access point IP address
print('Connection successful') print(ap.ifconfig())By default, the IP address is 192.168.4.1
Now, the access point is created.
Socket Server
For demonstrations purposes, we’re creating a socket server that displays an “Hello, Wolrd!” message.
def web_page(): html = """Hello, World!
""" return html s = socket.socket(socket.AF_INET, socket.SOCK_STREAM) s.bind(('', 80)) s.listen(5) while True: conn, addr = s.accept() print('Got a connection from %s' % str(addr)) request = conn.recv(1024) print('Content = %s' % str(request)) response = web_page() conn.send(response) conn.close()Connecting to the Access Point (AP)
After uploading the code as boot.py to your ESP32 or ESP8266 board, in your smartphone open your Wi-Fi settings and tap the MicroPython-AP network:

Enter the password you’ve defined earlier.

Open your web browser and type the IP address http://192.168.4.1. The web server page should load:

You should have a similar message showing up on the Shell:

Wrapping Up
In this tutorial you’ve learned how to set your EPS32 or ESP8266 boards as soft access point (soft-AP) using MicroPython. If you want to learn how to do the same using Arduino IDE, read the following guides:
Learn more about MicroPython with our resources: