- 3 способа включить Wi-Fi на своем ноутбуке: включение и решение проблем
- При помощи клавиатуры
- Windows 10
- Windows 7 и 8
- Про Wi-Fi адаптер
- How to enable and disable Wi-Fi
- How to enable Wi-Fi on a laptop
- Enable with laptop Wi-Fi button
- Enable with laptop Fn and function key
- Enable Wi-Fi in Windows
- Enable Wi-Fi in Windows Device Manager
- Enable Wi-Fi in BIOS setup
- How to disable Wi-Fi on a laptop
- Disable with laptop Wi-Fi button
- Disable with laptop Fn and function key
- Disable in Windows
- Disable in Windows Device Manager
- Disable in BIOS setup
- Wi-Fi on desktop computers
- Wi-Fi on Android smartphones and tablets
- Wi-Fi on Apple iPhone and iPad
- Related information
3 способа включить Wi-Fi на своем ноутбуке: включение и решение проблем
Приветствую тебя читатель! Одно дело подключиться к сети Wi-Fi, но нередко у пользователей возникает проблема включения. И сегодня я как раз и собираюсь рассказать о всех способах, как включить Wi-Fi на ноутбуке. Рассмотрим аппаратное включение, все операционные системы, возможные проблемы. Начинаем!
При помощи клавиатуры
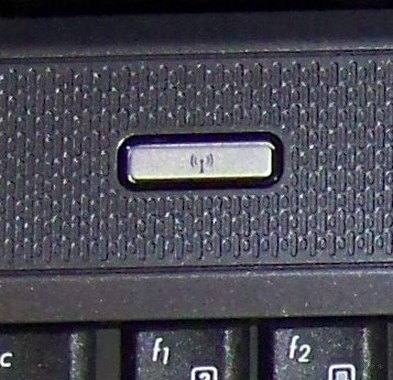
Самый частый способ включения Wi-Fi – с использованием клавиатуры. Некоторые старые модели имели отдельные кнопки для этого дела, некоторые использовали даже переключатели.
Но на современных моделях обычно используется сочетание кнопок – Fn+F#. На месте решетки должна быть нужная цифра, которая меняется в зависимости от производителя ноутбука. Вот пример для ASUS:
Остальные известные сочетания для всех актуальных брендов свел в следующей табличке, чтобы было проще найти:
| Acer | Fn + F3 |
| ASUS | Fn + F2 |
| Dell | Fn + PrtScr |
| HP | Fn + F12 |
| Lenovo | Fn + F5 |
| MSI | Fn + F9 |
| Toshiba | Fn + F12 |
| Samsung | Fn + F9 |
В качестве замечания отмечу, что нередко на это же сочетание клавиш вешается еще и функция включения Bluetooth, и если с первого раза все не включилось – попробуйте нажать еще несколько раз до положительного результата. Но если и здесь у вас возникла какая-то проблема – у нас есть комментарии, можно задать свой вопрос туда. Или посмотрите видео по теме, может так будет понятнее:

Windows 10
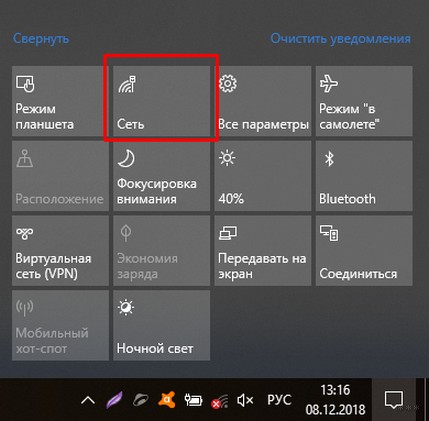
Далее рассмотрим программные средства включения. И начнем с последней операционной системы Windows 10. Здесь появился новый метод по сравнению с предыдущими системами, так что все стало еще проще. Делаем все по шагам:
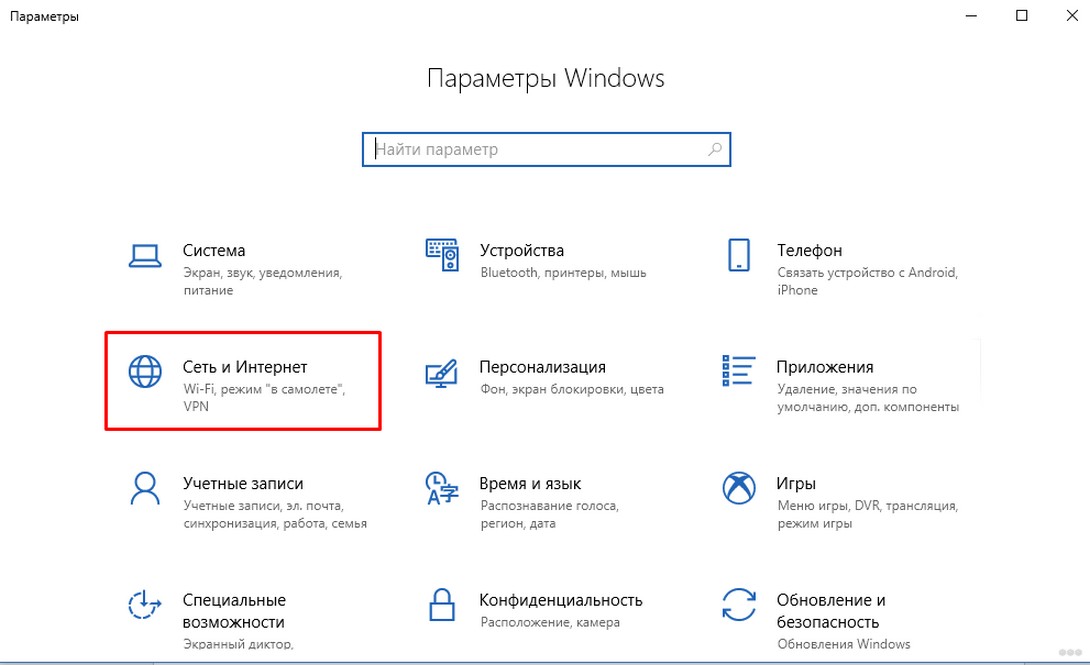
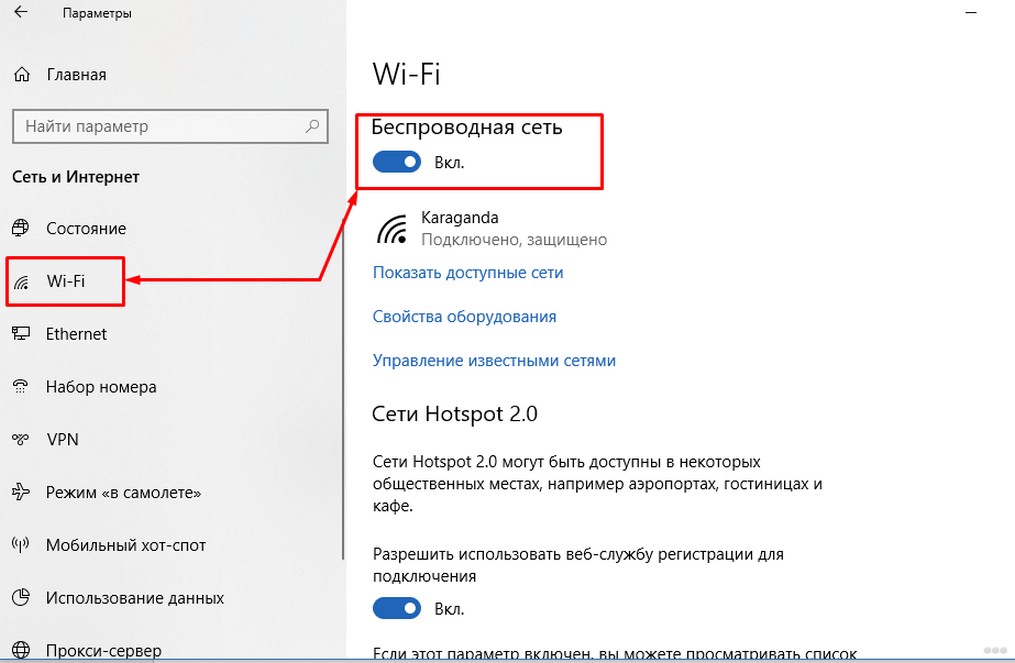
Все должно заработать! Но если вдруг чего-то нет (Майкрософт периодически изменяет свои интерфейсы), есть альтернативный вариант через Параметры (щелкаете по кнопке Пуск, выбираете Параметры на шестеренке). Инструкция:
И снова все должно включиться)
Windows 7 и 8
На данных операционных системах все включалось через включение адаптера, который иногда «отлетал». Способ универсальный, подходит и для «семерки», и для «восьмерки», и даже для «десятки». Главная задача – перейти в Центр управления сетями и общим доступом (на десятке теперь называется Параметры сети и интернет).
- Вариант 1. Правой кнопкой мыши щелкаем по значку подключения в трее (где обычно расположен значок Wi-Fi) и выбираем Центр управления сетями и общим доступом.
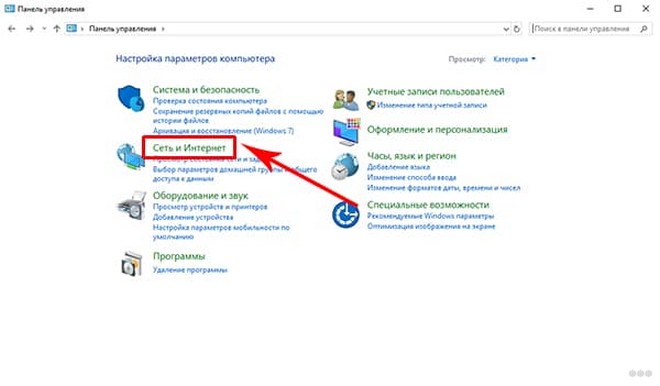
- Вариант 2. Переходим в Панель управления, Сеть и интернет, а далее уже наш Центр.
По трею вы и сами щелкните при желании, а Панель управления выглядит примерно вот так:
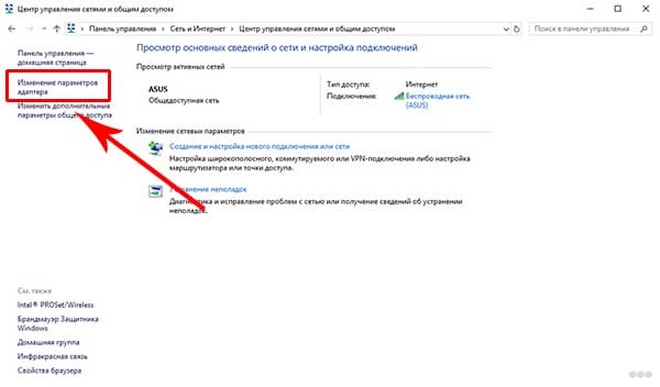
Слева выбираем «Изменение параметров адаптера»:
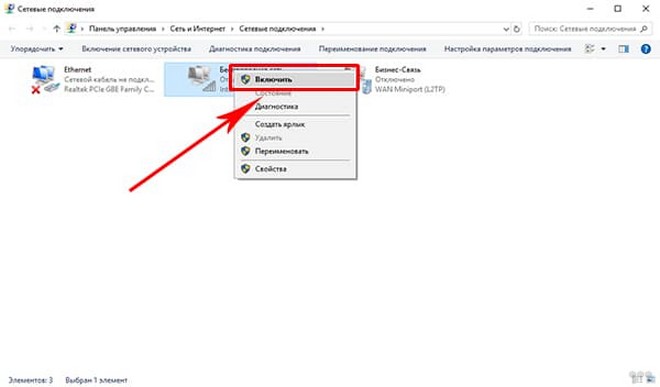
На следующем шаге должны открыться все доступные сетевые адаптеры в системе. Находим свой, смотрим, чтобы наш беспроводной адаптер был включен. А если он выключен, то щелкаем по нему правой кнопкой и выбираем «Включить»:
И снова после этого можно смело переходить в выбор сетей и подключаться к нужной.
Про Wi-Fi адаптер
В качестве послесловия хотелось бы сказать, что все современные ноутбуки и нетбуки снабжаются полноценным Wi-Fi модулем. И обычно все работает сразу и из коробки – нужно только иногда включить его. Но если вдруг что-то не включается, сразу проверьте, есть ли у вас вообще адаптер, видит ли его система, нет ли проблем с драйверами.
Делается это через «Диспетчер устройств»:
Смотрите: это мой Wi-Fi адаптер. Ключевое слово здесь – Wireless. У вас должно быть что-то вроде этого там же в Сетевых адаптерах. Если у вас этого нет, или еще хуже, напротив стоит какой-нибудь восклицательный знак – желтый или красный, значит возможно имеется проблема с драйверами.
Драйвера подбираются индивидуально под свою модель ноутбука. Заходите на сайт производителя, смотрите модель, качаете драйвер, устанавливаете. Личное замечание, нередко одна и та же модель может компоноваться производителем разными моделями адаптеров. Конкретная информация о текущей модели адаптера обычно расположена на наклейке на дне ноутбука.
После любого телодвижения лучше перезагружать ноут, чтобы все подгружалось как надо. Вообще перезагрузка для компьютеров – универсальный метод ремонта любой сложности. Очень часто помогает даже в самых странных случаях.
На этом заканчиваю. Вроде все возможные способы подключения обозначены. Если остаются какие-то вопросы, до сих пор не можете включить, задаем их в комментарии ниже. Свои пожелания и мысли можете написать туда же. Всем спасибо и хорошего дня! Ваш автор WiFi Гида – Ботан.
How to enable and disable Wi-Fi
Laptops today all have Wi-Fi (wireless Internet) built-in, allowing people to connect to the Internet from almost anywhere. For security, compatibility, or other reasons, you may want to enable and disable the Wi-Fi on your laptop. To do so, make a selection from the list below and follow the steps.
After enabling Wi-Fi on your computer, you need to connect to a Wi-Fi network to access the Internet. See: How to connect to a Wi-Fi network.
If your Wi-Fi is not working or the suggested buttons do not work, for troubleshooting steps, see: Why is my Wi-Fi not working?
How to enable Wi-Fi on a laptop
Wi-Fi can be enabled by performing any of the steps below.
Enable with laptop Wi-Fi button
Some laptops have an On/Off button or switch for the Wi-Fi connection, as shown in the picture. It is usually found on the laptop’s front edge or above the keyboard. Find the button or switch, and make sure it’s enabled. When enabled, the button should be illuminated as blue, or the switch should be in the On position.
Enable with laptop Fn and function key
Some laptops enable and disable Wi-Fi using the Fn key and one of the function keys (F1-F12). As seen in the picture, some laptops use the Fn and F12 keys to enable and disable Wi-Fi. The F12 key also has an orange LED when disabled and blue when enabled, shown in the picture.
Enable Wi-Fi in Windows
Look in the Windows notification area to find the Wi-Fi or wireless Internet icon. Right-click with your mouse on the icon and select the option for enabling (or turning off) the Wi-Fi device in the pop-up menu. If no Enable option is available in the pop-up menu, there may be an option called Open Network and Sharing Center. If so, select this option and then select Change adapter settings. Once the wireless network card icon is seen, right-click it and select Enable.
In Windows 8, when you right-click the Wi-Fi icon, check if Airplane Mode is turned on. Turn it off to enable the wireless network card if it’s turned on.
The Wi-Fi adapter can also be enabled in the Control Panel. Click the Network and Sharing Center option, then click the Change adapter settings link in the left navigation pane. Right-click the Wi-Fi adapter and select Enable.
Enable Wi-Fi in Windows Device Manager
Access the Device Manager by right-clicking with your mouse on the My Computer icon on your desktop or in the Windows Start menu. Select Properties from the pop-up menu, click the Hardware tab in the window that opens up and click the Device Manager button.
In Windows Vista, and later, there is no Hardware tab. Click the Device Manager link in the System window.
Find the Wi-Fi adapter in the list of hardware devices. Right-click the adapter name and select Enable from the pop-up menu. If no Wi-Fi adapter is found in Device Manager, the Wi-Fi adapter drivers are not installed.
Enable Wi-Fi in BIOS setup
Finally, there is also the option of enabling the Wi-Fi device in the computer’s BIOS setup. However, it is very unlikely the Wi-Fi device would be disabled in BIOS.
How to disable Wi-Fi on a laptop
Wi-Fi can be disabled by performing any of the steps below.
Disable with laptop Wi-Fi button
Some laptops have an On/Off button or switch for the Wi-Fi device, like the button shown in the picture. It is usually found on the front of the laptop or above the keyboard. Find the button or switch and make sure it is disabled. When disabled, the button should not be illuminated or illuminated as orange or red, or the switch should be in the Off position.
Disable with laptop Fn and function key
Some laptops enable and disable Wi-Fi using the Fn key and one of the function keys (F1-F12). Some laptops use Fn and F12 keys to enable and disable Wi-Fi and show an orange LED when disabled and blue when enabled.
Disable in Windows
Right-click the Wi-Fi icon in the Windows notification area and select Disable (or Turn off) from the pop-up menu. If no Disable option is available in the pop-up menu, there may be an option called Open Network and Sharing Center. If so, select this option and then select Change adapter settings. Once the wireless network card icon is seen, right-click it and select Disable.
In Windows 8, when you right-click the Wi-Fi icon, you can turn off Wi-Fi by turning on Airplane Mode.
The Wi-Fi adapter may also be disabled from the Control Panel. Click the Network and Sharing Center option, then click Change adapter settings in the left navigation pane. Right-click the Wi-Fi adapter and select Disable.
Disable in Windows Device Manager
Access the Device Manager by right-clicking with your mouse on the My Computer icon on your desktop or in the Windows Start menu. Select Properties from the pop-up menu, click the Hardware tab in the window that opens up and click the Device Manager button.
In Windows Vista, and later, there is no Hardware tab. Click the Device Manager link in the System window.
Find the Wi-Fi adapter in the list of hardware devices. Right-click the adapter name and select Disable from the pop-up menu. If no Wi-Fi adapter is found in Device Manager, the Wi-Fi adapter drivers are not installed.
Disable in BIOS setup
As is the case with enabling the Wi-Fi device, it can also be disabled in the computer’s BIOS setup.
Wi-Fi on desktop computers
Wi-Fi adapters are also available for desktop computers. The Wi-Fi button mentioned above is not available with most desktop computers. However, there is the possibility that the Wi-Fi adapter itself (e.g., an external version, like a USB Wi-Fi adapter) has an On/Off button or switch. If there is no button or switch, disconnecting the adapter from the computer disables the device.
If the Wi-Fi adapter is not an external device, it is either an internal PCI expansion card or built onto the motherboard. When you install the software for the Wi-Fi adapter, an icon shows in the Windows notification area, giving you access to enable and disable the device. Alternatively, you can enable and disable the Wi-Fi adapter through the Device Manager or the BIOS.
Wi-Fi on Android smartphones and tablets
There are many variants of Android-based smartphones and tablets. These steps are for a device with the stock Android operating system. You may have to adjust the instructions based on the brand of phone or tablet you have.
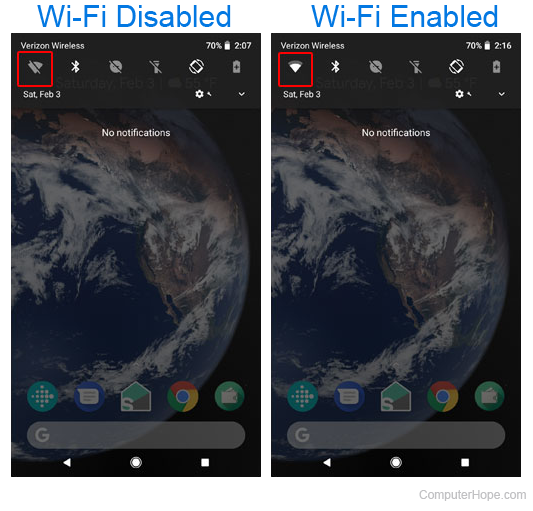
- On the home screen, place your finger near the top of the screen and swipe downward.
- Once a menu similar to the one below is seen, look for the Wi-Fi symbol.
Wi-Fi on Apple iPhone and iPad
Follow the steps below to enable or disable Wi-Fi on an iPhone or iPad.
- Open the Settings utility on the iPhone or iPad.
- On the Settings screen, tap the Wi-Fi option.
- On the Wi-Fi screen, for the Wi-Fi entry, tap the toggle switch. Wi-Fi is enabled when the toggle switch is green and disabled when the toggle switch is white, as shown below.


