- ESP32 Урок 19. Wi-Fi. Режим STA (Станция)
- Wi-Fi STA/AP Mode
- System Configuration
- Upgrade System
- Configuration Instructions
- Add Wlan1 Interface
- Setup Wlan1 as a Hotspot
- Go Online!
- Русские Блоги
- Подробное объяснение режима работы AP и STA беспроводного модуля Wifi
- Подробное объяснение режима работы AP и STA беспроводного модуля Wifi
- 1. Основные понятия AP и STA
- 2. Описание режимов работы AP и STA
- AP-STA mode
- What is AP-STA mode?
- Installation
- When to reboot?
- Changing hostapd settings
ESP32 Урок 19. Wi-Fi. Режим STA (Станция)
Ну вот, наконец-то, дошли мы до той темы, которую, я думаю, многие ждали — это приём и передача данных при помощи возможностей ESP32 по беспроводной сети Wi-Fi.
С данной темой мы уже работали с применением контроллера ESP8266, причём используя различные протоколы передачи данных модели OSI, поэтому нам будет намного легче.
Мы также подробно не будем изучать протокол Wi-Fi, так как с ним работает наш контроллер аппаратно. Также помогает в этом комплект IDF. Режимы работы WiFi контроллера — это станция (или кратко STA) и точка доступа (AP). Также мы можем одновременно использовать четыре виртуальных интерфейса WiFi.
Самым простым из этих режимов является первый — режим станции.
Режим станции (STA) — это такой режим, в котором контроллер не создает собственную сеть, а подключается к любой существующей сети Wi-Fi, например, к существующей локальной сети или к другому устройству, работающему в режиме точки доступа (AP).
На данном уроке мы настроим режим станции и попробуем подключиться к существующей точке доступа, например к роутеру, который раздаёт Wi-Fi по дому. Роутер от просто точки доступа отличается тем, что трафик, идущий от станций, подключенных к нему, он транслирует во внешнюю сеть и наоборот.
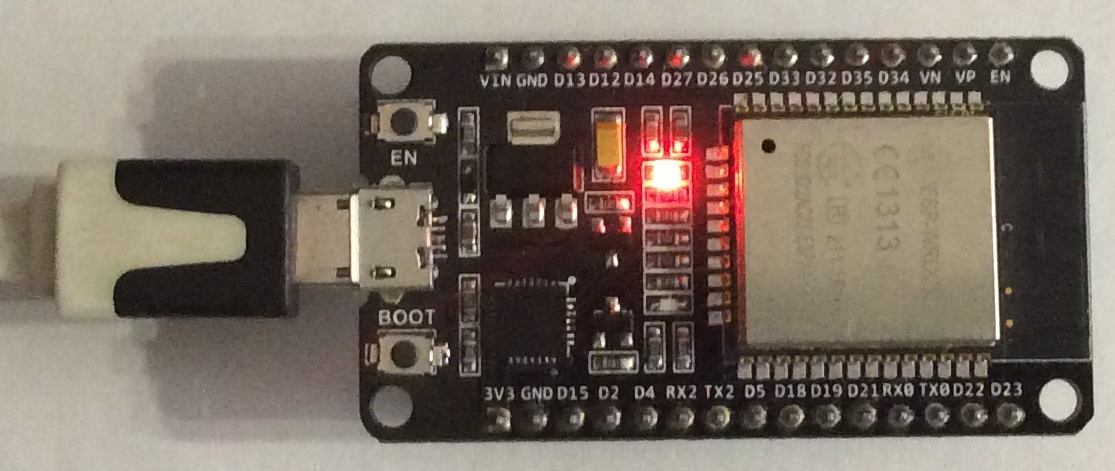
Схема у нас будет простейшая — отладочная плата, подключенная к USB компьютера
А проект мы на этот раз создадим новый. Как создавать новый проект, мы знаем из урока 3.
Но тем не менее я этот процесс покажу.
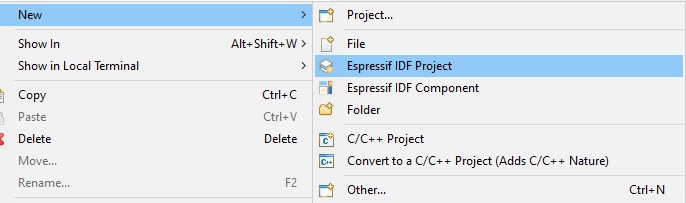
Где-нибудь в районе дерева проекта вызовем контекстное меню (правый щелчок мыши) и выберем пункт New->Espressif IDF Project
Придумаем имя и жмём Finish

Как обычно, мы получим готовый проект с неким кодом в файле main.c.
Также если мы откроем файл Kconfig.projbuild, то мы также там увидим два пункта для конфигурирования имени точки доступа, к которой мы подключаемся, а также для пароля (или ключа) подключения к точке доступа. Выше пункта ESP_WIFI_SSID добавим пункт по настройке светодиода, так как он нам пригодится для сигнализации подключения к точке доступа
Wi-Fi STA/AP Mode
This document mainly introduces the STA+AP mode of Wi-Fi. You’ll learn how to open a hotspot while connected to the Internet.
System Configuration
Upgrade System
Please make sure you use the latest image, if not please follow Upgrade The System to upgrade your system.
Configuration Instructions
Configure wlan0 to STA mode, and wlan1 to AP mode.
Add Wlan1 Interface
khadas@Khadas:~$ sudo iw phy phy0 interface add wlan1 type managed Use ifconfig to check if wlan1 has been added successfully:
khadas@Khadas:~$ ifconfig wlan0: flags=4099 mtu 1500 ether 18:93:7f:a9:9d:0e txqueuelen 1000 (Ethernet) RX packets 0 bytes 0 (0.0 B) RX errors 0 dropped 0 overruns 0 frame 0 TX packets 2 bytes 180 (180.0 B) TX errors 0 dropped 0 overruns 0 carrier 0 collisions 0 wlan1: flags=4099 mtu 1500 ether 1a:93:7f:a9:9d:0e txqueuelen 1000 (Ethernet) RX packets 0 bytes 0 (0.0 B) RX errors 0 dropped 0 overruns 0 frame 0 TX packets 0 bytes 0 (0.0 B) TX errors 0 dropped 0 overruns 0 carrier 0 collisions 0 Setup Wlan1 as a Hotspot
Setup wlan1 as a hotspot, and allow automatic connections.
2.4 GHz Frequency
We shall name our hotspot khadas_ap , with password 12345678 .
sudo nmcli con add type wifi ifname wlan1 con-name Hostspot autoconnect yes ssid khadas_ap sudo nmcli con modify Hostspot 802-11-wireless.mode ap 802-11-wireless.band bg ipv4.method shared sudo nmcli con modify Hostspot wifi-sec.key-mgmt wpa-psk sudo nmcli con modify Hostspot wifi-sec.psk "12345678" sudo nmcli con modify Hostspot ipv4.addresses 192.168.2.20/24 sudo nmcli con modify Hostspot ipv4.gateway 192.168.2.1 sudo nmcli con up Hostspot
5 GHz Frequency
To setup a 5GHz network, you’ll need to use the channel argument.
We shall name our hotspot khadas_ap , with password 12345678 .
sudo nmcli con add type wifi ifname wlan1 con-name Hostspot autoconnect yes ssid khadas_ap_5G sudo nmcli c modify Hostspot 802-11-wireless.mode ap 802-11-wireless.band a 802-11-wireless.channel 149 802-11-wireless.powersave 2 ipv4.method shared sudo nmcli con modify Hostspot wifi-sec.key-mgmt wpa-psk sudo nmcli con modify Hostspot wifi-sec.psk "12345678" sudo nmcli con modify Hostspot ipv4.addresses 192.168.2.20/24 sudo nmcli con modify Hostspot ipv4.gateway 192.168.2.1 sudo nmcli con up Hostspot
Use ifconfig to check if everything has been setup correctly:
khadas@Khadas:~$ ifconfig wlan0: flags=4099 mtu 1500 ether 18:93:7f:a9:9d:0e txqueuelen 1000 (Ethernet) RX packets 0 bytes 0 (0.0 B) RX errors 0 dropped 0 overruns 0 frame 0 TX packets 2 bytes 180 (180.0 B) TX errors 0 dropped 0 overruns 0 carrier 0 collisions 0 wlan1: flags=4163 mtu 1500 inet 192.168.2.20 netmask 255.255.255.0 broadcast 192.168.2.255 inet6 fe80::2069:83c5:2e4c:2614 prefixlen 64 scopeid 0x20 ether 1a:93:7f:a9:9d:0e txqueuelen 1000 (Ethernet) RX packets 0 bytes 0 (0.0 B) RX errors 0 dropped 0 overruns 0 frame 0 TX packets 18 bytes 1312 (1.3 KB) TX errors 0 dropped 0 overruns 0 carrier 0 collisions 0 Go Online!
Verify that wlan0 has a working internet connection:
You need to connect Wi-Fi first.
khadas@Khadas:~$ sudo ping -I wlan0 www.khadas.com PING td-balancer-dc11-60-161.wixdns.net (185.230.60.161) from 192.168.124.80 wlan0: 56(84) bytes of data. 64 bytes from 185.230.60.161 (185.230.60.161): icmp_seq=1 ttl=240 time=293 ms 64 bytes from 185.230.60.161 (185.230.60.161): icmp_seq=2 ttl=240 time=316 ms 64 bytes from 185.230.60.161 (185.230.60.161): icmp_seq=3 ttl=240 time=238 ms . Verify that wlan1 can be used as a hotpot:
Русские Блоги
Подробное объяснение режима работы AP и STA беспроводного модуля Wifi
Подробное объяснение режима работы AP и STA беспроводного модуля Wifi
Модуль Wi-Fi включает в себя два режима работы AP и STA. Благодаря поддержке этих двух режимов продукт беспроводной передачи изображения может реализовать функцию отправки одного и получения большего количества. Давайте начнем с основных концепций AP и STA.
1. Основные понятия AP и STA
AP: точка беспроводного доступа является создателем беспроводной сети и центральным узлом сети. Беспроводной маршрутизатор, используемый в обычных домах или офисах, является точкой доступа.
STA: каждый терминал, подключенный к беспроводной сети (например, ноутбуки, КПК и другое пользовательское оборудование, подключенное к сети), можно назвать сайтом.
2. Описание режимов работы AP и STA
1. Работа в режиме AP
Работая в режиме AP, мобильные телефоны, PAD, компьютеры и другие устройства могут быть напрямую подключены к модулю, который может легко управлять пользовательским оборудованием (Рисунок 2-1).

Рисунок 2-1 Работа в режиме AP
2. Работа в режиме STA
Это основной сетевой метод, состоящий из AP и множества STA, как показано на следующем рисунке. Характеристика состоит в том, что AP находится в центральном положении, и взаимная связь между STA завершается посредством пересылки AP. В этом режиме модуль WIFI работает в режиме STA (CLIENT). При правильных настройках данные COM и данные сети WIFI конвертируются друг в друга. (Рисунок 2-2)

Рисунок 2-2 Работа в режиме STA
AP-STA mode
This walkthrough describes an installation of RaspAP on the Raspberry Pi Zero W. A managed mode AP, variously known as WiFi client AP mode, a micro-AP or simply AP-STA, usually works with the Quick Installer if the steps below are followed carefully. This feature was added to RaspAP specifically to support Internet of Things (IoT) and embedded applications for the Pi Zero W, however it is equally useful for a broad range of projects.
This mode is completely unsupported and should be used for educational purposes only. If you need a reliable solution with an access point (AP) and wireless client (STA) on the same device, buy a second Wi-Fi adapter and follow this FAQ instead.
Before proceeding with the installation, it’s important to have a basic understanding of how AP-STA works.

What is AP-STA mode?
Many wireless devices support simultaneous operation as both an access point (AP) and as a wireless client/station (STA). This is sometimes called Wi-Fi AP/STA concurrency. In this configuration, it is possible to create a software AP acting as a wireless repeater for an existing network, using a single wireless device. This capability is listed in the following section in the output of iw list :
$ iw list | grep -A 4 'valid interface' valid interface combinations: * # < managed > The second valid interface combination indicates that both a managed and AP configuration is possible. The constraint #channels
If you have a second wireless adapter bound to wlan1 on a Pi Zero W (or other device), refer to this FAQ.
Use cases
There are many scenarios in which AP-STA mode might be useful. These are some of the more popular ones:
- A device that connects to a wireless AP but needs an admin interface to configure the network and/or other services.
- A hub for Internet of Things devices, while also creating a bridge between them and the internet.
- A guest interface to your home wireless network.
Security is an important consideration with IoT and it can be beneficial to keep your devices on a separate network, for safety’s sake. No one wants a random internet user turning your lights on and off.
How does AP-STA work?
In this configuration, we create a virtual network interface (here uap0 ) and add it as the AP to the physical wlan0 device. This virtual interface is used by several of the services needed to operate a software access point. RaspAP manages these configurations in the background for you. Relevant sections are displayed below as examples.
# RaspAP uap0 configuration interface uap0 static ip_address=192.168.50.1/24 nohook wpa_supplicant
# RaspAP wireless client AP mode interface=uap0
# RaspAP uap0 configuration interface=lo,uap0 # Use interfaces lo and uap0 bind-interfaces # Bind to the interfaces domain-needed # Don't forward short names bogus-priv # Never forward addresses in the non-routed address spaces
On AP-STA startup and system reboots, RaspAP's service control script adds the virtual uap0 interface and brings it up, like so:
iw dev wlan0 interface add uap0 type __ap ifconfig uap0 up
After the virtual uap0 interface is added to the wlan0 physical device, we can then start up hostapd . It is important that the virtual interface is brought up first, otherwise it will fail with the message "could not configure driver mode". We also need to be sure that the interface is not managed by systemd-networkd , so this service should be disabled. These steps are handled by the RaspAP daemon.
With a basic understanding of AP-STA mode, we can proceed with the installation.
Installation
- Begin by flashing an SD card with the latest release of Raspberry Pi OS (32- or 64-bit) Lite.
- Prepare the SD card to connect to your WiFi network in headless mode according to this FAQ.
- Enable ssh access by creating an empty file called "ssh" (no extension) in the SD card's root.
- Insert the SD card into the Pi Zero W and connect it to power. Note: the standard power supply for the Raspberry Pi is 5.1V @ 2.5A. Other power sources may result in undervoltage or other issues. Do not use the micro USB connection.
- Connect to your Pi via ssh. ssh pi@raspberrypi.local is typical.
- Follow the project prerequisites exactly. Do not skip any of these steps.
- Invoke the Quick Installer as normal: curl -sL https://install.raspap.com | bash .
- The installer automatically detects a Pi (or other device) without an active eth0 interface. In this case, you will not be prompted to reboot your Pi.
- Open the RaspAP admin interface in your browser, usually http://raspberrypi.local .
- The status widget should indicate that hostapd is inactive. This is expected.
- Confirm that the Wireless Client dashboard widget displays an active connection.
- Choose Hotspot > Advanced and enable the WiFi client AP mode option.
- Optionally, enable Logfile output as this is often helpful for troubleshooting.
- Choose Save settings and Start hotspot.
- Wait a few moments and confirm that your AP has started.

The WiFi client AP mode option will be disabled, or "greyed out", until a wireless client is configured.
When to reboot?
Rebooting before configuring AP-STA mode is likely the main cause of problems for users with the Pi Zero W. The reason is the default configuration is designed for a wired (ethernet) AP.
Once the Pi Zero W is configured in AP-STA mode, RaspAP will store several values in /etc/raspap/hostapd.ini :
LogEnable = 1 WifiAPEnable = 1 BridgedEnable = 0 WifiManaged = wlan0
These are used by RaspAP's systemd control service raspapd to determine that a managed mode AP is enabled for the Pi and restore the connection after subsequent reboots.
Changing hostapd settings
Changes to the hotspot configuration should be applied to the wlan0 physical device, not uap0 (a virtual interface). In other words, if you wish to change hostapd settings, stop the hotspot, disable AP-STA, make your config changes on wlan0 , re-enable AP-STA and finally restart hostapd. An explanation is available here.
