- Change Wi-Fi settings on Mac
- Details button settings
- Advanced button settings
- How to Change Default Wifi on Mac
- Solutions For Changing Default Wifi On Mac
- How To Delete Wi Fi Networks From Mac’s Preferred Network List?
- How To Form A Temporary Wi fi Network On Mac?
- Conclusion
- How to Set the Default Wireless (Wi-Fi) Network in macOS
- Here’s how to join a preferred wireless network:
- How To Set the Default Wireless Network
- How To Delete a Wireless Network
Change Wi-Fi settings on Mac

On your Mac, use Wi-Fi settings to set up and manage your Wi-Fi connection.
To change these settings, choose Apple menu

> System Settings, then click Wi-Fi in the sidebar. (You may need to scroll down.)
The name of the connected network and the connection status indicator.
Click Details to view the IP and router addresses, and change settings for the network. See Details button settings, below.
Available Personal Hotspots.
Connect to a Personal Hotspot: Move the pointer over the Personal Hotspot you want to join, then click Connect.
Available known networks. Known networks are Wi-Fi networks you’ve connected to previously.
Connect to a known network: Move the pointer over the known network you want to join, then click Connect.

Quickly toggle the automatic join setting for a known Wi-Fi network: Move the pointer over the known network, click the More button, then choose Auto-Join.
Copy the password of a known Wi-Fi network: Move the pointer over the known network, click the More button, then choose Copy Password.
Change the settings for a known Wi-Fi network: Move the pointer over the known network, click the More button, then choose Network Settings.
Remove a known Wi-Fi network from the list: Move the pointer over the known network, click the More button, then choose Forget This Network.
Available nearby networks. These are networks you haven’t connected to previously.
Connect to a network in the list: Move the pointer over the network you want to join, click Connect, then enter the password for the network.
Connect to a network that isn’t in the list: Click Other at the bottom of the list, then enter the network name, type of security, and password for the network.
Receive a notification when networks you haven’t joined previously are available.
Automatically join an available Personal Hotspot when no known Wi-Fi networks are found.
Set or view additional Wi-Fi information such as the list of known Wi-Fi networks, requirements for administrator authorization, and the Wi-Fi MAC address. See Advanced button settings, below.
Details button settings
Click Details to change or view the settings below.
Automatically join this network
Automatically connect to the specified network when it’s available.
Turn on low data mode to help reduce your data usage over the Wi-Fi network.
Choose a Wi-Fi 6E mode for the network.
- Automatic: Use the network’s 2.4 GHz, 5 GHz, and 6 GHz wireless bands. This is the default setting.
- Off: Don’t use the network’s 6 GHz band.
This setting is available only when you’re using a computer that supports Wi-Fi 6E, and the Wi-Fi 6E network uses the same network name for all bands.
Limit IP address tracking
Limit IP address tracking by hiding your IP address from known trackers in Mail and Safari.
If you subscribe to iCloud+ and have Private Relay turned on in iCloud settings, it’s turned off when you deselect this option.
View the IP address for the Wi-Fi connection. Only available when connected.
View the router address for the Wi-Fi connection. Only available when connected.
Configure IPv4 and IPv6, or renew the DHCP lease.
Configure DNS servers and search domains.
Configure Windows Internet Name Service (WINS) settings.
Connect to a network protected by 802.1X, view 802.1X profile settings, and enable automatic connection.
Configure internet proxies.
Configure hardware settings and view the hardware MAC address.
Advanced button settings
Click Advanced to change or view the settings below.
Require an administrator password to switch to a different Wi-Fi network.
Require an administrator password to turn Wi-Fi on or off.
Show legacy networks and options
Include the Create Network option in the Wi-Fi status menu. See Create a computer-to-computer network.
View the media access control (MAC) address for the computer’s Wi-Fi interface.
List of Wi-Fi networks you’ve set up.
How to Change Default Wifi on Mac

Are you stuck with a lousy default wifi connection on your Mac device? Do you want to ditch Mac’s default wifi network and work with a better and high-speed internet connection? If you are silently nodding a yes to these questions, you must learn how to change default wifi on Mac.
You would be glad to know that Apple has included user-friendly settings in all of its Mac devices which let users quickly change and adjust wifi settings according to their convenience.
As an added advantage, these procedures are designed so that they can be practiced and applied in little to no time.
Now that we have caught your attention, you must be looking forward to gaining more information about changing default wifi on Mac. Well, luckily you have come just to the right place.
In this post, we have discussed techniques compatible with Mac devices and will eventually help you change the default wifi connection on Mac.
Solutions For Changing Default Wifi On Mac
If you had previously connected a Mac device to a wifi network, then by default, your Mac will try to reconnect with it. You can tweak around with this feature of Mac and set up a system of preferred wifi networks.
You can create a preferred network list and change the default wi fi on Mac with the following steps:
- Open up your Mac device and click on the Apple icon, located on the screen’s upper left-hand corner. A drop-down menu will appear.
- Click on the System Preferences option. A new window will open up, and click on the Network icon that appears in the globe’s shape.
- Click on the ‘wifi’ option. If you are using an older Mac model, then the wi fi option will be labeled AirPort. If you can not find the wifi option, you should select the + button located at the bottom of the screen’s left-hand side. Click on the interface field and select wi fi.
- Once you have selected the wi fi option, you should click the advanced button. You can find the advanced button at the bottom right of the window.
- After clicking the advanced button, you will be directed to another window. You will see a list of wi fi networks that you accessed in the past. The first network on the top of the list is the default wi fi network for your Mac.
- If you do not see the expected network list, click on the ‘+’ sign/add button and add new networks. The ‘show networks’ button will open up a list of available wi fi networks within your device’s range.
- Select any one network connection from the list and click the join button. You will have to enter a password to join a secured wi fi connection.
- Now go through the preferred networks list and choose the network of your choice to be the default network by dragging it to the top of the list.
How To Delete Wi Fi Networks From Mac’s Preferred Network List?
Like you can add different networks to Mac’s preferred wi fi network list, you can also remove them from the list. This feature will help you operate your Mac device only with specified wi fi connections.
Use the following steps to delete wi fi networks from Mac’s preferred wifi network list:
- Open up the main menu on your Mac device. Click on the Apple icon, which is in the upper left corner of the screen.
- Select the System Preferences option and click on the Network settings tab.
- In the next window, you will see various options. You will see the’ Advanced’ button at the bottom of the list of options; you should press this button.
- Choose the ‘Wifi settings’ option from the next window. A list of recently connected wifi networks will appear on the screen.
- Select wi fi networks that you want to remove to develop a list of preferred networks.
- Once you have selected the wi fi networks, then you can proceed by clicking on the ‘-‘ key.
- Make sure to click ok so that the command moves on to your device’s system.
- A final pop-up menu will appear to confirm the selected networks. Just click on the remove button, and instantly those networks will be deleted.
How To Form A Temporary Wi fi Network On Mac?
With Mac devices, you have the option to create a temporary wifi network. This temporary wifi connection can be between your Mac and another device.
You can start the procedure by creating your own wi fi network through the following steps:
- Go to Apple Menu and select System Preferences from the drop-down menu.
- Open the wi fi menu and click create network button.
- Type in details like network name and network channel for the new wi fi connection.
- Once you have entered the details, the temporary wi fi connection will be ready to use.
Conclusion
Usually, setting up a wi fi connection and changing its settings require users to have some technical knowledge. Fortunately, Mac has a system that can be conveniently managed even by beginner-level users.
We hope the steps and techniques mentioned above help you out and facilitate your experience with Mac devices.
Patrick Dobbins
Patrick Dobbins is a technology writer with over eight years of experience in the online market. He specializes in exploring apple products and talks about the latest features for the MacOs, iPhone, and iPad. Although his main area of expertise lies in Mac and iOS, he doesn’t stray far from Windows. In addition to writing for RottenWifi, Patrick has also made editorial contributions to other forums, including Business 2 Community and Tweak Your Biz. Apart from his work, Patrick is a husband and a father of two who enjoys heavy metal. He also knows his way around a piano, but he’s not as good at it as he is at writing.
Blog.rottenwifi.com is a participant in the Amazon Services LLC Associates Program which means we may get paid commissions on editorially chosen products purchased through our links to retailer sites. All names, logos, brands, and images are trademarks or copyrighted materials of their respective owners. Amazon and the Amazon logo are trademarks of Amazon.com, Inc., or its affiliates.
How to Set the Default Wireless (Wi-Fi) Network in macOS
![]()
By default, macOS attempts to join the wireless network it was most recently connected to. However, if you’re like me, you have a Wi-Fi network you use most often. This guide will show how you can set it as the default network in macOS.
The wireless networks your computer has connected to in the past are listed in the Wi-Fi pane of Network preferences. You can view available Wi-Fi networks by clicking the Wireless icon in the menu bar.
- If it has lines running through it, Wi-Fi is on.

- If it’s just an empty triangle-ish shape, Wi-Fi is off.
Of course, you’ll need to make sure Wi-Fi is on.
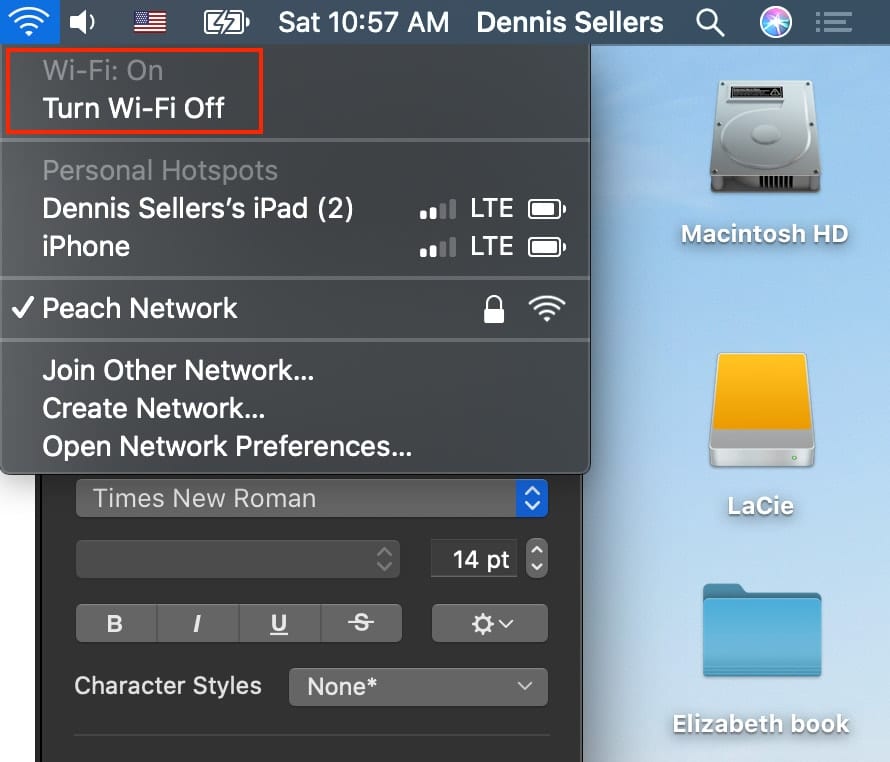
You can use the Wi-Fi menu on your Mac to see the status of your wireless network connection, switch between networks, or turn Wi-Fi on or off. The icon changes depending on the current Wi-Fi status and connection.
You can set up your Mac to join a preferred network when you start your computer, wake it from sleep, or turn Wi-Fi on.
Here’s how to join a preferred wireless network:
Choose “Apple menu > System Preferences…” then click Network.
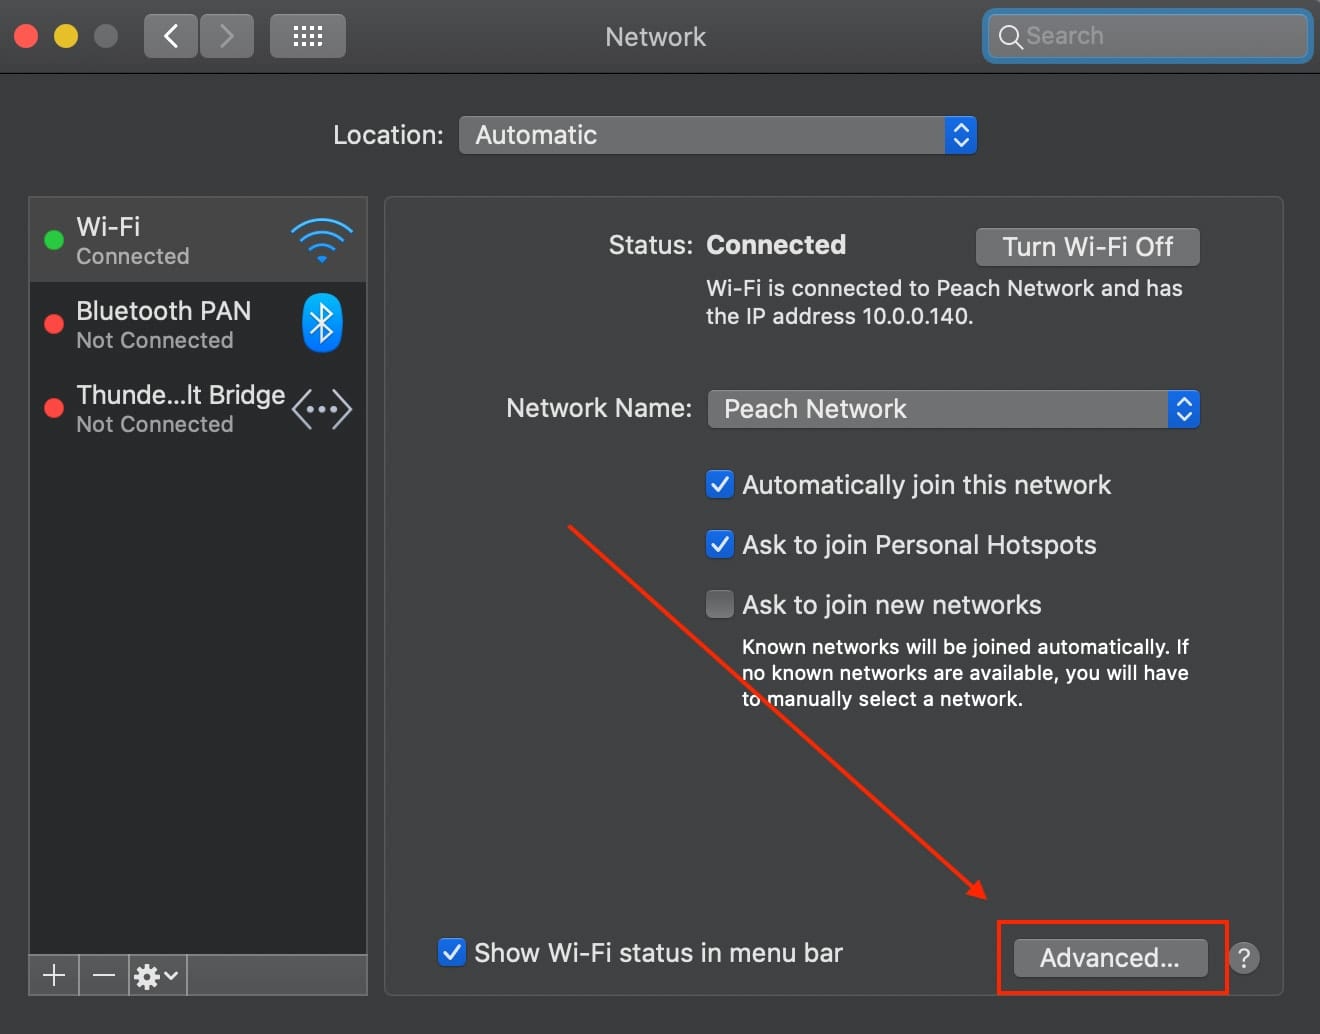
Click Wi-Fi in the list at the left, then click Advanced in the bottom-right corner. You’ll see a list of “Preferred Networks,” which are those you’ve accessed in the past.
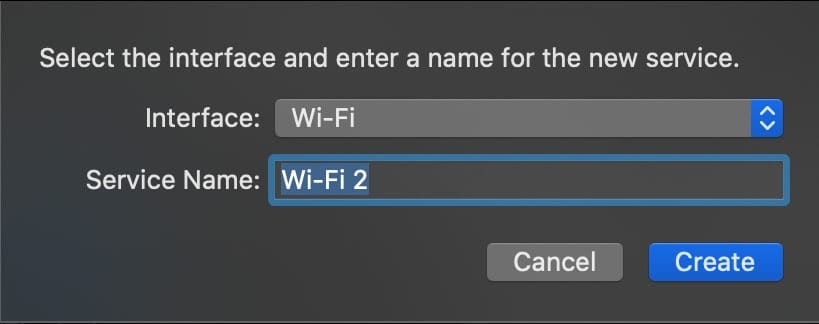
If Wi-Fi isn’t on the list of available tabs, make sure your Mac has wireless capability, then:
- Click the Add button (a plus “+” sign) at the bottom of the list
- Click the Interface pop-up menu
- Choose “Wi-Fi”
- Give the service a name
- Click “Create”
Now select the Wi-Fi tab.
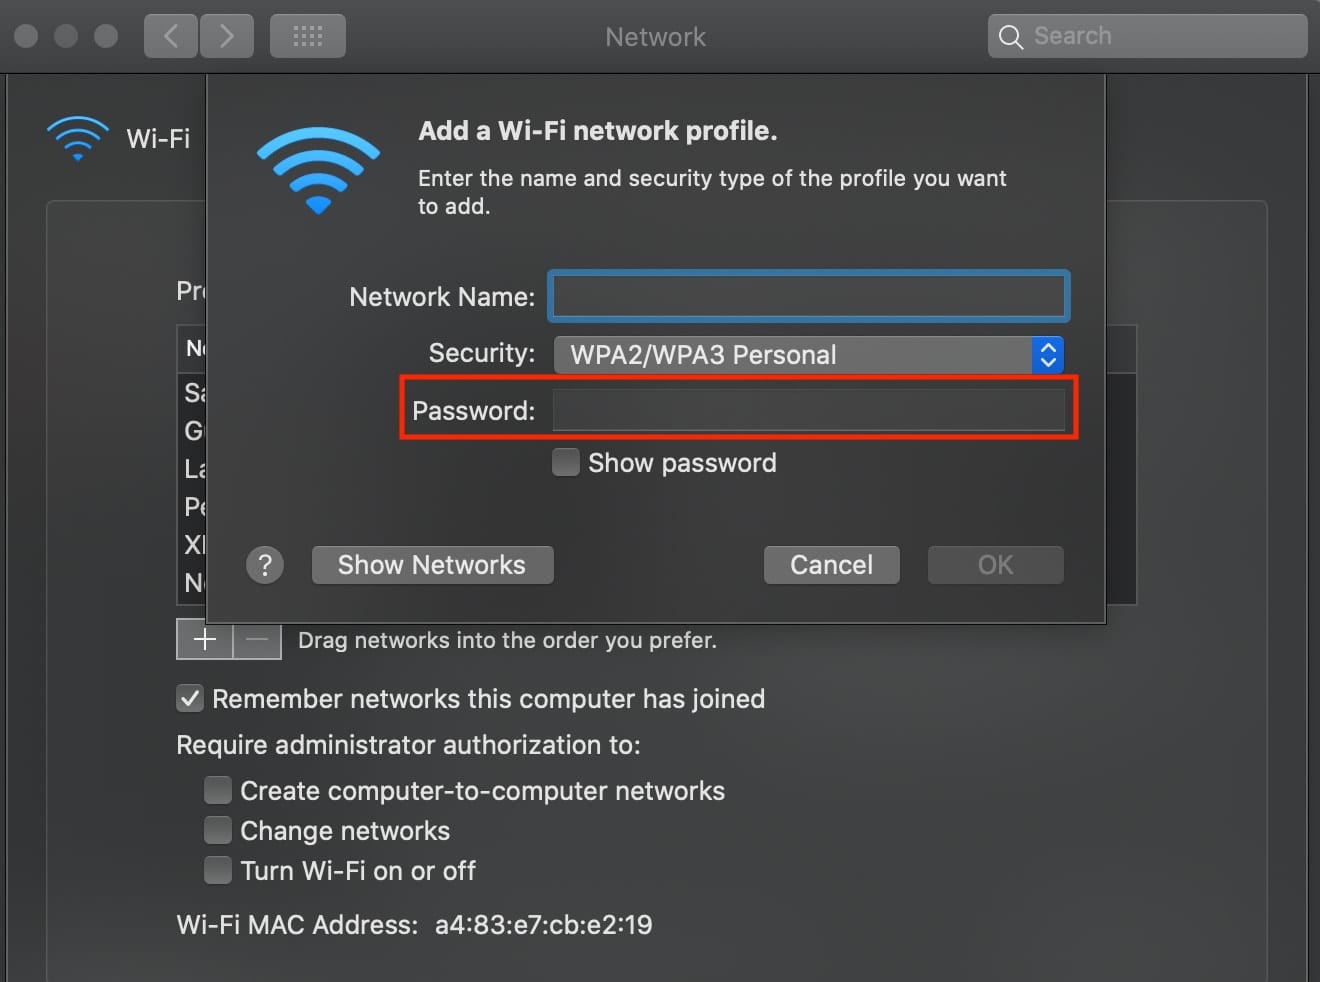
If the network you expect to see isn’t in the preferred networks list…

- Click the Add button (+) at the bottom of the list
- Click “Show Networks”
- Click the network you want to add to the list
- Click “Join”
If the network is protected by a password, enter it in the password field:
How To Set the Default Wireless Network
Drag the network you want to give the highest priority to the top of the preferred networks list. This is the network your computer will try to join first.
How To Delete a Wireless Network
To delete a network from the list, select it, then click the Remove button (the minus “-” sign).
These instructions apply, for the most part, to other versions of macOS besides Catalina. However, I’m using Catalina on a 16-inch MacBook Pro for this tutorial.