- Saved searches
- Use saved searches to filter your results more quickly
- License
- whid-injector/WHID
- Name already in use
- Sign In Required
- Launching GitHub Desktop
- Launching GitHub Desktop
- Launching Xcode
- Launching Visual Studio Code
- Latest commit
- Git stats
- Files
- README.md
- About
- Saved searches
- Use saved searches to filter your results more quickly
- Home
- WHID Injector – Plug And Hack Anything With USB
- What is WHID?
- USB Pinouts
- Possible Applications
Saved searches
Use saved searches to filter your results more quickly
You signed in with another tab or window. Reload to refresh your session. You signed out in another tab or window. Reload to refresh your session. You switched accounts on another tab or window. Reload to refresh your session.
WiFi HID Injector — An USB Rubberducky / BadUSB On Steroids.
License
whid-injector/WHID
This commit does not belong to any branch on this repository, and may belong to a fork outside of the repository.
Name already in use
A tag already exists with the provided branch name. Many Git commands accept both tag and branch names, so creating this branch may cause unexpected behavior. Are you sure you want to create this branch?
Sign In Required
Please sign in to use Codespaces.
Launching GitHub Desktop
If nothing happens, download GitHub Desktop and try again.
Launching GitHub Desktop
If nothing happens, download GitHub Desktop and try again.
Launching Xcode
If nothing happens, download Xcode and try again.
Launching Visual Studio Code
Your codespace will open once ready.
There was a problem preparing your codespace, please try again.
Latest commit
Added Croatian keyboard support
Git stats
Files
Failed to load latest commit information.
README.md
WiFi HID Injector for Fun & Profit
Hardware Design Author: Luca Bongiorni — https://twitter.com/lucabongiorni
Initial sw based on ESPloit by Corey Harding of www.LegacySecurityGroup.com
WHID Mobile Connector by Paul https://twitter.com/paulwebsec
For Sale at:**
** The Author has no profit out of the Cactus WHID sales. But you can always buy him an Italian Coffee 🙂
WHID Injector has an Official Android App https://apkpure.com/whid-mobile-connector/whid.usb.injector and guess what, we open sourced it. WHID Mobile Connector is Open/Source! Wanna contribute?
Look at https://github.com/whid-injector/WHID-Mobile-Connector
READ FIRST ALL THIS README OR DON’T YOU DARE TO OPEN ISSUES. I AM SERIOUS!
HOW TO START [Newbies Edition]
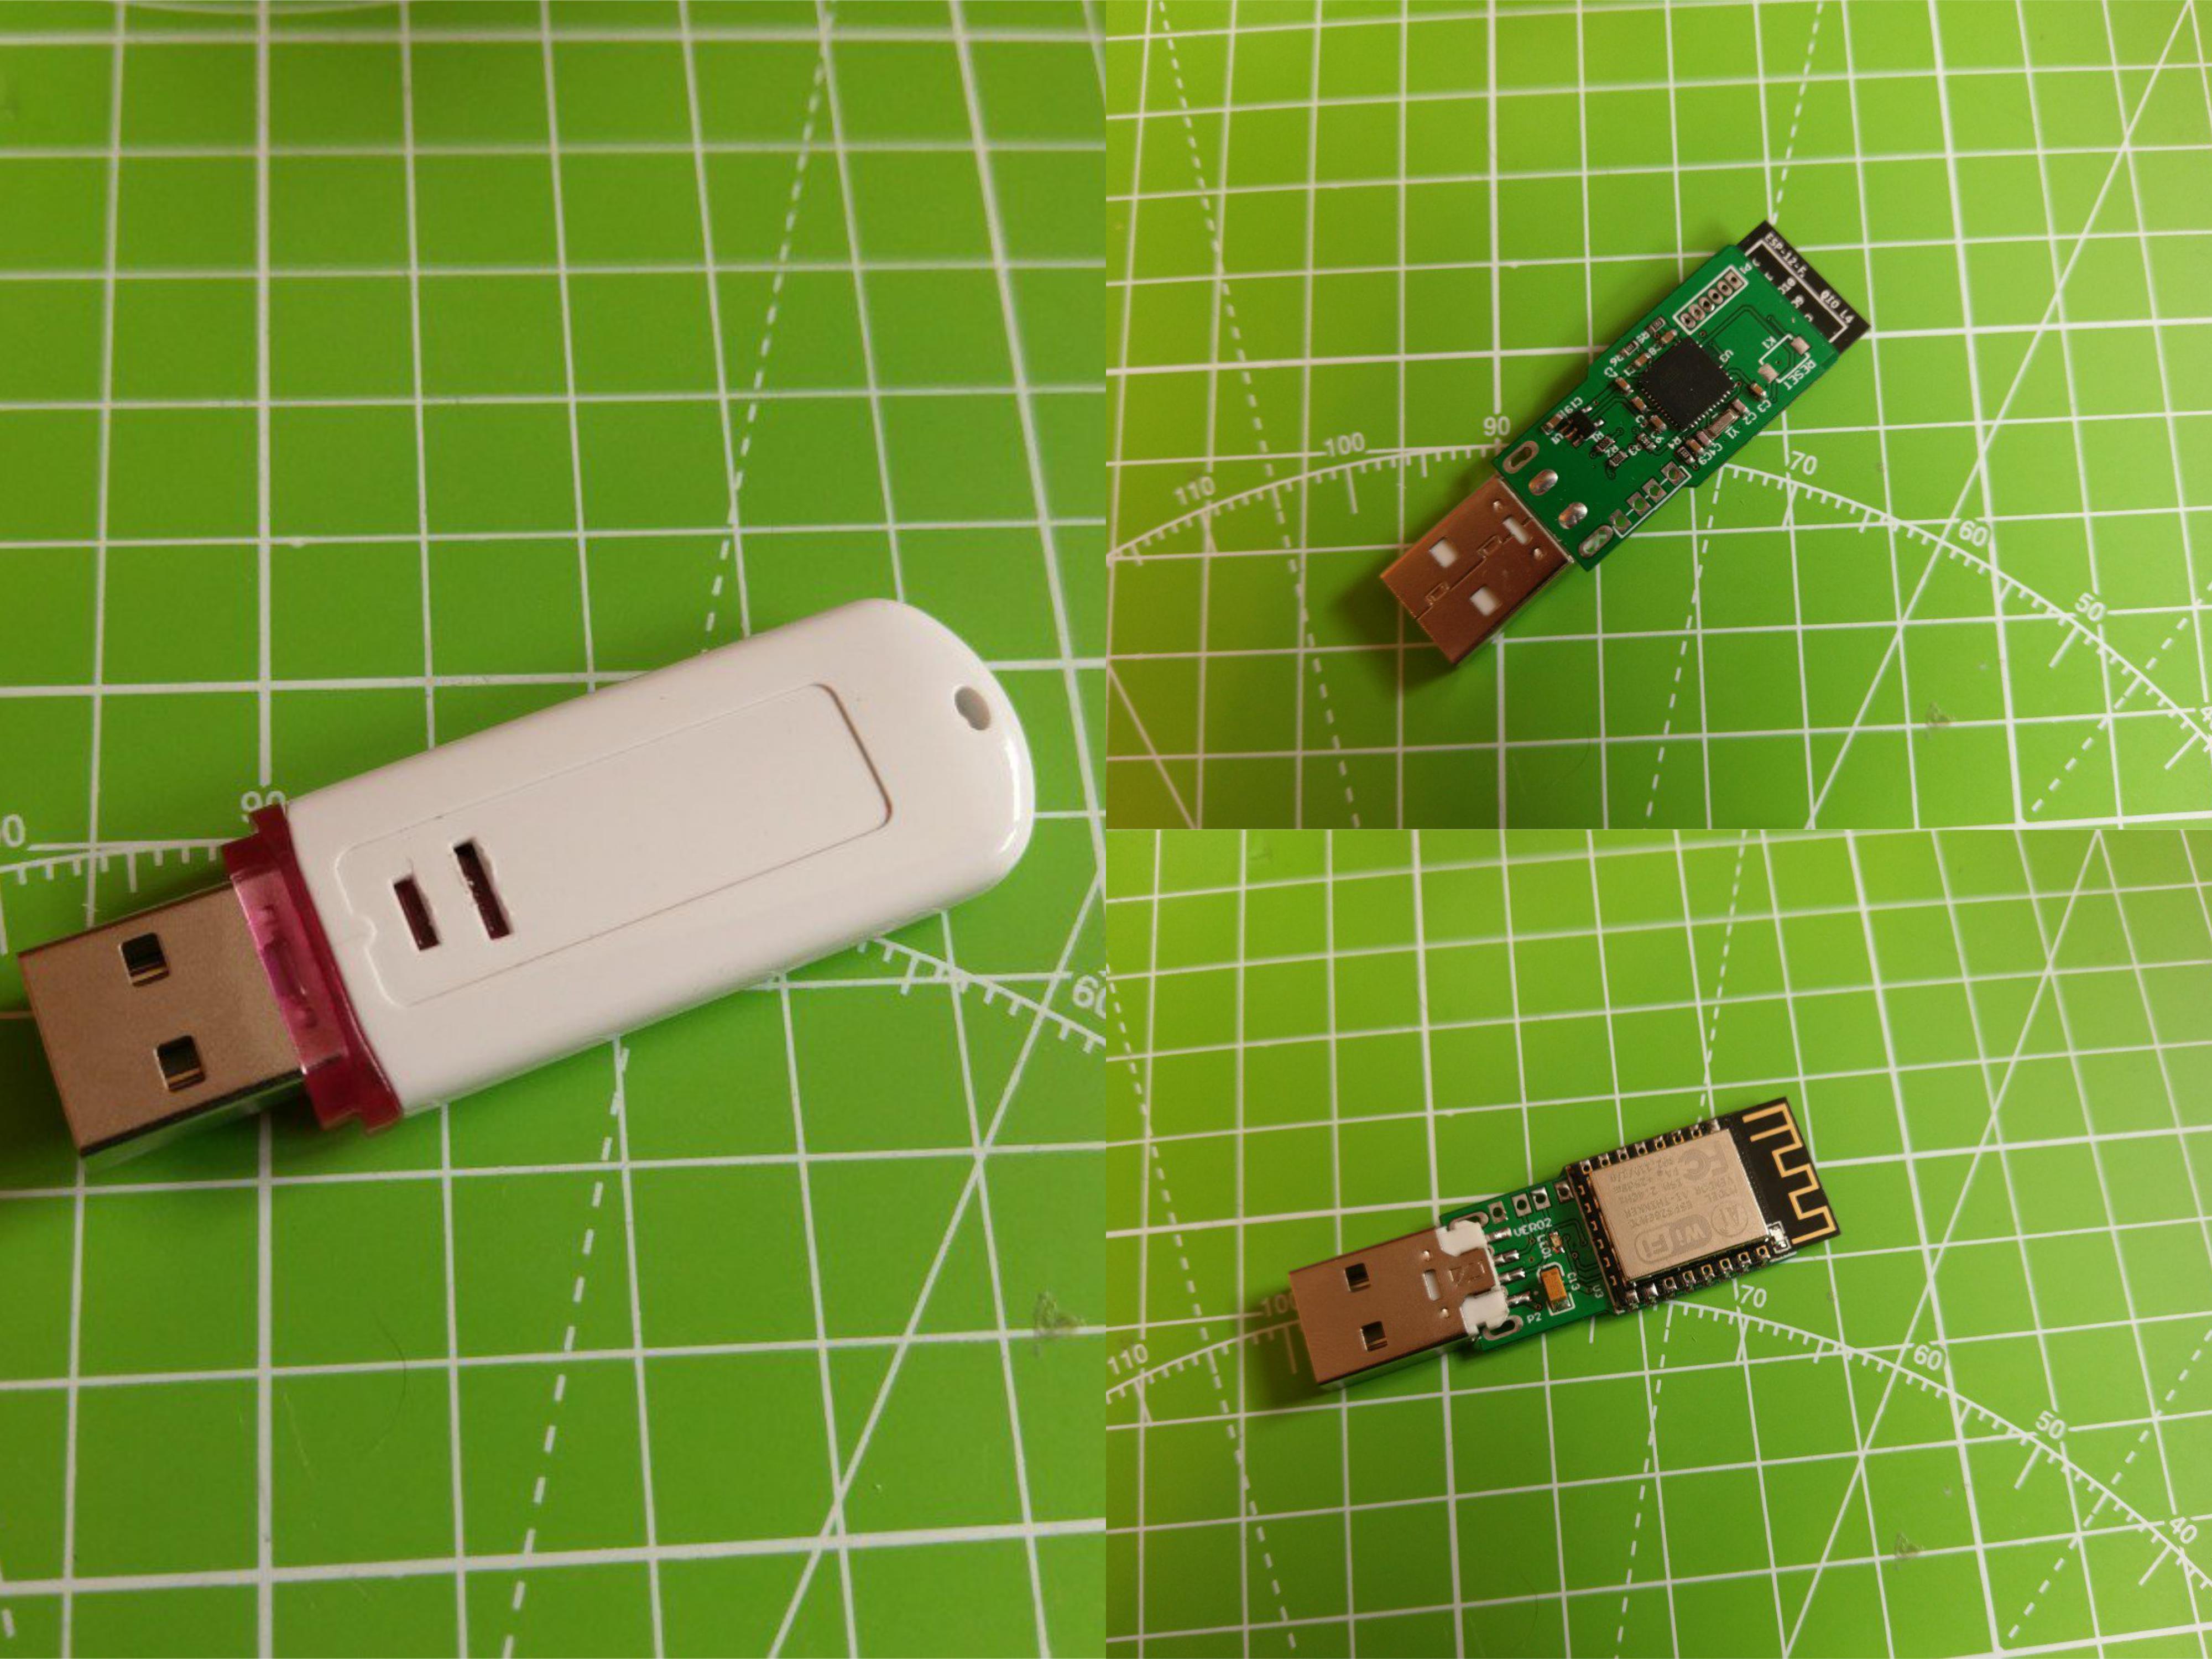
Since July 2017 all Cactus WHID are delivered with pre-loaded ESPloitV2 and are ready to Plug-n-Hack ✌
Thus, even if you are not an Arduino expert, you can immediately have fun!
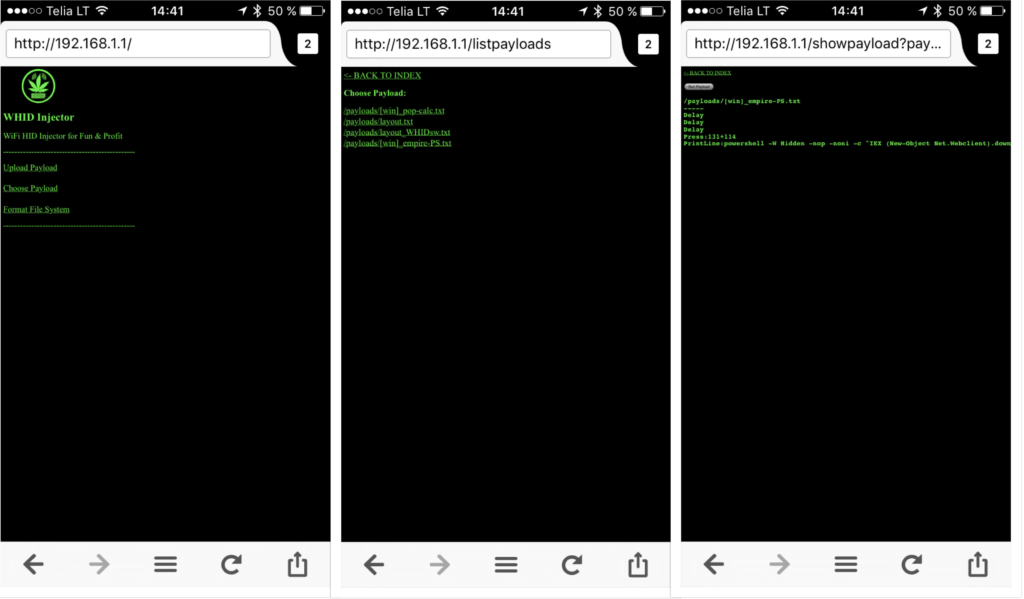
Just plug it in an USB port and connect to the WiFi network:
Open a web browser pointed to «http://192.168.1.1»
The default administration username is «admin» and password «hacktheplanet».
For cool payloads or more info check the Wiki or the Payloads directory.
In order to make easier the process of weaponizing USB gadgets, you can solder the USB wires to the dedicated pinouts.
The pin closer to USB-A is GND. The pins are:

Third-Party Softwares Compatible with WHID’s Hardware
https://github.com/whid-injector/WHID/tree/master/ESPloitV2_whid (Improved version of WHID GUI, installed by default on Cactus WHID hardware)
https://github.com/sensepost/USaBUSe (Dedicated software for AirGap bypass Vs Windows)
Deploy WHID on Victim’s machine and remotely control it by accessing its WiFi AP SSID. (eventually you can also setup WHID to connect to an existing WiFi network)

The main idea behind it is to test for Social Engineering weaknesses within your target organization (e.g. DLP policy violations) and to bypass physical access restrictions to Target’s device. Usually, I create a fancy brochure (sample template https://github.com/whid-injector/WHID/tree/master/tools/Social_Engineering_Lures ) attached with a weaponized USB gadget and then use a common delivery carrier (e.g. UPS, DHL, FedEx).


More Video on WHID’s Youtube Channel:
Forensics Analysis of HID Offensive Implants from Societe Generale’s CERT
About
WiFi HID Injector — An USB Rubberducky / BadUSB On Steroids.
Saved searches
Use saved searches to filter your results more quickly
You signed in with another tab or window. Reload to refresh your session. You signed out in another tab or window. Reload to refresh your session. You switched accounts on another tab or window. Reload to refresh your session.
Home
- What is WHID?
- Where to Buy?
- Main Requirements
- How To Configure WHID software (WINDOWS)
- How To Configure WHID software (OSX)
- Third Party Softwares
- ESPloit V2
- USaBuse
- Wifi Ducky
- Software Unbrick & Reset to Default Configuration
- Hardware Unbrick & Hard-Reset
- Still Issues? Here some Tips.
- HOW TO OPEN A TICKET!
- General Resources
Clone this wiki locally
What is WHID?
It stands for WiFi HID Injector. It is a WiFi remotely-controlled Emulator. Practically is an USB Rubberducky or BadUSB device on Steroids!
Where to Buy?
Main Requirements
First of all you need to install the ESP8266 Libraries.
- Go on File > Preferences > Additional Board Manager URLs
- Paste there http://arduino.esp8266.com/stable/package_esp8266com_index.json and press OK
- Go Tools > Board: > Board Manager
- Type ESP8266 and Install the 2.3.0 version.
How To Configure WHID software (WINDOWS)
Please keep in mind that the following Video is for installing WHID Software into Cactus Micro (which has 512K/64K Flash). If you wanna install on Cactus WHID hardware, select 4M/3M option in Arduino’s settings
How To Configure WHID software (OSX)
git clone https://github.com/whid-injector/esptool
sudo pip install pyserial
sudo python ./setup.py install
python esptool.py —port=/dev/cu.usbmodem1411 -b 115000 write_flash 0x00000 ../WHID/sketches/cactus_micro_rev2/ESP_Sketch/compiled.bin
Third Party Softwares
Enhanced version of WHID GUI (pre-installed on Cactus WHID) https://github.com/exploitagency/ESPloitV2
###[IMPORTANT]### If you wanna switch from WHID software to WifiDucky (or viceversa), you HAVE to: 1) Hard Reset WHID by using the magnet (as described in https://github.com/whid-injector/WHID/wiki#unbrick--hard-reset). 2) Erase the ESP's Flash: python esptool.py -p WHID-PORT erase_flash You need to do it AFTER uploading the ESP_Programmer.ino and BEFORE uploading the ESP_Sketch.ino (or esp8266_wifi_duck.ino). ###[IMPORTANT]### It is recommended to reduce Wifi Ducky's Serial speed from: #define BAUD_RATE 57200 to #define BAUD_RATE 9600 In https://github.com/spacehuhn/wifi_ducky/blob/master/arduino_wifi_duck/arduino_wifi_duck.ino and https://github.com/spacehuhn/wifi_ducky/blob/master/esp8266_wifi_duck/esp8266_wifi_duck.ino ### This repo has been already patched and ready to be used! https://github.com/whid-injector/wifi_ducky ### For the Wifi Ducky you also need to install the following Libraries
[VIDEO] How to configure Wifi Ducky (WINDOWS) https://youtu.be/PGa_ByyQw8Q
Software Unbrick & Reset to Default Configuration
Plug the device into your computer.
Open the Arduino IDE.
Select Tools — Board — «LilyPad Arduino USB».
Select Tools — Port and the port the device is connected to.
Select Tools — «Serial Monitor».
Select «38400 baud».
Now type in «ResetDefaultConfig:». Without the quotes but be sure to include the colon symbol.
Click Send.
You should now receive the following reply «Resetting configuration files back to default settings.»
Wait about 15 seconds or until the LED blinks and unplug and replug in the device.
The device has now been reset back to default settings.
Connect to the Access Point with the SSID «Exploit» with a password of «DotAgency».
Open a web browser pointed to «http://192.168.1.1»
The default administration username is «admin» and password «hacktheplanet».
NOTE: Certain devices seem to have trouble connecting to a password protected ESP8266 access point. The symptoms of this involve repeatedly being prompted to enter the password and being unable to connect to the ESP8266 via WiFi. This can be solved by following the above instructions but instead issuing the command «ResetDefaultConfig:OpenNetwork» via serial. The device will be restored to the factory defaults(with the exception of now being an unsecured network). The device will reboot and you may now connect to it as an unsecured WiFi access point with an SSID of «Exploit». You should now be able to establish a connection.
Hardware Unbrick & Hard-Reset
Incorporating all of the USB tasks on a single chip is an awesome feature that makes the WHID and boards like it truly unique. But it also places more stress on a single chip, and if anything goes wrong with that chip, the board becomes nearly unusable. It’s not uncommon for WHID’s to become “bricked” and unprogrammable. But, in most cases, the bricking is reversible!
The most common source of WHID “bricking” is uploading code to it with an incorrectly set board.
To revive the WHID, you’ll need to find a way to upload a sketch (even a default one is ok) to it with the board option correctly set. We can do this with a little help from the bootloader.
First, you’ll need to set the serial port to the bootloader. But that port is only visible when the board is in bootloader mode, so pull the reset line low twice quickly to invoke the bootloader reset feature discussed above. You can quickly press the reset button** twice. While the WHID is in the bootloader mode, change the ‘Tools > Serial Port’ menu to the bootloader COM port. Quick! You’ve only got eight seconds. [On Windows, the bootloader’s COM port number is usually one number higher than the Cactus WHID/Micro’s regular port number.]
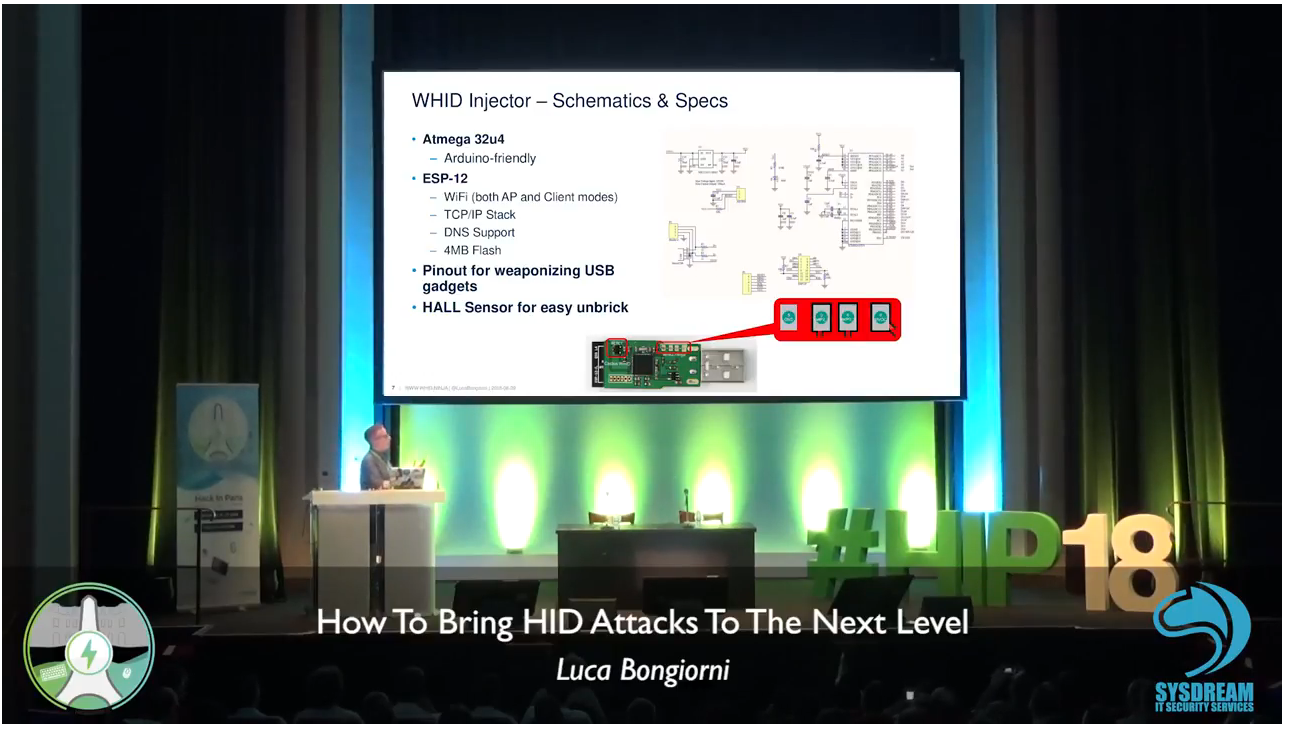
**The reset button is a HALL sensor, that means you need to place a magnet close that side of the PCB, in order to simulate the «button pressure». And yes, it works also with WHID inside the USB case! So you don’t need to extract the PCB from the plastic case everytime! 😃
- open Arduino IDE and open ESP PRogrammer sketch
- Insert WHID
- Press Upload sketch
- Start the unbrick phase with a magnet by placing it close that side of the PCB where the hall sensor is located (do it two times). Close-away-close-away

For Cactus Micro Rev2:
Still Issues? Here some Tips.
Here some tips that might help:
- Reduce BAUDRATE from 57200bps to 9600bps in both Wifi Ducky sketches. (9600bps for the serial between atmega32u4 and ESP is more than enough).
- When you flash with ESPTool or Flasher.exe, use a bit lower baudrates (e.g. 115000 instead of 115200)
- Upload the ESP Programmer sketch and then erase its flash with: python esptool.py -p WHID-PORT erase_flash
If above will not work. there is a 99,9% of probability the cause is your computer (i.e. USB controller, drivers, etc.) or something got fucked-up on the Arduino IDE!
- Try with another PC (if u can) or at least use a USB 2.0 port or a USB 2.0 HUB.
- Change Arduino IDE version (sometimes it get screwed-up)
- Completely uninstall and reinstall the existing version of Arduino IDE
HOW TO OPEN A TICKET!
- Which OS are you using?
- Which Arduino IDE Version?
- The ESPtool you are using is from https://github.com/whid-injector/esptool ?
- The USB port you are using is USB 3.0? (sometimes they may create issues with arduino boards. try a usb 2.0 or a usb hub)
- Did you try with an older version of Arduino IDE (i.e. 1.6.0)?
- Did you try to use an USB 2.0 port?
- Did you try with another laptop/PC?
General Resources
WHID Injector – Plug And Hack Anything With USB

This time i will share with you guys a multifunction USB that can remote (keyboard or mouse) for example wirelessly. USB that can buy in any online shop and can ship around the world is also can modify with third party like wifi ducky, ESPloit V2 and more. You can remote anything that plug with this usb from wifi to send keystrokes or payloads.
What is WHID?
It stands for WiFi HID Injector. It is a WiFi remotely-controlled Emulator. Practically is an USB Rubberducky or BadUSB device on Steroids!

USB Pinouts
In order to make easier the process of weaponizing USB gadgets, you can solder the USB wires to the dedicated pinouts.
The pin closer to USB-A is GND. The pins are :
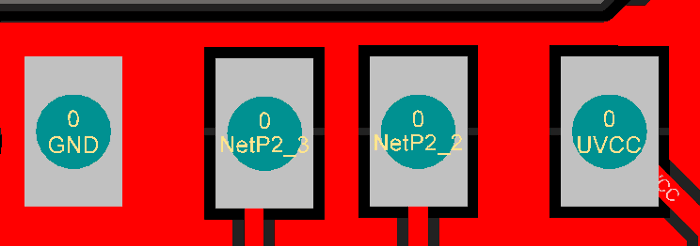
- GND
- D+
- D-
- VCC
Possible Applications
Deploy WHID on Victim’s machine and remotely control it by accessing its WiFi AP SSID. (eventually you can also setup WHID to connect to an existing WiFi network)