- How to create a wifi hotspot/share a connection on Kali linux? [duplicate]
- 1 Answer 1
- Setting Up Hotspot On Kali Linux
- Table of contents
- Prerequisites
- Introduction
- Finding wireless drivers
- Installing the necessary tools
- Setting up configuration files
- Using the graphical user interface
- Conclusion
- How to create WI FI Hotspot in Linux (kali Linux)
- Minimum Requirements:
- Step 1:
- Step 2:
- Step 3:
- Step 4:
- Search Content List:
- Tech Star
How to create a wifi hotspot/share a connection on Kali linux? [duplicate]
I have two USB wireless cards, wlan0 and wlan1. wlan0 is connected to a wifi far away using a yagi antenna (I have a house pretty far from «civilization» so I’m using an public open wifi) So what i want, is to be able to share that connection to my android phone, since i can’t really connected the yagi antenna to the android, i want to create a hotspot so that i can get internet to my android phone but still have the connection on my kali machine. Is this possible and if so how?
Why, o why do people have to use Kali Linux for tasks for which is wasn’t made, and which will only cause you trouble? Please read this, and use a distro more suitable for this. Any distro but Kali. And yes, making a hotspot is simple.
1 Answer 1
First download some necessary drivers from here. Then
In terminal type lspci If you use usb wireless adapter type command lsusb
apt-get install hostapd dnsmasq sudo service hostapd stop sudo service dnsmasq stop sudo update-rc.d hostapd disable sudo update-rc.d dnsmasq disable set up config files in terminal type:
gedit /etc/dnsmasq.conf or kate /etc/dnsmasq.conf if you use kde.
add those lines to the config file:
# Bind to only one interface bind-interfaces # Choose interface for binding interface=wlan0 # Specify range of IP addresses for DHCP leasses dhcp-range=192.168.150.2,192.168.150.10 # Define interface interface=wlan0 # Select driver driver=nl80211 # Set access point name ssid=myhotspot # Set access point harware mode to 802.11g hw_mode=g # Set WIFI channel (can be easily changed) channel=6 # Enable WPA2 only (1 for WPA, 2 for WPA2, 3 for WPA + WPA2) wpa=2 wpa_passphrase=mypassword You can change ssid name and password for anything you want here. Current config will create hotspot named myhotspot with password mypassword.
Now create anywhere you want a file named it hotspot.sh (best way to save script on Desktop) Edit it with any text editor like this:
#!/bin/bash # Start # Configure IP address for WLAN sudo ifconfig wlan0 192.168.150.1 # Start DHCP/DNS server sudo service dnsmasq restart # Enable routing sudo sysctl net.ipv4.ip_forward=1 # Enable NAT sudo iptables -t nat -A POSTROUTING -o ppp0 -j MASQUERADE # Run access point daemon sudo hostapd /etc/hostapd.conf # Stop # Disable NAT sudo iptables -D POSTROUTING -t nat -o ppp0 -j MASQUERADE # Disable routing sudo sysctl net.ipv4.ip_forward=0 # Disable DHCP/DNS server sudo service dnsmasq stop sudo service hostapd stop You will probably need to change ppp0 in this to eth0 or any other number which refers to your wired connection.
Now you can start your hotspot by starting script. Just run it. For me it looks like this:
root@kali:~# cd /root/Desktop/ root@kali:~/Desktop# ./hotspot.sh If you doesn’t want to do so, you can install pwnstar which works with any driver
Setting Up Hotspot On Kali Linux
Unlike other operating systems such as Windows, Kali Linux is an open-source operating system. It is considered the best operating system in cyber security implementation by the white hat and black hat hackers.
Kali is a Debian-based Linux distribution used mainly in advanced penetration testing, also known as pen-testing. It is freely available and accessible to professionals and learners.
Kali Linux has a wide range of features and tools for penetration testing. Each distro of Linux has an intended purpose for implementation; Kali Linux majoring in security.
Table of contents
Prerequisites
- Be familiar with the Linux family of operating systems.
- Be familiar with Kali Linux basics and the way to use it. Refer to this article to get started with Kali Linux
Introduction
In general, it is a nice idea to disable services that you do not use. Kali makes it easy to do this since network services are disabled by default. As long as services remain disabled, they do not pose any security threat.
However, it would be best to be careful when you enable them because it has no firewall by default. So, if they listen on all network interfaces, they are effectively publicly available, making it vulnerable.
Kali Linux distro has mobile hotspot ability disabled. Creating a mobile hotspot can only be done by customizing the network configuration.
This article will look into the processes used to create a mobile hotspot on Kali Linux and other Linux distros such as Ubuntu.
Throughout this tutorial, we are going to be using Kali Linux to create our hotspot. You can use any other Linux distribution of your choice.
Finding wireless drivers
To access the available network drivers, type the following command in the terminal:
The command above works only for wireless drivers.
In the case of using a USB adapter, use the command shown below:

Installing the necessary tools
To create our hotspot, we need to install the required tools. The first and crucial tool is hostapd , which acts as the hotspot server.
To install hostapd , type in the following command:
The second tool we will use is dnsmasq. It is a lightweight, easily configurable, DNS forwarder designed to provide DNS services to small networks.
It can serve the names of local machines which are not in the global DNS. The DNS server supports both static and dynamic DHCP leases, multiple networks, and IP address ranges. The dnsmasq will act as the server to the DHCP.
To install dnsmasq , type in the following command:
Once done with the installations, we can move to the next step.
We will proceed to check the just-installed processes. If already started, stop those in progress, and deter them from starting during the system’s start-up. This is because it turns off the Wi-Fi and turns it into a Wi-Fi hotspot.
Below are the commands used for stopping and disabling updates of the services:
To stop services in progress, we use these two commands:
sudo service hostapd stop sudo service dnsmasq stop To disable services already installed, we use these two commands:
sudo update-rc.d hostapd disable sudo update-rc.d dnsmasq disable 
Setting up configuration files
Configuration is vital since it reduces operation tasks, optimizing IP addressing planning, and easily manages user mobility. After installing the services, we will need to configure the necessary files, i.e. hotspot.sh.
We will begin by typing the command below in our terminal:
sudo gedit /etc/dnsmasq.conf After running the command, write the code below under hotspot.sh for configuration:
# Only bind it to one interface bind-interfaces # Select the interface to use for binding interface=wlan0 # Select a scope of IP addresses to be used in DHCP leasing dhcp-range=192.168.1.1,192.168.1.9 The preceding step in this stage involves performing hostapd configuration. To perform this configuration, type in the following command in the terminal:
To properly configure hostapd, add the following code to our configuration file:
# Set interface interface=wlan0 # Set driver to driver=nl80211 # Set your desired ssid(Wi-Fi name) ssid=Wi-FiConnection # Set the access point hardware mode to 802.11g hw_mode=g # Select WIFI channel channel=6 # Ensure to enable only WPA2 wpa_passphrase=Wi-Fi connection In the code above, wlan0 is your Wi-Fi card. WLAN stands for Wireless Local Area Network. The number 0 is the number allocated to the card. This is because the number of cards starts from zero and goes up (0,1,2,3, etc…).
You can change your SSID name and password with your desired choice. The above configuration will create a hotspot called a Wi-Fi connection with a password.
Note: You can create the configuration file anywhere you want, naming it as hotspot.sh using an editor of your choice.
After completing the configuration, we will stop the running services by typing in the commands below:
sudo service dnsmasq stop sudo service hostapd stop Using the graphical user interface
In this part, we will be using the graphical user interface to do the configurations. Go to advanced network settings, click on the gear icon to open it up.
Your screen should look like this:

To proceed with our configuration, follow the steps below:
Step I: You click the “+” button in the window, and another window pops up. In this new window, we are going to do the configuration of your hotspot.

Step II: Under the network type, select “Wi-Fi”. Ensure your configuration resembles the second screenshot below:

Step III: To set a password, click on Wi-Fi security and select WPA & WPA2 Personal. Below the input box, key in an eight or more memorable digit password of your choice and click save.
Security is an essential feature; this encryption protection is designed for homes and small office networks and does not need an authentication server.
WPA-Personal, also known as WPA-PSK (pre-shared key), is available on all 3 WPA versions, i.e. WPA, WPA2, and WPA3.
You’ve done it! Close all the opened windows, enjoy your newly created hotspot, and share it amongst computers, mobile phones, etc.
Conclusion
In this article, you have gained insights for setting up a hotspot on Kali Linux. You are now equipped to set up and manage your personal hotspot on Kali Linux.
Enjoy sharing data via hotspot on Kali Linux!
Peer Review Contributions by: Willies Ogola
How to create WI FI Hotspot in Linux (kali Linux)
.jpg)
Today every one crazy with Linux. Everyone knows the power of Linux. We always provide tutorials on Linux Basic Problems & services. In this chain today we learn How to Create WI FI hotspot in Linux. Because many user want to share his network connection on his other devices.
So the above requirement Linux gives many ways to create WI FI Hotspot on our system. But here we see the simplest method to create WIFI Hotspot in Linux.
Minimum Requirements:
- GNOME 3
- A WIFI Enabled Laptop OR A PC Which have wifi card.
- A Mobile (to check your WIFI Hotspot Connection)
Here we use kali Linux Distro. and you can choose any Linux Distro to Perform these operations to create WIFI Hotspot.
Step 1:
First you go to your system setting. For the system setting Click on root Icon which is appear on right side top in the desktop. Like this image

Step 2:
In the system setting dialog box. you see many categories there. in these categories Find out the Hardware Category. In this category you see a Network option. Click on the Network Icon.
Like this Image

Step 3:
In the network setting (which appear after you click on Network Option). you see a sub menu which have Wired network,wireless network and proxy network. Click On wireless option.
Here you see your WIFI Port is off or on Condition. If the button in off condition then swat the button to WIFI turn on.

Step 4:
After the WIFI turn on. A button is highlight which hide before you trun on WIFI. this button name is “ Use a Hot Spot.. “
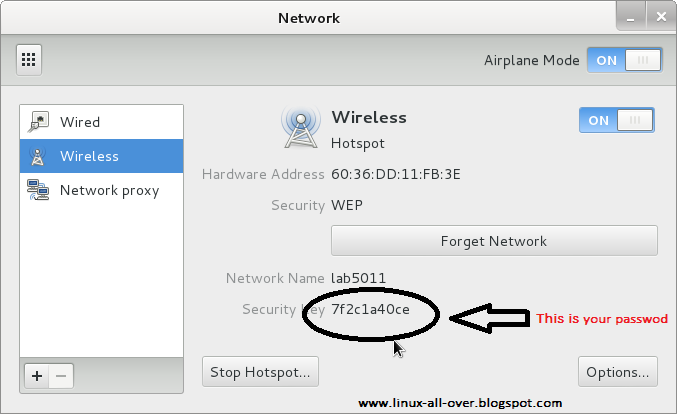
Click on Use a Hot Spot button. and after this you see your hot spot connection is on. and the window is show the Network name and Security key.
Note: the Security key is your password on other device (where you use internet)
Search Content List:
- How to Create WIFI Hotspot in Linux.
- How to Create WIFI Hotspot in Kali Linux.
- How to share internet Connection in Linux.
- What is WIFI Hotspot.
Tech Star

I have created a hotspot following a previous post . In this post I explain how I avoided the errors and succussfully created the hotspot on Kali Linux.
- If you have a fresh installation of Kali Linux, first ensure the internet connection. If you are connected to Wi-Fi and still having no internet, then use the following command.
sudo dhclient eth0 or sudo dhclient wlan0
apt-get install hostapd dnsmasq
sudo service hostapd stop sudo service dnsmasq stop sudo update-rc.d hostapd disable sudo update-rc.d dnsmasq disable
# Bind to only one interface bind-interfaces interface=wlan0 dhcp-range=192.168.150.2,192.168.150.10
interface=wlan0 driver=nl80211 ssid=myhotspot # Set access point harware mode to 802.11n hw_mode=g ieee80211n=1 channel=6
#!/bin/bash # Start sudo ifconfig wlan0 192.168.150.1 sudo service dnsmasq restart sudo sysctl net.ipv4.ip_forward=1 sudo iptables -t nat -A POSTROUTING -o eth0-j MASQUERADE sudo hostapd /etc/hostapd.conf sudo iptables -D POSTROUTING -t nat -o eth0-j MASQUERADE sudo sysctl net.ipv4.ip_forward=0 sudo service dnsmasq stop sudo service hostapd stop
nl80211: Could not configure driver mode nl80211: deinit infname=wlan0 disabled_lib_rates=0.
airmon-ng check killall wpa_supplicant sh

A device is connected to the hotspot!!