- Wifi hotspot on raspberry pi
- Script Removal
- Disable the IP Tables setup
- Disable NF Tables setup
- Access Point removal is now complete
- Trouble Shooting
- Create a Wi-Fi hotspot in less than 10 minutes with Pi Raspberry!
- The hardware needed to create your hotspot
- Install hostapd and its interface to turn your Raspberry Pi into a Wi-Fi hotspot
- Connect to your Wi-Fi hotspot
- And if it still does not work?
Wifi hotspot on raspberry pi
For vnc use 192.168.50.10::5900
If you have setup the Internet routed configuration. Connect an ethernet cable to the Raspbery Pi and your router and wait a few seconds. The hotspot will now allow connected wifi devices to use the internet as well as the Raspberry Pi
Once you are happy the setup is working ok then your done.
Script Removal
If you don’t wish to continue using the Hotspot then the Raspberry Pi can be reverted back to a standard wifi setup with the following steps.
Stop the Hostapd and dnsmasq services with the commands
sudo systemctl disable dnsmasq
sudo systemctl disable hostapd
In the /etc/dhcpcd.conf file remove the lines added at the bottom of the file.
#Static Hotspot nohook wpa_supplicant interface wlan0 static ip_address=192.168.50.10/24 static routers=192.168.50.1 static domain_name_servers=8.8.8.8
If you had previous config in your interfaces file and made a backup you can restore your original interfaces file with the command
sudo mv /etc/network/interfaces-backup /etc/network/interfaces
If you didn’t setup an internet routed access point then your done, after a reboot your RPi will not longer be an Access Point. For Internet routed Hotspots you also need to do the following;
Disable the IP Tables setup
Disable the hs-iptables service with the command
sudo systemctl disable hs-iptables
Then disable ip forwarding
# Uncomment the next line to enable packet forwarding for IPv4
net.ipv4.ip_forward=1
# Uncomment the next line to enable packet forwarding for IPv4
# net.ipv4.ip_forward=1
Disable NF Tables setup
sudo nano /etc/nftables.conf
If you know other NFtable rules are being used then you that is it, otherwise disable the nftables service.
sudo systemctl disable nftables
Access Point removal is now complete
Now reboot and the Raspberry Pi will be back to the standard wifi setup.
Trouble Shooting
- If you get no wifi connection or no hotspot and have this icon then it is most likley there is an error in one of the configuration files.
- If the RpiHotspot signal can’t be seen by another device, Use the command sudo systemctl status hostapd to see if there is an error with Hostapd.
- If Hostapd has an error that it is Masked then try
- sudo systemctl unmask hostapd
- sudo systemctl enable hostapd
- sudo systemctl start hostapd
-P INPUT ACCEPT -P FORWARD ACCEPT -P OUTPUT ACCEPT
PLEASE NOTE:
I have very limited time currently for the comments, so you will probably get a very slow response for questions I know the answer to. If I need to set up a Pi to check your issue or request then I am unlikely to have chance to spend time on this.
I will continue support once I can spare the time again.
Thank you for your interestCreate a Wi-Fi hotspot in less than 10 minutes with Pi Raspberry!

ⓘ Cet article peut avoir été partiellement ou totalement traduit à l’aide d’outils automatiques. Nous nous excusons des erreurs que cela pourrait engendrer.
Have you ever needed to create a second Wi-Fi network in addition to your primary network? If you (or someone close to you) have a business (coffee, restaurant, hairdresser or doctor, in short, a place where people are likely to wait), it is likely that you have already had to provide internet access to your Customers, without wanting to give the password of your box. In the same way, you may have already wanted to create an internal network that is cut off from the Internet, for example to exchange files within a small company, and so on.
For all these situations, the simplest solution is to create what is called a hotspot, that is to say a kind of box that you can control and to which your users can connect to access the internet. In this tutorial, let’s see how we can use a Raspberry Pi to create our own homemade hotspot, in less than 10 minutes!
The hardware needed to create your hotspot
In order to create our own hotspot, we will need a little bit of hardware, but nothing complicated or too expensive, you will be able to get around for about 50 € to 60 €, and you can use all the equipment for other uses in parallel.
To achieve our hotspot, we will need the following:
- A Raspberry Pi 3 (Chosen because it has an ethernet port and a built-in Wi-Fi connection)
- A power supply for your Raspberry Pi
- A MicroSD card of at least 8GB
- An Ethernet cable
As you can see, all these components are just the ones needed to operate a Raspberry Pi, and you will be able to use the Raspberry Pi in question for other things in parallel to its role as a hotspot.
Moreover, by tweaking a bit in the configurations, and if you add a second Wi-Fi interface on your Raspberry Pi, you can also transform your hotspot into a Wi-Fi repeater, in order to increase the range of your box!
Install hostapd and its interface to turn your Raspberry Pi into a Wi-Fi hotspot
Now that we have all the hardware we need, we will be able to switch to installing the various software needed to transform our Raspberry Pi to Wi-Fi.
The first step will be to install Raspbian (the lite version, preferably) on your Raspberry Pi. To do this, we will let you consult our tutorial explaining how to install Raspbian on Raspberry Pi from Windows, or from Linux.
Once you have installed Raspbian, the first thing to do is to plug your Raspberry Pi to your internet router using the Ethernet cable and then take control of your Raspberry, either directly with a keyboard / screen, or through SSH , as explained in this tutorial.
Once done, we will make sure that the Wi-Fi connection of the Raspberry remains available for the creation of the hotspot. For this purpose, we will simply create a copy of the configuration file allowing the connection to a box, in order to keep it aside, and modify the main file.
To do this, go to the terminal of the Raspberry Pi and run the following commands:sudo cp /etc/wpa_supplicant/wpa_supplicant.conf /etc/wpa_supplicant/wpa_supplicant.conf.sav sudo cp /dev/null /etc/wpa_supplicant/wpa_supplicant.conf
Finally, edit in the file /etc/wpa_supplicant/wpa_supplicant.conf and add the following lines:
ctrl_interface=DIR=/var/run/wpa_supplicant GROUP=netdev update_config=1
Now that we are sure that the Wi-Fi interface is available, all we have to do now is install the various software to make the Raspberry Pi an access point.
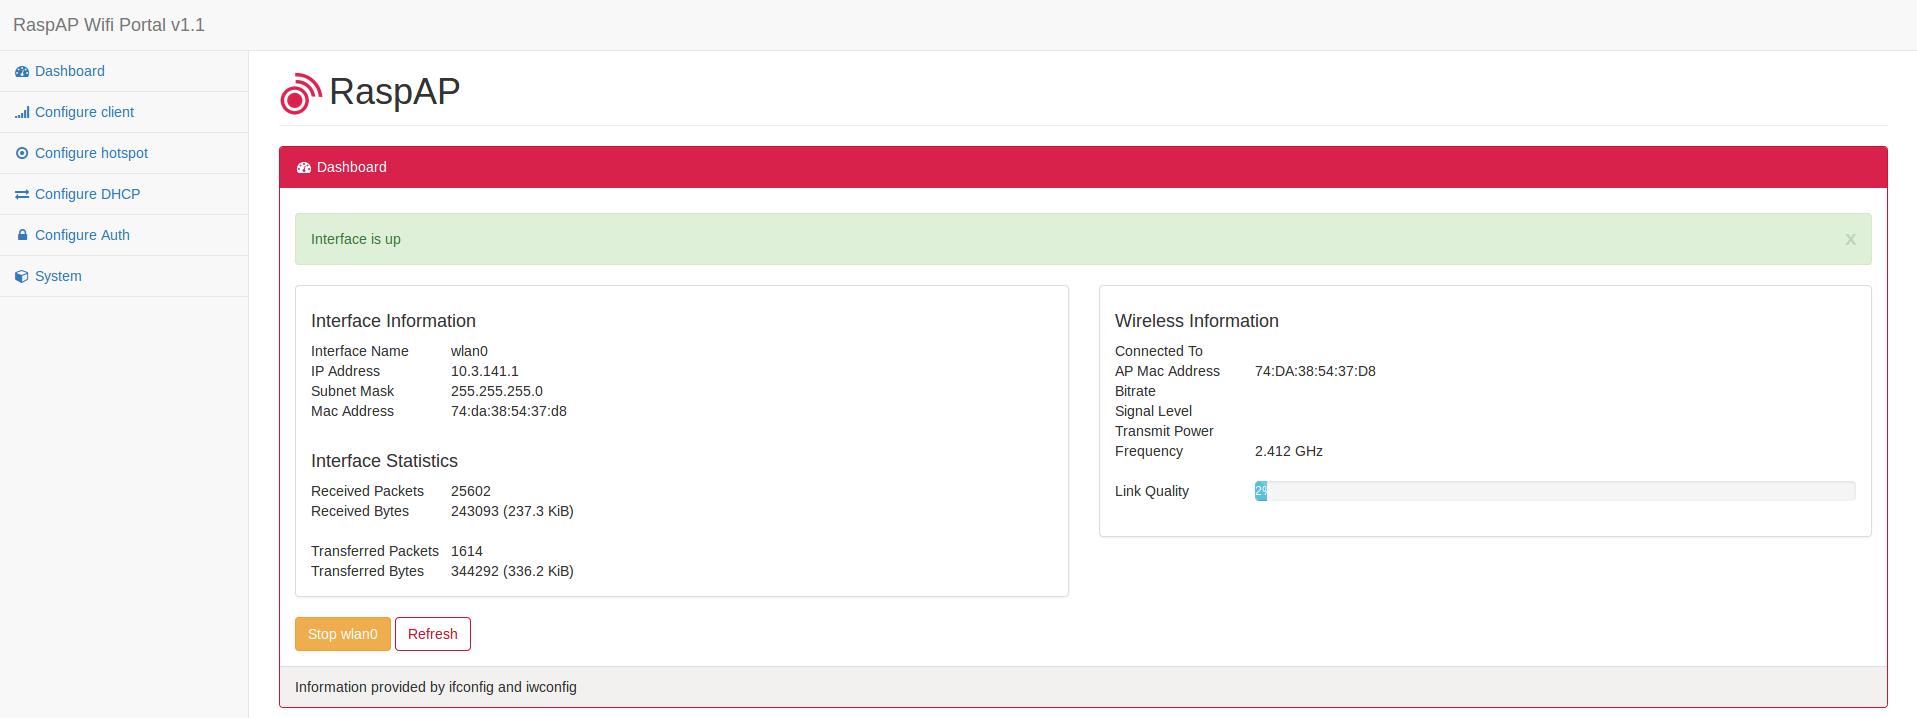
In this tutorial, we will use the hostapd software, which will allow us to turn the Raspberry Pi into an access point. And to facilitate the installation and administration of this access point, we will also install a web interface that will allow us to control our hotspot, RaspAP (for more info, go to the Github page of the software, https://github.com/billz/raspap-webgui).

With RaspAP, you can manage your Wi-Fi hotspot with a web interface.
And the good news is that to do all this we will need to run only one command:
wget -q https://git.io/voEUQ -O /tmp/raspap && bash /tmp/raspapOnce the command is launched, you only have to answer the few questions that will be asked, and the installation of all the components will be done by itself.
Connect to your Wi-Fi hotspot
When the installation is complete, your Raspberry Pi restarts, and you should see a “raspi-webgui” network in the list of accessible networks.
If, however, the network does not appear, find the IP of the Raspberry Pi, and connect to it via your web browser. You should arrive on the hotspot administration interface, the default password is shown on the github page of the software. Once connected, go to the “Configure Hotspot” section, and change the “Wireless Mode” field, this should solve the problem.
Once the network is visible, all you have to do is connect to it, the default password is ChangeMe .
You can change this password, network name, and many other things by connecting to the admin interface of your Raspberry hotspot via your web browser, by default the address should be 10.3.141.1 .And if it still does not work?
For some time, we do not know why, but it seems that Internet access is no longer functional by default after installation. To solve this problem you only need to do the following two things.
As a first step, enable the transfer of IPv4 packets. To do this, edit the file /etc/sysctl.conf and uncomment (ie remove it # at the beginning) the following line:
This done, we will modify iptables to define the output IP that will be indicated so that the servers know who to answer (well, from what I understand, if I’m wrong rectifications are welcome ). To do this, open the file /etc/rc.local and add the following line before the “exit 0” part:
iptables -t nat -A POSTROUTING -j MASQUERADE
Restart the pi and everything should now work as it should!
All you have to do is configure your hotspot to suit your needs!
We hope that this tutorial will have helped you, do not hesitate to consult our other tutorials, such as the one on the creation of a retro-gaming console with the Raspberry Pi, and if you need help, do not hesitate to ask for on the comments !