- How to Put WiFi Icon on Taskbar in Windows 10
- Solutions: WiFi network Icon is Missing Issue in Windows 10
- 1 – Look for Hidden WiFi network Icon
- 2 – Activate WiFi Icon from Setting App
- 3 – By Restarting Windows Explorer from Task Manager
- 4 – By Restarting the Network Connections Service
- 5 – Group Policy Editor: Enable Networking Icon
- 6 – Run Internet Connections Troubleshooter
- 7 – Reinstall WiFi Device Driver
- Пропал значок WiFi на ноутбуке Windows 10
- 1. Проверить отображаемые значок WiFi в параметрах
- 2. Перезапуск проводника
- 3. Перезапуск сетевых служб
- 4. Редактирование реестра
- 5. Переустановка драйвера WiFi
How to Put WiFi Icon on Taskbar in Windows 10
Usually, you will find the WiFi icon present on the Task Bar of Windows 10 on the screen’s bottom-right corner. But what if the Wireless icon goes missing? Worry not; the WiFi icon missing issue is not uncommon and can be fixed pretty easily. Several reasons could lead to the WiFi icon not showing up on the Taskbar.
Some third party could be messing with your PC, or it is quite possible that the Wireless icon is not set to appear on the Taskbar. Whatever the case is, we will take a look at the solutions that will help you out of the WiFi icon missing situation on your Windows 10 PC.
Solutions: WiFi network Icon is Missing Issue in Windows 10
1 – Look for Hidden WiFi network Icon
It might be possible that the Wi-Fi icon is hidden in the extended menu of the Taskbar. This happens when other applications running on your PC occupy the primary spots on the Taskbar. Click on the Taskbar and locate the arrow icon to show hidden icons. In the hidden icons menu, see if you can find the network icon.
If you want the Wireless icon to appear on the Taskbar, drag and drop the WiFi icon from the hidden menu to the Taskbar notification area of Windows.
If you find the WiFI icon missing from the hidden Taskbar menu, too, try the next solution.
2 – Activate WiFi Icon from Setting App
In the Settings app, you will find the option to select which icon appears on your Windows 10 PC’s Taskbar notification area. We show you how to do that in the following steps:
Step 1: Launch the Settings app on your PC. To do so, press the Win + I keys together. As the Settings app opens, make a click on the Personalization option.
Step 2: On the screen with new options, check out the left panel for the Taskbar option; click on it. Now, in the right panel, click on the Select which icons appear on the taskbar option.
Step 3: On the next screen to select which icons appear on the Taskbar; you will see many options. Here, go to the Network option and make sure that the toggle switch next to Network.
PS: If you are unable to find the Network option on the previous screen, go to the previous screen and select the Turn system icons on or off option. Once you choose the Turn system icons on or off option, enable the Network option from here and proceed with the solution.
Close the Settings app. If you still find the WiFi icon missing from Taskbar in Windows 10, go ahead and reboot your PC once and check.
3 – By Restarting Windows Explorer from Task Manager
According to many users, restarting the Windows Explorer can help you put the WiFi network icon on the Taskbar notification area. It is a relatively simple process; follow the steps:
Step 1: Launch the Task Manager window on your Windows 10 PC. To do this, press the Ctrl + Shift + Esc button simultaneously.
Step 2: Stay on the Processes tab on the Task Manager and look for the Windows Explorer option. Select Windows Explorer, then make sure to click on the Restart button present at the bottom of the window.
This should probably restore the missing WiFi icon on the Task Manager.
4 – By Restarting the Network Connections Service
Windows requires various services to run correctly. One of the essential services needed to handle WiFi and other internet connection processes is the Network Connections service. If you cannot find the WiFi network icon on the Taskbar notification area in Windows 10, you can also restart the Network Connection Service. Check out the steps below:
Step 1: Press the Windows key + R key together on your keyboard. In the Run window, enter services. msc and click on the Ok button.
Step 2: In the Services window that opens, look for Network Connections service. When found, make a right-click on it, then from the context menu, select the Restart option.
If you cannot find the WIFi icon on the Taskbar after restarting wireless network services, restart Windows 10 computer and recheck the Taskbar.
5 – Group Policy Editor: Enable Networking Icon
You can also use the Group Policy Editor to put a Wi-Fi icon on Taskbar in Windows 10. Follow the steps:
Step 1: Open the Local Group Policy Editor window on your PC. To do this, press the Win + R buttons and type gpedit.msc in the Run window that will open.
Step 2: In the Local Group Policy Editor window, go to the left panel. Here, navigate to the following directory: User Configuration > Administrative Templates > Start Menu and Taskbar.
You will find the Remove the networking icon option; double click on it.
Step 3: On the next window that will open, select the Disabled option, then click on the Ok button present on the bottom section of the window. This will save the setting. Close the Group Policy window now and see if this helped to fix this Windows 10 issue.
6 – Run Internet Connections Troubleshooter
The Internet Connections Troubleshooter is meant to look for issues on your PC related to the internet connection. You can run this troubleshooter to ensure that the Wi-Fi icon appears on the Taskbar in Windows 10. Below are the steps for you to follow:
Step 1: Press Windows key + I key on the keyboard to run the Settings app.
Step 2: In the Settings window, click on the following option: Update & Security
Step 3: In the Settings window, check out the left pane for the Troubleshoot option. Click on it, then go to the right pane and select the Additional troubleshooter’s option.
Step 4: From the next screen, select the Internet Connections option. Now, select the Run the troubleshooter option.
Let the troubleshooter run and look for issues on your PC. It will fix the issue if anything is found. After the troubleshooter has run, check for the WiFi icon on the taskbar.
7 – Reinstall WiFi Device Driver
The WiFi Device Driver is responsible for the proper running of the WiFi hardware installed on your PC. If the issue is with the driver, the network icon may go missing. In such a case, go ahead and reinstall the WiFI Device Driver. Follow the steps:
Step 1: Open Device Manager. To do so, press Win + X keys. A Menu will open. Here, select the Device Manager option.
Step 2: In the Device Manager window, click on the Network adapters option. This will expand the list of network device drivers. Here, make a right-click on the Wireless device, then select the Uninstall device option.
Now, confirm that you want to uninstall the driver software. After the uninstallation, restart your PC.
After the restart, the driver will be automatically installed on your PC.
Now check if the Wi-Fi icon appears back on the Taskbar. If the WiFi icon is still missing, leave us a reply, and we will try to help you.
Recommended for You:
Johnny Crumley
A self-defined geek, Johnny Crumley comes from the USA. As a kid genius, he started DOS batch files at just five years old and was soon messing with BASIC in kindergarten. He was always into the bits and bytes. As luck would have it, Johnny became a freelance PC technician, something he’s genuinely passionate about. From his teenage years, he started writing about anime and games. He’s also an avid educator, spreading his knowledge and expertise in the tech sector. He has been a professional writer for six years and has written for several emerging tech publications.
Blog.rottenwifi.com is a participant in the Amazon Services LLC Associates Program which means we may get paid commissions on editorially chosen products purchased through our links to retailer sites. All names, logos, brands, and images are trademarks or copyrighted materials of their respective owners. Amazon and the Amazon logo are trademarks of Amazon.com, Inc., or its affiliates.
Пропал значок WiFi на ноутбуке Windows 10
Если вы используете ноутбук, то вероятно у вас подключение к интернету идет через WiFi. Это касается и некоторых компьютеров, которые используют сетевую карту WiFi для подключения к интернету. Сам значок WiFi находится на панели задач около области уведомлений, который по разным причинам может пропасть, и вы не сможете работать с переподключением сети WiFi. В этой инструкции о том, что делать и как исправить, когда значок WiFi пропал на панели задач Windows 10.
1. Проверить отображаемые значок WiFi в параметрах
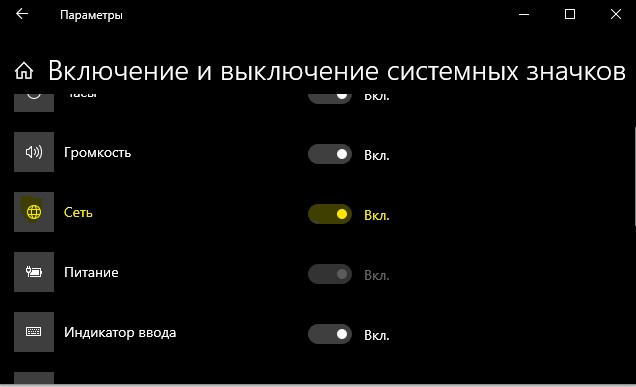
Откройте «Параметры» > «Персонализация» > «Панель задач» > с правой стороны нам нужны два пункта «отображаемые значки в панели задач» и «включение и отключение системных значков«.
Перейдите по очереди в выше указанные области и проверьте, включено ли отображение значка «сеть».
2. Перезапуск проводника
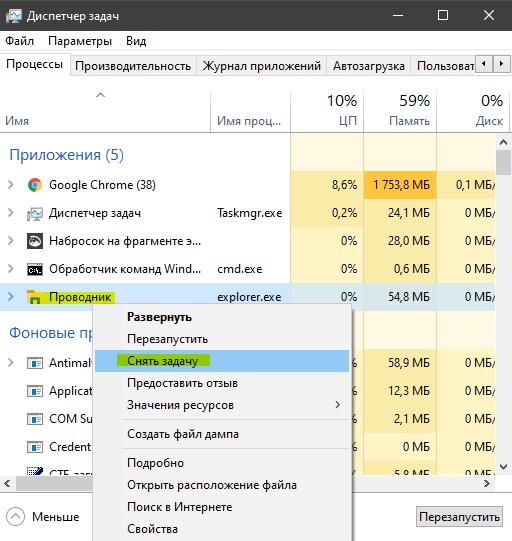
Значок WiFi может пропасть после установки обновлений Windows 10. В большинстве случаев это исправляется перезапуском «проводника». Откройте диспетчер задач нажав сочетание кнопок на клавиатуре Ctrl+Shift+Esc.
- Во вкладке процессы найдите «проводник», выделите его, и нажмите «Снять задачу«.
- Далее нажмите на вкладку «Файл» в верхнем левом углу и выберите «Запустить новую задачу«.
- Напишите explorer.exe и нажмите Enter.
Тем самым мы перезапустим проводник и значок WiFi должен отображаться в панели задач Windows 10.
3. Перезапуск сетевых служб
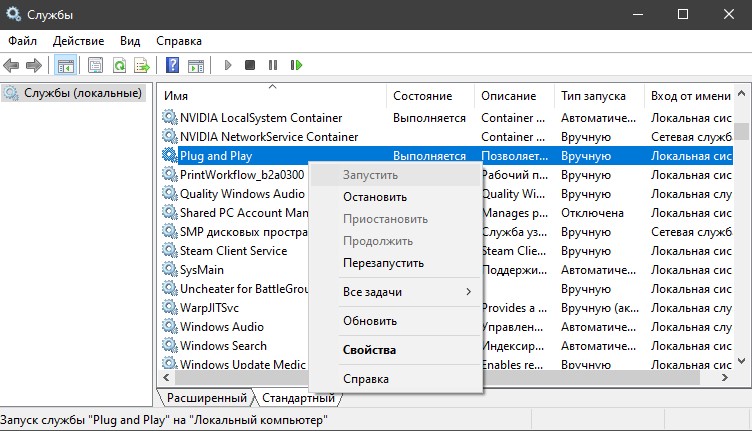
Нажмите Win+R на клавиатуре и введите services.msc, чтобы быстро открыть службы. Найдите службы и проверьте, работают ли они в данный момент. Если нет, то нажмите правой кнопкой мыши по службе и «Запустить«.
- Удаленный вызов процедур (RPC)
- Сетевые подключения
- Plug and Play
- Диспетчер подключений удаленного доступа
Перезагрузите компьютер и проверьте, появился ли значок WiFi.
4. Редактирование реестра
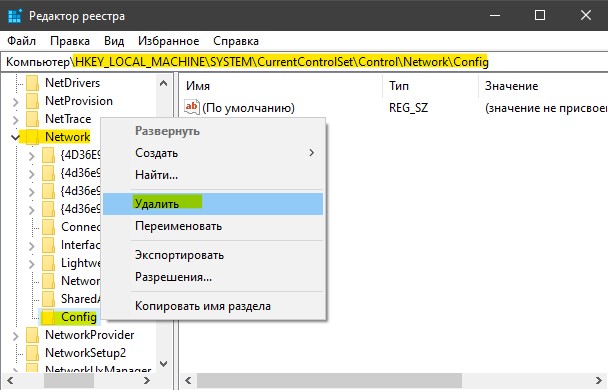
Если выше способы не помогли, то приступим к радикальным методам. Нажмите Win+R и введите regedit, чтобы открыт редактор реестра. В реестре перейдите по пути:
- HKEY_LOCAL_MACHINE\SYSTEM\CurrentControlSet\Control\Network
- Раздвиньте список Network и удалите папку Config.
Если у вас нет папки Config, значит закройте реестр и пропустите этот способ.
5. Переустановка драйвера WiFi
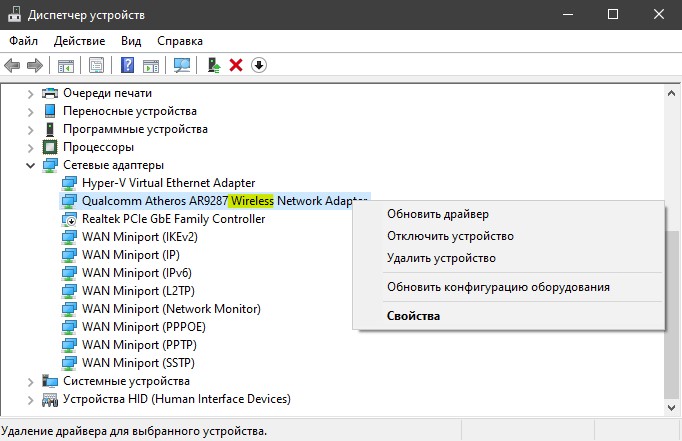
Нажмите Win+R на клавиатуре и введите devmgmt.msc, чтобы быстро открыть диспетчер устройств. Найдите и разверните графу «Сетевые адаптеры«. Далее удалите беспроводной сетевой адаптер WiFi, перезагрузите компьютер.
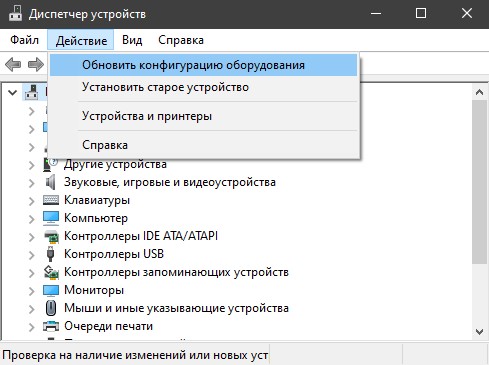
После перезагрузки зайдите обратно в диспетчер устройств, нажмите сверху на вкладку «Действие» и выберите «Обновить конфигурацию оборудования«.
Смотрите еще:
- Почему Пропал и Не Работает Звук в Windows 10?
- Пропали ярлыки с рабочего стола Windows 10
- Пропала Корзина с рабочего стола Windows — Как восстановить Корзину
- Пропала графа «Создать» в контекстном меню
- Пропала языковая панель Windows 10 — Как восстановить?


