ESPHome. Установка → конфигурация → ESP8266 → Home Assistant
Сегодня я рассмотрю еще один популярный тип прошивок для ESP плат, с которым познакомился буквально на днях. Есть свои особенности, плюсы и минусы, попытаемся разобраться во всем постепенно.
Translation to English is here . Также основной канал вtelegram.
ESP платы стали сегодня, пожалуй, самым распространенным среди DIY сообщества контроллером. За сравнительно небольшие деньги можно сделать кучу проектов и все они становятся IoT благодаря встроенным беспроводным интерфейсам. Естественно, благодаря распространенности, под эти платы было создано бесчисленное множество проектов и конструкторов прошивок.
Ранее я или делал что-то в ESP easy:
Другие проекты я делал в среде Arduino с установленной поддержкой ESP:
И отдельное новогоднее спасибо создателям WLED:
И вот мы подошли к еще одному конструктору, о котором я много слышал, но не использовал, просто по тем или иным обстоятельствам. Знакомьтесь — ESPHome .
Если проекты, такие как Easy ESP уже включает в себя инструкции для работы с теми или иными компонентами, которые есть в списке поддерживаемых устройств, то ESP Home собирает прошивку под конкретное устройство с необходимыми компонентами, что усложняет вход для новичков, но расширяет границы применения многократно.
Возможно, я путаю, но раньше проекты собирались на сайте, но я еще раз повторю, что я могу путаться. Сейчас, для того чтобы собрать прошивку, потребуется установить соответствующее ПО себе на устройство. Я нашел 2 вида установки, в HA Supervisor и в Docker. Supervisor я не использую и не планирую т.к. не вижу в нем для себя никакой необходимости, а вот Docker очень даже облюбил, именно поэтому я и выбираю второй способ .
Начинаем читать инструкцию, для было странно увидеть команду:
Эта команда скачает последнюю версию контейнера, но ничего более.
Easily create you DIY IoT devices with ESP Home and Home Assistant
When I started to tinker with home automation and electronics a few years ago, it was common to use arduino cards to create DIY connected devices. You would then communicate with a central server to send and receive information. The communications were usually done using usb, ethernet (using an ethernet shield) or radio (2.4Ghz or 433Mhz) with projects like MySensors.
Most of the time these cards were programmed using the “Arduino language” which is quite close to C++. I kept this habit when I switched to use the esp8266/esp32 cards but in the meantime, awesome projects were developped to facilitate the development of this kind of devices, especially dedicated ecosystems like ESP-Easy, Tasmota and ESP Home, which is the project that I decided to use.
Why ESP Home ?
While Tasmota and ESP-Easy are “battery-included” firmwares that you flash on the esp board and then configure with a web ui, ESP Home compiles a firmware specially for your device based on a yaml configuration file that tells it which kind of technology (SPI, I2C, UART) and sensor (dht22, HC-SR04 …) you are using and on which pins they are accessible. It even allows you to manally add C++ code through “lambdas”. Another great point of ESP Home is the native integration to Home Assistant (a very powerful home automation system) so we can focus on actually creating our IoT device instead of bothering about communication with the server. So let’s get started !
While this is not mandatory, I would recommend to install the ESP Home server using the docker image, which will facilitate the development of our devices with a user friendly web interface. (You can also skip this step and use directly ESP Home in CLI). So, I created the following docker-compose file to start the esphome dashboard and access it using traefik. I also decided to use ping instead of mdns to check for device status.
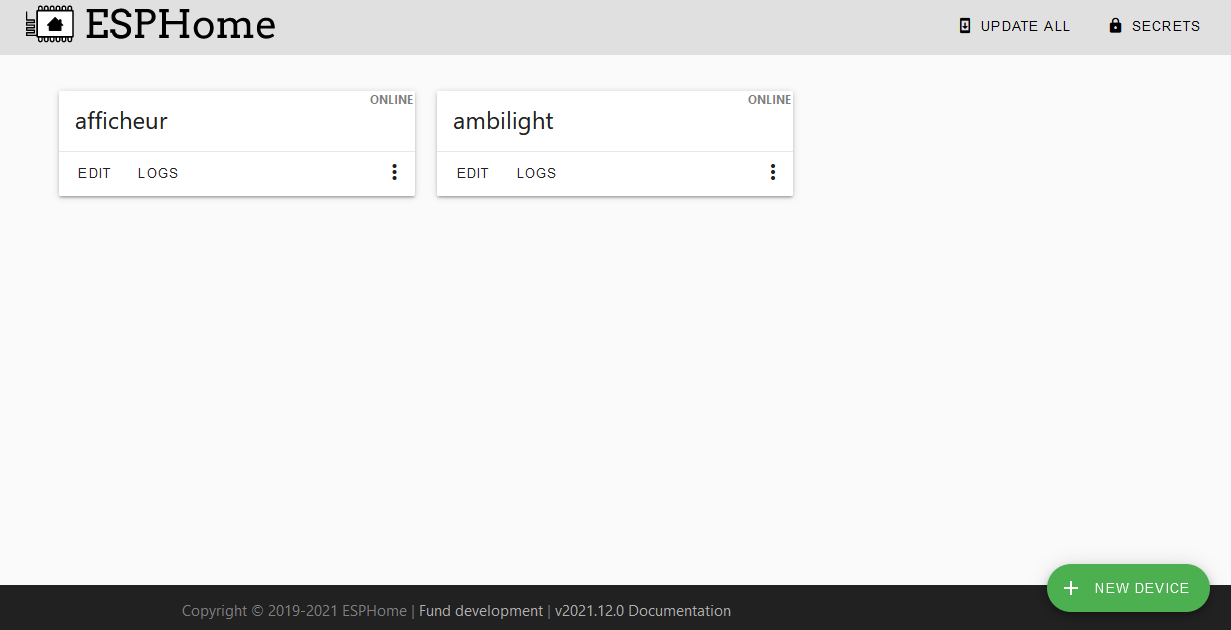
You now have access to your ESP Home dashboard and can create a new configuration by clicking on the “NEW DEVICE” button. You will then have to enter some information about your device and a default configuration will be generated.
You should have something like this. The captive_portal and ap configuration will allow you to reconfigure your device in case your wifi is no longer available. The “normal” connection to your wifi is configured with the ssid and password keys. The !secret refers to the data stored in the secrets section (in the top right corner of the ui). In there you can configure your wifi credentials like this:
You now have the basic configuration needed to flash your device, we will now add the specific configuration to register your sensors.
Create your first IoT device
Here’s the device that I will make: a simple display based on 4 8×8 matrices in a wooden enclosure painted in black.
The device will also have a photoresistor to adapt the brightness of the matrices and a row of 4 buttons to trigger some actions on home assistant. Everything is wired on a node mcu (with an esp8266).
My matrices are of type max7219. They communicate using SPI, so I defined a spi section with the clk and mosi pins. I can then define a max7219digit component and specifiy the CS pin. The num_chips key indicates the number of matrices that I have connected, here 4. I used custom C++ code to define the message to display using the lambda key. This code displays the message from the text sensor if it has changed or defaults to a clock. The display is refreshed every 3 seconds.
I also defined 2 template switches: a slider to control the brightness of the matrices from home assistant and a switch to turn on/off the display.
For the sensors part, I defined an adc component with the pin A0 where my photoresistor is connected and a resistance component that converts the voltage to resistance and reports it to home assistant. I also defined 4 binary sensors for the buttons disposed on top of the display.
Flashing the ESP
To flash your esp click on the install button. For the first time I recommand to use the Manual Dowload option and use ESPHome-Flasher (you can also flash it using a chrome-based browser but it will be slower). Futures updates can be done via OTA so you will only need to plug your device to your computer for the first installation.
По правилам YAML, если секция находится в другой секции, нужно сделать отступ. Как понятно из названий в state_topic прописываем топик состояния реле, а в command_topic прописываем топик для изменения состояния.
Тк для Home Assistant стандартным значениями являются ON/OFF, а контроллер работает с 0 и 1, то в настройках мы внесли секции payload_on и payload_off, которые меняют эти значения на заданные.
После перезагрузки конфигурации, в интерфейсе Home Assistant появится наше реле
Теперь им можно управлять из меню и в автоматизациях.
Подключение бинарного датчика
По аналогии с переключателем, подключим бинарный сенсор
Настройка unit_of_measurement отвечает за единицу измерения сенсора.
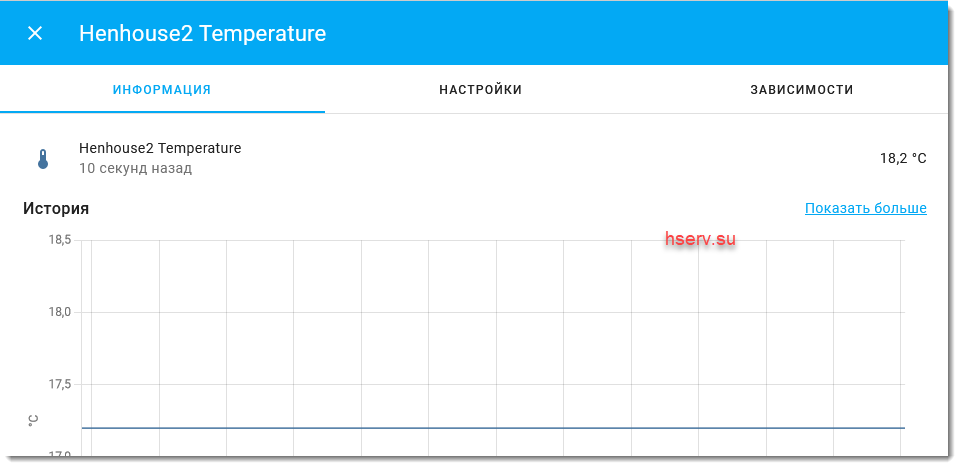
После перезагрузки конфигурации, в интерфейсе Home Assistant появится наш сенсор температуры
Заключение
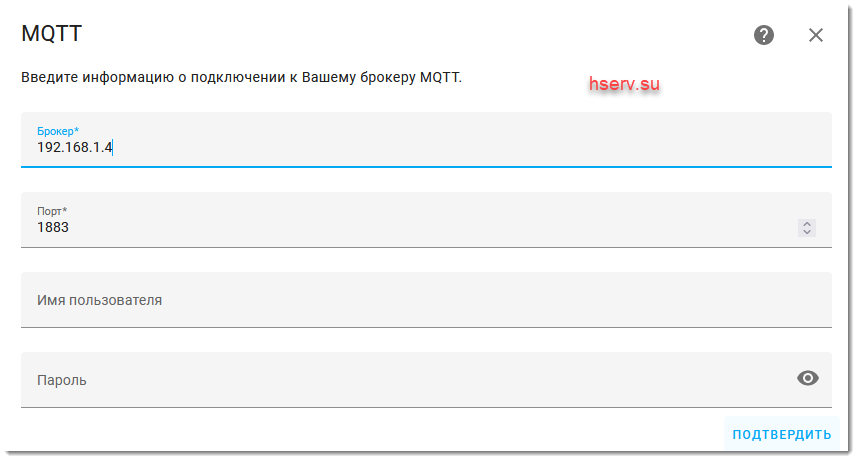
Чем хорош Home Assistant, так это тем, что для него есть большой набор интеграций, написанных разработчиками или сообществом, и практически любое умное устройство, тем или иным способом можно подключить к Home Assistant. MQTT брокер, по факту, стал стандартом для общения iot устройств между собой. Поэтому в статье я описал способ подключения устройств, через MQTT брокер.
Добавление других устройств происходит также по аналогии, через раздел Интеграции. Для некоторых устройств нет стандартных интеграций. Но нам поможет сообщество и дополнение HACS. Как его ставить я описывал в статье Установка HACS в Home Assistant. В HACS мы добавляем репозиторий из GitHub и вот Home Assistant может работать с дополнительными интеграциями.
У многих «эмигрантов», мигрирующих с MajorDomo на Home Assistant возникают проблемы с подключением устройств прошитых WiFi-IoT.
На самом деле, нет ничего проще. Нужно понять, что у WiFi-IoT индивидуальная метрика — отличная от привычной Tasmota. Которая подробно описуется на сайте разработчика: https://wifi-iot.com/p/wiki/23/ru/
Разберем на примере подключения реле Sonoff Basic с датчиком DHT22 DHT11:
Бра, которое находится на кухне имеет имя KitchenBra и к MQTT серверу подкоючается с логином mqtt, соответственно топик имеет имя mqtt/KitchenBra. Далее, что бы включить, или выкоючить реле, необходимо на определенный выход подать соответствующую команду, а в Sonoff Basic — это GPIO12. То есть согласно метрике WiFi-IoT, путь к команде приобретает слелующий вид: mqtt/KitchenBra/output12
.</p><p>In order to display text, you will need to configure a font, here I am using the pixelmix.ttf file that you can download here. You then need to place the font file in the same directory of your config file (in my case /app/docker/data/EspHome , see the docker-compose file).</p><p>As I want to use the display as a clock when I have no message to show, I defined a time section with home assistant as the source. I also define 2 global variables to help to switch between the “message mode” and the “clock mode”, and a text sensor to allow home assistant to send a message to display.</p><div style=)