- I need to change the WiFi credentials (SSID and key / password) on my devices. How should I do that?
- Option 1: use the in-app “change WiFi credentials” feature for devices that supports it
- Option 2: reuse your old router
- Option 2a: routers without special settings to use it as an accesspoint
- Option 3: change router / accesspoint settings of the new router
- Option 4: re-pair the devices without deletion in the eWeLink app
- Share this:
- Change WiFi network name and password
- How to change the name of the WiFi network
- Change default Wifi password
I need to change the WiFi credentials (SSID and key / password) on my devices. How should I do that?
There are 4 ways to do this which depend a litte bit on your exact situation.
Since eWeLink 4.6.0 you can change the WiFi credentials for power measurement devices (like the Sonoff POW and several brands SA-001) with firmware 3.5.0 or higher from within the app. Since eWeLink 4.11.0 Sonoff TH10/16’s and RF bridge with firmware 3.5.0 do support this feature too. You need to have a working WiFi connection between your mobile and eWeLink supported device. If you don’t have a working WiFi connection then you can proceed with option 2, 3 or 4.
When the involved device is not a power measurement device and you bought a new router / accesspoint you can use option 2 or 3. When the involved device is not a power measurement device and you had security issues with the old credentials you can use option 4.
Option 1: use the in-app “change WiFi credentials” feature for devices that supports it
In eWeLink 4.6.0 this option works only works with power measurement devices like the Sonoff POW, Sonoff S31, several brands SA-001, etc. with firmware 3.5 or higher. Sonoff TH10/16 and RF Bridge with firmware 3.5.0 do support this too with firmware 3.5.0 and eWeLink 4.11.0. Other devices will follow in the future.
- Connect your mobile phone to the WiFi network where you want your eWeLink supported device to connect to.
- Open the settings of the device in the eWeLink app.
- Scroll down the page and tap on WiFi settings .
- Tap the networkname the device is currently connected to (only option shown).
- Check whether the network displayed is the one you are connected to with your mobile.
- Edit the WiFi password if needed.
- Tap Save in the upper right corner.
- Wait a little while untill the network indicator stopped blinking.
- Your eWeLink supported device is now connected to the new network.
Option 2: reuse your old router
Most routers can be reused as an accesspoint. Modern routers even have features to configure them as accesspoint without a lot off hassle. How you exactly need to connect and configure your old router varies. But below we give some general points of attention. If you want to know some specific information for your router Google the brand and model number of your router for a manual or community information.
More information about the definition of an accesspoint can be found at this Wikipedia page: https://en.wikipedia.org/wiki/Wireless_access_point
Option 2a: routers without special settings to use it as an accesspoint
This solution is also explained in a Youtube video below (not ours, just a random one). In that video the old router gets connected to the new one before configuring the settings on the old router. The risk of doing that is that you get the wrong IP address send by the new router and that you can’t access the old router in that way. That’s why you are going to disable the DHCP server and why we recommend to first configure the old router and then connect the old router to the new router.
- Connect your PC or laptop with a LAN cable to one of the LAN ports (mostly numbered 1 to 4) of the old router.
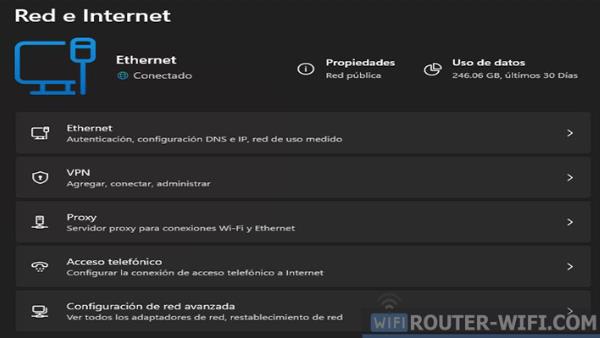
- On a Windows PC hold the Windows key , press R and release the keys. As analternative you can press the Windows key + S or click the magnifying icon on the taskbar.
- Type CMD and press the Enter key.
- Type ipconfig and press Enter.
- Search for an active Ethernet LAN controller and look which IP-address and gateway IP address it has. Write down the gateway IP address.
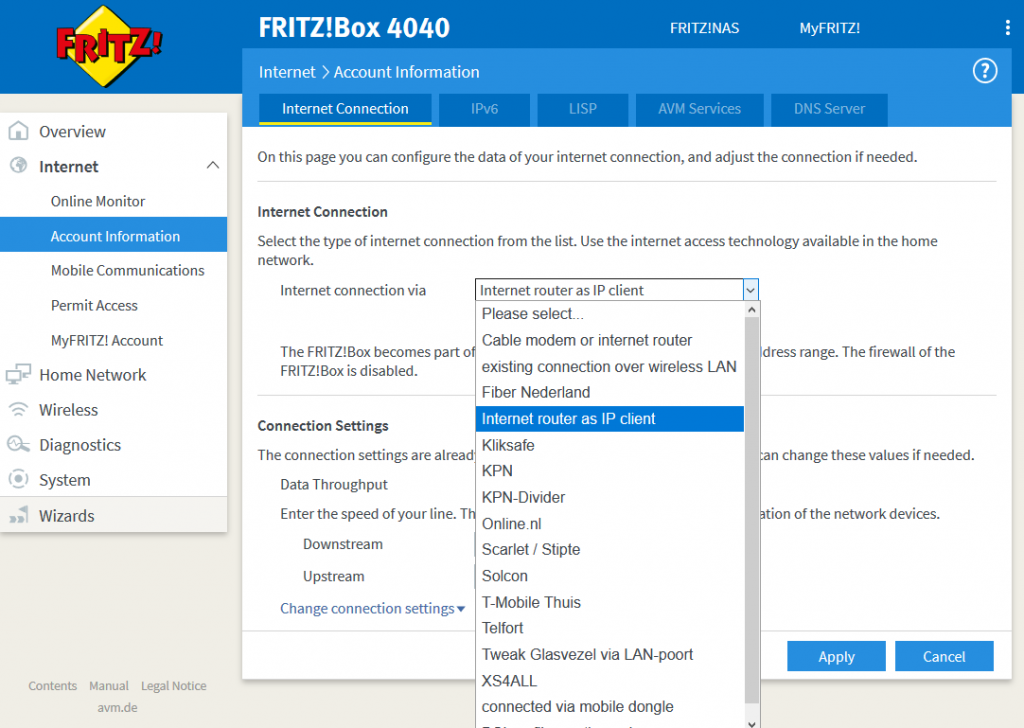
- Open a webbrowser, enter the gateway IP address on the address bar and press enter.
- Login to your router with the last login credentials set. If you don’t know often a default admin works both username and password. Or admin as username and a empty password. Elsewise: Google is your friend to find the default login credentials. Otherwise: contact the seller/provider/manufacturer of the router.
- Find and disable the DHCP settings of the router and disable the DHCP server. If possible do not restart the router.
- Set an unique IP address for the router it self so that you can change other settings when needed in the future.
- Save the settings.
- Restart the router if required by the router’s confirmation of saving the settings.
- Connect the LAN cable on your new router to one of the LAN ports (mostly numbered 1 to 4). Connect the other side of the cable to one of the LAN ports on the old router.
- If needed login again at the router’s webpage to change WiFi credentials to the same as before.
Option 3: change router / accesspoint settings of the new router
In your router / accesspoint settings you can change the WiFi SSID (network name) and key (password) to be exactly the same as it was on the old router / accesspoint. Mostly all devices will connect again to the new router / accesspoint. In the case some of them won’t: remove them from the power and after a few seconds power them again. And if that doesn’t help too: follow option 2 below.
Option 4: re-pair the devices without deletion in the eWeLink app
Leave the devices in your current account ( so don’t delete them! ). Pair the devices in the way you normally would do. All settings will remain in tact. Since eWeLink 4.4.0 it is possible to pair more than 1 device at once with the Add multiple devices options during the pairing process in the app. This help speeding up the process a bit.
This article describes more about what settings are being saved where and what the (dis)advantages are: Where do eWeLink supported devices save what data and what are (dis)advantages of that?
Share this:
- Click to share on Twitter (Opens in new window)
- Click to share on Facebook (Opens in new window)
- Click to share on Telegram (Opens in new window)
- Click to share on LinkedIn (Opens in new window)
- Click to share on WhatsApp (Opens in new window)
- Click to share on Skype (Opens in new window)
- Click to share on Reddit (Opens in new window)
- Click to share on Tumblr (Opens in new window)
- Click to share on Pinterest (Opens in new window)
- Click to print (Opens in new window)
- Click to email this to a friend (Opens in new window)
Change WiFi network name and password
Your router is the gateway to your home network, as well as all the devices connected to it. If someone gains access to it, they can not only exploit your connection, but if they are an expert, they may have the ability to break into connected devices.
That is why it is important that you change the name and password of your WiFi network. Many people make the mistake of using default settings, so it’s important that you know how and why you should change these settings to prevent WiFi theft.
Choose the brand of your router
How to change the name of the WiFi network
Changing the WiFi network name and password is an easy way to increase the security of your wireless network. This task can be done quickly and easily if you follow the right steps. This guide will show you how to change your WiFi network name and password from your Internet provider’s modem:
- Open an Internet browser window and type your router’s IP address in the address bar.
- Enter the username and password to access your router.
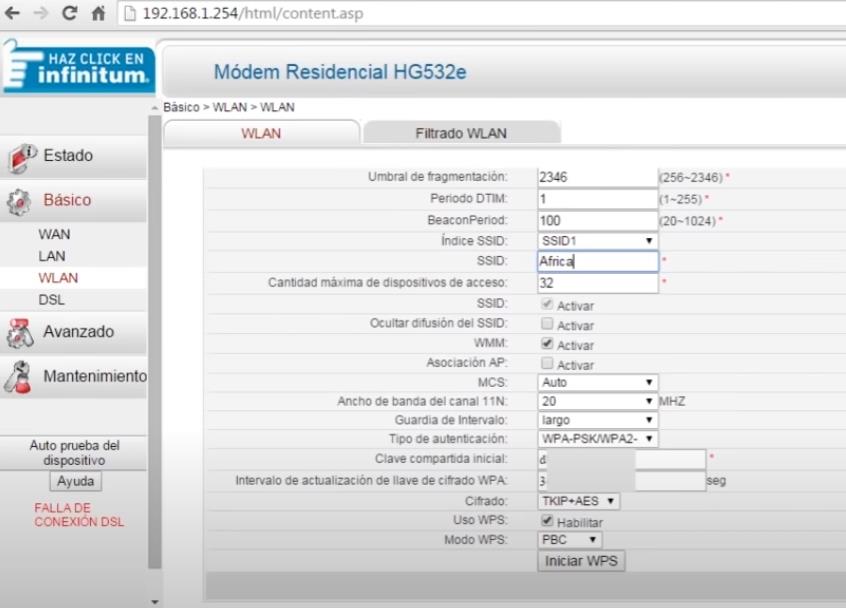
- Look for the «Wireless Settings» or «Wireless Network» section on your router’s settings page.
- Locate the network name (SSID) and change it to a name that is unique and identifies your network.
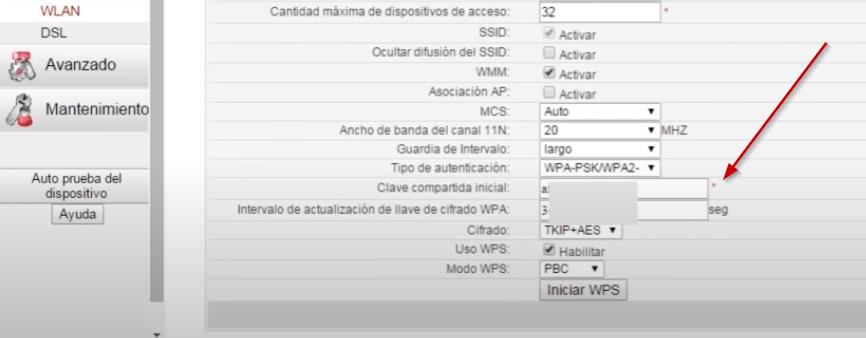
- Set a password to protect the network. This password is known as the network security password or security key.
- Click the “Apply” or “Save” button to save the changes.
- Reboot the router for the changes to take effect.
Once you have completed the steps above, you will have changed your WiFi network name and password. This will increase the security of your wireless network and help protect your connected devices.
Change default Wifi password
Changing the default WiFi password is an important step to ensure network security. It is recommended to change the default password to a strong password to protect the network from unauthorized access attempts.
- connect to point of wifi access with a device.
- Enter the menu router configuration.
- Look for the Wi-Fi password section.
- Enter the new password and confirm it.
- Save the new configuration and reboot the router.
For this reason, it is important to change your WiFi name and password to prevent unauthorized access to your network. This will make your data safe and your network more secure. So remember: change your WiFi name and password to ensure your privacy.