- How to Fix a “Wi-Fi Doesn’t Have a Valid IP Configuration” Error
- Restart Your Router
- Reset Your Wireless Network Adapter
- Renew Your PC’s IP Lease
- Reset the TCP/IP Stack
- Reinstall the Wireless Network Adapter
- Update the Wireless Network Adapter
- Obtain the IP Address Automatically
- Change the Router’s SSID and Password
- Run the Network Adapter Troubleshooter
- Reset Your PC’s Network Settings
- The Wi-Fi IP Configuration Is Valid
- Solved: Wi-Fi doesn’t have a valid IP configuration
- Solution 1: Release and renew IP address
- Solution 2: Reset TCP/IP
- Solution 3: Uninstall wireless adapter driver
- Solution 4: Update the drivers
- Solution 5: Manually set IP address
How to Fix a “Wi-Fi Doesn’t Have a Valid IP Configuration” Error
A “Wi-Fi doesn’t have a valid IP configuration” error message in Windows 10 or 11 happens when your PC fails to secure a functioning IP (Internet Protocol) address over Wi-Fi. You may also come across a similar IP-related error with Ethernet.
If restarting your computer didn’t fix the problem (try that if you haven’t already), then the following troubleshooting tips should help you sort things out.
Restart Your Router
In most cases, the “Wi-Fi doesn’t have a valid IP configuration” error shows up due to random faults on the router side. The solution—restart your router.
Turn the router off, wait at least ten seconds, and then turn it back on. When your computer re-establishes its Wi-Fi connection, see if you can access the internet.
Reset Your Wireless Network Adapter
Disabling and re-enabling your PC’s wireless network adapter is another potential fix for connectivity-related issues in Windows.
1. Press Windows+R to open the Run box.
2. Type ncpa.cpl and select OK.
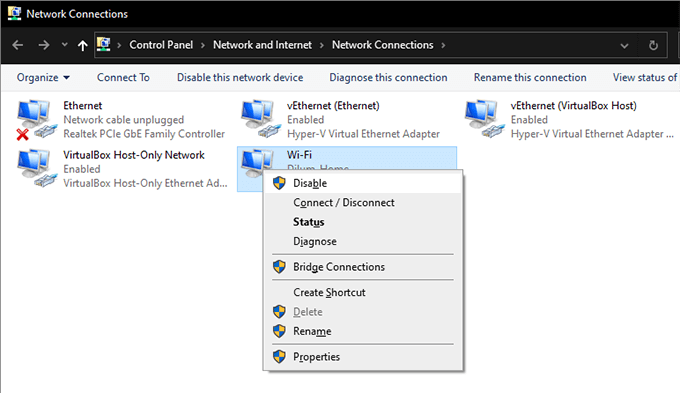
3. In the Network and Sharing Center, right-click the wireless network adapter and select Disable.
4. Wait at least ten seconds.
5. Right-click the Wi-Fi adapter again and select Enable.
Renew Your PC’s IP Lease
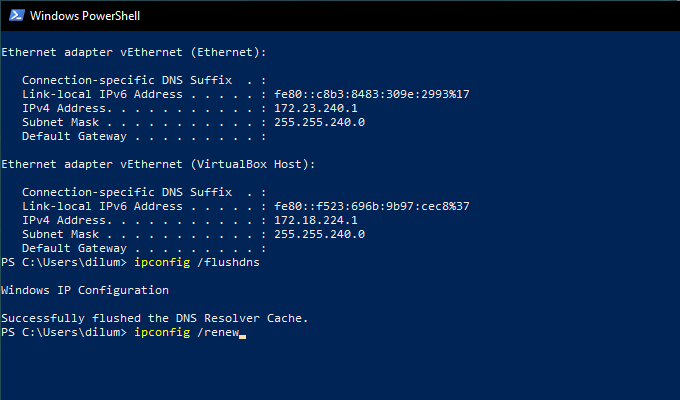
If restarting the router or disabling/re-enabling the wireless network adapter doesn’t resolve the issue, you can force your computer into renewing its IP lease by running a few commands via Windows PowerShell. The same commands also work in Command Prompt or the new Windows Terminal if you prefer to use that.
1. Press Windows+X and select Windows PowerShell.
2. Type each of the commands below, pressing the Enter key after each and waiting for the process to finish:
3. Exit Windows PowerShell.
Reset the TCP/IP Stack
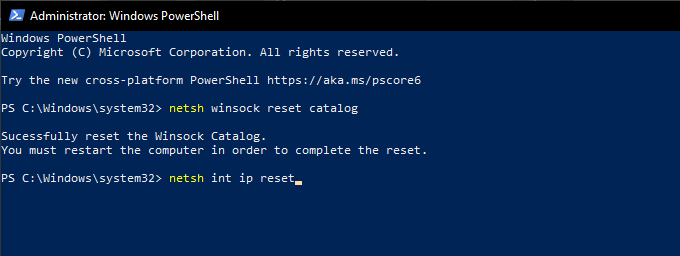
If renewing the IP lease didn’t help, you should reset your PC’s TCP/IP stack. That requires running another couple of commands, but this time you’ll need to run them in an elevated Windows PowerShell console (one you run with admin privileges). As before, you can also use these commands in Command Prompt or Terminal, as long as you run them as administrator.
1. Press Windows+X and select Windows PowerShell (Admin).
2. Run each of the commands below, pressing Enter after each line and waiting for the process to finish:
3. Exit the PowerShell window and restart the computer. If a corrupted TCP/IP stack was at the source of the error, you should be able to connect online without problems.
Reinstall the Wireless Network Adapter
If you still receive the “Wi-Fi doesn’t have a valid IP configuration” error message, try uninstalling and reinstalling the wireless network adapter on your computer. That should rule out a corrupted driver.
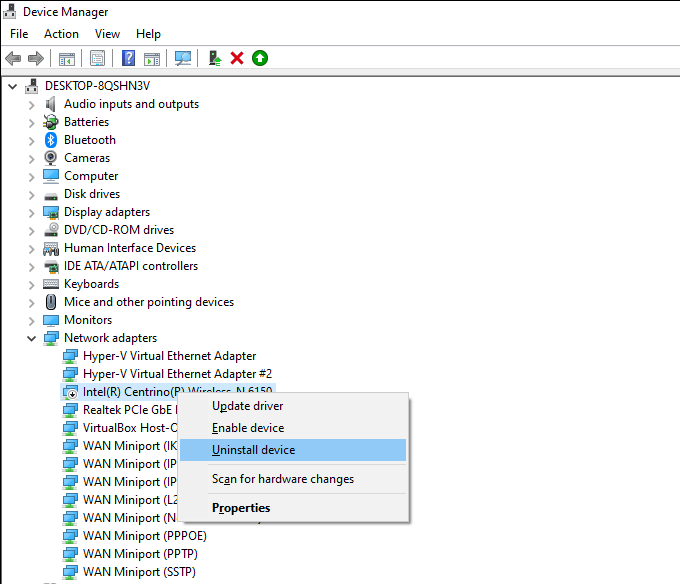
1. Press Windows+X and select Device Manager.
2. Expand Network adapters.
3. Right-click your wireless network adapter and select Disable device.
4. Select Yes.
5. Right-click the wireless network adapter again and select Uninstall device.
6. Reboot your computer, and it should re-install the wireless network adapter automatically.
Note: If your computer fails to detect and install the wireless network adapter after the restart, open the Device Manager again, right-click your PC’s name to the top, and select Scan for hardware changes.
Update the Wireless Network Adapter
If disabling and reinstalling the wireless network adapter didn’t help, try updating its driver. Windows installs a generic driver by default, but it’s a good idea to grab an up-to-date copy from the device manufacturer’s website. You must—obviously—use a device with an active internet connection for that.
Once you’ve downloaded and transferred the driver setup file, just run it and follow all on-screen instructions to update the wireless network adapter.
Obtain the IP Address Automatically
Have you configured your PC’s wireless network adapter with a custom IP address and DNS settings? If so, you should switch back to obtaining them automatically.
1. Press Windows+R to open the Run box. Then, type ncpa.cpl and select OK.
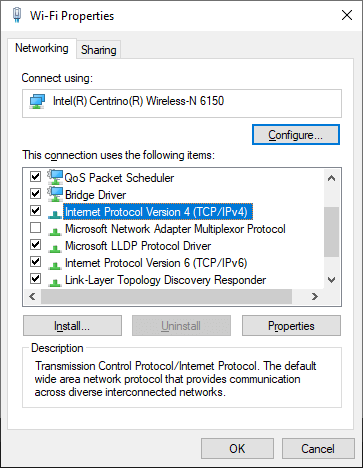
2. Right-click the Wi-Fi adapter and select Properties.
3. Under the Networking tab, double-click Internet Protocol Version 4 (TCP/IPv4) Properties.
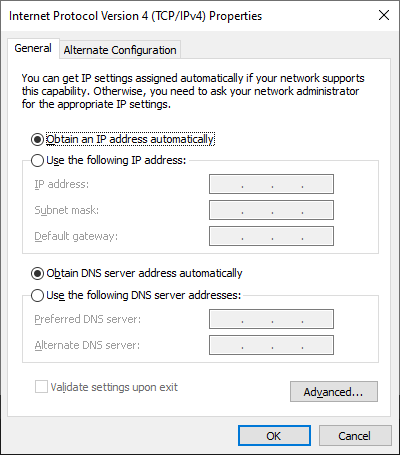
4. Select the radio buttons next to Obtain an IP address automatically and Obtain DNS server address automatically.
5. Repeat steps 3 and 4 for Internet Protocol Version 6 (TCP/IPv6) Properties.
Change the Router’s SSID and Password
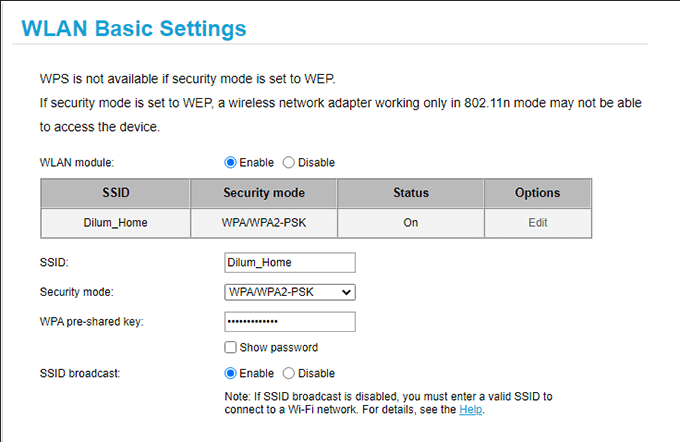
Another way to fix the “Wi-Fi doesn’t have a valid IP configuration” error is to change the SSID and password of your router. To do that, you must visit the router’s settings.
Note: You need the router’s gateway IP, username, and password to access its settings. You can typically find the details on a label somewhere on the router itself.
1. Enter the gateway IP into a new browser tab—in Chrome, Firefox, or Edge—and press Enter.
2. Log in to the router using the username and password.
3. Sift through the router settings and change the SSID and password. Then, save your changes.
Once you’ve done that, you must update your PC’s connection to the router with the new SSID and password. Don’t forget to update the network on other devices that connect to it as well.
Run the Network Adapter Troubleshooter
Now that you’ve worked through several fixes, it’s time to diagnose your Wi-Fi connection once more using the network troubleshooter.
- Press Start and type Network Troubleshooter.
- Select Find and fix network settings from the results (or Identify and repair network problems in Windows 10).
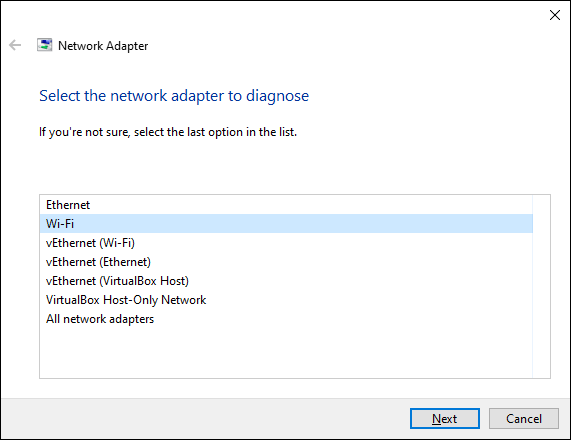
- Step through the wizard and select Wi-Fi when you have the choice. Then, select Next and follow the onscreen instructions to resolve any issues.
If you run into the “Wi-Fi doesn’t have a valid IP configuration” again, move on to the next fix.
Reset Your PC’s Network Settings
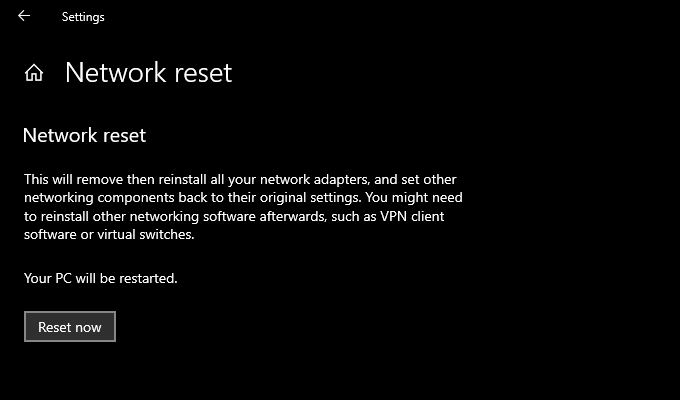
It’s time to reset your PC’s network settings. That should revert every network-related setting to its default and likely patch out incorrect or corrupt configurations for good.
After resetting the network settings, reconnect to Wi-Fi, and you probably won’t run into the “Wi-Fi doesn’t have a valid IP configuration” error anymore.
The Wi-Fi IP Configuration Is Valid
You can usually resolve the “Wi-Fi doesn’t have a valid IP configuration” error by restarting the router, resetting the wireless network adapter, or renewing the IP lease. But if the issue recurs after some time, we recommend you work through some of the advanced fixes above until it goes away permanently.
Dilum Senevirathne is a freelance tech writer and blogger with three years of experience writing for online technology publications. He specializes in topics related to iOS, iPadOS, macOS, and Google web apps. When he isn’t hammering away at his Magic Keyboard, you can catch him binge-watching productivity hacks on YouTube. Read Dilum’s Full Bio
Did you enjoy this tip? If so, check out our YouTube channel from our sister site Online Tech Tips. We cover Windows, Mac, software and apps, and have a bunch of troubleshooting tips and how-to videos. Click the button below to subscribe!
Solved: Wi-Fi doesn’t have a valid IP configuration
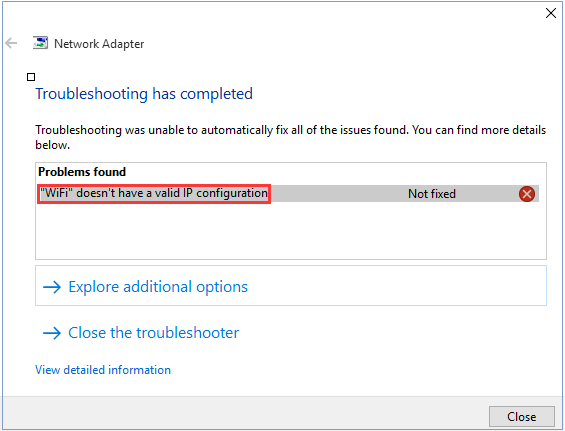
In most cases, Windows Troubleshooting may just find issues but not provide fixes. Issue “WiFi doesn’t have a valid IP configuration” is the case. After finishing the troubleshooting, you need to solve the issue manually. Here you will learn how to fix this issue on Windows 10.
The problem can be caused by several issues, such as incorrect network settings, faulty network drivers. There are five solutoins you can use to fix the problem. You may not have to try them all. Just work your way down at the top of the list until you find the one that works for you.
Solution 1: Release and renew IP address
In some cases, this solution would work if there are problems with the network. And many users have reported it helped them with the WiFi doesn’t have a valid IP configuration problem. Follow steps below and it may work like a charm for you.
1) Open Command Prompt as an administrator.
If you’re using Windows 7, visit How to Open Command Prompt in Windows 7 for the instrucitons.
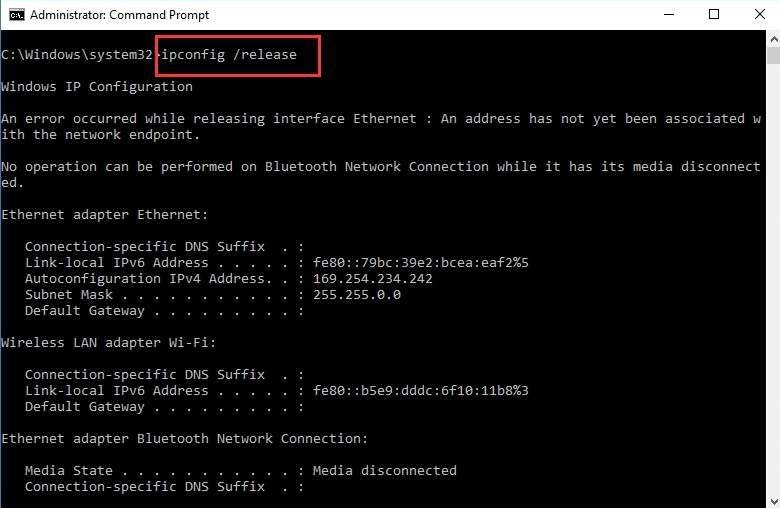
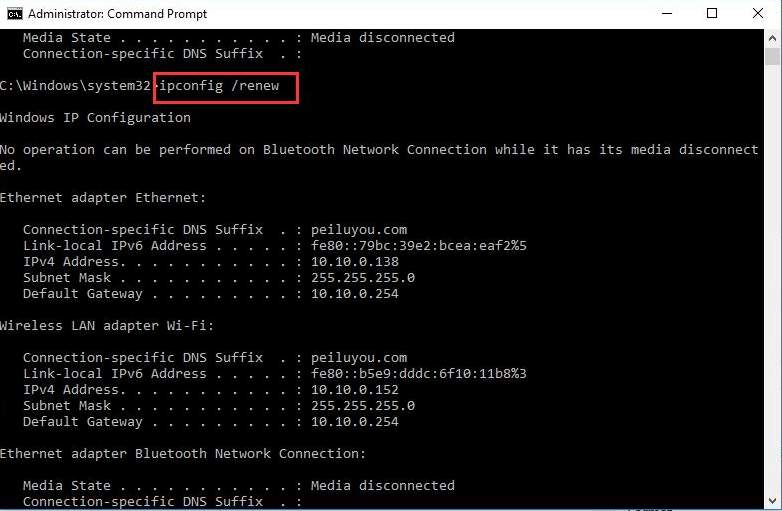
2) In Command Prompt, type ipconfig /release and hit Enter.
3) Then type ipconfig /renew and hit Enter.
4) Type Exit and hit Enter.
Solution 2: Reset TCP/IP
Follow these steps:
1) Open Command Prompt as an administrator.
If you’re using Windows 7, visit How to Open Command Prompt in Windows 7 for the instrucitons.
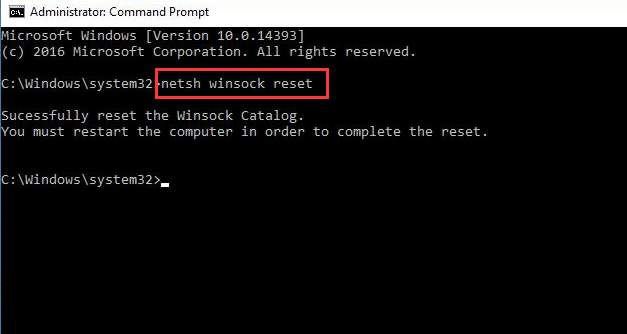
2) When Command Prompt opens, type netsh winsock reset and hit Enter .
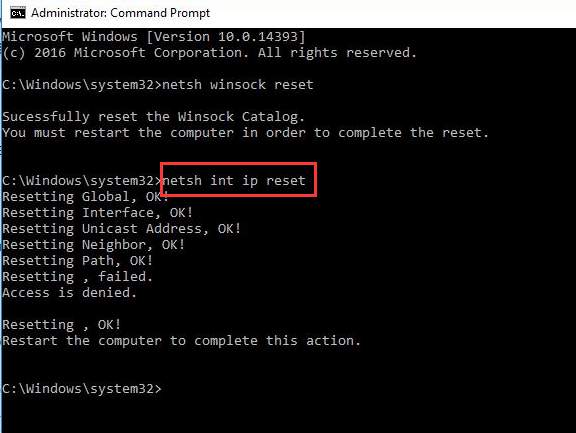
3) Then type netsh int ip reset and hit Enter.
4) Restart your computer and see if the problem resolves.
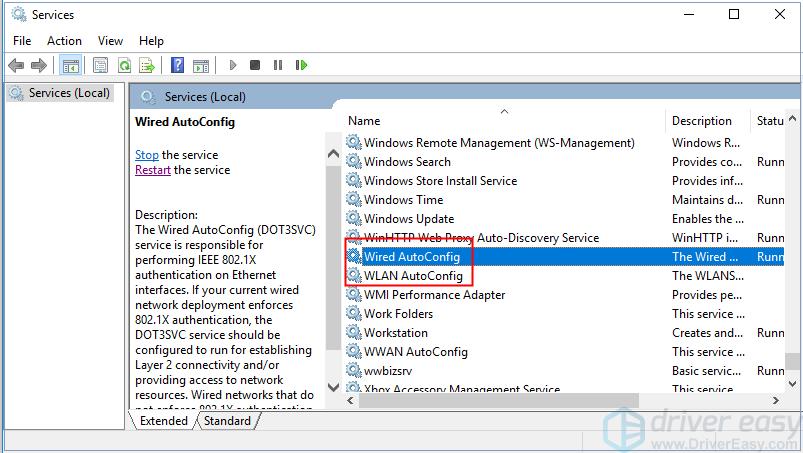
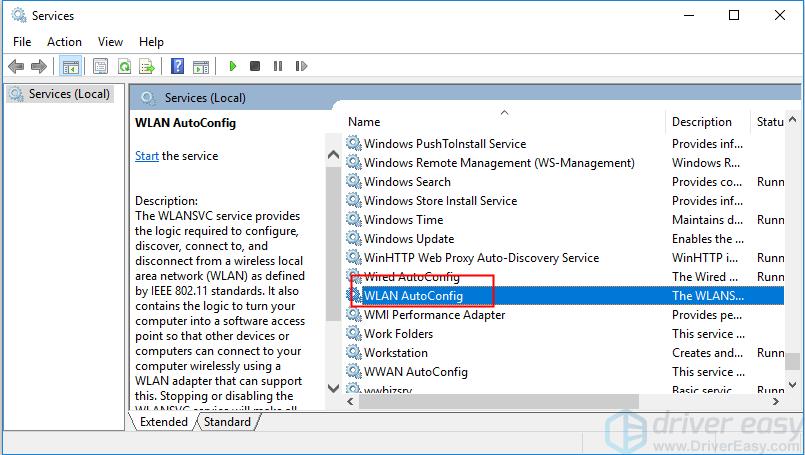
If the problem persists after you restart the computer, check and ensure the Wired Autoconfig service and the WLAN autoconfig service are running and their Startup type is set Automatically. Follow steps below:
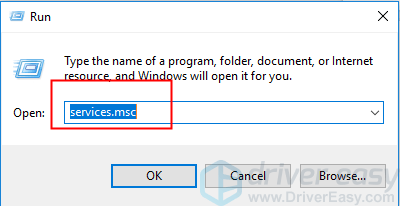
1) On your keyboard, press the Win+R (Windows logo key and R key) at the same tiem to invoke the run box.
2) Type services.msc and click the OK button.
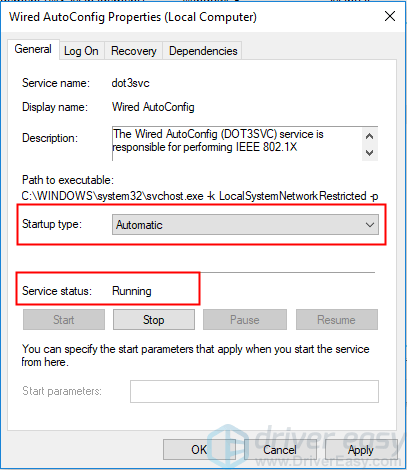
3) Double-click on Wired Autoconfig to open the Properties window.
4) Ensure the Startup type is Automatic and the Service status is Running. After you change the settings, click the Apply button.
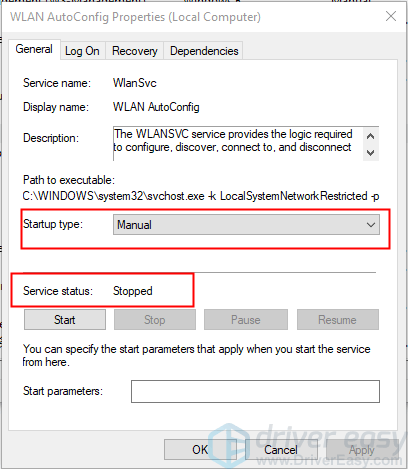
5) Double-lcick on WLAN AutoConfig.
6) Ensure the Startup type is Automatic and the Service status is Running. After you change the settings, click the Apply button.
7) Check to see if the problem is resolved.
Solution 3: Uninstall wireless adapter driver
The problem can also be caused by faulty network driver. Try to uninstall the wireless adapter driver and allow Windows to reinstall the driver.
Follow steps below to uninstall the driver.
1) Go to Device Manager.
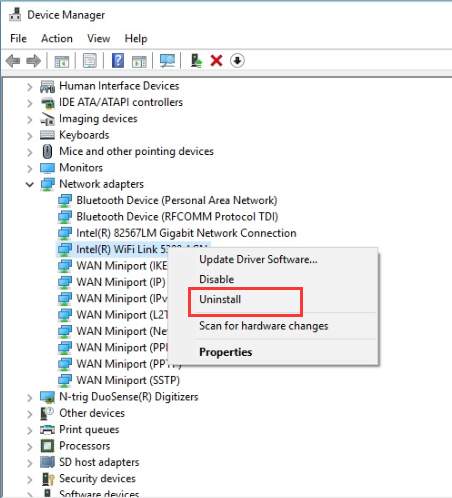
2) Expand categories “Network adapters”. Right-click on wireless device and select Uninstall.
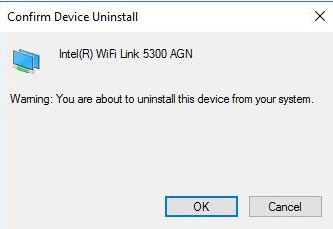
3) Then click “ OK ” button to confirm the Uninstall. If you see “Delete the driver software for this device.” at the bottom corner, before pressing OK, check the box next to it.
Solution 4: Update the drivers
If uninstalling the network driver doesn’t work, try to update the drivers. or you’re not confident playing around with drivers manually, you can do it automatically with Driver Easy.
IMPORTANT: To run Driver Easy, you need to have access to the internet. If you can’t access to the internet, you can use the Offline Scan feature of Driver Easy. The Offline Scan feature allows you to download and install the network driver easily even without internet.
Driver Easy will automatically recognize your system and find the correct drivers for it. You don’t need to know exactly what system your computer is running, you don’t need to risk downloading and installing the wrong driver, and you don’t need to worry about making a mistake when installing.
You can update your drivers automatically with either the FREE or the Pro version of Driver Easy. But with the Pro version it takes just 2 clicks (and you get full support and a 30-day money back guarantee):
1) Download and install Driver Easy.
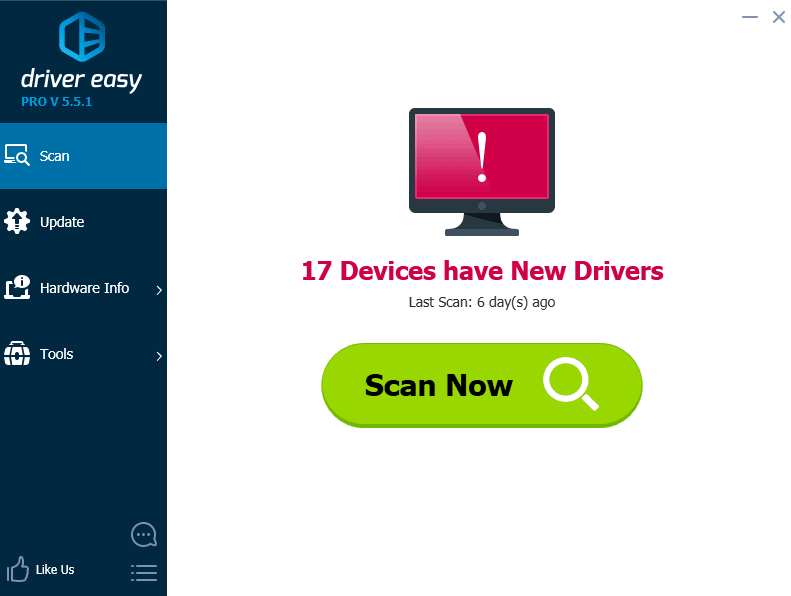
2) Run Driver Easy and click Scan Now button. Driver Easy will then scan your computer and detect any problem drivers.
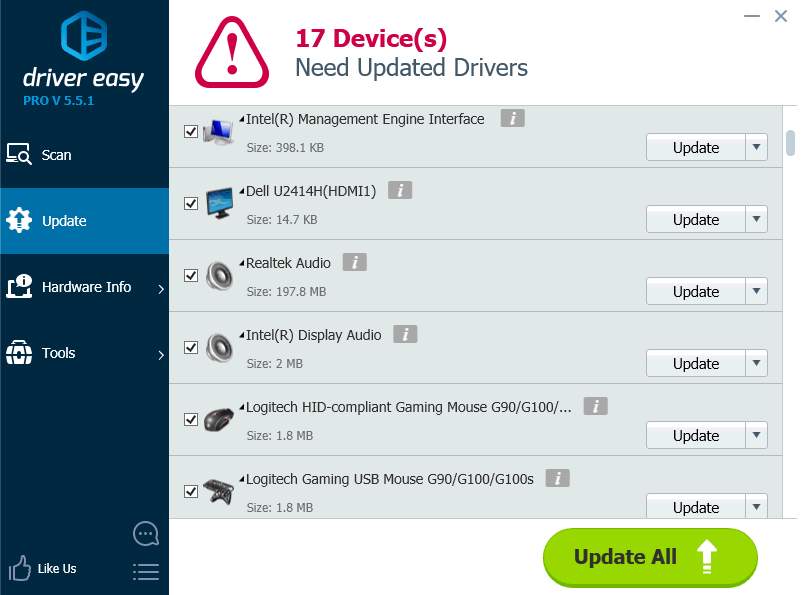
3) Click the Update button next to a driver to automatically download and install the correct version of this driver (you can do this with the FREE version). Or click Update All to automatically download and install the correct version of all the drivers that are missing or out of date on your system (this requires the Pro version – you’ll be prompted to upgrade when you click Update All).
Solution 5: Manually set IP address
If you have a home network with several computers, the IP address of each computer will be automatically assigned . To fix the problem, you can try to reset the IP on the computer that has the network problem.
Follow these steps:
1) Open Control Panel.
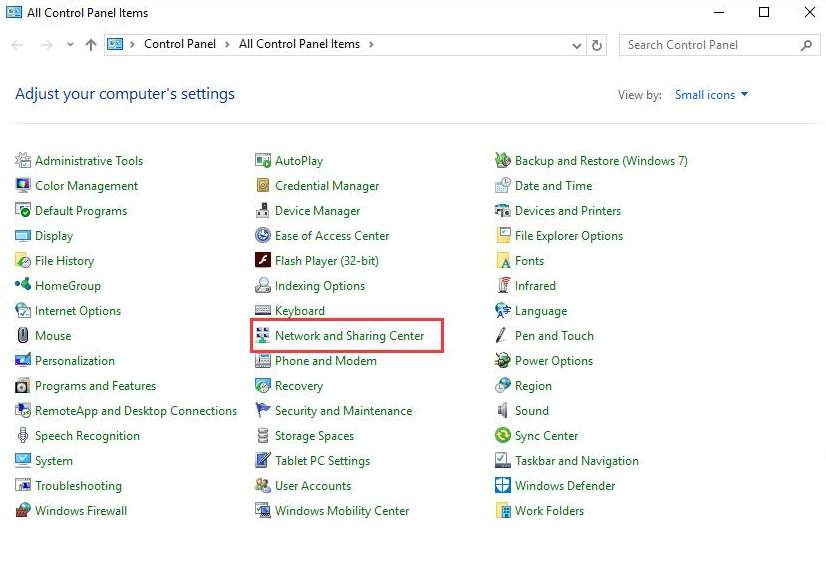
2) View by Small icons, click Network and Sharing Center.
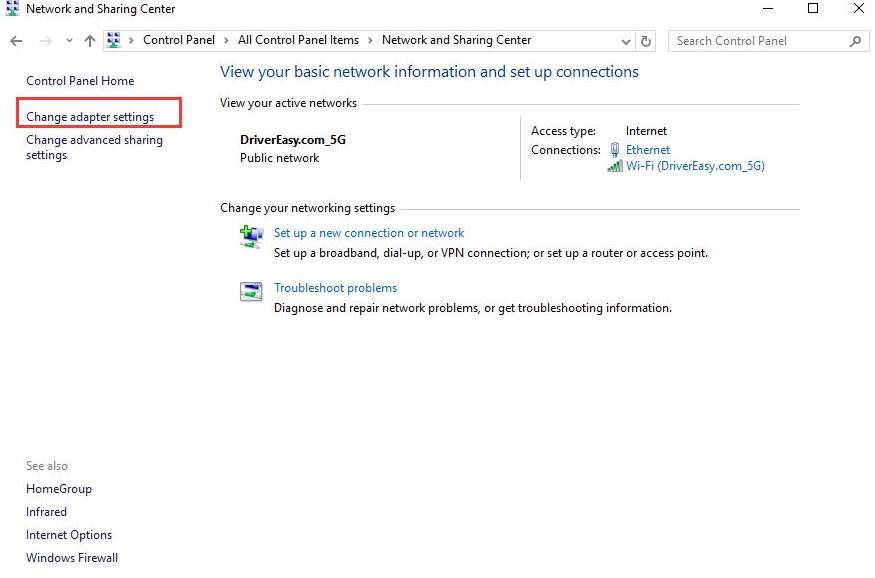
3) Select Change adapter settings in the left pane.
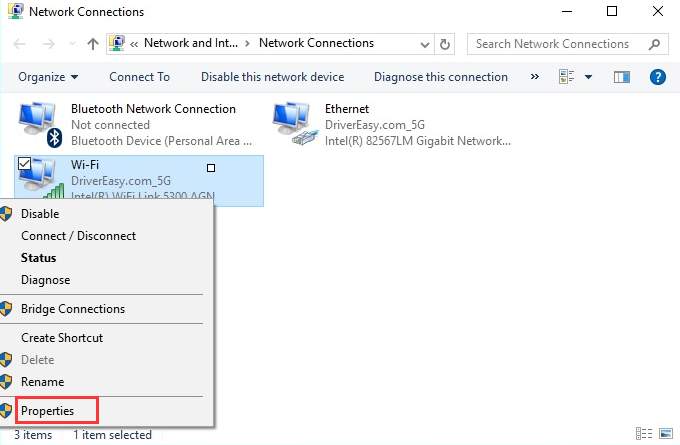
4) Right-click on WiFi connection (In my case, the WiFi connection is DriverEasy.com_4G.) and click Properties.
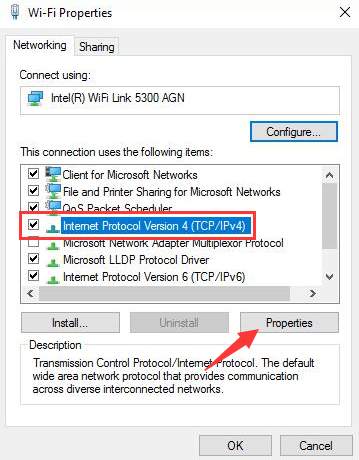
5) Select Internet Protocol Version 4 (TCP/IPv4) and click Properties.
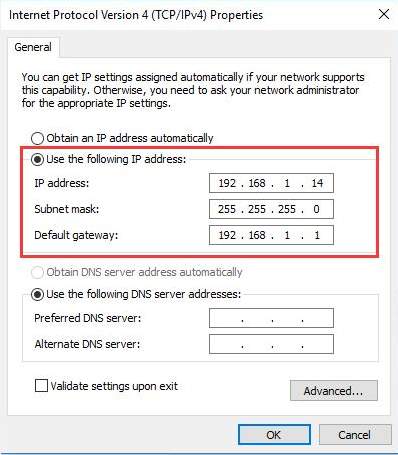
6) Select Use the following IP address, then set IP address to 192.168,1.x (You can choose x to any digit number. If you are not sure about this, use 192.168,1.14.). Set Subnet mask to 255.255.255.0 and set IP gateway to 192.168.1.1.
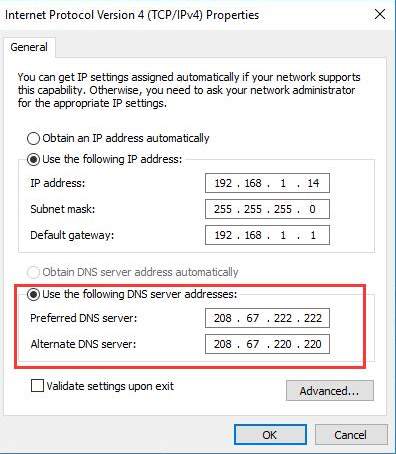
7) Under Use the following DNS server addresses, then set the Preferred DNS server to 208.67.222.222 and set the Alternate DNS server to 208.67.220.220.
8) Click OK button.
Hope the solutions here help fix your WiFi doesn’t have a valid IP configuration issue on Windows 10.
