- Настраиваем WiFi в Linux Mint
- How do I connect to Wi-Fi on Linux Mint
- Prerequisites
- How to connect Wi-Fi on Linux Mint
- How to connect Wi-Fi on Linux Mint using Graphical Interface
- How to connect Wi-Fi on Linux Mint using the command-line interface
- Conclusion
- How to setup WiFi in Linux Mint
- How to connect to your wireless network
- Use your Linux machine as hotspot
- Related Posts
- How to disable threaded conversations in Thunderbird
- How to use Applets in Linux Mint Cinnamon – Linux Mint 21 edition
- How to prevent your Linux computer from falling asleep with Caffeine
- About John Been
- My Linux book is available now!
- Why this website
Настраиваем WiFi в Linux Mint
Структура Linux Mint сделана таким образом, чтобы свести на нет все трудности, которые могут возникнуть с настройками системы и, в частности, с настройкой WiFi. Все необходимые драйвера скорее всего будут загружены при установке системы, так что вам остается сделать только несколько движений для окончательной настройки беспроводной сети.
В правом нижнем углу панели инструментов располагается значок сетевого подключения. Переместите на него курсор мыши и кликните. Откроется окно со списком всех доступных в настоящее время сетей.
Вы видите все доступные сети, среди которых есть и ваша. Кликните по названию своей сети. Появится запрос на ввод пароля. Введите свой пароль и кликните ОК . Настройка сети закончена.
Бывают случаи, когда ваша сеть не видна. Чем это может быть вызвано? Ну, банально, отсутствием в настоящее время сетевого трафика. У поставщика услуг могут быть какие-либо технические неполадки. Также, нужно проверить сам роутер, его настройки и корректную установку драйверов. В последнем случае можно прибегнуть к помощи терминала. Для этой цели открываем терминал, вводим команду sudo -i . Затем нажимаем Enter , и вводим свой пароль. После чего можно ввести одну из двух команд: sudo iwconfig , или sudo lspci . Окно терминала выдаст следующее:
В данном случае все опознано и работает как часы. В случае некорректной установки драйверов, нужно обратиться на сайт производителя оборудования, или погуглить в сети, чтобы найти свой драйвер. Но обычно такого не происходит.
Вы также можете настроить скрытую сеть WiFi. Для этого переместите снова указатель мыши на значок сетевого подключения, и кликните на него. Откроется знакомое вам окно, в котором нужно выбрать Параметры сети .
How do I connect to Wi-Fi on Linux Mint
![]()
Wi-Fi is simply an internet connection that is used to connect the computing devices, laptops, smartphones or tablets to the internet. In this modern tech era, every computer needs an internet connection and to avoid inconvenience, a wireless connection is preferred. The internet service providers use Wi-Fi routers to convert the ethernet connection to wireless signals and any computing device can connect to that wireless connection by entering correct credentials. In this article, several ways are provided to connect to Wi-Fi on a Linux Mint.
Prerequisites
Before getting into connection with a wireless network, there are a set of prerequisites that are necessary to connect to a wireless network.
- The wireless adapter is in a functional state.
- And you are using a Linux Mint based operating system
How to connect Wi-Fi on Linux Mint
To connect your Linux Mint to Wi-Fi, there are two ways to do so, and they are mentioned below:
The upcoming sections briefly describe both methods.
How to connect Wi-Fi on Linux Mint using Graphical Interface
This section guides you to the graphical support of Linux Mint to connect to Wi-Fi. You must follow the steps carefully.
Step 1 : Navigate to the connection icon, and you would observe the available wireless connections.
Step 2 : Select on your wireless connection that you want to connect, and if it is encrypted you have to enter its password to connect successfully.

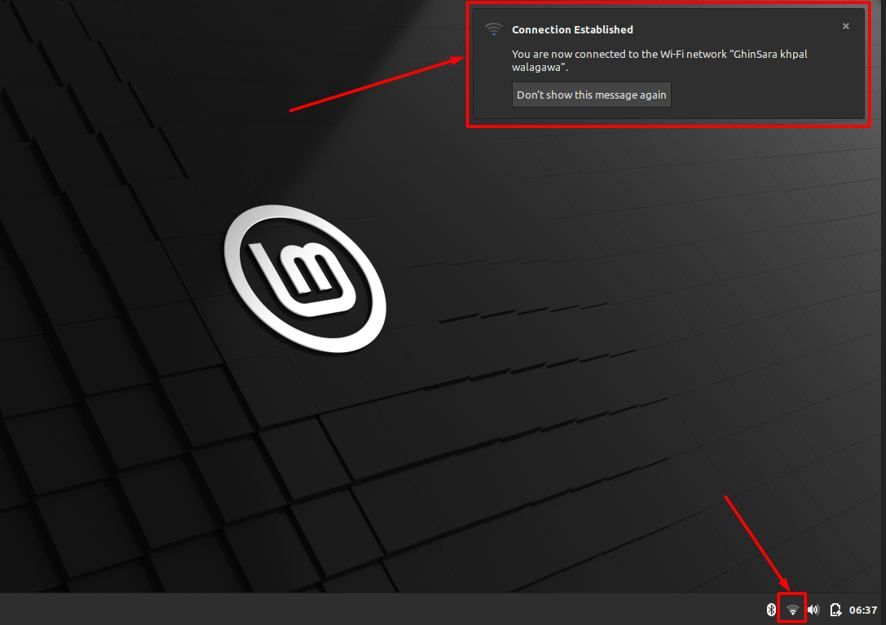
After connecting, the “Connection Established” prompt will appear.
How to connect Wi-Fi on Linux Mint using the command-line interface
The command-line interface of Linux-Mint is enriched in features as any terminal of Linux-based distribution. You have to execute several commands to enable Linux-Mint to connect with the Wi-Fi.
Step 1 : Firstly, it is recommended to trace your wireless network by navigating to the directory where network information resides. The directory’s address is “/sys/class/net“, and use the ls command to get the list of available networks.

Step 2 : Look for the network configuration file using the netplan utility. By doing so, you would get the .yaml file, where you can put your wireless network configuration.
So, use the command written below to verify that the file exists in the “/etc/netplan” directory or not.

Note : Netplan is a Linux utility that is used to configure network interfaces. For that, a .yaml file is used to add the details of the network interface.
Step 3 : As the output of the above command returns the file 1-network-manager-all.yaml. Open the 1-network-manager-all.yaml file in nano(any editor can be used) editor.
The first three lines are already there; append the following lines after entering the details in the network-manager file, press “Ctrl+S” and “Ctrl+X” to save and exit the file.
Note: It is recommended that you keep the indentation in mind as you might not connect if proper indentation rules are not followed.
Wifis:
Wlp2s0:
optional: true
access points:
«SSID of wireless-connection»
Password: «password-of-wireless-connection»
dhcp4: true
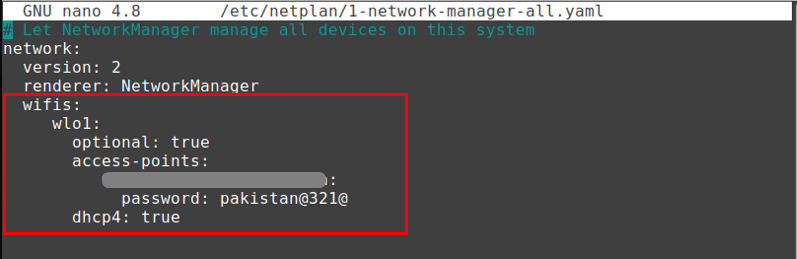
Note: In the above syntax, SSID is the name of your wireless network, and the name selection depends on the user; thus, it varies from user to user.
For completing the configuration of netplan, you must execute the command written below.
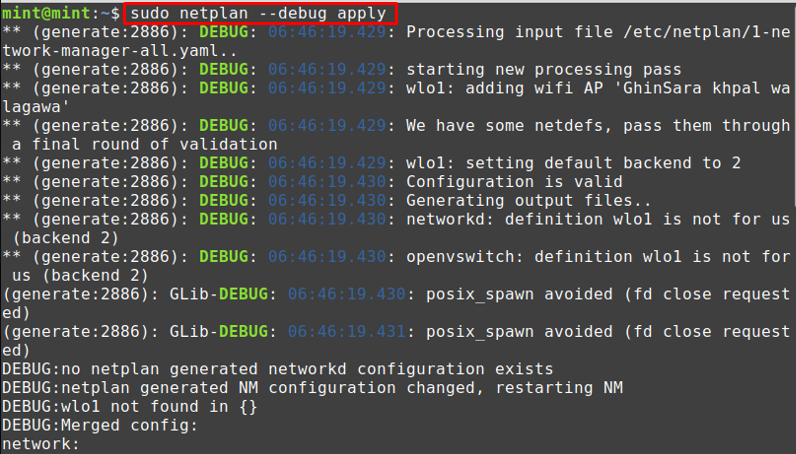

After applying the changes, the connection will be made, and you can use the ip command to check the state of your wireless network.
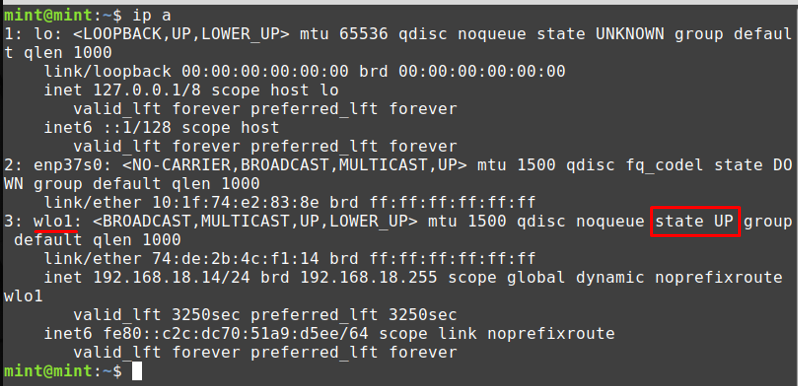
After this, you would be able to use the internet provided by your wireless network interface.
Conclusion
Wireless technology has emerged as a key player in revolutionizing the world. The Wi-Fi connection has eased the way of communicating with the world. Their application can be seen from computing devices to tablets/phones, from several electrical appliances to setting up an IoT-based network. This demonstration provides the procedural guide to connect your Linux Mint system with Wi-Fi. The two methods are mentioned here that can be followed to connect to a Wi-Fi network. The graphical interface is quite easy and quick to make a connection, whereas Linux users should be familiar with the command line method.
How to setup WiFi in Linux Mint

Setting up WiFi in Linux Mint is pretty easy, but of course you need to setup your WiFi adapter first, which in Linux can be everything between very easy and almost impossible. In the previous chapter of this Linux Mint beginner course I explained how to install WiFi drivers in Linux Mint. It all depends on which hardware components or which laptop you have. For my Dell Latitude E7450 it was a no brainer to have a working WiFi adapter, as it was recognized by Linux Mint out of the box. This is often the case for a lot of A-class laptops, like the Lenovo ThinkPad, HP Stream, Dell XPS and Dell Latitude. But on my custom build i7 workstation it was much more difficult to come up with a working solution for several usb WiFi adapters, so that one is wired. So now it is time to setup the WiFi connection itself.
How to connect to your wireless network
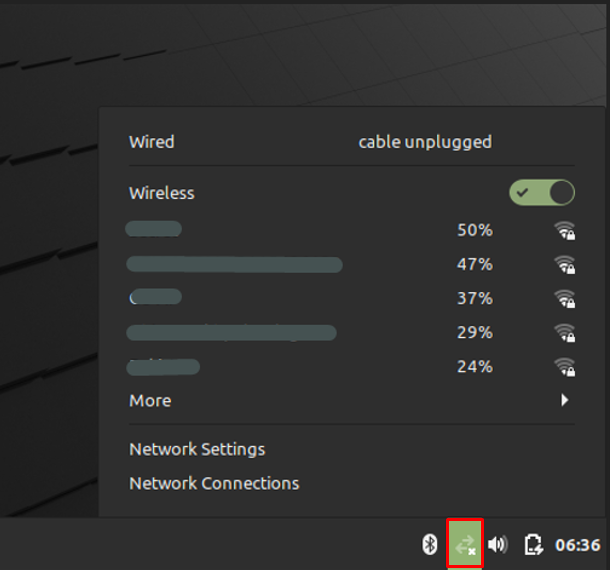
I assume you have a working WiFi adapter (based on the explanation in the previous chapter How to install WiFi drivers in Linux Mint), so it is time now to setup the WiFi connection itself. When you have your Linux Mint desktop in front of you and you didn’t yet connect to your wireless network you will see the following icon on the right hand side of your panel in what we call the system indicator area. This “two arrows with a small x” icon tells you that the wireless connection is not active yet.

If the wireless connection is active then you will see the WiFi indicator. There are embedded four levels in this icon that will give you information on the strength of your received signal. In this example the strength of your signal is approximately 75%.

But let’s assume this is the first time we try to activate a WiFi connection. Start by left-clicking on the “two arrows with a small x” icon and the following screen will pop-up.
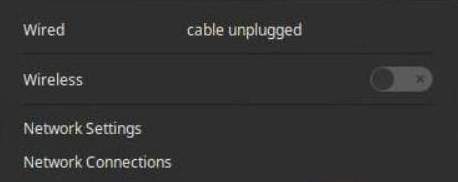
In this screen you see that both the wired and the wireless connections are not active. So click on the on/off switch on the right of the Wireless section.
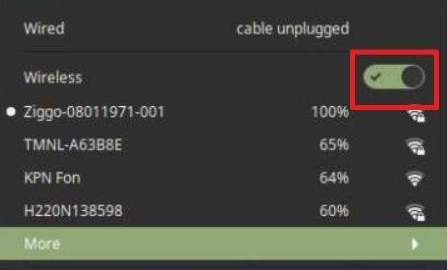
Now the activation switch will change to activated and one or more available WiFi networks will hopefully be shown with their strength levels. Here you can select your own wireless network.
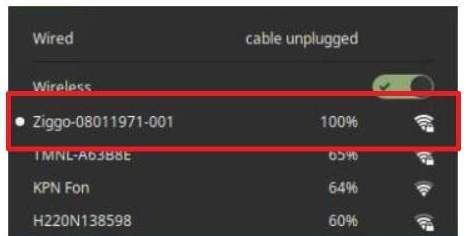
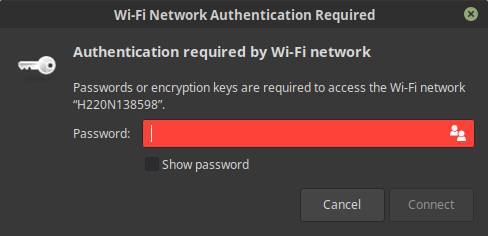
When you selected your preferred wireless network, a WiFi Network Authentication pop-up will be presented to you. Give your administrator password here and click Connect.
If everything goes as expected you are now connected to your wireless network and you can start surfing the web.
Use your Linux machine as hotspot
With respect to wireless connectivity Linux Mint has an additional trick under its sleeve. It is possible to use your workstation or laptop installed with a Linux Mint distribution as a wireless hotspot for other wireless devices like laptops, tablets and mobile phones. The only catch is that this Linux hotspot computer must be connected by wire to your internet router. When wireless connected your computer can’t be used as a wireless hotspot.
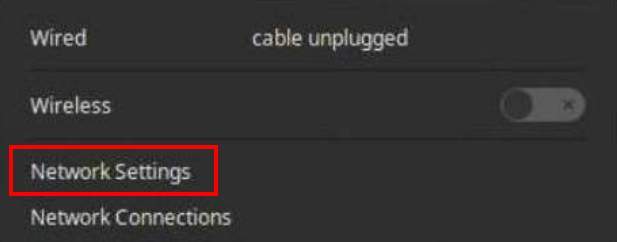
So to setup a wireless hotspot, first make sure your computer has a wired connection. Now left-click on the network icon in the system indicator area on the right hand side of the panel.

Click on Network Settings.
Now the Network settings screen will be opened. Here you find the button “Use as hotspot”.

So click on it to open the hotspot settings.
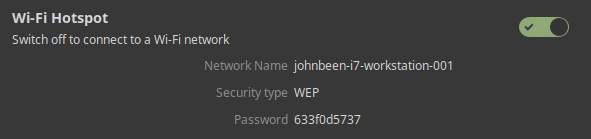
In the above screenshot you see that a Network Name has been created together with a Password. Now you simply search in the network settings of your mobile phone or tablet or another laptop for this network name and type the provided password to log in this wireless network. That’s all.
Related Posts

How to disable threaded conversations in Thunderbird

How to use Applets in Linux Mint Cinnamon – Linux Mint 21 edition
June 11, 2023 June 11, 2023

How to prevent your Linux computer from falling asleep with Caffeine
About John Been
Hi there! My name is John Been. At the moment I work as a senior solution engineer for a large financial institution, but in my free time, I am the owner of RealAppUser.com, RealLinuxUser.com, and author of my first book «Linux for the rest of us». I have a broad insight and user experience in everything related to information technology and I believe I can communicate about it with some fun and knowledge and skills.
My Linux book is available now!
Linux for the rest of us — my starter guide for all of you who just want to be productive with your Linux system. The book is available in Paperback and Kindle format. Click on the image below to see for yourself. Or maybe you want to have some information first.

Why this website
Hi, my name is John Been. I started this website because I think that many Linux-oriented websites are too technical to be of any interest for novice users or people who just want to be productive with their computer, and that scares off a potentially large group of new people to take the step to Linux. And that is a pity because Linux is a formidable platform and with the right user-centered approach Linux could get a much larger footprint. So this website tries to be different and will be simple and focused on users who just want to be productive with Linux and related software.