- Saved searches
- Use saved searches to filter your results more quickly
- License
- adityashrm21/RaspberryPi-Packet-Sniffer
- Name already in use
- Sign In Required
- Launching GitHub Desktop
- Launching GitHub Desktop
- Launching Xcode
- Launching Visual Studio Code
- Latest commit
- Git stats
- Files
- README.md
- About
- Wi-Fi packet sniffing / monitoring on Windows using Raspberry Pi — inspired by Wimonitor
- Required hardware
- Setup
- The “minimal” setup to get up and running
- Summary
- Sid
Saved searches
Use saved searches to filter your results more quickly
You signed in with another tab or window. Reload to refresh your session. You signed out in another tab or window. Reload to refresh your session. You switched accounts on another tab or window. Reload to refresh your session.
An HTTP and HTTPS sniffing tool created using a Raspberry Pi
License
adityashrm21/RaspberryPi-Packet-Sniffer
This commit does not belong to any branch on this repository, and may belong to a fork outside of the repository.
Name already in use
A tag already exists with the provided branch name. Many Git commands accept both tag and branch names, so creating this branch may cause unexpected behavior. Are you sure you want to create this branch?
Sign In Required
Please sign in to use Codespaces.
Launching GitHub Desktop
If nothing happens, download GitHub Desktop and try again.
Launching GitHub Desktop
If nothing happens, download GitHub Desktop and try again.
Launching Xcode
If nothing happens, download Xcode and try again.
Launching Visual Studio Code
Your codespace will open once ready.
There was a problem preparing your codespace, please try again.
Latest commit
Git stats
Files
Failed to load latest commit information.
README.md
A simple HTTP and HTTPS sniffing tool created using Raspberry Pi (only for educational purposes)
Setting up your Raspberry Pi
- A class 4 Micro SD card of at least 8GB size
Getting the Operating System to install on the Pi
- You need to install the latest version of NOOBS or Raspbian on your Pi, and for that you need a bootable SD card with the OS installed on it
Plugging in your Raspberry Pi
- Slot in your Micro SD card into the slot provided on the Raspberry Pi which would fit in only one way
Logging into your Raspberry Pi
- Now after the Pi has completed the boot process, a login will appear where you can use the default settings for login into the Pi: Username — pi, Password — raspberry
Steps to create a Wifi-access point
- If you have an ethernet cable plugged in into your Pi, you can start the web browser and see if the internet is working or not
sudo apt-get install dnsmasq hostapd
interface wlan0 static ip_address=172.24.1.1/24
sudo nano /etc/network/interfaces
and comment out the line containing wpa-conf in the wlan0 section, so that it looks like this
allow-hotplug wlan0 iface wlan0 inet manual # wpa-conf /etc/wpa_supplicant/wpa_supplicant.conf sudo service dhcpcd restart
and it should assign wlan0 with a static IP address
sudo nano /etc/hostapd/hostapd.conf
with the contents given in the hostapd.conf file
sudo /usr/sbin/hostapd /etc/hostapd/hostapd.conf
If everything goes well, you should be able to see the network Pi3-AP from your mobile phone or laptop device. You can try connecting to it in whoch case you would see some output from the Pi but you won’t be allotted an IP address until we configure dnsmasq. So press Ctrl + c to stop it
sudo nano /etc/default/hostapd
- The dnsmasq config file that comes preinstalled contains a lot of functionalities that we don’t require at all so we delete it and create a new one using and paste the contents of dnsmasq.conf into it:
sudo mv /etc/dnsmasq.conf /etc/dnsmasq.conf.orig sudo nano /etc/dnsmasq.conf
and uncommenting the line net.ipv4.ip_forward=1 and it will be enabled on the next boot
sudo sh -c "echo 1 > /proc/sys/net/ipv4/ip_forward" sudo iptables -t nat -A POSTROUTING -o eth0 -j MASQUERADE sudo iptables -A FORWARD -i eth0 -o wlan0 -m state --state RELATED,ESTABLISHED -j ACCEPT sudo iptables -A FORWARD -i wlan0 -o eth0 -j ACCEPT
sudo sh -c "iptables-save > /etc/iptables.ipv4.nat" and this will copy the settings to iptables.ipv4.nat file
sudo nano /lib/dhcpcd/dhcpcd-hooks/70-ipv4-nat
iptables-restore /etc/iptables.ipv4.nat sudo service hostapd start sudo service dnsmasq start
Now we would tweak some settings and configurations and use mitmproxy to set up a man in the middle attack using our Raspberry Pi on it’s hotspot
- First you would need to install mitmproxy and any dependencies related to it:
sudo pip install mitmproxy
Configuring mitmproxy for secure connections
- To get mitmproxy working for secure sites, you need to make a fake SSL certificate for the site you want to sniff and this would work even when the certificate is invalid because of the reasons given in Priyank’s blog which you can go through
openssl genrsa -out myown.cert.key 8192 openssl req -new -x509 -key myown.cert.key -out fakesite.cert
cat myown.cert.key fakesite.cert > fakesite.pem mitmproxy -p 8888 –cert=fakesite.pem
Note: You can use any available port number in place of 8888
So this is how you can create a Raspberry Pi Sniffer. You can tweak the steps and do something really different on your own! If you liked the tutorial, star the repository!
About
An HTTP and HTTPS sniffing tool created using a Raspberry Pi
Wi-Fi packet sniffing / monitoring on Windows using Raspberry Pi — inspired by Wimonitor
Wimonitor is a wonderful product from Hacker Arsenal that saves pentesters the hassle of having to configure VMs, carry compatible wireless cards that support monitor mode etc. and comes with a web interface to do the configurations. It gives you the flexibility to plug in the device into the Ethernet port and start Wi-Fi monitoring on any OS. Basically it is a tp-link TL-MR3020 router with a custom firmware that does all the monitoring part and sends the packets to the host laptop (or Mac !) where you can start Wireshark and concentrate on the packet analysis.
I haven’t got one yet, but have been hearing good reviews about the product since launch. The shipping cost to EU is a bummer :(. Hopefully they will start shipping from EU soon.
Meanwhile — why not try this on a Raspberry Pi ?
The Pi can run a variety of OS including Kali and I have had good success using Pi’s during Wi-Fi pentests. The Raspberry Pi 3B is powerful enough to do stable monitoring and with a few simple steps can be converted to a Wimonitor (well, almost !).
The awesome folks at Hacker Arsenal have done a brilliant job in building Wimonitor. It is a stable plug n play device with firmware support expected. So if you are a beginner to Wi-Fi security or need a trouble free monitoring tool, I would recommend going with Wimonitor.
Required hardware
- Host laptop running Windows(tests and screenshots done on Windows 8.1)
- Raspberry Pi 3B, micro SD card, power adapter (USB 3.0 power should be enough to power the Pi + wireless card)
- Ethernet cable to connect the Pi to host laptop
- Wi-Fi card supporting monitor mode (e.g. TL-WN722N v1)
Setup
- Burn RASPBIAN STRETCH LITE on to the micro SD card. The OS is light weight and comes with out of the box monitor mode support for cards like TL-WN722N. If you are not sure on how to burn the OS, steps can be found here.
- Once Raspbian is written to the micro SD card, enable SSH on the Pi. This can be done by creating a blank file named ssh (note: no file extension) on the micro SD card.
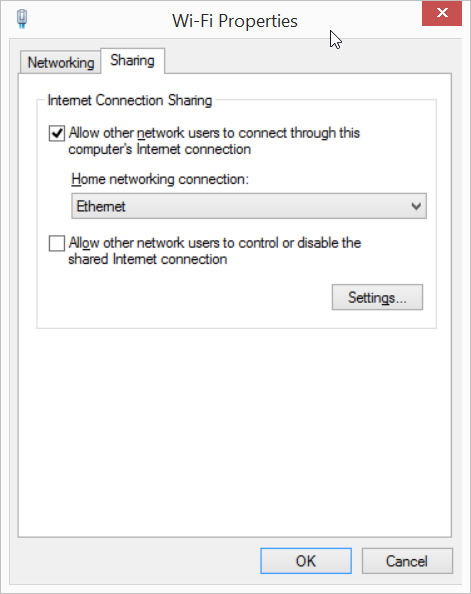
- In order to make the host laptop communicate with the Pi, the easiest method is to share the host laptop Wi-Fi with the Pi over Ethernet. This will ensure that the Pi gets an IP address in the range 192.168.137.x. To do this, go to network connections (ncpa.cpl), right-click on the Wi-Fi adapter and select Properties. Under the Sharing tab, select the Ethernet adapter to which you will plug in the Pi. Click OK.
- It is now time to connect the Pi to the host laptop. Insert the micro SD card into the Pi’s slot, Wi-Fi card into the USB port, connect the Ethernet cable between the host laptop and Pi and power ON.
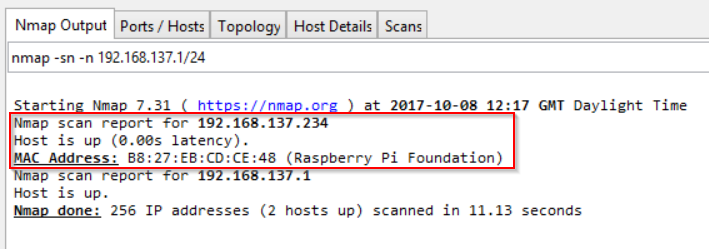
- Once the Pi boots up, it should get an IP using the shared connection. The easiest way to discover Pi’s IP address is to use nmap on the host laptop and do a host discovery on 192.168.137.1 /24 subnet.
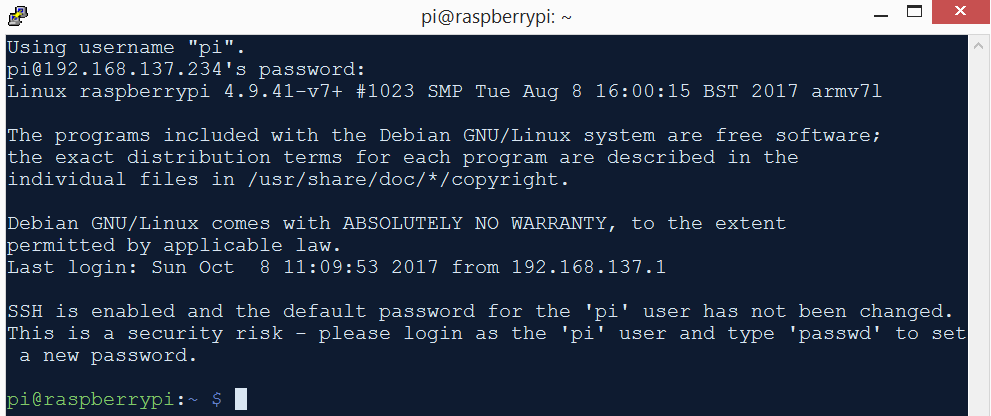
- Open PuTTY and ssh into Pi. The default username / password is pi / raspberry for the Raspbian OS we are using.
- To set a static IP for the Pi, open up /etc/dhcpcd.conf and add the following lines at the end of the file:
- I prefer to use key based authentication for the SSH login. To do that open PuTTYgen that comes with PuTTYgen and generate a key pair.
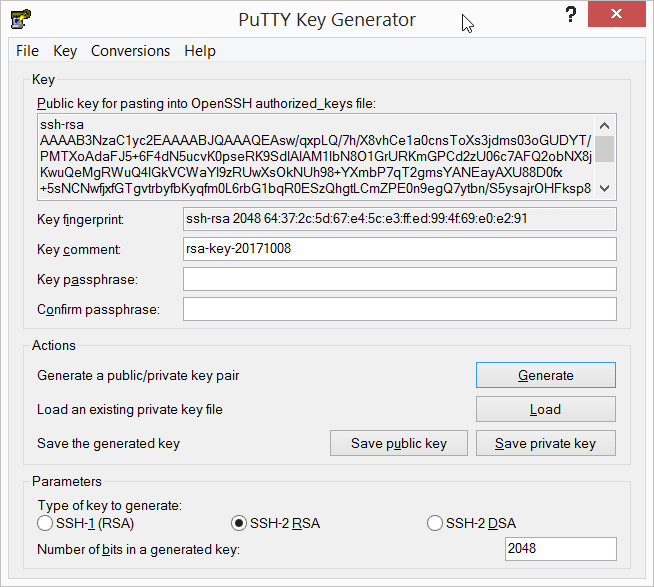
- Create a .ssh folder inside the Pi’s home folder. Then create a file named authorized_keys inside the .ssh folder. Paste the public key from PuTTYgen into the authorized_keys file. Save the private key from PuTTYgen. Restart SSH service on the Pi. Also change the user pi’s default password on the Pi.

- The Raspbian lite OS by default does not ship with the necessary packages to do the monitoring. So to install them, follow the steps below:
sudo apt install aircrack-ng tcpdump -y

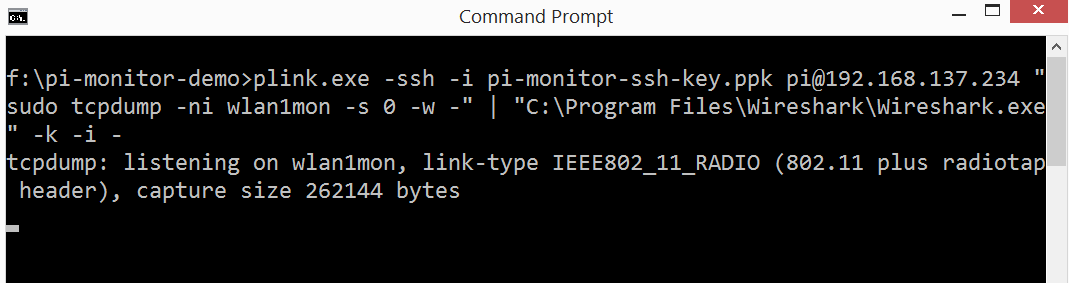
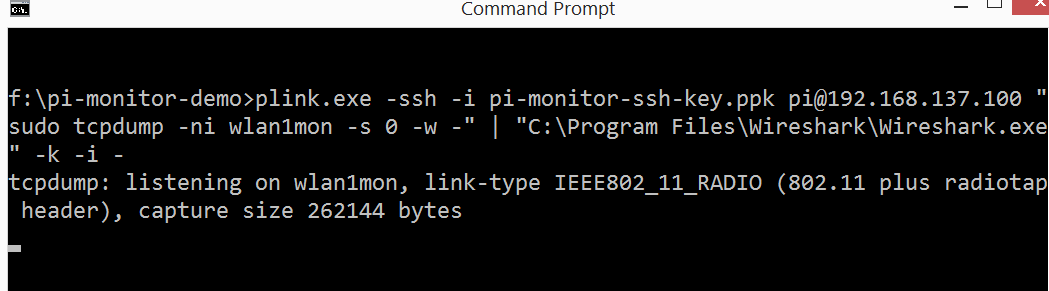
- Now that we verified that the monitoring is working on the Pi, we can SSH into the Pi, run tcpdump on Pi and feed it to Wireshark running on the host laptop. plink.exe is command line interface to PuTTY.exe that makes all of this possible on Windows. For ease, I have put plink.exe, the SSH private key from PuTTYgen in the same folder. If they are in different folders, change the paths in the below command appropriately.
The one-liner to do all of this is:
plink.exe -ssh -i pi-monitor-ssh-key.ppk [email protected] «sudo tcpdump -ni wlan1mon -s 0 -w -» | «C:\Program Files\Wireshark\Wireshark.exe» -k -i —
To monitor only channel 1,
sudo iwconfig wlan1mon channel 1
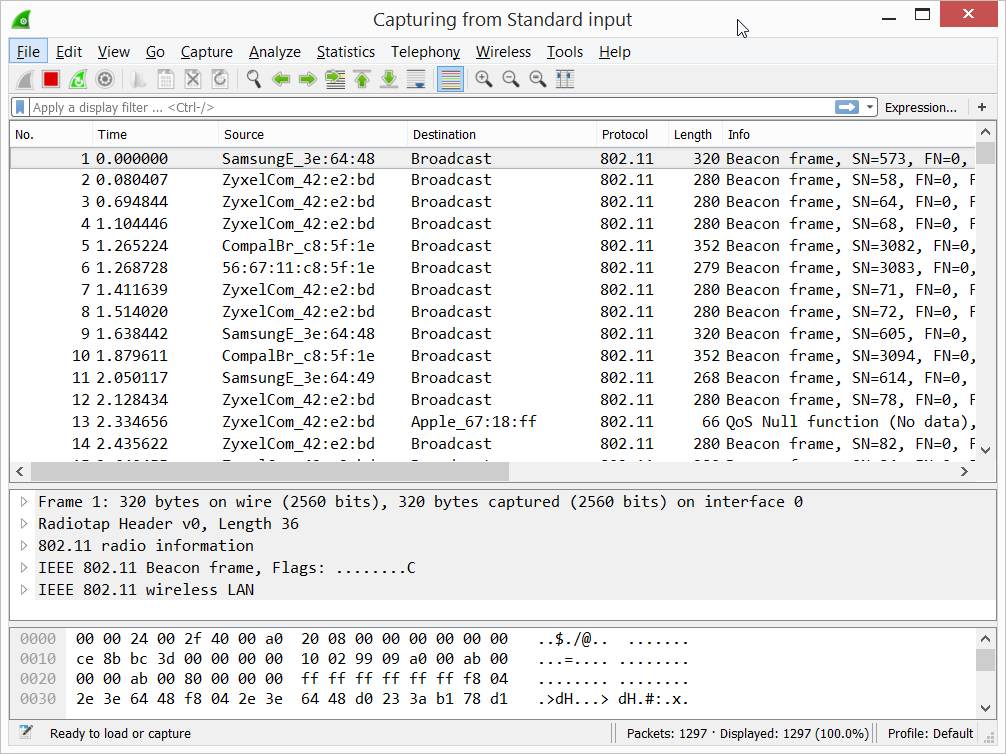
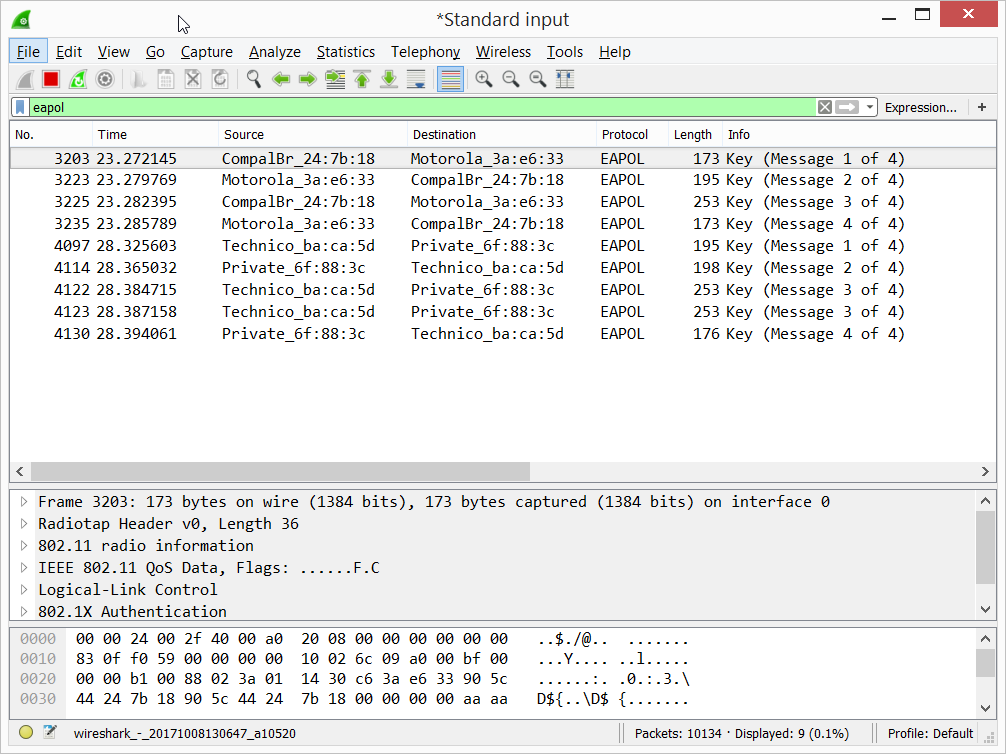
As you can see, a Raspberry Pi can be used to do Wi-Fi monitoring with minimal effort and pipe the output for viewing using Wireshark on Windows or any OS using the same method.
The “minimal” setup to get up and running
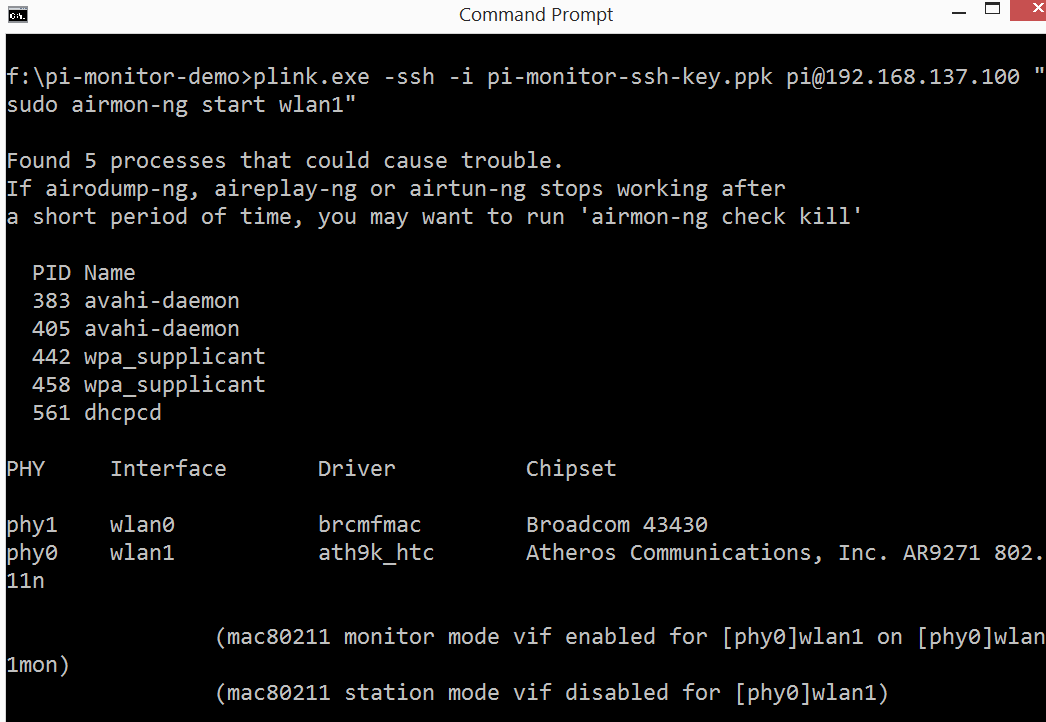
The above steps are a one time setup. For subsequent monitoring, plug in the Pi with wireless card, power ON the Pi and run the below command to create a monitor mode on the Pi.
plink.exe -ssh -i pi-monitor-ssh-key.ppk [email protected] «sudo airmon-ng start wlan1»
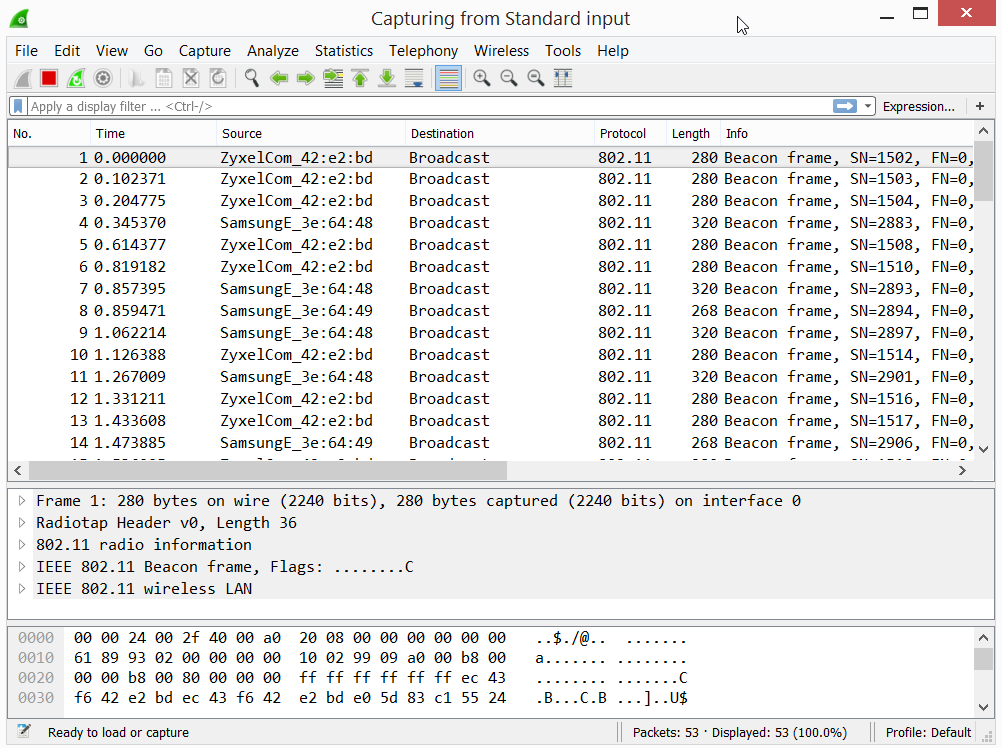
Fire up Wireshark to start the monitoring.
plink.exe -ssh -i pi-monitor-ssh-key.ppk [email protected] «sudo tcpdump -ni wlan1mon -s 0 -w -» | «C:\Program Files\Wireshark\Wireshark.exe» -k -i —
Summary
- No need to worry about chunky VMs. Wi-Fi monitoring can be performed on Windows with Wireshark and plink.exe. I haven’t tried on Linux / Mac OS yet, but should be able to pipe the SSH output to Wireshark (?).
- Cheap Wi-Fi monitoring. If you are already into pentesting or similar, you should be having a RPi, Wireless card lying around. 🙂
- Wimonitor is limited to the onboard Wi-Fi chipset (?). Raspberry Pi in this setup has the ability to use any (multiple) wireless card with monitor mode support. Only needs to plug the Pi into a power socket or use a batter pack with more juice than a USB hub to power the cards. How about a Yagi–Uda antenna with RPi’s wireless card ?
- Minimal setup required. Raspbian, Kali comes with out-of-the-box support for cards like Alfa AWUS036NHA, TL-WN722N etc. Once the above steps are done, it is just a matter of plugging in the Pi with wireless card, and running the two lines of commands to start packet analysis.
- RPi has enough firepower to do the monitoring comfortably. In a relatively busy Wi-Fi neighborhood, the Pi hardly consumes 35 MB of RAM in total with the above setup.
- Not plug n play like Wimonitor. Some initial setup (2 lines at cmd :)) is required to get it up and running.
- No web interface for configuration changes.
- No channel subset hopping capabilities for now.
Hope you find the post useful.
Sid
Information Security Professional