where can i find settings for wifi internal scan period
I have already found some guide related to this. But my experience is that if wifi.supplicant_scan_interval = 15
my device scans for wifi with 60s period so I dont think that this is the right parameter for that. Any suggestions?
Edited: here is my build.prop:
# begin build properties # autogenerated by buildinfo.sh ro.build.id=GRK39F ro.build.display.id=GRK39F ro.build.version.incremental=eng.paul.30092011.041430 ro.build.version.sdk=10 ro.build.version.codename=REL ro.build.version.release=2.3.6 ro.build.date=Fri Aug 30 04:14:55 EDT 2011 ro.build.date.utc=0 ro.build.type=user ro.build.user=paul ro.build.host=paul-VM ro.build.tags=test-keys ro.product.model=U20i ro.product.brand=Sony Ericsson ro.product.name=mimmi ro.product.device=mimmi ro.product.board=mimmi ro.product.cpu.abi=armeabi-v6l ro.product.cpu.abi2=armeabi ro.product.manufacturer=Sony Ericsson ro.product.locale.language=en ro.product.locale.region=US ro.wifi.channels=14 ro.board.platform=msm7k # ro.build.product is obsolete; use ro.product.device ro.build.product=mimmi # Do not try to parse ro.build.description or .fingerprint ro.build.description=passion-user 2.3.6 GRK39F 189904 release-keys ro.build.fingerprint=google/passion/passion:2.3.6/GRK39F/189904:user/release-keys # end build properties # # ADDITIONAL_BUILD_PROPERTIES # keyguard.no_require_sim=true ro.ril.hsxpa=2 ro.ril.hsupa.category=5 ro.ril.def.agps.mode=2 ro.media.dec.jpeg.memcap=20000000 rild.libpath=/system/lib/libril-qc-1.so rild.libargs=-d /dev/smd0 wifi.interface=wlan0 wifi.supplicant_scan_interval=15 ro.ril.def.agps.mode=2 ro.ril.def.agps.feature=1 ro.opengles.version=131072 ro.com.google.locationfeatures=1 ro.com.google.networklocation=1 ro.ril.enable.a52=1 ro.ril.enable.a53=1 ro.media.enc.file.format=3gp,mp4 ro.media.enc.vid.codec=m4v,h263 ro.media.enc.vid.h263.width=176,640 ro.media.enc.vid.h263.height=144,480 ro.media.enc.vid.h263.bps=64000,1600000 ro.media.enc.vid.h263.fps=1,30 ro.media.enc.vid.m4v.width=176,640 ro.media.enc.vid.m4v.height=144,480 ro.media.enc.vid.m4v.bps=64000,1600000 ro.media.enc.vid.m4v.fps=1,30 ro.media.dec.aud.wma.enabled=1 ro.media.dec.vid.wmv.enabled=1 ro.media.dec.aud.divx.enabled=1 ro.media.dec.vid.xvid.enabled=1 settings.display.autobacklight=0 media.stagefright.enable-player=true media.stagefright.enable-meta=true media.stagefright.enable-scan=true media.stagefright.enable-http=true keyguard.no_require_sim=true #MT and LCD ro.sf.lcd_density=120 qemu.sf.lcd_density=120 ro.product.multi_touch_enabled=true ro.product.max_max_num_touch=2 dalvik.vm.execution-mode=int:jit dalvik.vm.heapsize=32m ro.compcache.default=0 ro.rommanager.developerid=cyanogenmod ro.url.legal=http://www.google.com/intl/%s/mobile/android/basic/phone-legal.html ro.url.legal.android_privacy=http://www.google.com/intl/%s/mobile/android/basic/privacy.html ro.com.google.clientidbase=android-sonyericsson ro.com.android.wifi-watchlist=GoogleGuest ro.setupwizard.enterprise_mode=1 ro.com.android.dateformat=MM-dd-yyyy ro.com.android.dataroaming=false ro.config.ringtone=MiniCM7Pro.mp3 ro.config.notification_sound=DontPanic.ogg ro.config.alarm_alert=alarm.ogg ro.modversion=MiniCM7 Pro V16 Pre-Final ro.setupwizard.mode=OPTIONAL net.bt.name=Android dalvik.vm.stack-trace-file=/data/anr/traces.txt #SEMC persist.service.xloud.enable=1 persist.service.swiqi.enable=1 ro.semc.timescape_keys=Sony_Ericsson_Xperia ro.semc.sound_effects_enabled=true ro.semc.xloud.supported=true ro.service.swiqi.supported=true ro.semc.batt.capacity=950 ro.semc.batt.test.consumption=150 ro.semc.batt.test.z_threshold=50 ro.semc.batt.test.min_level=60 Edit2: The scanning period is depending on the connectivity as well. Means if the phone establishes a WI-FI connection, then the scanning period will be different from the wifi.supplicant_scan_interval . Also when the phone get into idle state (around 10 mins of inactivity) the scanning period will be 10 min.
How Android Wifi State Machine Works
Recently, I studied how Android Wi-Fi subsystem works. I was more specifically interested to learn the scan behavior. The source code related to this is mainly in framework/base/wifi/java/android/net/wifi/ within AOSP source tree.
The Big Picture
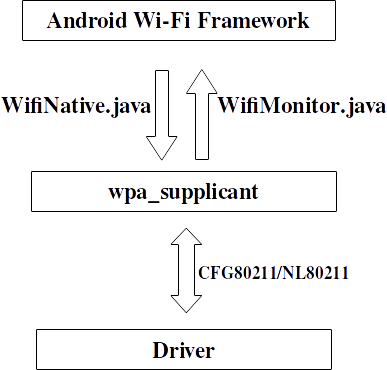
Android uses a customized wpa_supplicant to perform AP authentication and association, and also communicate with underlying driver. The WifiNative class is used to send various commands to wpa_supplicant ,and the WifiMonitor class is used to monitor wpa_supplicant status change and notify Android framework.
wpa_supplicant communicates with underlying driver using new CFG80211/NL80211 interface.
Basics of Hierarchical State Machine
Android framework uses a Hierarchical State Machine (HSM) to maintain the different states of Wi-Fi connection. As the name indicates, all states are organized in a tree, and there is one special initial state. The interface of each state is as follows:
- enter() : called when entering this state.
- exit() : called when exiting this state.
- processMessage() : called when message arrives.
The most import property of HSM is that when transitioning between states, we first found the common ancestor state that’s closest to current state, the we exit from current state and all its ancestor state up to but not include the closest common ancestor, then enter all of the new states below the closet common ancestor down to the new state.
Here is a simple example HSM.

S4 is the initial state. When we first start the HSM, S0.enter() , S1.enter() and S4.enter() will be called in sequence. Suppose we want to transit from S0 to S7 , since the closet common ancestor is S0 , S4.exit() S1.exit() , S2.enter() , S5.enter() and S7.enter() will be called in sequence.
More details about HSM can be found in the comments of frameworks/base/core/java/com/android/internal/util/StateMachin.java .
Wifi State Machine
Here is a subset of the whole Android Wifi HSM, states about P2P connections are omitted.
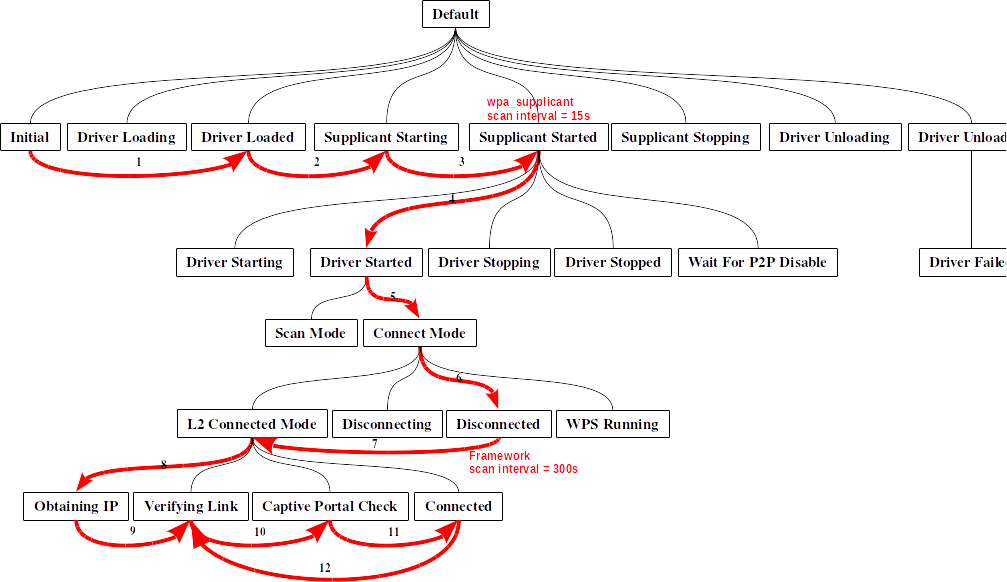
So in Initial state’s enter() function, we check if the driver is loaded, and transit to Driver Loaded state if yes. Then we start wpa_supplicant and transit
When we receive SUP_CONNECTED_EVENT , we switch to Driver Started state. But before that, we need to first enter Supplicant Started state first. In the enter() function of Supplicant Started state, we set the supplicant scan interval, which, by default, is 15 seconds defined in frameworks/base/core/res/res/values/config.xml as config_wifi_supplicant_scan_interval . So the first fact of Android scan behavior is that it’ll do scan every 15 seconds as long as the wpa_supplicant is started, no matter what the Wi-Fi condition is.
Then we come to Driver Started State, if we’re not in scan mode, then we switch to Disconnected Mode state. Scan mode means that Wi-Fi will be kept active, but the only operation that will be supported is initiation of scans, and the subsequent reporting of scan results. No attempts will be made to automatically connect to remembered access points, nor will periodic scans be automatically performed looking for remembered access points.
In Disconnected Mode state’s enter() function, if the chipset does not support background scan, then we enable framework periodic scan. The default interval is 300 seconds (5 mins), defined in framworks/base/core/res/res/values/config.xml as config_wifi_framework_scan_interval . So the second behavior of Android scan is that, in disconnected mode, it’ll issue scan every 5 mins.
Then if received NETWORK_CONNECTION_EVENT event from WifiMonitor , we switch to Obtaining IP state, which will initiate the DHCP process if needed. Then we go through Veifying Link and Captive Portal Check state, and finally reach Connected state.
WifiWatchdogStateMachine will continuously monitor the link quality and packet loss event, and will send out POOR_LINK_DETECTED or GOOD_LINK_DETECTED event.
Android Scan Interval
Here is the statistics of scan interval distribution collected on 129 Nexus S phones for about 5 months.
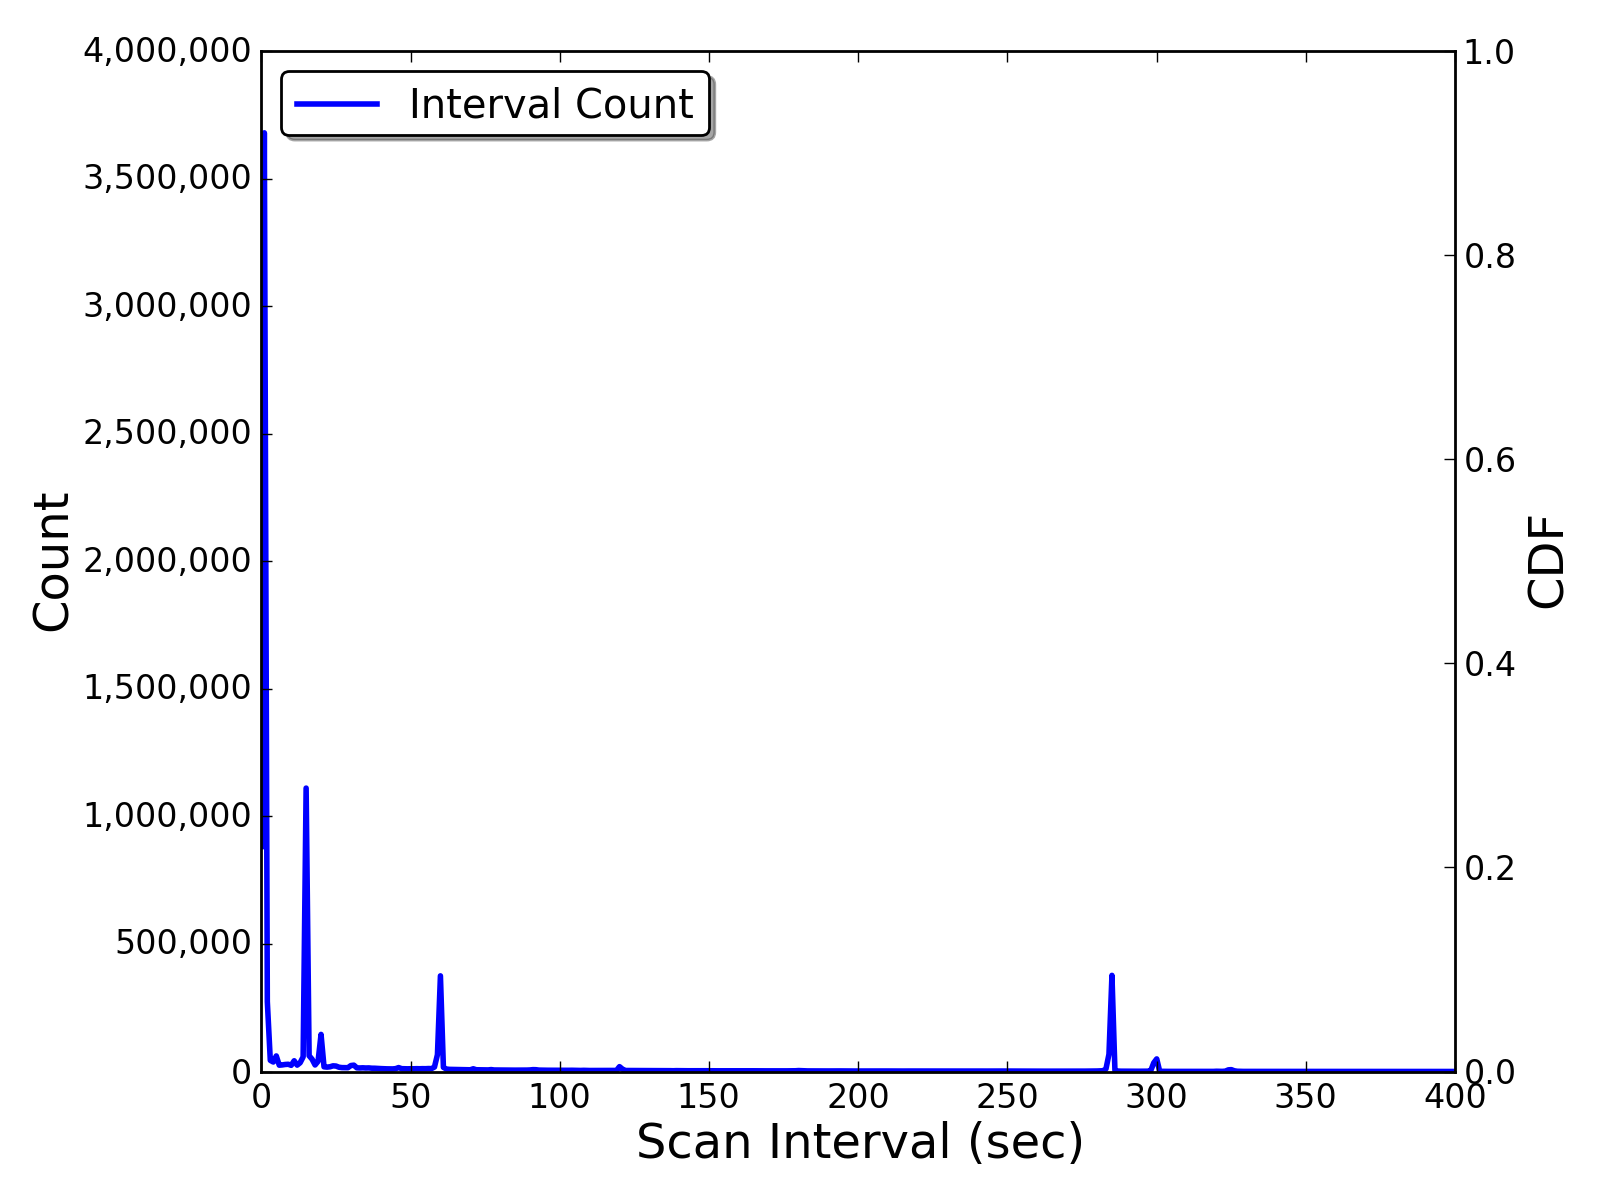
We can see that there are 4 peaks in the distribution. The peak around 15 seconds is due to wpa_supplicant scan interval, and the peak around 300 is due to framework periodic scan. The peak around 60 seconds is not much clear yet, probably due to the scan interval when P2P is connected.
The interesting fact is actually the peak within 2 seconds. It seems most of the scan results are clustered together in a small time windows (1~2 seconds). This is because when the driver is scanning, it’ll report every time it detects one AP. So in one scan, multiple scan result event will be triggered. And every time when there is a low level scan result event, Android will report the complete updated scan result list.
Related Posts:
Post History:
Saturday 07:19 PM, October 10 2015
Saturday 06:06 PM, October 10 2015
1mpseven’s blog

Иногда вам кажется, что ваше устройство тормозит?? Ругаете, по вашему мнению, устаревшее железо? Глюченный софт? Разгоняете устройство, с помощью сторонних утилит, которые приносят больше вреда чем пользы? А между тем, все основные оптимизации можно выполнить без использования специальных инструментов и получить не мифический, а совершенно реальный прирост скорости работы
В этой статье мы поговорим об оптимизации Android без применения каких-либо специальных инструментов, кроме файлового менеджера с поддержкой прав root и собственной головы. В первой части речь пойдет о файле /system/build.prop, который содержит системные настройки Android, большинство из которых влияют на производительность работы и отзывчивость системы. Вторая часть будет посвящена скриптам инициализации, размещаемых в каталоге /system/etc/init.d и содержащие команды, которые будут выполнены во время загрузки системы. Применив определенные команды можно повлиять на поведение ядра системы, заставив его быстрее выгружать приложения из памяти, включить режим упреждающего чтения для повышения производительности работы SD-карты и многое другое. Все примеры будут приведены в виде уже опробованных многими другими пользователями рецептов.
Оптимизации build.prop
Файл /system/build.prop представляет собой обычный текстовый файл, содержащий набор пар «ключ=значение», где ключ определяет определенную настройку системы Android, а значением может быть число или строка, в зависимости от ключа. Изначально этот файл был создан для того, чтобы при сборке прошивки для определенного устройства разработчик прошивки могут оптимально подогнать параметры работы Android под это устройство и не изменять их в будущем. Именно поэтому этот файл недоступен для модификации и может быть отредактирован только при наличии прав root на устройстве.
Если телефон рутован, то отредактировать файл не составит труда с помощью любого файлового менеджера с поддержкой root (например, Root Explorer или Ghost Commander). Для этого достаточно просто перемонтировать каталог /system в режиме записи, перейти в него и открыть файл build.prop на редактирование. Далее можно вписать в него необходимые строки или изменить имеющиеся. Обычной практикой является добавление новых строк в самый конец файла. Ниже приведены строки (пары ключ=значение), которые могут быть полезны в определенных ситуациях.
windowsmgr.max_events_per_sec=150 ro.telephony.call_ring.delay=0 wifi.supplicant_scan_interval=180 pm.sleep_mode=1 ro.ril.disable.power.collapse=0 debug.performance.tuning=1 video.accelerate.hw=1 ro.media.dec.jpeg.memcap=8000000 ro.media.enc.hprof.vid.bps=8000000 ro.ril.hsxpa=2 ro.ril.gprsclass=10 ro.ril.hep=1 ro.ril.enable.dtm=1 ro.ril.hsdpa.category=10 ro.ril.enable.a53=1 ro.ril.enable.3g.prefix=1 ro.ril.htcmaskw1.bitmask=4294967295 ro.ril.htcmaskw1=14449 ro.ril.hsupa.category=5 net.tcp.buffersize.default=6144,87380,1048576,6144,87380,524288 net.tcp.buffersize.wifi=524288,1048576,2097152,524288,1048576,2097152 net.tcp.buffersize.umts=6144,87380,1048576,6144,87380,524288 net.tcp.buffersize.gprs=6144,87380,1048576,6144,87380,524288 net.tcp.buffersize.edge=6144,87380,524288,6144,16384,262144 net.tcp.buffersize.hspa=6144,87380,524288,6144,16384,262144 net.tcp.buffersize.lte=524288,1048576,2097152,524288,1048576,2097152 net.tcp.buffersize.hsdpa=6144,87380,1048576,6144,87380,1048576 net.tcp.buffersize.evdo_b=6144,87380,1048576,6144,87380,1048576 ro.config.hw_menu_unlockscreen=false persist.sys.use_dithering=0 persist.sys.purgeable_assets=1 dalvik.vm.dexopt-flags=m=y ro.mot.eri.losalert.delay=1000 net.ppp0.dns1=8.8.8.8 net.ppp0.dns2=8.8.4.4 net.dns1=8.8.8.8 net.dns2=8.8.4.4 Обратите внимание, что далеко не все эти настройки приведут к нужному результату, а некоторые вообще имеют эффект плацебо. Поэтому стоит лишний раз подумать, нужны ли они вам и после каждого изменения наблюдать за работой смартфона и, в случае ухудшения производительности, убирать строки из файла.
Чтобы опробовать ту или иную настройку без необходимости в редактировании build.prop и перезагрузки можно использовать команду setprop, которую следует набирать из эмулятора терминала (доступен в маркете). Например:
su setprop windowsmgr.max_events_per_sec 150