- How To: Connect your Raspberry Pi to WiFi
- Connecting to your Raspberry Pi
- Getting your network information
- Configuring your WiFi network
- Raspberry Pi WiFi Setup: Here are 5 Methods for Raspbian
- Raspberry Pi WiFi Setup in Headless Mode
- Method 1: Using wpa_supplicant File
- Set up WiFi on Raspbian Desktop
- Method 2: Configure WiFi using Welcome Wizard
- Method 3: Connecting from the Taskbar
- Set up WiFi on Raspbian Lite
- Method 4: Using raspi-config Tool
- Method 5: Manual Configuration
- Final Words
- About the Author: Vishnu Mohan
- Подключение wi-fi модуля к raspberry pi
How To: Connect your Raspberry Pi to WiFi
This is an updated guide showing you how to connect your Raspberry Pi to your home WiFi network in cases where you do not have a graphical user interface for your Raspberry Pi.
For this guide you need a Raspberry Pi – and unless you’re using the Raspberry Pi 3 – an external USB WiFi Dongle like this one.
Connecting to your Raspberry Pi
First step is connecting to your Raspberry Pi in order to get to a terminal. You can do this by connecting your Raspberry Pi to a monitor and keyboard – or connecting via Ethernet like described in this guide.
Login to the Raspberry Pi with the default Raspberry Pi credentials:
Username: pi Password: raspberry
Getting your network information
For the purpose of this guide we will be connecting to a WiFi network with the following information:
Every time you see this network name and password in the guide you need to change them to the network name and password of your local network.
If you need to find the network name of your local network you can run the following command in the Raspberry terminal:
This will list all the networks in your vicinity along with some useful information for each network. To find your network name look for something that look like: ESSID:”Test Wifi Network”.
Configuring your WiFi network
To tell the Raspberry Pi to automatically connect to your WiFi network you need to edit a file called: wpa_supplicant.conf.
To open the file in nano type the following command:
sudo nano /etc/wpa_supplicant/wpa_supplicant.conf
Scroll to the end of the file and add the following to the file to configure your network:
Remember to replace this with your own network name and password.
Save and close the file by pressing Ctrl+X followed by Y. At this point the Raspberry Pi should automatically connect to your network.
You can check your network connection by running the following command:
If the output looks something like this (with an inet addr) you are connected:
wlan0 Link encap:Ethernet HWaddr 74:da:38:2b:1c:3d
inet addr:192.168.1.216
Bcast:192.168.1.255 Mask:255.255.255.0 inet6 addr: fe80::8727:5526:a190:b339/64 Scope:Link UP BROADCAST RUNNING MULTICAST MTU:1500 Metric:1 RX packets:6917 errors:0 dropped:229 overruns:0 frame:0 TX packets:2931 errors:0 dropped:1 overruns:0 carrier:0 collisions:0 txqueuelen:1000 RX bytes:10001000 (9.5 MiB) TX bytes:295067 (288.1 KiB)
Sometimes the Raspberry Pi will not connect automatically and require a reboot to connect.
If it doesn’t connect after waiting 2-3 minutes try to reboot the pi using the following command:
Raspberry Pi WiFi Setup: Here are 5 Methods for Raspbian

Setting up a proper WiFi connection on Raspberry Pi is somewhat tricky for beginners. They often face some issues while trying to connect Raspberry Pi to WiFi. One of the main questions I’m receiving from the newbies is Raspberry Pi is not connecting to WiFi, what should I do?
And some others are asking to give a proper Raspberry Pi WiFi setup that they can follow easily. Since I’m getting questions like this regularly, I decided to write a detailed guide to set up a WiFi connection on the Raspberry Pi.
Here I’m gonna hold your hands and walk you through 5 different ways by which you can set up a WiFi connection on Raspberry Pi OS or Raspbian. Note that this is not for any specific Raspberry Pi models (but for Raspbian only) so this will work on all models that support WiFi connectivity.
Raspberry Pi WiFi Setup in Headless Mode
Method 1: Using wpa_supplicant File
Here we going headless mode means we are not gonna use or need a monitor/ display connected to your Pi. This method is applicable if you have just flashed your SD card and want to connect it with WiFi in its first boot. However, it also works with an older sd card that you used on any other wireless network.
All you need to do here is to create a raspberry pi wifi setup wpa_supplicant file and copy it to your SD card. Nothing else. This file will hold the WiFi credentials and tell the Pi to connect automatically at the next booting.
- First, you need to open a text editor (like Notepad) on your computer and copy the following code into it.
country=IN ctrl_interface=DIR=/var/run/wpa_supplicant GROUP=netdev update_config=1 network=
- Now replace YOURSSID and YOURPASSWORD with your WiFi network name and password respectively. The SSID is nothing but Service Set IDentifier and is your network’s name. Also, change the country code if needed.
- Save the file with the name: wpa_supplicant.conf (the file name should be exactly like this).
- Insert your SD card into your computer and copy the wpa_supplicant.conf file into the boot partition.
In case if you want to enable SSH automatically, then you need to create and copy another file named ssh into the same boot partition. You don’t actually need any content in that file. Just create an empty file and you’re done.
Set up WiFi on Raspbian Desktop
Method 2: Configure WiFi using Welcome Wizard
For this method of WiFi configuration on your Pi, we need a desktop connection so that we can directly set it up from the welcome wizard.
If this is your first boot after flashing the SD card, then you will surely come across a welcome wizard with a message like “Welcome to Raspberry Pi”. Subsequently, it will ask for setting up your system.
After booting, once you choose your language and country, you will be taken to a window like this:
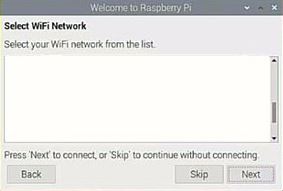
Here select your WiFi network name (SSID) from the list and enter the password. That’s all. Wait for a few moments and you’ll be connected to the network.
Method 3: Connecting from the Taskbar
Just in case you missed the welcome wizard or this is not your first boot, you can configure and connect at any time from the taskbar. For this:
- Click on the network symbol at the top of the main panel near the clock.
- You will now see a list of WiFi networks available.
- Choose your preferred network, enter the password.
Set up WiFi on Raspbian Lite
If you are running on the Raspbian Lite version, then you may need some additional help you find out and configure the WiFi properly. On Raspbian Lite, there are 2 methods by which you can do the same. Let’s check it out.
Method 4: Using raspi-config Tool
The raspi-config is a great tool available on Raspbian by default. This will help you configure your wireless network with ease.
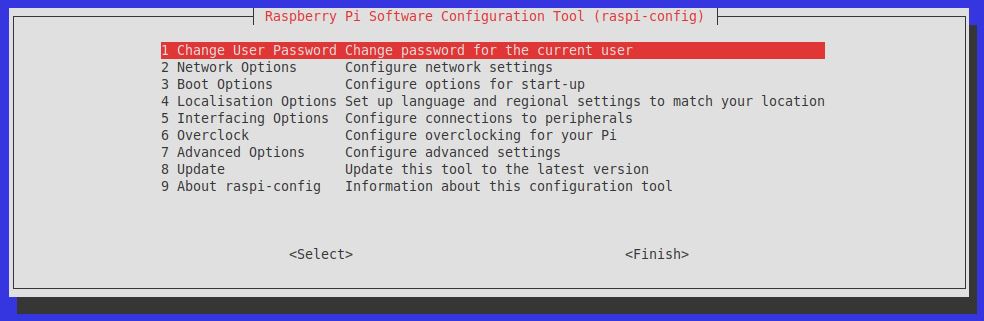
- Navigate to the Network Options > Wi-Fi
- Then type your SSID and password.
- Exit the tool.
Your Pi will now connect to the WiFi network and you can proceed with that.
Method 5: Manual Configuration
This method is a bit difficult but may be useful for connecting to big networks that need secure authentication or other complexities.
For manual configuration, the first part is the same as we did in method 1 that is editing the wpa_supplicant.conf file with your desired configuration. The file will be available at /etc/wpa_supplicant/ and you can edit it using the Nano editor. For this, you can use this command:
sudo nano /etc/wpa_supplicant/wpa_supplicant.confThis will open the file and you can see the same content as we have seen in method 1. That’s actually a basic configuration.
If you are interested, you can refer to some more examples here to adapt the configurations to your network for security options like WEP, EAP, etc.
Now, when coming to the network configuration, if you wish to set a static IP on your network, the configuration can be performed in dhcpcd.conf file. Type this command to open the file:
Now scroll down and find the “Example static IP configuration” line and uncomment every line of code that you need. This may include routers, DNS, IP address, etc. Modify the values and save them.
To reflect the changes, just reboot your Pi using the below command.
Final Words
Hopefully, by now you have familiarised all the 5 methods that can be used for Raspberry Pi WiFi setup. Now you can try this yourself and configure your WiFi according to your needs.
Wherever possible, try to use the desktop methods which will be the easiest ones for beginners. For advanced users, they can use any of the methods at any time. But before proceeding with complicated experimentation or modification, consider creating a backup of your sd card. This will be useful at times when you mess up with something.
If you have any comments, drop them in the comment section below.
Found an issue with this article? Report it here, so that I can resolve it.
About the Author: Vishnu Mohan
Vishnu Mohan is an ardent hobbyist of Raspberry Pi projects, who hails from God’s Own Country. He is kind of a minimalist person who believes in keeping things simple & elegant in life. Apart from the techy things, he is passionate about music and cricket. In his free time, he likes to read books and spend quality time with his family and friends.
Подключение wi-fi модуля к raspberry pi
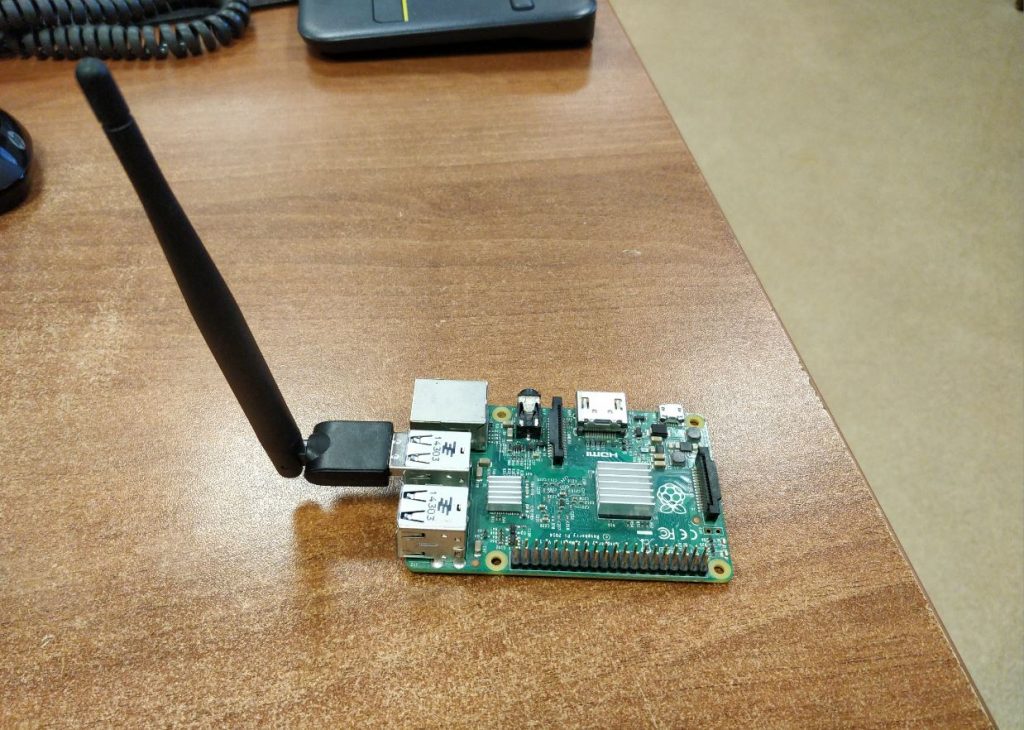
В новых версиях raspberry pi уже есть встроенный wi-fi и все работает из коробки. Но что делать с raspberry pi 1 и 2 в которых есть только Ethernet разъем, а хочется управлять данными платами через wi-fi сеть. Для этого как раз и служит данная статья, которая расскажет как подключить usb wi-fi адаптер к малинке.
В основном обычные wi-fi адаптеры работают на распространенных контроллерах. Для них уже есть драйвер в операционной системе Rasbian. К сожалению у меня нет wi-fi адаптера который был бы менее распространен и для него пришлось бы ставить сторонний драйвер (например wi-fi адаптер xiaomi). Я покажу именно настройку с уже установленным драйвером в ОС. Список поддерживаемых адаптеров можно посмотреть тут.
Ну чтож давайте приступим уже непосредственно к настройке wi-fi адаптера, опустив часть с установкой ОС на малинку и опустив часть с подключением к ней по ssh.
И так подключив наш wifi адаптер к малинке и подключившись по ssh, проверим что же за адаптер у нас, так как в моем случае на нем нет никаких опознавательных знаков.
Вводим команду: lsusb

Как видим наше устройство это MT760U и если посмотреть в списке поддерживаемых устройств, оно там есть, значит драйвер уже вшит в ОС.
Далее вводим команду: ifconfig -a
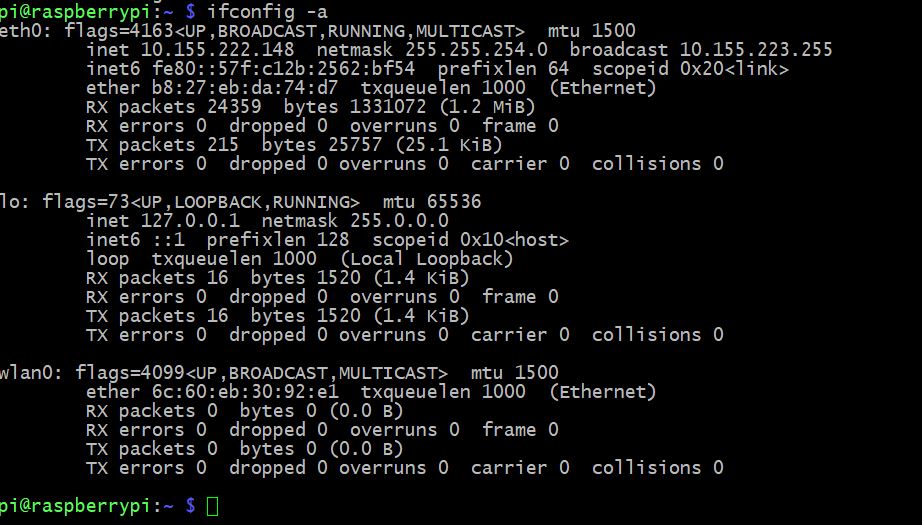
Видим 3 интерфейса eth0 – это наш ethernet разъем. lo – это loopback на него не обращаем внимания. и wlan0 – это как раз наш wi-fi адаптер. ( Важно, если вставили wi-fi адаптер уже после того как загрузилась ОС, то в списке интерфейсов вы его не увидите, необходимо будет перезагрузить raspberry pi)
Зная что у нас интерфейс wlan0. нам необходимо настроить конфиг сетевых интерфейсов, который находится в /etc/network/interfaces
Настраивать будем командой sudo nano /etc/network/interfaces и в открывшимся окне записать настройки для wlan0:
allow-hotplug wlan0 iface wlan0 inet manual wpa-roam /etc/wpa_supplicant/wpa_supplicant.conf iface default inet dhcp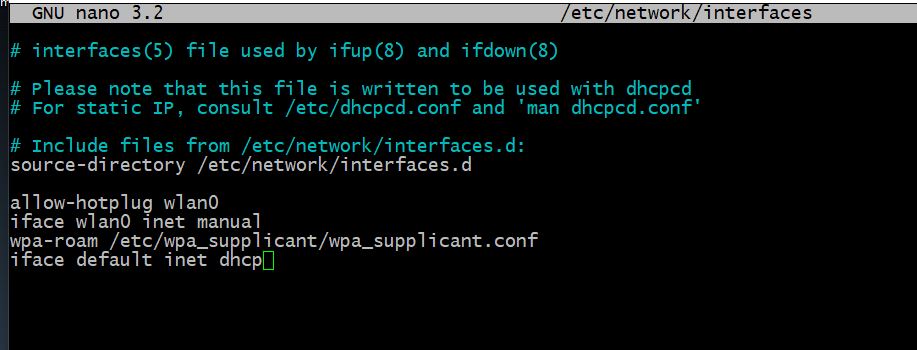
Выглядеть это должно следующим образом:
После этого комбинацией клавиш ctrl+X и Y сохраняем наш файл.
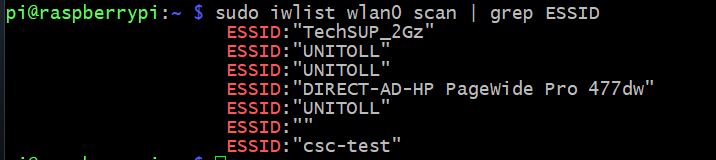
Теперь давайте посмотрим какие сети находит наш wi-fi адаптер командой: sudo iwlist wlan0 scan | grep ESSID
Теперь чтоб подключиться к необходимой нам wi-fi сети, необходимо в файл sudo nano /etc/wpa_supplicant/wpa_supplicant.conf записать следующее:
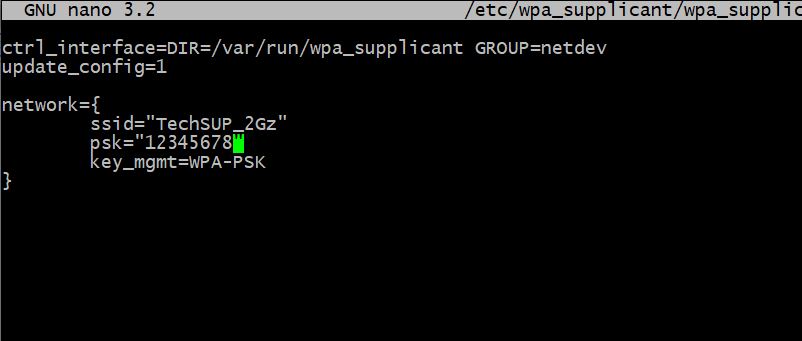
Выглядящее это примерно так:
Далее опять Ctrl+X и Y для сохранения.
Ну и перезагружаем raspberry pi командой sudo reboot
И уже по тому ip адресу который был мы не подключимся к малинке, теперь он выдастся уже новый wi-fi адаптеру.
Подключившись уже по другому ip адресу и введя команду ifconfig -a видим какой получил ip адрес наш интерфейс wlan0:
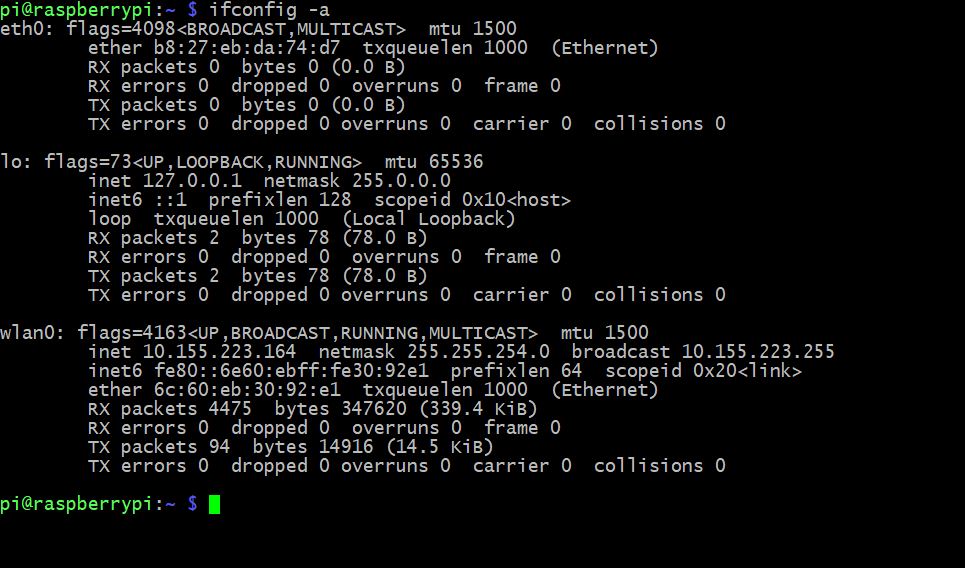
На этом настройка wifi закончена и теперь можно управлять малинкой через wifi.
