- How to Switch from Wi-Fi to Ethernet in Windows with NetConnectChoose
- How to switch from cable to Wi-Fi in Windows quickly
- Switch from Wi-Fi to Ethernet with NetConnectChoose
- NetConnectChoose Features
- MAC address
- Adapter name
- Interface speed
- How to Switch From Wifi to Ethernet Windows 10?
- Switching From Wifi to Ethernet on Windows 10
- What is Ethernet?
- How to Connect to Ethernet on Windows 10
- Configuring Your Network Settings
- Troubleshooting Ethernet Connectivity Issues
- How to Switch From Wifi to Ethernet on Windows 10
- Using Ethernet Instead of Wifi
- Advantages of Ethernet Over Wifi
- Conclusion
- Few Frequently Asked Questions
- 1. What is Ethernet?
- 2. How do I switch from Wi-Fi to Ethernet in Windows 10?
- 3. How can I tell if my computer is connected to Ethernet?
- 4. Do I need an Ethernet driver for Windows 10?
- 5. What is the difference between Wi-Fi and Ethernet?
- 6. What is the maximum speed of an Ethernet connection?
- How to Change Network Priority of Connection on Windows 10
How to Switch from Wi-Fi to Ethernet in Windows with NetConnectChoose
Today we have the possibility of connecting both by cable and Wi-Fi networks and achieve good results. If our installation is correct, if we are not far from the access point and therefore the coverage is not bad, we can say that there are no major differences between one option or another. This causes many users to connect indistinctly depending on the moment and where they are. In this article we are going to show a simple tool, NetConnectChoose , that allows us to quickly switch from cable to Wi-Fi in Windows 10.
How to switch from cable to Wi-Fi in Windows quickly
Windows 10 makes it easy to switch from Ethernet to Wi-Fi . We just have to go to the Internet settings and connect in one way or another. However, we can also use third-party tools that make this step even faster and easier.
For this we can use a free program called NetConnectChoose . It allows us with a single click to go from cable to Wi-Fi or vice versa. In this way, for example, we could be browsing through Ethernet and at any time switch to a wireless network to be able to take our laptop to another part of the house and continue to have access to the Internet without problems.
Switch from Wi-Fi to Ethernet with NetConnectChoose
The first thing we have to do in order to use this free tool is to download it from its NirSoft website. We have to download the program in the link enabled for it, where it indicates Download NetConnectChoose.
It is available in different languages, including Spanish. If we click on any of them, it will download another ZIP file that contains the translation file of the program into that language. The one we download as standard is in English.
Once we have downloaded it we will simply have to unzip that file and run the program icon. It should be noted that it does not need installation, but is portable. We just have to open it and it will automatically start working.
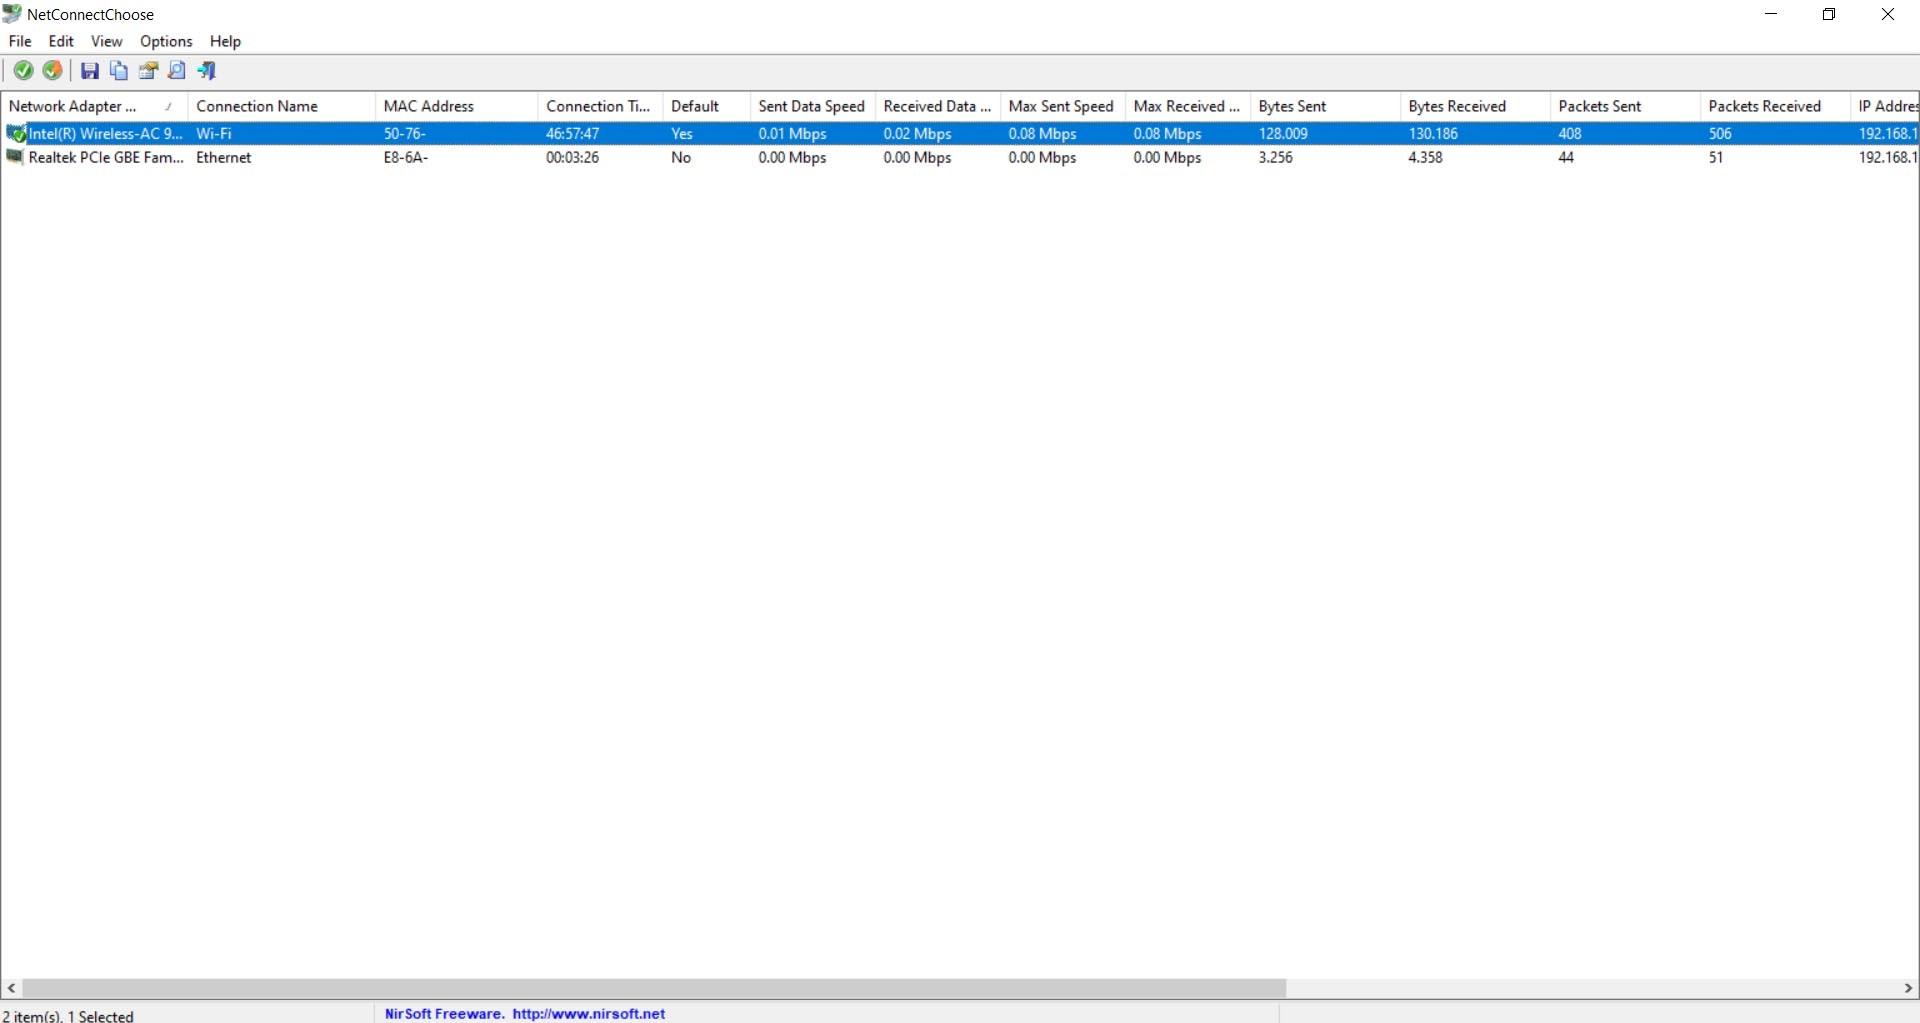
When we open it, an image like the one we see above will appear. There it will show us the different network cards that we have available on that computer. Normally, it shows us two: the Ethernet network card and the Wi-Fi network card. Details such as the name, the MAC address, the connection time or the IP address also appear. One of the data we see is the one that shows “Default”, which indicates which of them is the default network card.
Now, how do we switch from Wi-Fi to Ethernet or vice versa? It is very simple. We only have to click on the network card that interests us and then click on the green circular icon with a white tick that we will see at the top left. Instantly our equipment will be connected through that network card.
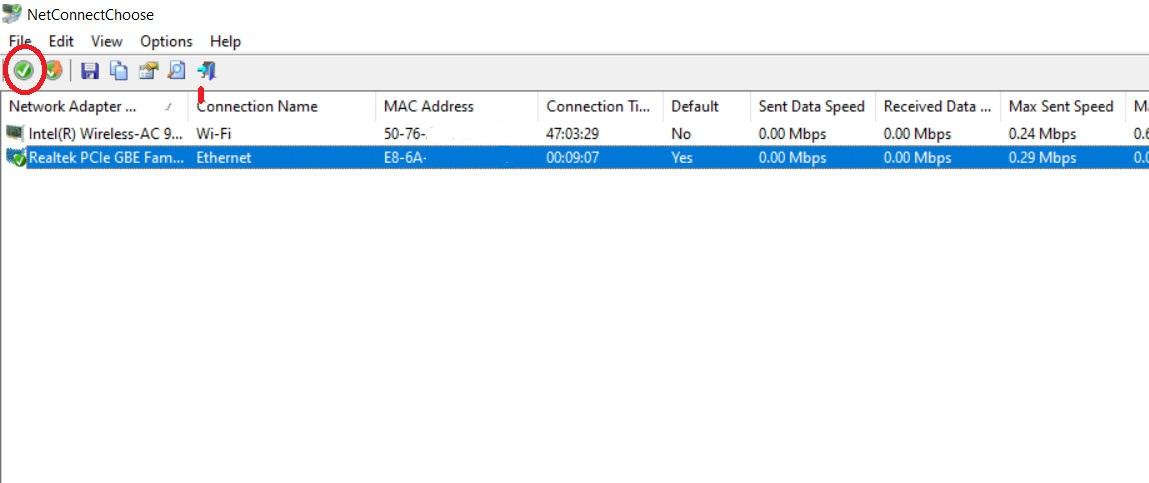
We will also see another icon right next to it that allows us to switch between networks by default. In this way, what we mark will be saved and our team will connect in this way. It is also a simple option to change this value.
NetConnectChoose Features
Although the main objective of this article is to explain how to switch between Wi-Fi and Ethernet quickly with NetConnectChoose, this program also has other functions. All of them are simple and it is about basic information that we can see quickly with this application.
MAC address
One of the interesting data that NetConnectChoose offers us is to know the MAC address of each of the network adapters that we have installed in our computer.
On many occasions, it is useful and necessary to know this information to carry out certain configurations on our equipment and make the most of the network possibilities. Therefore, to know at a glance which is the corresponding MAC we can use this program.
Adapter name
It also shows us the name of the network adapter . In this way we will know exactly which one we have installed on our computer and be able to search for information in case there are problems or also to simply find if there is a firmware update that we can apply to improve performance.
Interface speed
On the other hand, another piece of information that also appears in NetConnectChoose is the speed of the interface . We can know what is the maximum speed at which our network card can work, either Wi-Fi or Ethernet.
In short, with NetConnectChoose we will be able to go from Wi-Fi to Ethernet or vice versa in a fast and easy way. It also shows us a series of data that may be interesting for users.
How to Switch From Wifi to Ethernet Windows 10?

Are you tired of having to deal with slow and unreliable WiFi connections? Would you like to switch to a more reliable connection method? If so, then look no further – this guide will provide you with step-by-step instructions on how to switch from WiFi to Ethernet on Windows 10. With the right instructions and the right hardware, you will be able to enjoy a faster and more reliable connection in no time. So, let’s get started!
Switching from WiFi to Ethernet on Windows 10 is very easy. Here’s a step-by-step guide on how to do it:
- Open the Start menu and click on ‘Settings’.
- Click on ‘Network & Internet’.
- Click on ‘Ethernet’.
- Click on ‘Change Adapter Options’.
- Right-click on your WiFi connection and select ‘Disable’.
- Right-click on your Ethernet connection and select ‘Enable’.
- You should now be connected to Ethernet.

Source: addictivetips.com
Switching From Wifi to Ethernet on Windows 10
Windows 10 is a great operating system for the modern age, with a variety of features and settings that allow users to customize their experience. One of the most important features is the ability to switch from wifi to Ethernet, allowing users to get the most out of their internet connection. In this article, we’ll go over exactly how to switch from wifi to Ethernet on Windows 10.
What is Ethernet?
Ethernet is a type of wired internet connection that is typically faster and more reliable than wifi. It is the most commonly used connection for businesses and is the best option for people who need a reliable and fast connection. In order to use Ethernet, users need to have an Ethernet port on their computer and an Ethernet cable.
How to Connect to Ethernet on Windows 10
Once you have an Ethernet port and cable, it’s time to connect to Ethernet on Windows 10. The first step is to plug the Ethernet cable into the Ethernet port on your computer and the other end into your modem or router. Then, open the Windows 10 network settings by clicking on the network icon in the bottom right corner of your screen. From here, you should see a list of available networks. Select the Ethernet network and click Connect.
Configuring Your Network Settings
Once you’ve successfully connected to the Ethernet network, you’ll need to configure your network settings. This can be done by clicking on the network icon in the bottom right corner of your screen, then selecting Change adapter options. From here, you can configure your network settings, such as assigning an IP address and setting up a Static IP.
Troubleshooting Ethernet Connectivity Issues
If you’re having trouble connecting to the Ethernet network, there are a few troubleshooting steps you can take. First, make sure that the Ethernet cable is securely connected to both your computer and your modem or router. If it is, then you should try restarting your computer and modem or router. If that doesn’t work, then you may need to reset your network settings. You can do this by clicking on the network icon in the bottom right corner of your screen, then selecting Change adapter options. From here, you can reset your network settings.
How to Switch From Wifi to Ethernet on Windows 10
Once you’ve successfully connected to the Ethernet network, you can switch from wifi to Ethernet on Windows 10. This can be done by clicking on the network icon in the bottom right corner of your screen, then selecting Change adapter options. From here, you can select the wifi network and click Disable. Then, select the Ethernet network and click Connect.
Using Ethernet Instead of Wifi
Using Ethernet instead of wifi is the best way to get the most out of your internet connection. It’s faster and more reliable, and you don’t have to worry about the interference and signal loss that can come with wifi networks. Plus, you don’t have to worry about signal strength or how far you are from the router, as long as you have a good Ethernet cable.
Advantages of Ethernet Over Wifi
The main advantage of Ethernet over wifi is that it offers a faster and more reliable connection. It’s also more secure, as it doesn’t broadcast over the air like a wifi connection does. Plus, you don’t have to worry about signal strength or how far you are from the router, as long as you have a good Ethernet cable.
Conclusion
Switching from wifi to Ethernet on Windows 10 is easy, and it can help you get the most out of your internet connection. It’s faster, more reliable, and more secure than wifi, and it doesn’t require you to worry about signal strength or how far you are from the router. All you need is an Ethernet port and an Ethernet cable, and you’ll be able to enjoy the benefits of Ethernet on Windows 10.
Few Frequently Asked Questions
1. What is Ethernet?
Ethernet is a type of physical network connection that is used to connect computers, routers, and other devices in a local area network (LAN). It is a reliable way to transfer data over long distances and is commonly used in home and office networks. Ethernet networks use a wired connection, meaning that a physical cable must be used to connect the computers and other devices in the network. This makes it more secure than a wireless connection and also provides faster speeds.
2. How do I switch from Wi-Fi to Ethernet in Windows 10?
To switch from Wi-Fi to Ethernet in Windows 10, you will need to first connect an Ethernet cable to your computer. Once the cable is connected, open the Settings menu and go to the Network & Internet section. Select Ethernet from the left-hand menu, and then click on the Change adapter options link. Select the Ethernet connection from the list of available connections, then click on Properties. On the Properties window, click on the Networking tab, select Internet Protocol Version 4 (TCP/IPv4) from the list, and click on the Properties button. Finally, click on the “Obtain an IP address automatically” and “Obtain DNS server address automatically” options and click OK to save the changes.
3. How can I tell if my computer is connected to Ethernet?
To check if your computer is connected to Ethernet, open the Settings menu and go to the Network & Internet section. Select the Ethernet connection from the left-hand menu, and then click on the Adapter options link. If you see an Ethernet connection listed here, then your computer is connected to Ethernet. You can also check the status of the connection by looking at the icon in the bottom right corner of your screen. If the icon is a cable, then you are connected to Ethernet.
4. Do I need an Ethernet driver for Windows 10?
In most cases, no. Windows 10 already comes with the necessary drivers for most Ethernet connections, so you do not need to install any additional drivers. However, if you have an older computer or Ethernet connection, then you may need to install a driver in order to get your connection working properly.
5. What is the difference between Wi-Fi and Ethernet?
The main difference between Wi-Fi and Ethernet is the type of connection used. Wi-Fi is a wireless connection, meaning that you do not need to physically connect a cable to your computer in order to connect to the internet. On the other hand, Ethernet requires a physical cable to be connected between your computer and the router. Ethernet is generally faster and more secure than Wi-Fi, but it requires more setup and is more difficult to move around.
6. What is the maximum speed of an Ethernet connection?
The maximum speed of an Ethernet connection depends on the type of Ethernet cable being used. The most common type of cable, Cat5e, has a maximum speed of up to 1,000 Mbps (1 Gbps). However, newer cables such as Cat6 and Cat7 can have speeds of up to 10,000 Mbps (10 Gbps). Your actual connection speed will be limited by other factors such as the speed of your router and any other devices connected to the network.
How to Change Network Priority of Connection on Windows 10
Switching from wifi to ethernet on Windows 10 is a great way to improve your connection speed, reliability, and security. It is a simple, straightforward process that can be completed in a few steps. With a few clicks of the mouse, you can easily switch from wifi to ethernet and enjoy a better internet experience. So, take the time to make the switch today, and enjoy a faster, more secure connection.