- Bridge WiFi to Ethernet in Windows 10
- Is it Possible to Bridge the Internet from WiFi to Ethernet?
- How to Bridge WiFi to Ethernet in Windows 10
- How to Remove a WiFi to Ethernet Bridge Connection
- Closing Words
- Wi-Fi Vonets VAP11G-300 RJ45 беспроводной мост
- Напишите отзыв и получите подарок
- Best Selling!VAP11G RJ45 Mini WIFI Bridge/Wireless Bridge For Dreambox Xbox PS3 PC Camera TV ,Wifi Adapter with Retail Box
Bridge WiFi to Ethernet in Windows 10
Before we find out how to bridge WiFi to Ethernet in Windows 10, it is essential to know what exactly it is. When you create a network bridge from WiFi to Ethernet, you are letting the bandwidth of the WiFi internet connection on your PC be shared through Ethernet or the LAN port. By doing so, you will be providing internet to other devices through a LAN wire.
This technique is quite proper when you have WiFi internet, but a device you need to use only connects to the internet via LAN port or ethernet. You can also use this process to create a Local Area Network among multiple Windows 10 computers.
This article shows if Windows 10 lets you create a bridge connection from WiFi to LAN. If yes, then how to create this bridge connection. Let us find out all you need to know about WiFi to Ethernet bridge connection.
Is it Possible to Bridge the Internet from WiFi to Ethernet?
Yes, it sure is possible to create a bridge connection from WiFi to LAN. You can do it from Windows settings. This means that you do not require to install any third-party software to bridge WiFi to Ethernet in Windows 10. All you need to do is access the Control Panel, where you will find all the options required to carry out internet connection sharing between WiFi and Ethernet.
The following section will find the steps and screenshots that will guide you through creating a network bridge from WiFi to Ethernet.
How to Bridge WiFi to Ethernet in Windows 10
Creating an internet connection sharing bridge is quite simple and straightforward. As mentioned earlier, this can be done through the Control Panel window. Follow the steps provided below, and you will be able to make a network bridge yourself:
Bridge WiFi to Ethernet Using Control Panel
Step 1: Open Control Panel on your Windows PC. Although there are several ways to launch Control Panel, we will do it through the Run box. Press Win + R keys together. This will open the Run box. In the box, type control panel, then press the Enter key on your keyboard.
Step 2: The Control Panel window will open. In the Control Panel window, click Network and Internet option.
Step 3: On the next screen that opens, select the Network and Sharing Center option.
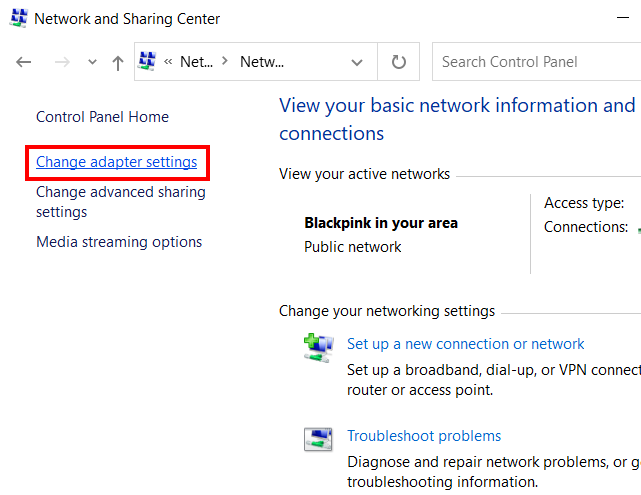
Step 4: Again, you will see new options on the next screen. Go to the left panel on this window, then select the option that says Change adapter settings.
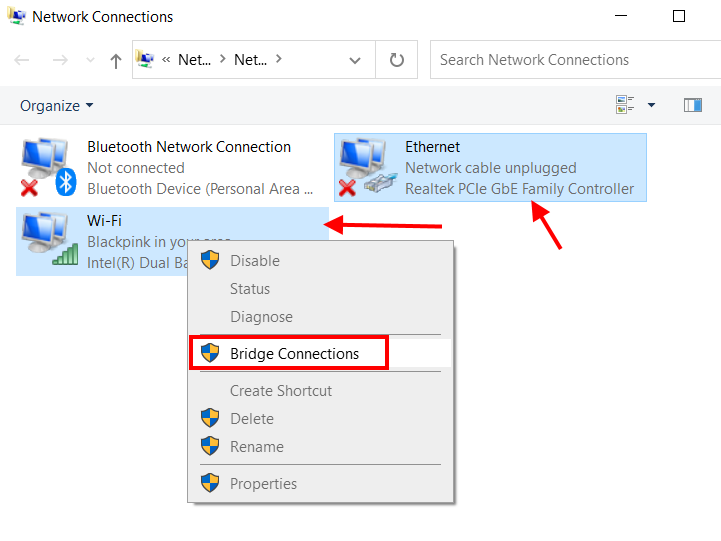
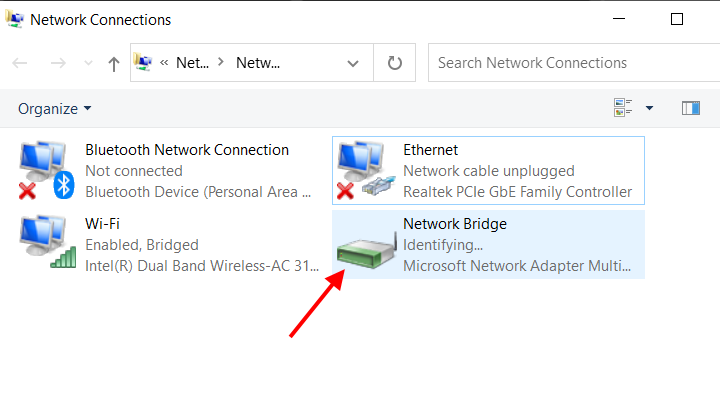
Step 5: A new window will appear now. Here, you will be able to see all the network adapters available on your Windows 10 PC, including the wireless network adapter and the ethernet adapter.
To create a bridge between the two, make a click on the wireless network adapter icon. Now press the Ctrl key and keep it pressed till you select the ethernet adapter icon. Once both the WiFI adapter and the Ethernet are chosen, make a right-click on any of the icons. A context menu will appear. Here, select the Bridge Connections option.
Once a network bridge is created, you will see a new WiFi adapter appear on the Network Connection window. The name of the adapter should be Network Bridge, as shown in the screenshot below.
Now, you should access the internet on any device that you connect the LAN cable to your Windows 10 PC. This way, you have been successful in creating a WiFi to Ethernet bridge in Windows 10.
But what if you want to manage the bridge connection between WiFi adapter and ethernet adapter? Well, by accessing the Network Connection window from the Control Panel, you can efficiently operate the Wi-Fi to ethernet bridge.
Here, you can disable, enable, rename, change properties, or even delete the bridge connection if you like. You can change the IP address and DNS setting too. If there seems to be a problem between the Wi-Fi to Ethernet bridge, you can even run a diagnosis for the same.
Go to the Network Connections window through Control Panel > Network and Internet > Network and Sharing Center > Change adapter settings.
This will evoke the Network Connections window. Here, make a right-click on the Network Bridge icon to see all the options in the context menu.
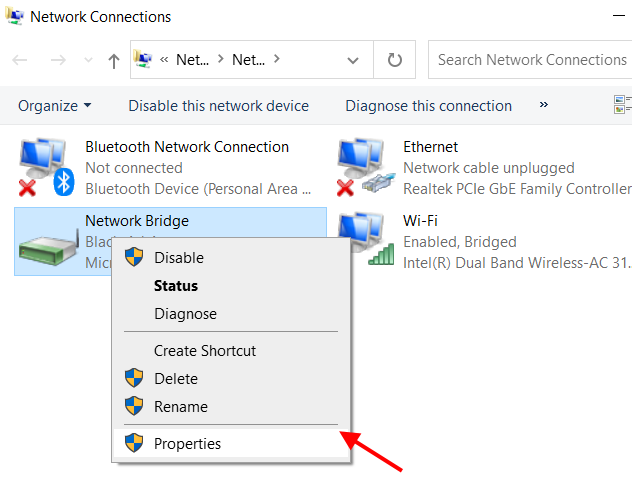
By selecting the Disable option, you can disable the internet connection from Wi-Fi to the Ethernet or LAN port. After disabling the bridge, the device(s) accessing the internet from LAN wire won’t access it anymore.
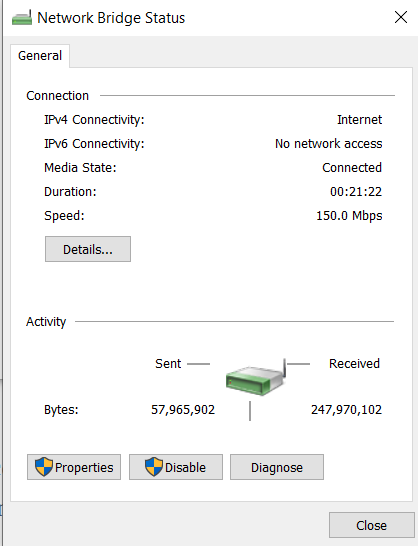
Through the Status section, you will view the internet connectivity type, the duration of the connection, along with the maximum connection speed. You also get to know about the amount of data sent and received over this connection.
To change the bridge connections settings and properties, you can access the Properties window and make any changes if required.
How to Remove a WiFi to Ethernet Bridge Connection
Now, we already know how to disable WiFi to Ethernet bridge connections, but what if you want to remove the network bridge altogether. Well, it is quite a simple process and involves only a couple of steps. Follow these steps:
Step 1: Select the Network Connections window. You can do it through the Control Panel, as mentioned in the above sections. Here, you will see all the network adapters, including the Network Bridge adapter.
Step 2: To remove the bridge connections between WiFi and Ethernet, make a right-click on the Network Bridge icon. A context menu will open. Here, select the Delete option.
A dialog box will open up to confirm if you want to delete the bridge. Click on Yes to confirm. After the confirmation, the bridge will be deleted from your Windows 10 PC.
Closing Words
Now that you know how to bridge WiFi to Ethernet on Windows 10 PC, we hope you can do it yourself without looking at any tutorials. Of course, you would be, as the steps involved are pretty simple to follow.
Recommended for You:
Johnny Crumley
A self-defined geek, Johnny Crumley comes from the USA. As a kid genius, he started DOS batch files at just five years old and was soon messing with BASIC in kindergarten. He was always into the bits and bytes. As luck would have it, Johnny became a freelance PC technician, something he’s genuinely passionate about. From his teenage years, he started writing about anime and games. He’s also an avid educator, spreading his knowledge and expertise in the tech sector. He has been a professional writer for six years and has written for several emerging tech publications.
Blog.rottenwifi.com is a participant in the Amazon Services LLC Associates Program which means we may get paid commissions on editorially chosen products purchased through our links to retailer sites. All names, logos, brands, and images are trademarks or copyrighted materials of their respective owners. Amazon and the Amazon logo are trademarks of Amazon.com, Inc., or its affiliates.
Wi-Fi Vonets VAP11G-300 RJ45 беспроводной мост

Это устройство предназначено для «ловли» сигнала Wi-Fi и раздачи его его через сетевой RJ45 кабель в режиме моста – подключение через стандартный Ethernet порт устройства самое лучшее решение.

Vonets VAP11g понравился вам своей универсальностью. Подключаем устройство к компьютеру, запускаем несложную программу, настраиваем беспроводную сеть и после этого устройство можно подключать к любой сетевой карте любого устройства. Vonets сам подключится к сети в режиме моста и все.
Само подключение простое – вставляем кабель USB от VAP11g в свободный разьем на компьютере, сетевой провод – в сетевую карту. Просто и понятно. Устанавливаем софт с прилагаемого к Vonets диска.
- Входное напряжение Wi-Fi моста: 5-15В постоянного тока
- Имеет низкое энергопотребление: менее 1.5Вт
- Оснащен тремя параллельными разъемами питания постоянного тока (DC 2.5, DC 2.0, USB), обеспечивающими удобство использования моста с другими IP-устройствами
- Компактный дизайн позволяет удобно разместить его в углу
- Беспроводной мост Wi Fi обеспечивает стабильную производительность и станет отличным решением для организации IP видео наблюдения
- Поддерживает работу в режиме Wi-Fi моста
- Поддерживает IEEE 802.11b/g беспроводной протокол
- Поддерживает WEP (64 бит), WEP (128 бит), WPA, WPA шифрование
- Поддерживает SSID вещание
- Частота: 2.4ГГц
- Дальность передачи: 100м (без препятствий)
- Оборудование для Wi Fi имеет стандартный RJ-45 Ethernet коннектор
- Габариты: 50 х 60 х 90мм
1 х Wi-Fi мост VPMETS VAP11G

олег |
2016-09-29
Я купил две. я использую их в качестве wi-fi сетевой карты с разъемом rj45. они работает супер. хороший продукт.
Стас |
2016-09-13
хорошая упаковка и продукт отлично работает. 🙂 я использую его в качестве соединения от моего ТЕЛЕВИЗОРА к wi-fi маршрутизатору, так как мой ТЕЛЕВИЗОР не имеет встроенной wi-fi.
Игорь |
2016-02-22
спасибо, отличная информация, решил поискать настройки в интернете и сразу так повезло. очень редко находишь что то стоящее сразу.
Олег |
2016-02-22
Кстати, сей девайс не обязательно к дриму подключать через юсб. Достаточно использовать дримовский блок питания в качестве источника питания этого устройства, нет необходимости лишний раз занимать юсб и грузить Ваш дрим. Подтверждаю, что вещь очень удобна не только для дрима и других wi-fi устройств, но и хороша для wi-fi камер наблюдения. Удачи
Напишите отзыв и получите подарок
Ваш отзыв: После оставления отзыва свяжитесь с нами и мы предоставим скидочный купон для дальнейших покупок
Best Selling!VAP11G RJ45 Mini WIFI Bridge/Wireless Bridge For Dreambox Xbox PS3 PC Camera TV ,Wifi Adapter with Retail Box
Наконец пришел с TOMTOPa (что примечательно на самом TOMTOP он на 5$ дороже.) мой клиент вай-фай с питанием от УСБ. (Хочу к дримбоксу подключить).
Сабж является вай-фай клиентом и позволяет поключить любое устройство через LAN к вайфаю, питаясь от USB или внешнего источника питания (5-15B).
Попался мне как-то на глаза такой девайс Wi-Fi Адаптер NETGEAR WNCE2001. Интересная вещь, LAN, питание УСБ, WPS, простота настройки, но дороговато.
Решил поискать аналог у китайцев, но нашел только сабж. Заказал.
Коробка и ее содержимое: 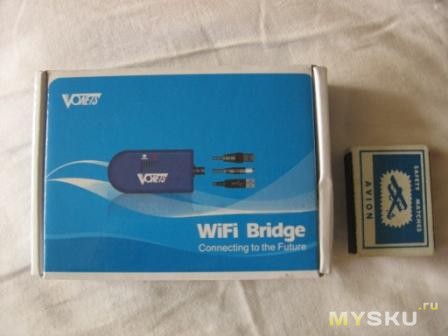

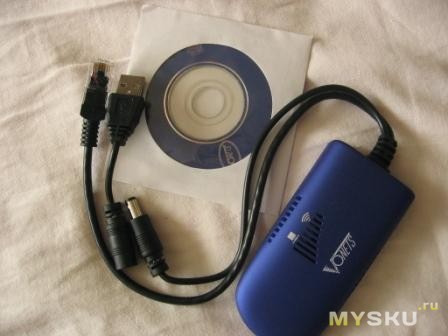
На самом устройстве при этом горят 2 светодиода, один показывает подключение к устройству (питание), а второй наличие ВайФай сети (но не правильность подключения к ней)
Сзади устройства имеется разъем под штекер внешнего питания, наличие выходного штекера (тот который переходит в УСБ) позволяет запитать транзитом питанием внешнее устройство.
На диске содержится PDF описание и софт. Софт позволяет произвести сканирование сетей и подключение к ним (указав параметры подключения).
Плюсы: питание ЮСБ и внешнее, компактный размер, простота настройки.
Минусы: отсутствие WPS, невнятная индикация работы, греется заметно, короткий LAN шнур.
P.S. испытание в боевых условиях еще не производил, так что об этом позже.