- IoT | Internet weather station with ESP8266 Wi-Fi module
- ESP8266 WiFi Weather Station with Color TFT Display
- Software
- Saved searches
- Use saved searches to filter your results more quickly
- License
- ThingPulse/esp8266-weather-station
- Name already in use
- Sign In Required
- Launching GitHub Desktop
- Launching GitHub Desktop
- Launching Xcode
- Launching Visual Studio Code
- Latest commit
- Git stats
- Files
- README.md
IoT | Internet weather station with ESP8266 Wi-Fi module
Internet weather station with ESP8266 module circuit:
IoT project circuit diagram is shown below.

(All grounded terminals are connected together)
The recommended operating voltage of the ESP8266 (ESP-01) module is 3.3V and I’ve a 5V power source which means I’ve to step-down the 5V into 3.3V, for that I used the AMS1117-3.3V (LM1117-3.3V) voltage regulator. There is no need for the voltage regulator if there is available 3.3V source with 1A or higher.
RX pin of the ESP-01 module is connected to TX pin of the FT232RL USB-to-Serial module.
TX pin of the ESP-01 module is connected to RX pin of the FT232RL USB-to-Serial module.
Internet weather station with ESP8266 module code:
To get weather data, I used openweathermap.org website, so first we’ve to sign up for a free account in order to get an API key which is important in this project. With the openweathermap.org website we can:
- Access current weather data for any location including over 200,000 cities
- Current weather is frequently updated based on global models and data from more than 40,000 weather stations
- Data is available in JSON, XML, or HTML format
- Available for Free and all other paid accounts
Once you sign in to your account (of course after the free registration), you’ll be directed to member area, go to API keys and you’ll find your API key as shown in the following image:
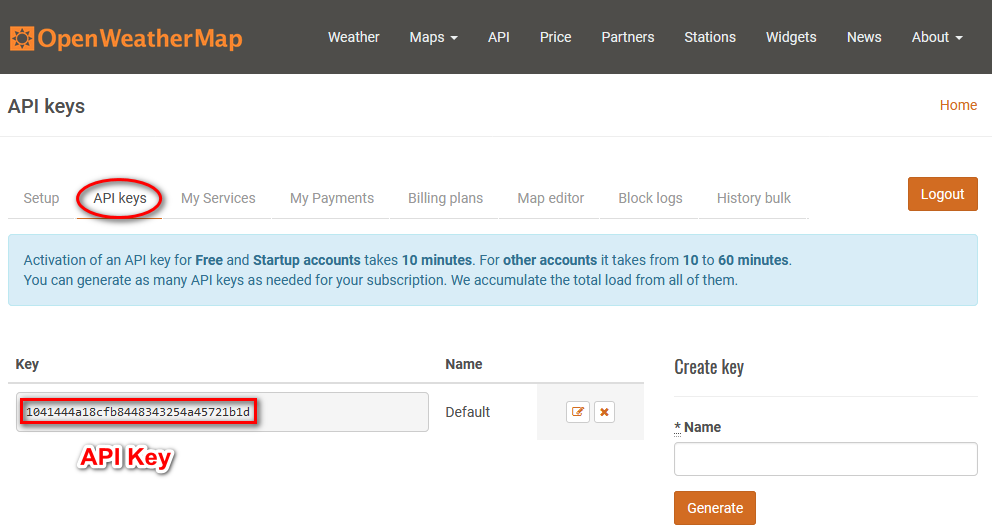
The API code is well shown, we’ll use it later.
With that key we can access weather data provided by the website, all what we do is entering the following URL into web browser (google Chrome, Mozilla Firefox …):
ESP8266 WiFi Weather Station with Color TFT Display

You will be redirected back to this guide once you sign in, and can then subscribe to this guide.


WUnderground no longer provides API keys for free so we’ve updated the code in this guide to use the newer OpenWeatherMap code, the assembly is the same but the final graphics will differ!
In this project, we’ll learn how to make a DIY fully featured weather station using an ESP8266 and a 2.4″ TFT touchscreen display. This project pulls weather data using the Wunderground API. It displays the date, time, current weather conditionals, 4-day forecast and even moon phases.

We recommend walking through the guides listed here to get a better understanding of the components used in this project.

You’ll need the following parts to build this project.

- Soldering Iron & Solder
- 3D Printer & Filament
- microUSB Data Cable
- 30AWG Silicone Coated Stranded Wire

Software
WUnderground no longer provides API keys for free so we’ve updated the code in this guide to use the newer OpenWeatherMap code, the assembly is the same but the final graphics will differ!
If you’re new to the Adafruit Feather HUZZAH ESP8266, you’ll need to install the board and libraries in order to compile and upload code to it using the Arduino IDE. Follow the guide below to install the board and libraries, then come back here once you’ve successfully installed it.
The guide walks you through installing the Arduino IDE as well.
You’ll need to download and install a few libraries in order to compile the sketch.
The Adafruit libraries are in the library manager so use that to install them:

If using an earlier version of the Arduino IDE (pre-1.8.10), locate and install Adafruit_BusIO (newer versions handle this prerequisite automatically).


Download the Arduino Sketch by clicking the green button below.
The original software was written by Daniel Eichhorn @ http://blog.squix.ch we made some changes to make it plug-n-play with this setup!
You’ll need to manually adjust a few settings in order to properly display weather conditions from your area. In the settings.h file, look for the «WIFI SSID» section. Here, you’ll need to enter your WiFi SSID & Password
// Setup #define WIFI_SSID "yourssid" #define WIFI_PASS "yourpassw0rd" #define WIFI_HOSTNAME "ThingPulse-weather-station-color"
// Setup #define WIFI_SSID "yourssid" #define WIFI_PASS "yourpassw0rd" #define WIFI_HOSTNAME "ThingPulse-weather-station-color"
String OPEN_WEATHER_MAP_LOCATION = «Zurich,CH»;
String OPEN_WEATHER_MAP_LOCATION = «New York,US»;
Finally, you can set your timezone at this section by adjusting the UTC offset for your location — if you have to deal with DST, there’s also code to set that as well!
#define UTC_OFFSET +1 struct dstRule StartRule = ; // Central European Summer Time = UTC/GMT +2 hours struct dstRule EndRule = ; // Central European Time = UTC/GMT +1 hour // Settings for Boston // #define UTC_OFFSET -5 // struct dstRule StartRule = ; // Eastern Daylight time = UTC/GMT -4 hours // struct dstRule EndRule = ; // Eastern Standard time = UTC/GMT -5 hour
#define UTC_OFFSET +1 struct dstRule StartRule = ; // Central European Summer Time = UTC/GMT +2 hours struct dstRule EndRule = ; // Central European Time = UTC/GMT +1 hour // Settings for Boston // #define UTC_OFFSET -5 // struct dstRule StartRule = ; // Eastern Daylight time = UTC/GMT -4 hours // struct dstRule EndRule = ; // Eastern Standard time = UTC/GMT -5 hour
Once your adjustments have been made, you can upload the sketch to the board. Before you do, goto Tools > Board and select Adafruit HUZZAH ESP8266. Then, check the varies options below:
- CPU Frequency: 80 MHz
- Flash Size: 4M (3M SPIFFS) — this is not default!
- Upload Speed: 115200
Plug in a microUSB data cable into the board and connect it to a USB port on your computer. Under the Port section, in the Tools menu, you should see the board listed. (If you’re on a Mac, it will be listed as /dev/cu.SLAB_USBtoUART.)
With those options selection, you can now upload the code to the board by clicking the upload button. You’ll see the status of the upload in the black window on the bottom of the Arduino IDE.
The ESP8266 will then automatically download the assets (weather condition icons) to the board. Once it’s finished, it’ll automatically display the date, time, weather, and moon phases. Pretty cool, huh? 🙂
Saved searches
Use saved searches to filter your results more quickly
You signed in with another tab or window. Reload to refresh your session. You signed out in another tab or window. Reload to refresh your session. You switched accounts on another tab or window. Reload to refresh your session.
ESP8266 Weather Station library supporting OpenWeatherMap, Aeris and other sources
License
ThingPulse/esp8266-weather-station
This commit does not belong to any branch on this repository, and may belong to a fork outside of the repository.
Name already in use
A tag already exists with the provided branch name. Many Git commands accept both tag and branch names, so creating this branch may cause unexpected behavior. Are you sure you want to create this branch?
Sign In Required
Please sign in to use Codespaces.
Launching GitHub Desktop
If nothing happens, download GitHub Desktop and try again.
Launching GitHub Desktop
If nothing happens, download GitHub Desktop and try again.
Launching Xcode
If nothing happens, download Xcode and try again.
Launching Visual Studio Code
Your codespace will open once ready.
There was a problem preparing your codespace, please try again.
Latest commit
Git stats
Files
Failed to load latest commit information.
README.md
ThingPulse ESP8266 Weather Station
This code works best with the NodeMCU V2 ESP8266 module and an 0.96″ OLED display. To get you up and running in no time we created a kit which contains all the necessary parts: https://thingpulse.com/product/esp8266-iot-electronics-starter-kit-weatherstation-planespotter-worldclock/
By buying this and other kits from us you are funding maintenance and development of this library. Thank you!

Install and configure Arduino IDE
Make sure you use a version of the Arduino IDE which is supported by the ESP8266 platform. Follow the tutorial on our documentation platform.
Install libraries in Arduino IDE
Install the following libraries with your Arduino Library Manager in Sketch > Include Library > Manage Libraries.
- ESP8266 Weather Station
- JSON Streaming Parser by Daniel Eichhorn
- ESP8266 OLED Driver for SSD1306 display by Daniel Eichhorn. Use Version 3.0.0 or higher!
- Create an API Key for OpenWeatherMap
- In the Arduino IDE go to File > Examples > ESP8266 Weather Station > Weather Station Demo
- Enter the OpenWeatherMap API Key
- Enter your WiFi credentials
- Adjust the location according to OpenWeatherMap API, e.g. Zurich, CH
- Adjust UTC offset
If you are using the PlatformIO environment for building
- choose one of the available IDE integration or the Atom based IDE
- install libraries 561, 562 and 563 with «platformio lib install»
- adapt the WeatherStationDemo.ino file to your needs (see details above)
- Time Client: simple class which uses the header date and time to set the clock
- NTP Client: a NTP based time class written by Fabrice Weinberg
- OpenWeatherMap Client: A REST client for the OpenWeatherMap.com service, providing weather information
- Aeris Client: Client for the service provided by aerisweather.com. Fully functional initial version. After the Wunderground incident (see upgrade notes) we first targeted Aeris before we settled with OpenWeatherMap. This code is unmaintained but will remain part of this library for the time being.
- Thingspeak Client: fetches data from Thingspeak which you might have collected with another sensor node and posted there.
- Astronomy: algorithms to calculate current lunar phase and illumination.
- SunMoonCalc: a calculator for sun and moon properties for a given date & time and location. This implementation is port of a Java class by T. Alonso Albi from OAN (Spain).
Why Weather Station as a library?
I realized that more and more the Weather Station was becoming a general framework for displaying data over WiFi to one of these pretty displays. But everyone would have different ways or sources for data and having the important part of the library would rather be the classes which fetch the data then the main class. So if you write data fetchers which might be of interest to others please contact me to integrate them here or offer your code as extension library yourself and call it something like esp8266-weather-station-. We will gladly list it here as third party library.
Version 2, January 2020, removes WU support, see below
Replace Wunderground with OpenWeatherMap as weather data provider
The weather information provider we used so far (Wunderground) recently stopped their free tier without previous notice on May 15, 2018. This release adds support for a new provider with a free tier for weather information: OpenWeatherMap.com. The basic demo (WeatherStationDemo) has been adapted to use this new API through the OpenWeatherMapCurrent and OpenWeatherMapForecast REST clients.
Sadly OpenWeatherMap provides less information than Wunderground did (or still does). If you are missing attributes in the response documents then please contact the OpenWeatherMap team.
ESP8266 OLED Library upgrade
The ESP8266 OLED Library changed a lot with the latest release of version 3.0.0. We fixed many bugs and improved performance and changed the API a little bit. This means that you might have to adapt your Weather Station Code if you created it using the older 2.x.x version of the library. Either compare your code to the updated WeatherStationDemo or read through the upgrade guide
| Announcement | Module | Removal |
|---|---|---|
| 2018-06-13 | all Wunderground related code, see our blog for details | January 2020, version 2.0.0 |