- You are not connected to any networks WiFi on Windows 11 [Solved]
- Method 1 – Restart Network Adapter
- Method 2 – Perform a Network Reset
- Method 3 – Forget and Reconnect
- Method 4 – Use Automatic IP & DNS
- Method 5 – Restore Advanced Internet Settings
- Method 6 – Fix Socket Errors and Reset IP Logs
- Method 7 – Check Network Services
- Method 8 – Turn Off WiFi Adapter Power Management
- Method 9 – Run the Network Adapter Troubleshooter
- Method 10 – Re-install and Update the Network driver
- Additional Fix
- Read More:
You are not connected to any networks WiFi on Windows 11 [Solved]
Are you facing an issue connecting to WiFi on your Windows 11/10 PC, even when the WiFi network is listed? Many users have reported seeing an error message that says “You are not connected to any networks” when they are using WiFi to connect to the internet. You might have noticed that you can see the WiFi connection listed and when you connect to the network it either doesn’t connect or displays the above error message.
If you are also confronting the above issue with respect to the WiFi connection on your Windows 11/10 PC, then you have landed in the correct post. In this article, we have curated a list of some troubleshooting methods that can help you fix this WiFi problem.
Method 1 – Restart Network Adapter
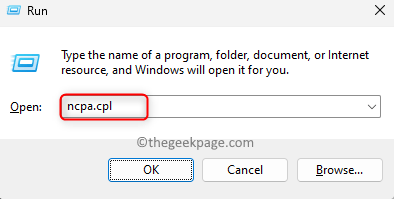
Step 1. Press Windows + R to open the Run box.
Step 2. Type ncpa.cpl and hit Enter to open the Network Connections window.
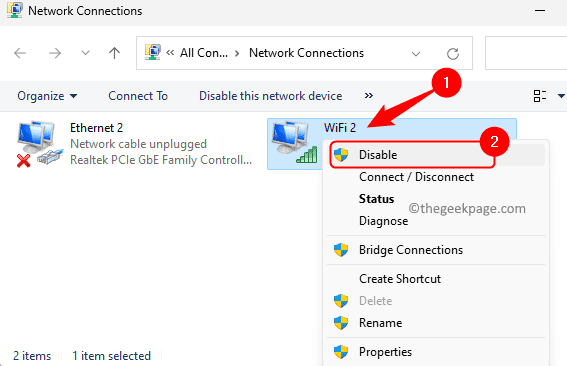
Step 3. In the network adapters listed on this page, right-click on WiFi and click on Disable.
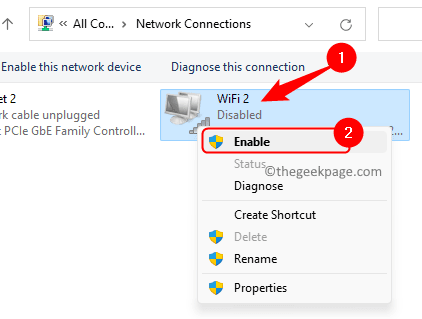
Step 4. After you see that the WiFi adapter is disabled, right-click on it again and click on Enable.
Check if the problem is resolved.
Method 2 – Perform a Network Reset
Step 1. Open the Run box using the Windows and R key combination.
Step 2. Type ms-settings:network and hit Enter to go to the Network & internet in the Settings app.
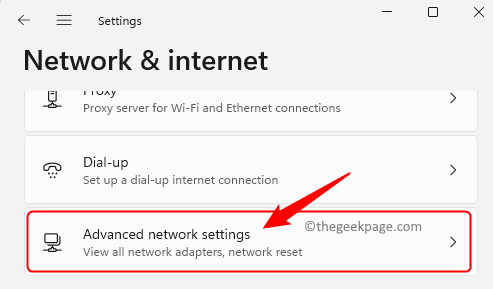
Step 3. On this page, click on Advanced network settings.
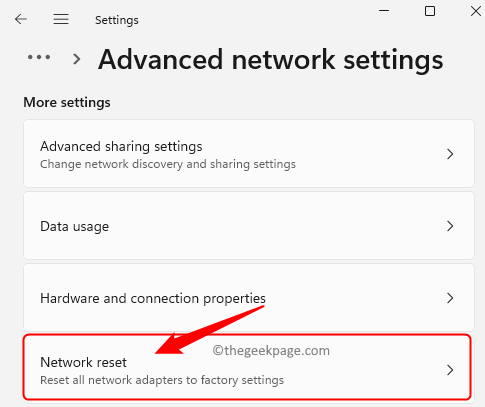
Step 4. In the More settings section, click on Network reset.
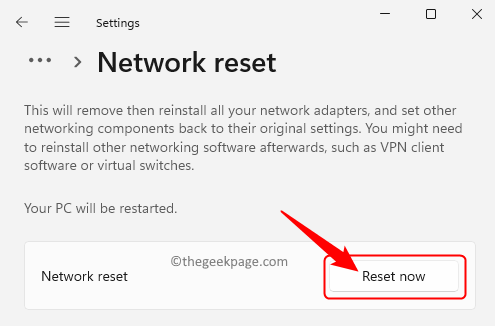
Step 5. Click on the Reset now button associated with Network reset.
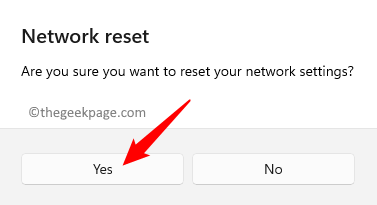
Click on Yes in the confirmation prompt that pops up.
Step 6. This restarts your Windows PC.
After the restart, it will reset all the network profiles on your computer.
Try connecting to your WiFi network and check if the issue is fixed.
Method 3 – Forget and Reconnect
1. Make sure that the WiFi is turned ON.
If there is any physical key try using the key to turn on the WiFi.
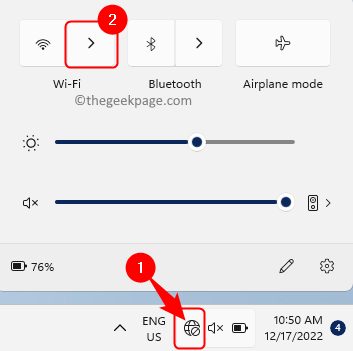
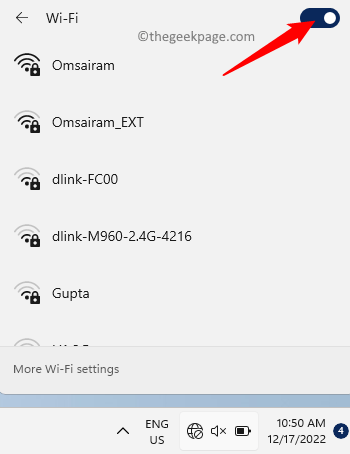
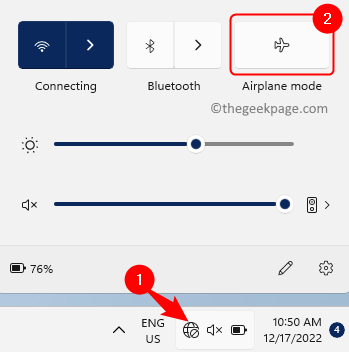
Else, click on the globe symbol in the system tray indicating No internet, and then click on the arrow above Wi-Fi.
Then, turn on the toggle to switch on Wi-Fi on your PC.
Also, make sure that Airplane mode is turned off.
2. You can forget the connection and then try reconnecting to it again.
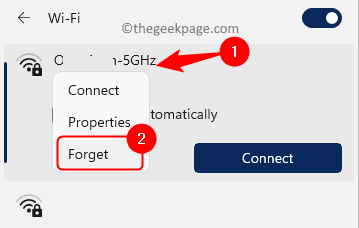
Click on the globe symbol in the system tray and click on the arrow above Wi-Fi.
Then, right-click on your network and choose the option Forget.
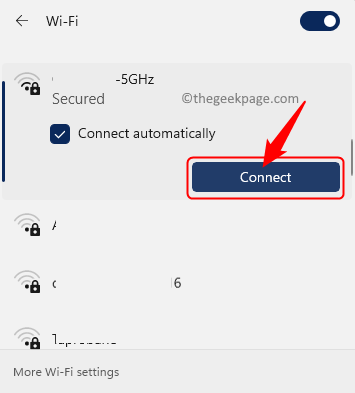
After forgetting the network, go back to the WiFi network and click on Connect next to the WiFi network that you want to connect to.
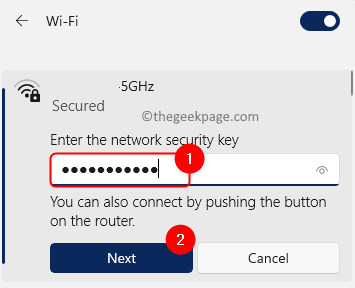
Then, enter the network security key and click on Next to get connected to the network.
Method 4 – Use Automatic IP & DNS
Step 1. Press Windows + R to open Run.
Step 2. Type ncpal.cpl and hit Enter.
Step 3. Right-click on your WiFi adapter and choose Properties.
Step 4. In the WiFi Properties window, select Internet Protocol Version 4 (TCP/IPv4).
Then, click on the Properties button.
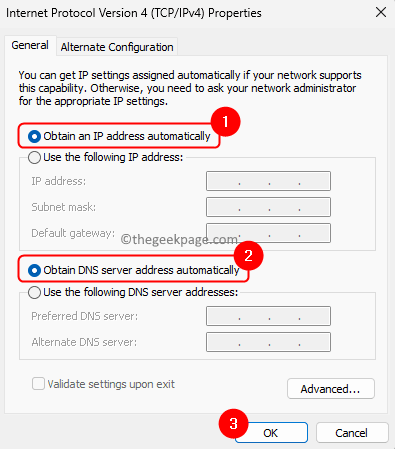
Step 5. Make sure that the options “Obtain IP address automatically” and “Obtain DNS server address automatically” are selected.
There should not be any manual value present.
Then, click on OK.
Step 6. Check if you are able to connect to WiFi.
Method 5 – Restore Advanced Internet Settings
Step 1. Open the Run dialog by pressing the Windows and R keys simultaneously.
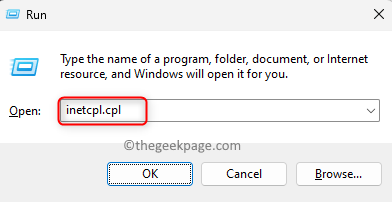
Step 2. Type inetcpl.cpl and hit Enter to open the Internet Properties.
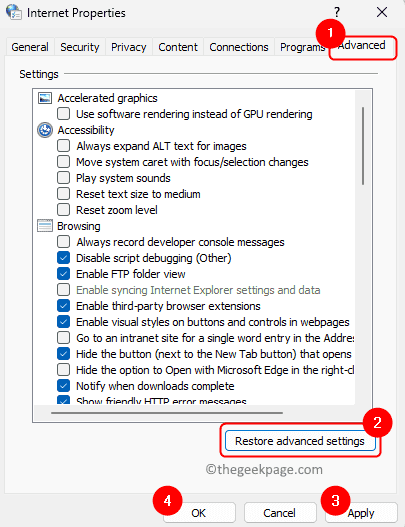
Step 3. In the Internet Properties window, go to the Advanced tab.
Step 4. Here, click on the Restore advanced settings button.
Step 5. Finally, hit on Apply and then OK to save the changes.
Step 6. Reboot your Windows system and check if you are able to connect to WiFi without any errors.
Method 6 – Fix Socket Errors and Reset IP Logs
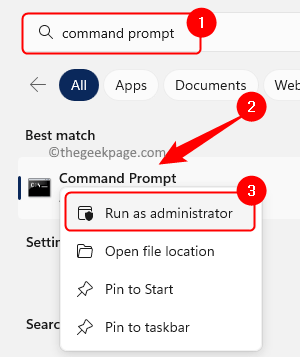
Step 1. Hit the Windows key and type command prompt in the Windows search box.
Step 2. Right-click on Command Prompt and choose Run as administrator.
When you are prompted by User Account Control to grant permissions, click on Yes.
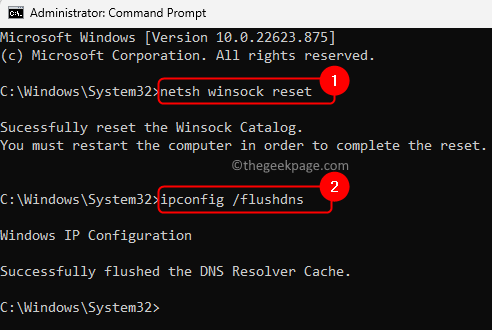
Step 3. Type the command given below and hit Enter.
The above command will fix any Socket API errors if any.
Step 4. Next, type the below command and hit Enter to clear the DNS cache.
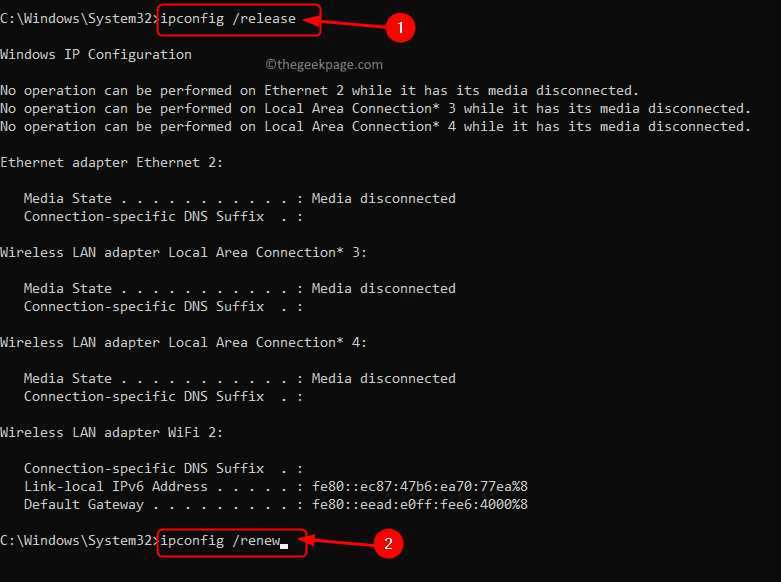
Step 5. You can try using the commands below to release and renew the IP if you are not able to access some websites while connected to the WiFi.
ipconfig /release ipconfig /renew
Step 6. Restart your PC and check if the problem is fixed.
Step 7. If the problem persists, then open Command Prompt as admin and execute the commands below to reset the IP logs.
netsh winsock reset catalog netsh int ip reset resetlog.txt netsh int ipv4 reset resetlog.txt
Step 8. Exit the command prompt and restart your system.
Check if you are able to connect to the WiFi after the system starts up.
Method 7 – Check Network Services
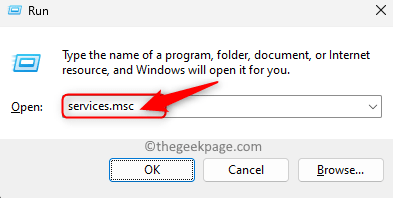
Step 1. Press Windows + R to open the Run box.
Step 2. Type services.msc and hit Enter to open the Services app.
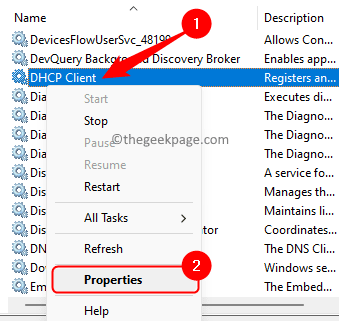
Step 3. Locate DHCP Client in the list of services.
Right-click on DHCP Client and choose Properties.
Make sure that the Startup type is set to Automatic.
If the service is not running, then click on the Start button to start the service.
Click on Apply and then on OK.
Step 4. Repeat Step 3 for the services listed below.
WLAN AutoConfig
Network Connections
Network Setup Service
Any other Network related service from the list
WiFi Direct Services Connection Manager Service
Step 5. Check if the problem with your WiFi not connecting is resolved or not.
Method 8 – Turn Off WiFi Adapter Power Management
Step 1. Press the Windows + X key combination on your keyboard.
Step 2. Select Device Manager in the context menu that opens up.
Step 3. Click on the arrow next to Network adapters to expand it.
Step 4. Identify your wireless network adapter in the list.
Right-click on it and choose Properties.
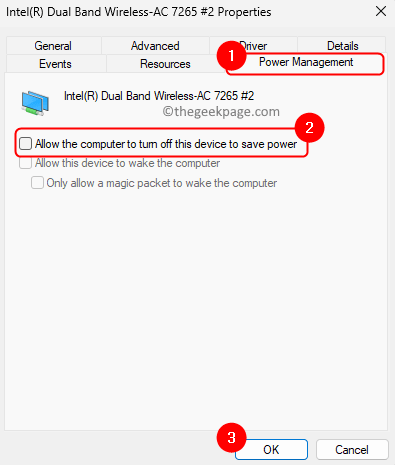
Step 5. In the Properties window, go to the Power Management tab.
Step 6. Here, uncheck the box next to Allow the computer to turn off this device to save power.
Then, click on OK.
Step 7. Check if you are able to connect to the WiFi network.
Method 9 – Run the Network Adapter Troubleshooter
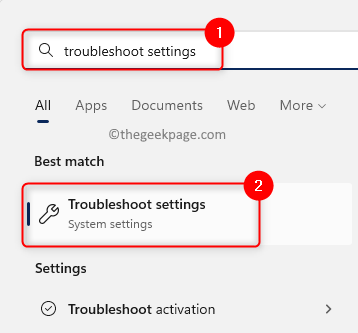
Step 1. Hit the Windows key on your keyboard and type troubleshoot settings in the search box.
Step 2. Click on Troubleshoot Settings in the search results.
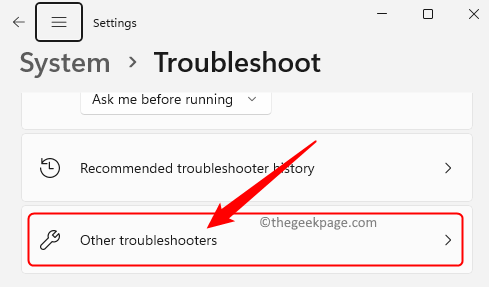
Step 3. On the Troubleshoot page, click on Other troubleshooters.
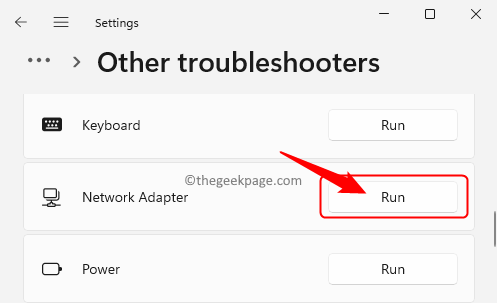
Step 4. Locate Network Adapter in the lists of troubleshooters on this page.
Step 5. Click on the Run button associated with the Network Adapter troubleshooter.
Step 6. Wait for the troubleshooter to run and detect any problems if present.
If there are any issues found, it will display solutions to fix them.
Follow the instructions to fix the detected problem.
Step 7. Once you performed the necessary actions, check if you are seeing the error message when using the WiFi connection.
Method 10 – Re-install and Update the Network driver
Step 1. Press the Windows + X key combination on your keyboard.
Step 2. Select Device Manager in the context menu that opens up.
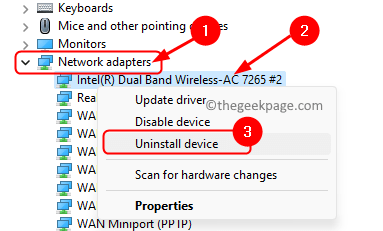
Step 3. Click on the arrow next to Network adapters to expand it.
Step 4. Identify your wireless network adapter in the list.
Step 5. Right-click on your Wireless network adapter and choose Uninstall device.
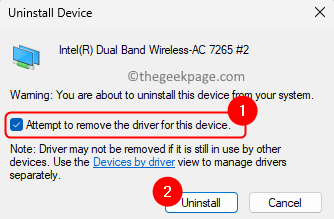
In the confirmation dialog, click on Uninstall.
Step 6. Restart your PC.
On the restart, Windows will automatically search for missing drivers and install them.
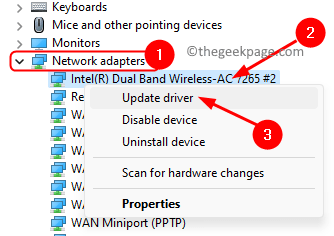
Step 7. If the problem still exists, then go back to Device Manager.
Right-click on the network adapter and choose Update driver.
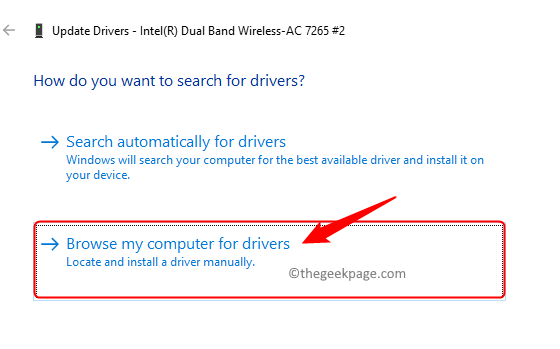
Step 8. In the Update Drivers window, click on Browse my computer for drivers.
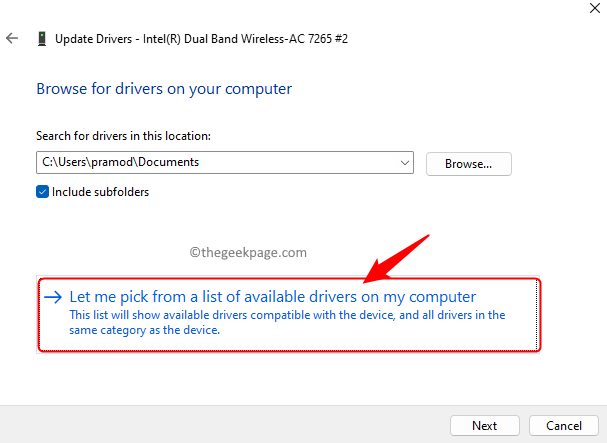
Step 9. Now, click on Let me pick from a list of available drivers on my computer.
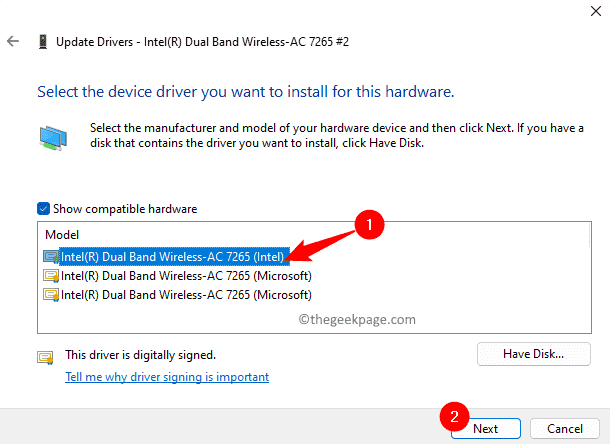
Step 10. From the list, select a driver from the date on which your WiFi was working.
Then, click on Next.
Step 11. After the driver is installed, restart your PC and check if the problem is overcome.
If updating and reinstalling the network driver did not help in fixing the problem, then you can try to Roll back the driver.
Step 1. Go to Device Manager.
Right-click on your network adapter and choose Properties.
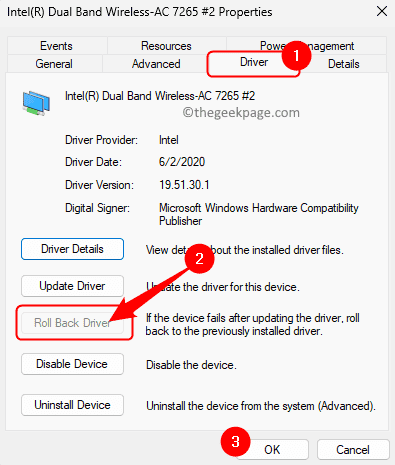
Step 2. In the Properties window, go to the Driver tab.
Step 3. If the Roll Back driver button is not greyed out, then click on it.
Follow the on-screen instructions to roll back the network driver to its working version.
Step 4. Restart your PC and check if the issue is resolved.
Additional Fix
The methods mentioned above must help you fix the issue at hand. But if you are still encountering the error message and are not able to connect to WiFi, then you will need to go to your PC manufacturer’s website using a computer with a working network connection.
On your manufacturer’s website, search for your laptop model and the network driver. Find the related networking driver and download it. Transfer it to the PC having this problem using a USB device and install the WiFi driver. Once you have installed the driver, the problem must be fixed.
If everything fails, then you can try power flushing your PC. For this, you need to shut down your computer completely, then disconnect the power supply. Now, press and hold the power key for 30 seconds to flush out all the remaining power from your system. Connect your power supply back and turn on your computer and check if the problem related to WiFi is fixed.
We hope the methods mentioned in this article have been helpful in fixing the “You Are Not Connected to Any Networks” error message associated with the WiFi connection on your Windows 11/10 PC. If you found this article informative and useful in resolving the problem, then comment and let us know your opinions.
