- How to Change Your Wi-Fi Network Name and Password
- Does your internet feel less than secure?
- Update password on standalone routers and wireless gateways
- Get your router’s IP address (web interface only)
- Part 1: Connect wirelessly or with a cable
- Part 2: Find your router’s default IP address
- iOS 14/iPadOS 14
- Android 11 (stock)
- Android 10/11 (Samsung)
- Windows 10
- macOS Big Sur and newer
- Log in to your router using a browser
- First time logging in?
- Modify your wireless network
- Part 1: Change your network name
- Part 2: Modify your network security
- Want to keep your home network secure?
- Test your new network settings
- Part 1: Test the wireless connection
- Part 2: Reconnect other devices
- Is your new home Wi-Fi network too slow?
- Update password on mesh networking kits
- Looking to upgrade your mesh Wi-Fi system?
How to Change Your Wi-Fi Network Name and Password
Changing your Wi-Fi network name and password is a simple and important way to keep your devices secure, but it can also be a bit daunting.
Fortunately, it doesn’t matter if you have Xfinity, AT&T, or any other service provider—the steps to changing your Wi-Fi settings are the same. The process is also similar across different router manufacturers, like NETGEAR or TP-Link.
We’ll show you how to find your router’s IP address (if needed) and change the wireless network name using a web interface and an app.
Does your internet feel less than secure?
Some internet providers offer a free security suite when you sign up. Enter your zip code below to see what’s available to you.
Update password on standalone routers and wireless gateways
The whole process of changing your Wi-Fi network name and password can be broken down into four main steps:
These steps are pretty simple, but there’s a bit of variation depending on various factors, like what kind of device you’re using to connect. Keep reading for a more detailed breakdown of these steps.
Get your router’s IP address (web interface only)
All standalone routers and wireless gateways provide a web interface so you can modify the settings. However, manufacturers may also provide a mobile app for changing the wireless network name, password, and other settings from your phone or tablet.
Use the mobile app if available, and then skip ahead to the testing portion of this guide.
If you’re using the web interface instead, you’ll need to discover your router or gateway’s private IP address first so you can enter it into the browser’s address bar.
Part 1: Connect wirelessly or with a cable
If you’re setting up a new router for the first time, there’s usually an Ethernet cable in the box that will allow you to connect a PC directly to your router. This is probably the easiest way to set things up, but sometimes this won’t work. Many slim laptops, like MacBooks, don’t have Ethernet ports and require a USB adapter for a wired connection to the network. Sometimes it’s more convenient to use a phone or other mobile device.
To connect wirelessly, you’ll need the default network name and password for your router. These can be found in the instruction manual and sometimes found on the router itself, printed on a sticker or label. The network is often labeled as the SSID (service set identifier).
If you’re changing the settings on a network that’s already set up, you don’t need this default information and can just connect to the network with the name and password you typically use.
Part 2: Find your router’s default IP address
Next, you’ll need your router’s private IP address. There are several ways to do this, depending on what kind of device you’re using:
iOS 14/iPadOS 14
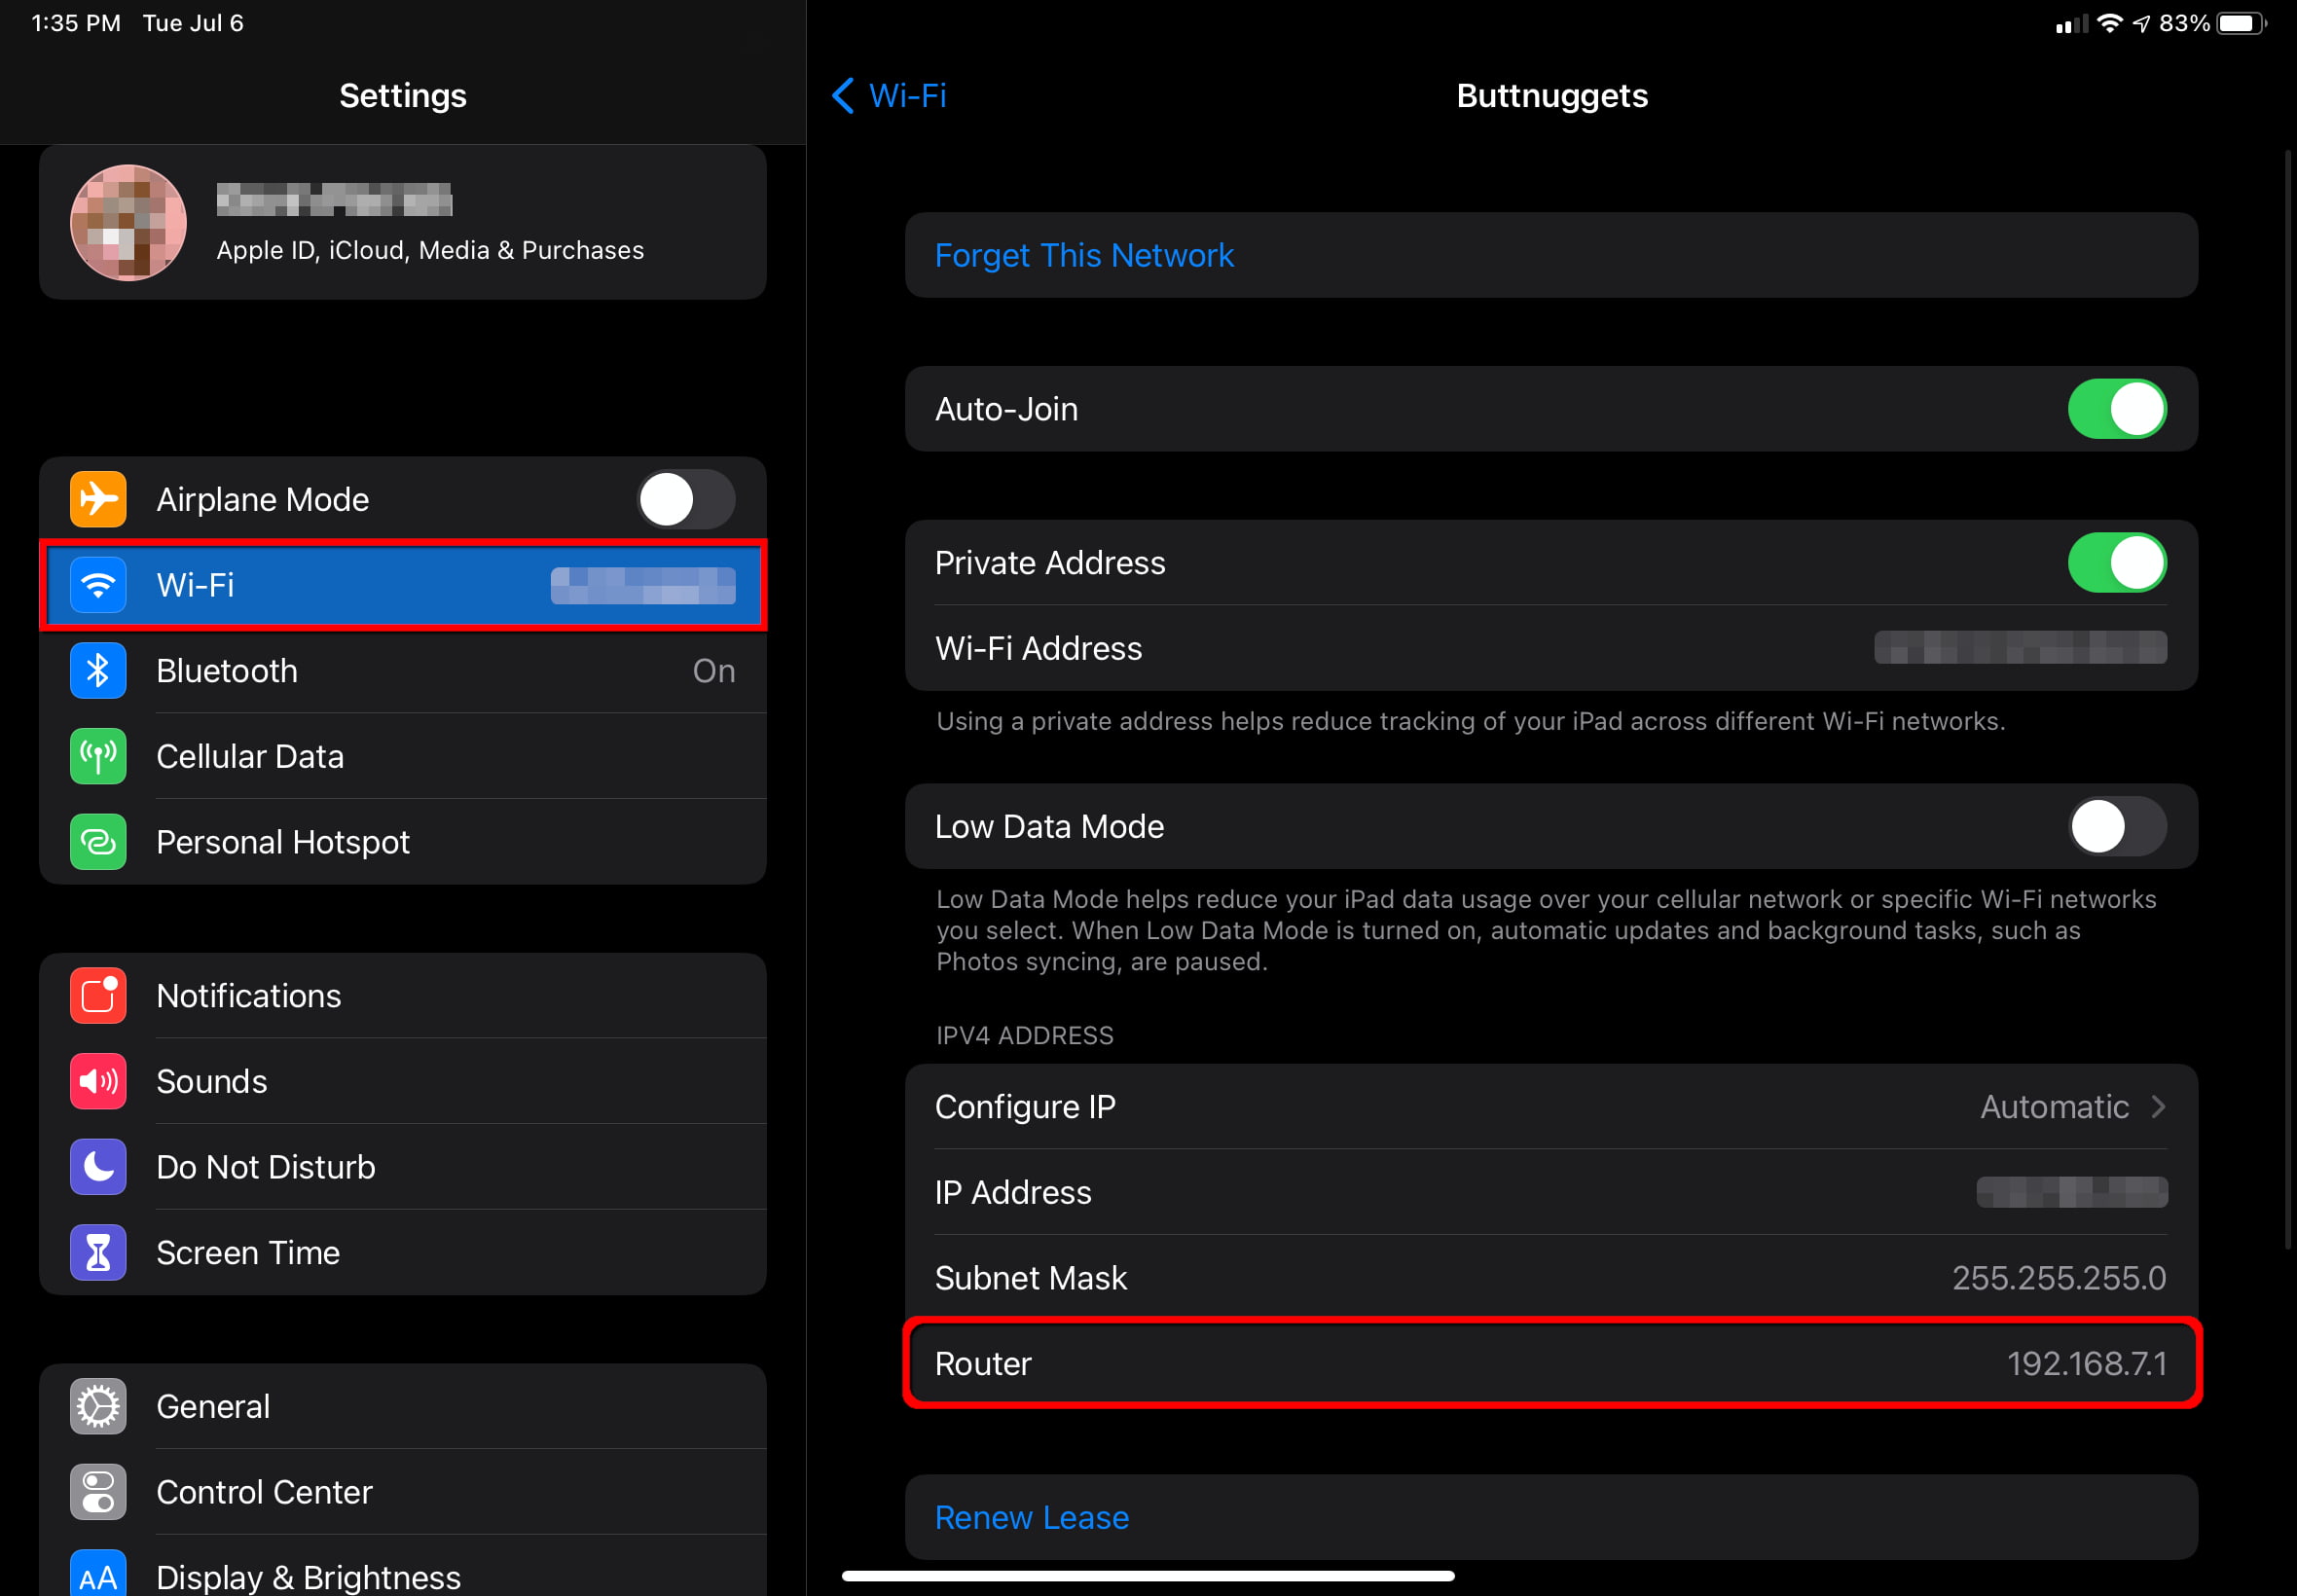
Step 1: Tap to open Settings .
Step 2: Tap on Wi-Fi .
Step 3: Tap on your network’s name.
Step 4: Write down the number displayed next to Router .
Android 11 (stock)
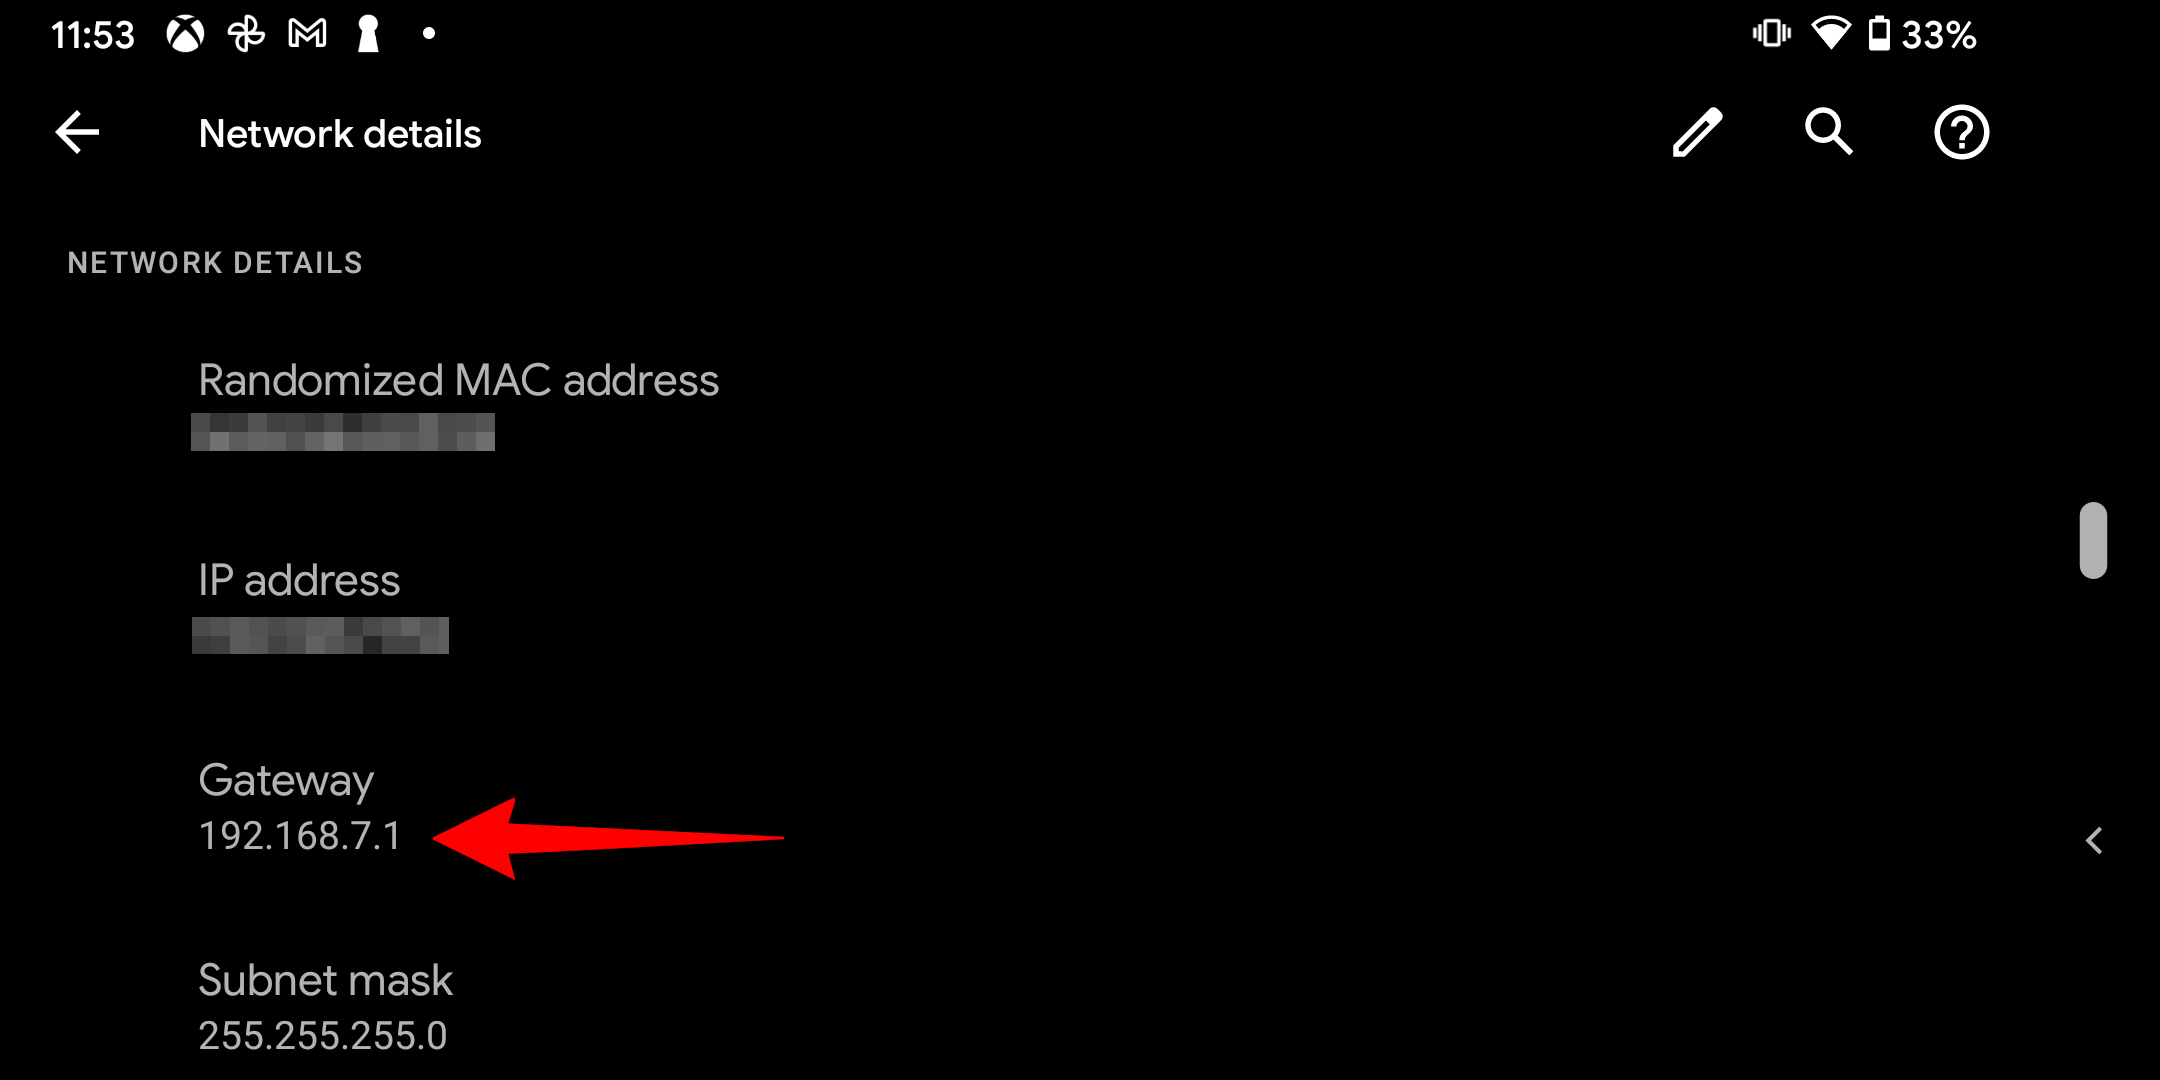
Step 1: Swipe a finger down from the top to expand the Notification Shade and tap the “cog” icon to open the Settings panel.
Step 2: Tap on Network & internet .
Step 3: Tap on Wi-Fi .
Step 4: Tap on the “cog” icon displayed next to your network’s name.
Step 5: Tap on Advanced .
Step 6: Scroll down and write down the number displayed next to Gateway under Network Details .
Android 10/11 (Samsung)
There’s no way to find your router’s IP address on a Samsung phone, but you can get an idea using the phone’s IP address.
Step 1: Swipe a finger down from the top to expand the Notification Shade and tap the “cog” icon to open the Settings panel.
Step 2: Tap on Connections .
Step 3: Tap on Wi-Fi .
Step 4: Tap on the “cog” icon next to your network’s name.
Here you will see your Samsung phone’s IP address. Generally, the first three portions address the router, and the last portion is your device. For example, “192.168.7” is the router and “155” is your device. So, the router’s full address is probably 192.168.7.1.
Many mobile apps developed for analyzing networks, such as Network Analyzer , make it easy to find your router’s IP address. Using an app is also a handy way to find your router’s IP address using an Android device.
Windows 10
You can use the IPCONFIG command to get the IP address on a Windows PC. To do this, follow these steps:
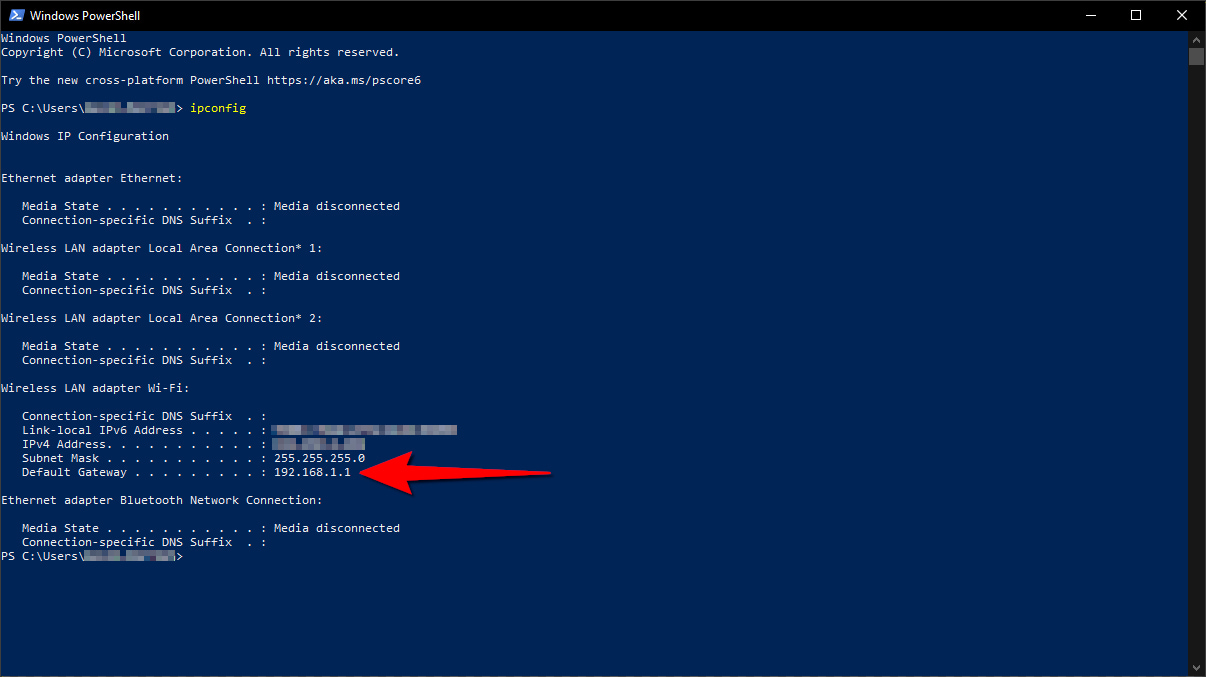
Step 1: Right-click on the Start button and select Windows PowerShell on the Power User Menu.
Step 2: Type the command “IPCONFIG” into Windows PowerShell and press the Enter key.
Step 3: Write down the number listed next to Default Gateway .
macOS Big Sur and newer
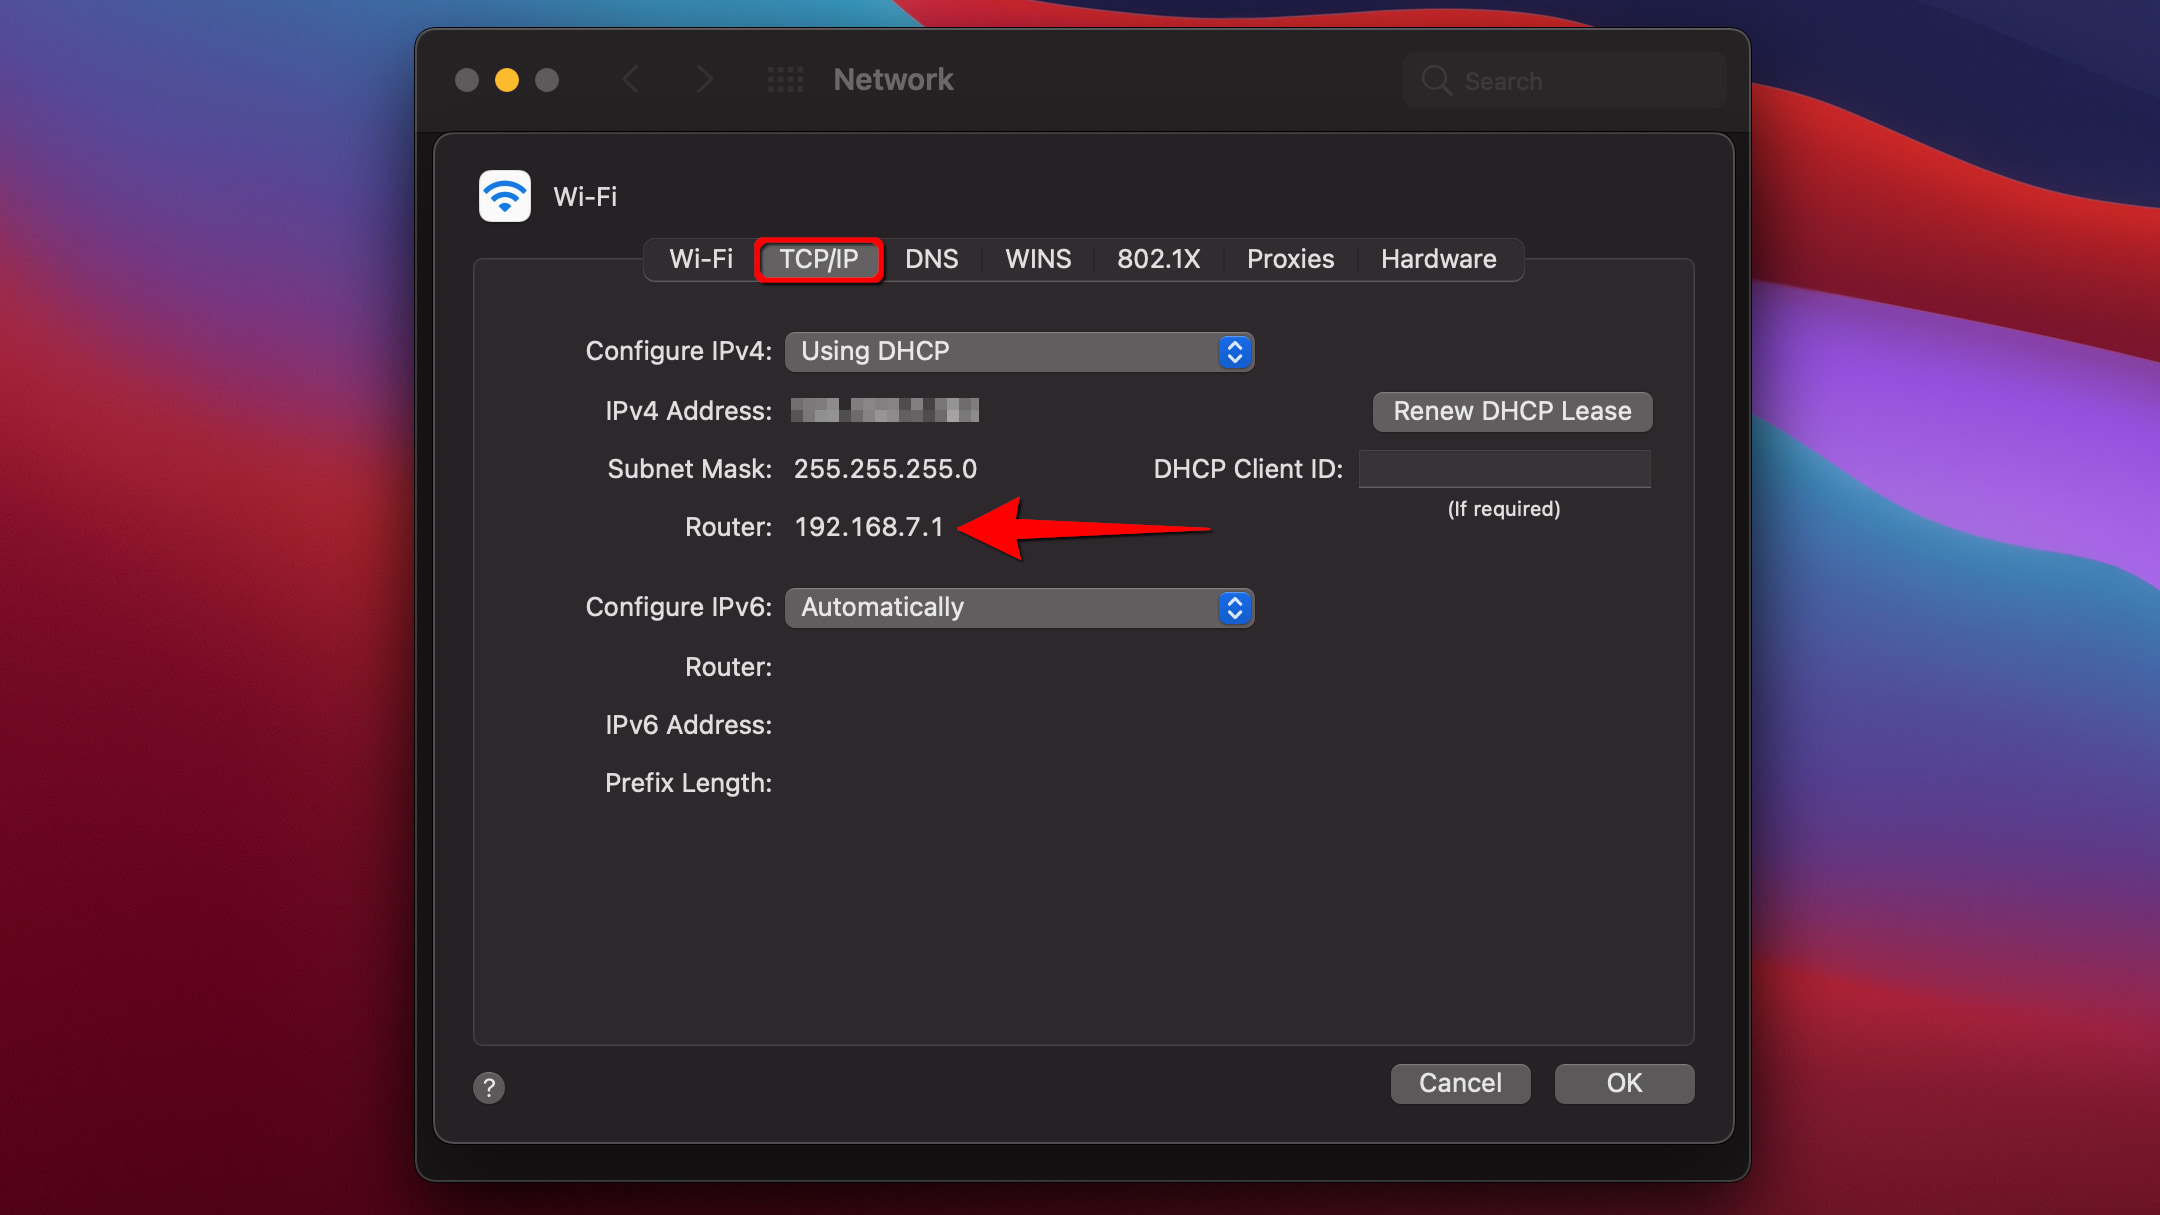
Step 1: Click on the System Preferences icon on the Dock or click the Apple logo in the top left corner, followed by System Preferences on the drop-down menu.
Step 2: Select Network.
Step 3: If you’re on a wired connection, write down the number next to Router .
If you’re on a Wi-Fi connection, click the Advanced button.
Step 4: Click on the TCP/IP tab.
Step 5: Write down the number next to Router.
Log in to your router using a browser
Now that you have the IP address of your router, you can access its settings using a standard web browser like Firefox, Chrome, or even Internet Explorer.
Step 1: Open any web browser and type the router’s IP address in the address bar.
Step 2: Your router’s web interface appears within the browser. Log in using your username and password.
First time logging in?
You’ll need to log in using the router’s default username and default password. Different brands of routers have different default usernames and passwords, but they are usually very generic. In most cases, the combo is “admin” and “password.”
This information is often printed on a sticker somewhere on the router itself. Otherwise, refer to your router’s instructions to find the correct username and password, or go to the manufacturer’s website, which will often list them as well.
Modify your wireless network
Once you log in to your router, you’ll quickly discover that there are many settings you can adjust. However, we’re going to focus on just two: your network name and password.
Part 1: Change your network name
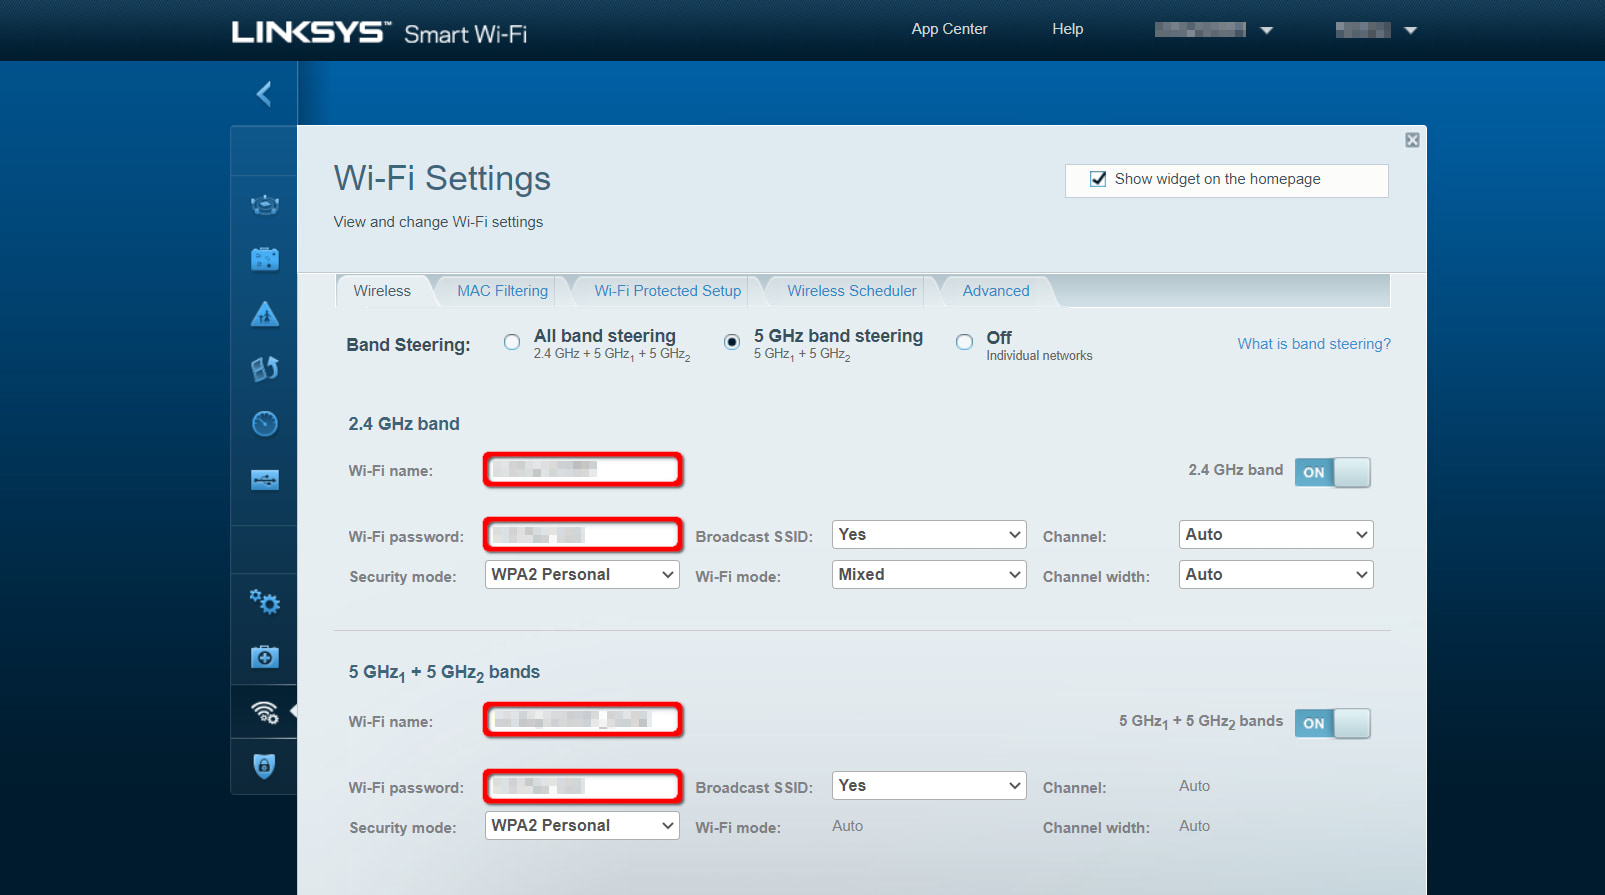
Your network name, often referred to as its SSID, is how people will see your network when they are searching for Wi-Fi networks on their devices. By default, this will usually be the name of the router manufacturer with some added numbers. You can change this to whatever you want, as long as it’s a name that you will quickly recognize, especially if you’re in an urban area where there are many overlapping Wi-Fi networks.
The following instructions are based on a Linksys router, so they may differ from what you see on the screen.
Step 1: Click on Wi-Fi Settings listed on the left under Wi-Fi Settings.
Step 2: Enter a new name in the text field next to Wi-Fi Name . Do this for both the 2.4 GHz and 5 GHz bands, but be sure they’re different.
Step 3: Click the Apply button.
Part 2: Modify your network security
Once you’ve named your network, you want to secure it with a strong password so that passersby can’t steal your Wi-Fi or, worse, use your network to distribute malware to your devices.
Want to keep your home network secure?
There are several options for security protocols, including simply leaving your network open, but the best option is WPA2, also known as WPA2-PSK or AES. This allows you to put a password on your network.
As with any password you frequently use, make sure that it’s something you can remember. Also, it’s important not to use a password that you also use for important sites, especially if you’re going to be giving it out to guests who want to use your Wi-Fi.
The following instructions are based on a Linksys router, so they may differ from what you see on the screen.
Step 1: Click on Wi-Fi Settings listed on the left under Wi-Fi Settings.
Step 2: Click the download arrow next to Security Mode and select WPA2 Personal on the drop-down menu. Do this for both the 2.4 GHz and 5 GHz bands.
Step 2: Enter a new network password in the text field next to Wi-Fi Password . Do this for both the 2.4 GHz and 5 GHz bands, but be sure they’re different.
Step 3: Click the Apply button.
Test your new network settings
You have now updated the Wi-Fi network name and password. But before you pack up your laptop and go about your business, you should double-check to make sure everything’s working.
Part 1: Test the wireless connection
Grab a wireless device and find your new network name in the list of available networks. Enter your new password to make sure you can connect wirelessly. It’s better to find out now than having to start the process all over again when you’re late for a Zoom meeting or two minutes away from winning an auction on eBay.
Part 2: Reconnect other devices
Now that you updated the network’s name and password, all the devices that were previously connected to your Wi-Fi network will need their information updated so they can reconnect . Remember that this doesn’t just include all your computers and mobile devices, but smart TVs, smart thermostats, security systems, and any other devices that use your Wi-Fi network to connect.
Is your new home Wi-Fi network too slow?
Be sure to consult our guide on how to increase the speed of your home Wi-Fi. Some of our suggestions include power cycling your router, relocating your router, and more.
Update password on mesh networking kits
Mesh networking kits are different from your standard router. You can’t access a backend web interface to change the settings. Instead, you use a mobile app to log in to an account and make adjustments. That also means you don’t need to go out of your way to locate the kit’s IP address as you would with a standard router.
The following instructions are based on the Eero kit, so they may differ from what you may see on your screen.
Step 1: With the Eero app open, tap on the Settings icon located in the bottom right corner.
Step 2: Tap on Wi-Fi Name .
Step 3: Tap in the new name and then tap on the Save button.
Step 4: Tap on Wi-Fi Password .
Step 5: Tap on the Edit Password button.
Step 6: Enter a new password and then tap on the Save button.
Looking to upgrade your mesh Wi-Fi system?
We list the best mesh Wi-Fi systems you can get today, including Google Nest Wifi and Amazon’s Eero 3-pack kit.