- How to Enable WiFi in Windows 10
- Methods to Enable Wi-Fi
- Enable WiFi Through Keyboard Hotkey
- Enable WiFi from Taskbar
- Turn Wi-Fi on through the Settings app in Windows 10
- Closing Words
- Connect to a Wi-Fi network in Windows
- Setting up a wireless network in Windows
- Get the right equipment
- Setting up the modem and Internet connection
- Positioning the wireless router
- Securing your wireless network
- Connect a PC to your wireless network
How to Enable WiFi in Windows 10
In this article, we are going to talk about various methods to enable WiFi in Windows. And while we do that, we will also get to know how to disable WiFi using the same methods.
Well, laptops and PCs these days come with built-in Wi-Fi adapters and receivers. However, if you have a desktop, it may or may not have a wireless network adapter installed on it. In that case, you must check for its availability on your PC. So, before you look for solutions to enable Wi-Fi on your PC, check if the hardware is installed on it.
Once you are sure about the Wi-Fi Network hardware availability, you can check out the solutions that we talk about in the sections below.
Methods to Enable Wi-Fi
It is pretty easy to enable or disable Wi-Fi in Windows 10. All of the methods that you will find here are pretty simple to follow. Just make sure to stick to the steps provided in the methods. Here they are:
Enable WiFi Through Keyboard Hotkey
Every keyboard these days come with a hotkey to enable or disable the Wi-Fi network. The key usually has an Airplane logo on it and can be found on any of the function keys situated at the keyboard’s top row. Once you find that key, you can press it to toggle Wi-Fi on or off your PC.
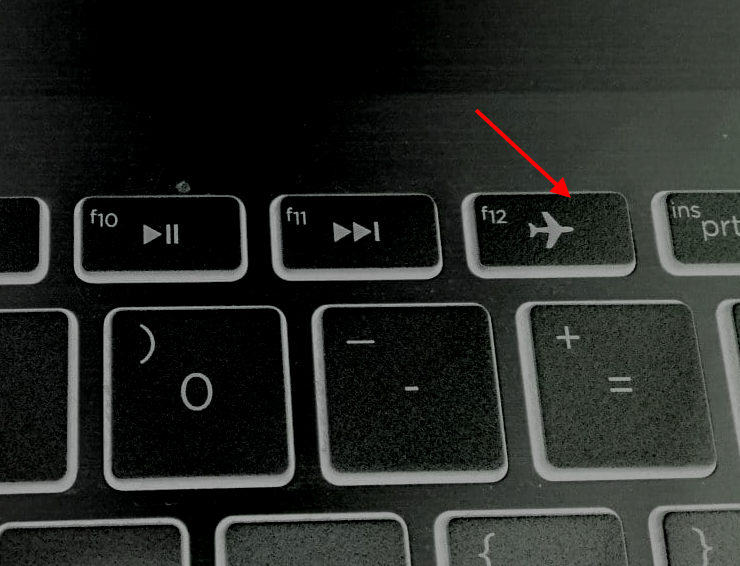
Remember, you may or may not have to press the Function key along with the Fn key on the keyboard. The Fn key is usually located among the bottom row of the keys on the keyboard.
Press the airplane toggle key. If the Airplane mode is enabled, the keypress will disable it. This means that the WiFi will be enabled, and you will be able to view the Wi-Fi networks on your PC.
To Disable Wi-Fi through the flight mode key, go ahead and press the same key again.
Enable WiFi from Taskbar
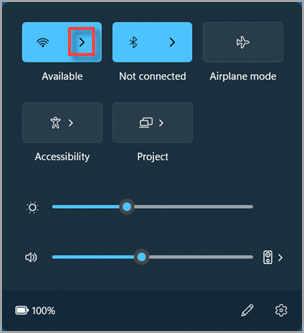
Windows Taskbar is where you will find various options on your PC. These options make operating the Windows platform easier. The Taskbar can be found at the bottom of the screen. Go to the right corner of the Taskbar and look for the Internet access icon.
If the Wi-Fi is turned off, you will usually find the highlighted icon on the Taskbar you will need to click. A pop-up menu will open, as shown below. Here, see if the WiFi network icon is disabled. If disabled, the Wi-Fi icon will be grayed out, as shown below. To enable Wi-Fi network, go ahead and click on the Wi-Fi button.
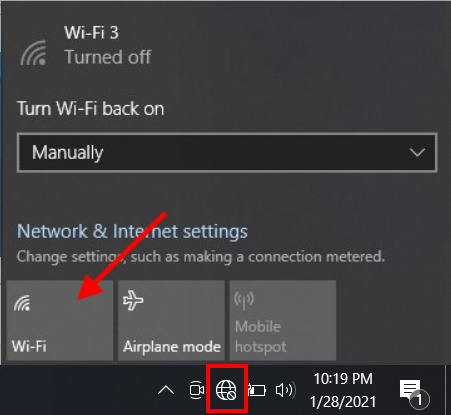
Once the Wi-Fi is enabled, the Wi-Fi logo will turn blue.
Now, you will be able to detect and connect to Wi-Fi networks on your Windows 10 PC.
To disable Wi-Fi from Taskbar, click on the Wi-Fi icon again. This will turn off the WiFi adapter. When the WiFi adapter is disabled, you won’t access any wireless network on your PC.
Turn Wi-Fi on through the Settings app in Windows 10
The Settings app also lets you enable/disable WiFi networks’ connectivity. Here’s how:
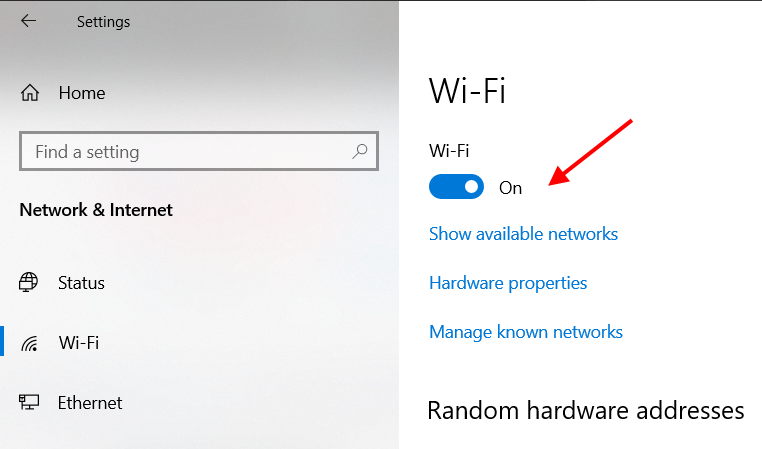
Step 1: Open the WiFi Settings window by pressing Win + I keys simultaneously.
Step 2: In the Settings app, select the Network & Internet option.
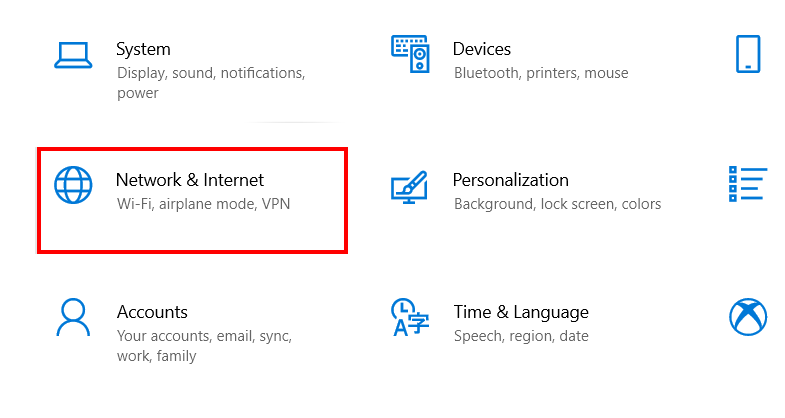
Step 3: In the new Wi-Fi Settings window, go to the panel on the left and click on the Wi-Fi option. Then, go to the panel on the right and click on the WiFi button switch below the Wi-Fi text to enable Wi-Fi.
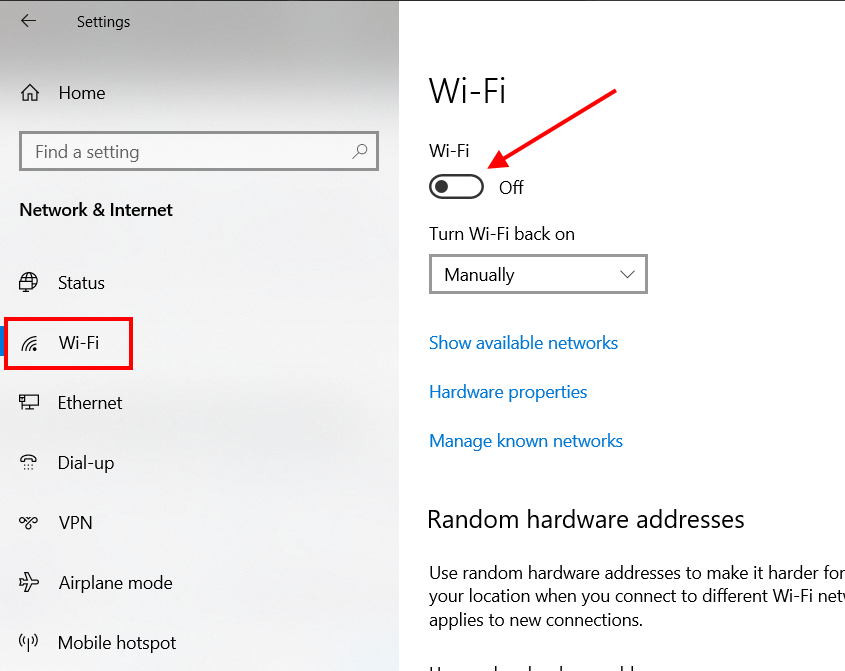
If you want to disable WiFi in Windows 10 through the Settings app, follow the steps provided above and click on the toggle switch to turn Wi-Fi back off. When Wi-Fi is enabled, the Wi-Fi toggle switch will look what is shown in the screenshot below:
Now you know how to enable Wi-Fi or disable it through the Settings app in Windows 10.
Closing Words
These were some of the commonly used methods that you can use to enable or disable Wi-Fi on a Windows 10 PC. There are various other methods too that you can use to toggle Wi-Fi on or off on your PC, but I guess these will suffice.
Recommended for You:
Johnny Crumley
A self-defined geek, Johnny Crumley comes from the USA. As a kid genius, he started DOS batch files at just five years old and was soon messing with BASIC in kindergarten. He was always into the bits and bytes. As luck would have it, Johnny became a freelance PC technician, something he’s genuinely passionate about. From his teenage years, he started writing about anime and games. He’s also an avid educator, spreading his knowledge and expertise in the tech sector. He has been a professional writer for six years and has written for several emerging tech publications.
Blog.rottenwifi.com is a participant in the Amazon Services LLC Associates Program which means we may get paid commissions on editorially chosen products purchased through our links to retailer sites. All names, logos, brands, and images are trademarks or copyrighted materials of their respective owners. Amazon and the Amazon logo are trademarks of Amazon.com, Inc., or its affiliates.
Connect to a Wi-Fi network in Windows
Whether you’re at home, work, or out and about, chances are you’ll find a Wi-Fi network that you can connect to for internet access.
- Select the Network, Sound, or Battery icons ( ) on the far right side of the taskbar to open quick settings.
The Disconnected icon appears when you’re not connected.

On the Wi-Fi quick setting, select Manage Wi-Fi connections .
Whether you’re at home, work, or out and about, chances are you’ll find a Wi-Fi network that you can connect to for internet access.
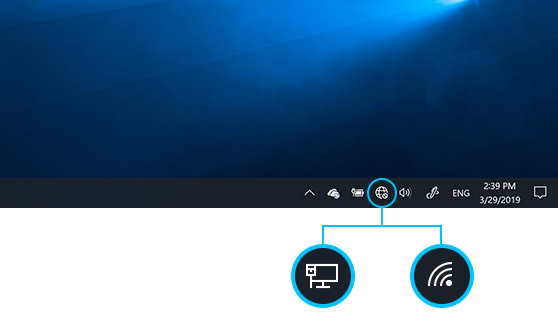
- Select the Network icon on the taskbar. The icon that appears depends on your current connection state. If you don’t see one of the network icons (or a similar one) shown in the following image, select the Up arrow to see if it appears there.
- Choose the Wi-Fi network you want, then select Connect.
- Type the network password, and then select Next.
- Choose Yes or No, depending on the type of network you’re connecting to and if you want your PC to be discoverable by other PCs and devices on the network.
Setting up a wireless network in Windows
A wireless network at home lets you get online from more places in your house. This article describes the basic steps for setting up a wireless network and starting to use it.
Get the right equipment
Before you can set up your wireless network, here’s what you’ll need:
Broadband Internet connection and modem. A broadband Internet connection is a high-speed Internet connection. Digital Subscriber Line (DSL) and cable are two of the most common broadband connections. You can get a broadband connection by contacting an Internet service provider (ISP). Typically, ISPs that provide DSL are telephone companies and ISPs that provide cable are cable TV companies. ISPs frequently offer broadband modems. Some ISPs also offer combination modem/wireless routers. You can also find these at computer or electronics stores, and online.
Wireless router. A router sends info between your network and the Internet. With a wireless router, you can connect PCs to your network using radio signals instead of wires. There are several different kinds of wireless network technologies, which include 802.11a, 802.11b, 802.11g, 802.11n, 802.11ac, and 802.11ax.
Wireless network adapter. A wireless network adapter is a device that connects your PC to a wireless network. To connect your portable or desktop PC to your wireless network, the PC must have a wireless network adapter. Most laptops and tablets—and some desktop PCs—come with a wireless network adapter already installed.
To check whether your PC has a wireless network adapter:
- Select Start , type device manager in the search box, and then select Device Manager.
- Expand Network adapters.
- Look for a network adapter that might have wireless in the name.
Setting up the modem and Internet connection
After you have all the equipment, you’ll need to set up your modem and Internet connection. If your modem wasn’t set up for you by your Internet service provider (ISP), follow the instructions that came with your modem to connect it to your PC and the Internet. If you’re using Digital Subscriber Line (DSL), connect your modem to a phone jack. If you’re using cable, connect your modem to a cable jack.
Positioning the wireless router
Put your wireless router somewhere where it will receive the strongest signal with the least amount of interference. For better results, follow these tips:
Place your wireless router in a central location. Place the router as close to the center of your home as possible to increase the strength of the wireless signal throughout your home.
Position the wireless router off the floor and away from walls and metal objects, such as metal file cabinets. The fewer physical obstructions between your PC and the router’s signal, the more likely that you’ll be using the router’s full signal strength.
Reduce interference. Some networking equipment uses a 2.4 gigahertz (GHz) radio frequency. This is the same frequency as most microwaves and many cordless phones. If you turn on the microwave or get a call on a cordless phone, your wireless signal might be temporarily interrupted. You can avoid most of these issues by using a cordless phone with a higher frequency, such as 5.8 GHz.
Securing your wireless network
Security is always important; with a wireless network, it’s even more important because your network’s signal could be broadcast outside your home. If you don’t help secure your network, people with PCs nearby could access info stored on your network PCs and use your Internet connection.
To help make your network more secure:
Change the default user name and password. This helps protect your router. Most router manufacturers have a default user name and password on the router and a default network name (also known as the SSID). Someone could use this info to access your router without you knowing it. To help avoid that, change the default user name and password for your router. See the documentation for your device for instructions.
Set up a security key (password) for your network. Wireless networks have a network security key to help protect them from unauthorized access. We recommend using Wi-Fi Protected Access 3 (WPA3) security if your router and PC support it. See the documentation for your router for more detailed info, including what type of security is supported and how to set it up.
Some routers support Wi-Fi Protected Setup (WPS). If your router supports WPS and it’s connected to the network, follow these steps to set up a network security key:
- Do one of the following, depending on which version of Windows is running on your PC:
- In Windows 7 or Windows 8.1, select Start, start typing Network and Sharing Center, and then choose it in the list.
- In Windows 10, select Start , then select Settings >Network & Internet >Status >Network and Sharing Center.
- In Windows 11, select Start, type control panel, then select Control Panel >Network and Internet >Network and Sharing Center.
- Select Set up a new connection or network.
- Select Set up a new network, then choose Next.
The wizard will walk you through creating a network name and a security key. If your router supports it, the wizard will default to Wi‑Fi Protected Access (WPA2 or WPA3) security. We recommend that you use WPA3 if you can, because it offers better security than WPA2, WPA, or Wired Equivalent Privacy (WEP) security. With WPA3, WPA2 or WPA you can also use a passphrase, so you don’t have to remember a cryptic sequence of letters and numbers.
Write down your security key and keep it in a safe place. You can also save your security key on a USB flash drive by following the instructions in the wizard. (Saving your security key to a USB flash drive is available in Windows 8 and Windows 7, but not in Windows 10 or Windows 11.)
Use a firewall. A firewall is hardware or software that can help protect your PC from unauthorized users or malicious software (malware). Running a firewall on each PC on your network can help control the spread of malicious software on your network, and help protect your PCs when you’re accessing the Internet. Windows Firewall is included with this version of Windows.
Connect a PC to your wireless network
- Select the Network or Wifi icon in the notification area.
- In the list of networks, choose the network that you want to connect to, and then select Connect.
- Type the security key (often called the password).
- Follow additional instructions if there are any.
If you have problems with your Wi-Fi network when using Windows 10, see Fix Wi-Fi problems in Windows for advanced troubleshooting info.
- Select the Network icon in the notification area, then select the > icon next to the Wi-Fi quick setting to see a list of available networks.
- Choose the network that you want to connect to, and then select Connect.
- Type the security key (often called the password).
- Follow additional instructions if there are any.
If you have problems with your Wi-Fi network when using Windows 11, see Fix Wi-Fi problems in Windows for advanced troubleshooting info.