- How to enable or disable wi fi autoswitch on windows 11?
- Fix WiFi Keeps Disconnecting On Windows 11
- Windows 11: Enable or disable WiFi and Ethernet network adapters
- How to enable and disable Wi-Fi
- How to enable Wi-Fi on a laptop
- Enable with laptop Wi-Fi button
- Enable with laptop Fn and function key
- Enable Wi-Fi in Windows
- Enable Wi-Fi in Windows Device Manager
- Enable Wi-Fi in BIOS setup
- How to disable Wi-Fi on a laptop
- Disable with laptop Wi-Fi button
- Disable with laptop Fn and function key
- Disable in Windows
- Disable in Windows Device Manager
- Disable in BIOS setup
- Wi-Fi on desktop computers
- Wi-Fi on Android smartphones and tablets
- Wi-Fi on Apple iPhone and iPad
- Related information
- How to switch WiFi state on/off with PowerShell & Windows 10?
- 4 Answers 4
How to enable or disable wi fi autoswitch on windows 11?
To enable or disable wi fi autoswitch on Windows 11, follow these steps:
- Open the Control Panel.
- Click on Network and Internet.
- Under “Wi-Fi,” click on the “Wi-Fi Options” button.
- In the “Wi-Fi Options” window, under “Auto-switch On:” select the desired option from the drop-down menu.
5.
Fix WiFi Keeps Disconnecting On Windows 11

Windows 11: Enable or disable WiFi and Ethernet network adapters

There are a few ways to disable Windows from automatically turning on Wi-Fi. One way is to go to Settings > Network & Internet > Wi-Fi and uncheck the box next to “Turn on Wi-Fi automatically.” Another way is to open the Control Panel and under “Network and Internet” click on “Wi-Fi.” Under “Advanced settings” you can uncheck the box next to “Allow networks from this location.
There are a few ways to keep your Wi-Fi from turning on automatically. You can disable the automatic turn on feature in your router’s settings, or you can use a timer to turn your Wi-Fi off after a set amount of time. You can also use an app like SmartThings to control when your Wi-Fi turns on and off.
There are a few reasons why your Wi-Fi might be switching on and off. A common issue is that your router is not properly connecting to the internet. If you’re having trouble connecting to the internet, try restarting your router and/or changing the network settings. If that doesn’t work, there could be something blocking your signal from reaching your router. If you’re still having trouble, you might need to contact your ISP or router manufacturer for help.
Wi-Fi is a wireless technology that uses radio waves to connect devices in a home or office. When you’re using Wi-Fi, your device searches for and connects to a network called your home network. If you’re at home, your home network is probably the only network you can see. If you’re away from home or if there are multiple networks in the area, your device can search for and connect to networks called public networks.
There are a few reasons why your laptop might automatically disconnect from WiFi. One possibility is that your laptop is trying to save power by shutting down the WiFi adapter when it’s not in use. If you’re having trouble connecting to WiFi, you can try restarting your computer or changing the network settings.
There are a few reasons why your computers might be on different networks. One reason is that you might have multiple networks at home, for example an office network and a home network. You might also have multiple networks at work, for example a corporate network and a private network for employees. Sometimes people set up their computers to automatically connect to the network they are most likely to be using, which is often the office network.
The Bluetooth range indicator is a small light that will turn on when the Bluetooth connection is within range.
There are a few different ways to find Wi-Fi assist. One way is to go to the settings of your device and look for an option that says “Wi-Fi Assist.” Another way is to go to a website like Google and type in “Wi-Fi assist.
WiFi Direct is a feature of some routers that allows you to connect directly with other devices without using a network. This can be useful if you want to share files, stream music, or control smart home devices without having to go through the internet.
To use Wi-Fi Direct on Windows 11, you will first need to install the Wi-Fi Direct software. After installing the software, open it and click the “Create a new network” button. In the “New network” dialog box, enter a name for your network, choose a security type, and click the “Create” button. Next, open the “Wi-Fi Direct settings” window and click the “Configure” button.
There is no way to see what someone is doing on their phone through Wi-Fi without their permission.
How to enable and disable Wi-Fi


Laptops today all have Wi-Fi (wireless Internet) built-in, allowing people to connect to the Internet from almost anywhere. For security, compatibility, or other reasons, you may want to enable and disable the Wi-Fi on your laptop. To do so, make a selection from the list below and follow the steps.
After enabling Wi-Fi on your computer, you need to connect to a Wi-Fi network to access the Internet. See: How to connect to a Wi-Fi network.
If your Wi-Fi is not working or the suggested buttons do not work, for troubleshooting steps, see: Why is my Wi-Fi not working?
How to enable Wi-Fi on a laptop
Wi-Fi can be enabled by performing any of the steps below.
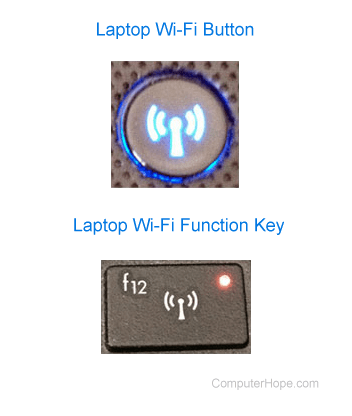
Enable with laptop Wi-Fi button
Some laptops have an On/Off button or switch for the Wi-Fi connection, as shown in the picture. It is usually found on the laptop’s front edge or above the keyboard. Find the button or switch, and make sure it’s enabled. When enabled, the button should be illuminated as blue, or the switch should be in the On position.
Enable with laptop Fn and function key
Some laptops enable and disable Wi-Fi using the Fn key and one of the function keys (F1-F12). As seen in the picture, some laptops use the Fn and F12 keys to enable and disable Wi-Fi. The F12 key also has an orange LED when disabled and blue when enabled, shown in the picture.
Enable Wi-Fi in Windows
Look in the Windows notification area to find the Wi-Fi or wireless Internet icon. Right-click with your mouse on the icon and select the option for enabling (or turning off) the Wi-Fi device in the pop-up menu. If no Enable option is available in the pop-up menu, there may be an option called Open Network and Sharing Center. If so, select this option and then select Change adapter settings. Once the wireless network card icon is seen, right-click it and select Enable.
In Windows 8, when you right-click the Wi-Fi icon, check if Airplane Mode is turned on. Turn it off to enable the wireless network card if it’s turned on.
The Wi-Fi adapter can also be enabled in the Control Panel. Click the Network and Sharing Center option, then click the Change adapter settings link in the left navigation pane. Right-click the Wi-Fi adapter and select Enable.
Enable Wi-Fi in Windows Device Manager
Access the Device Manager by right-clicking with your mouse on the My Computer icon on your desktop or in the Windows Start menu. Select Properties from the pop-up menu, click the Hardware tab in the window that opens up and click the Device Manager button.
In Windows Vista, and later, there is no Hardware tab. Click the Device Manager link in the System window.
Find the Wi-Fi adapter in the list of hardware devices. Right-click the adapter name and select Enable from the pop-up menu. If no Wi-Fi adapter is found in Device Manager, the Wi-Fi adapter drivers are not installed.
Enable Wi-Fi in BIOS setup
Finally, there is also the option of enabling the Wi-Fi device in the computer’s BIOS setup. However, it is very unlikely the Wi-Fi device would be disabled in BIOS.
How to disable Wi-Fi on a laptop
Wi-Fi can be disabled by performing any of the steps below.
Disable with laptop Wi-Fi button
Some laptops have an On/Off button or switch for the Wi-Fi device, like the button shown in the picture. It is usually found on the front of the laptop or above the keyboard. Find the button or switch and make sure it is disabled. When disabled, the button should not be illuminated or illuminated as orange or red, or the switch should be in the Off position.
Disable with laptop Fn and function key
Some laptops enable and disable Wi-Fi using the Fn key and one of the function keys (F1-F12). Some laptops use Fn and F12 keys to enable and disable Wi-Fi and show an orange LED when disabled and blue when enabled.
Disable in Windows
Right-click the Wi-Fi icon in the Windows notification area and select Disable (or Turn off) from the pop-up menu. If no Disable option is available in the pop-up menu, there may be an option called Open Network and Sharing Center. If so, select this option and then select Change adapter settings. Once the wireless network card icon is seen, right-click it and select Disable.
In Windows 8, when you right-click the Wi-Fi icon, you can turn off Wi-Fi by turning on Airplane Mode.
The Wi-Fi adapter may also be disabled from the Control Panel. Click the Network and Sharing Center option, then click Change adapter settings in the left navigation pane. Right-click the Wi-Fi adapter and select Disable.
Disable in Windows Device Manager
Access the Device Manager by right-clicking with your mouse on the My Computer icon on your desktop or in the Windows Start menu. Select Properties from the pop-up menu, click the Hardware tab in the window that opens up and click the Device Manager button.
In Windows Vista, and later, there is no Hardware tab. Click the Device Manager link in the System window.
Find the Wi-Fi adapter in the list of hardware devices. Right-click the adapter name and select Disable from the pop-up menu. If no Wi-Fi adapter is found in Device Manager, the Wi-Fi adapter drivers are not installed.
Disable in BIOS setup
As is the case with enabling the Wi-Fi device, it can also be disabled in the computer’s BIOS setup.
Wi-Fi on desktop computers
Wi-Fi adapters are also available for desktop computers. The Wi-Fi button mentioned above is not available with most desktop computers. However, there is the possibility that the Wi-Fi adapter itself (e.g., an external version, like a USB Wi-Fi adapter) has an On/Off button or switch. If there is no button or switch, disconnecting the adapter from the computer disables the device.
If the Wi-Fi adapter is not an external device, it is either an internal PCI expansion card or built onto the motherboard. When you install the software for the Wi-Fi adapter, an icon shows in the Windows notification area, giving you access to enable and disable the device. Alternatively, you can enable and disable the Wi-Fi adapter through the Device Manager or the BIOS.
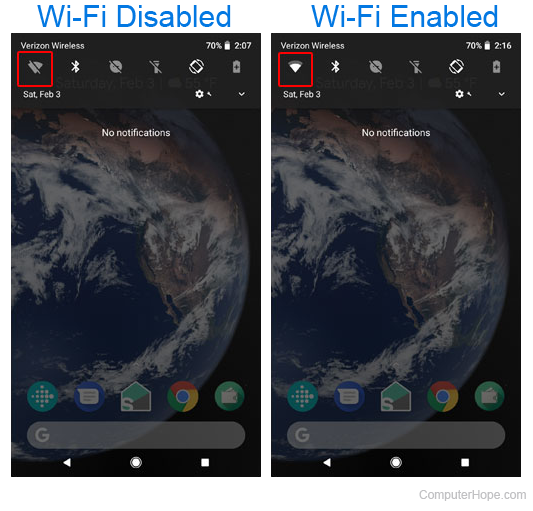
Wi-Fi on Android smartphones and tablets
There are many variants of Android-based smartphones and tablets. These steps are for a device with the stock Android operating system. You may have to adjust the instructions based on the brand of phone or tablet you have.
- On the home screen, place your finger near the top of the screen and swipe downward.
- Once a menu similar to the one below is seen, look for the Wi-Fi symbol.
Wi-Fi on Apple iPhone and iPad
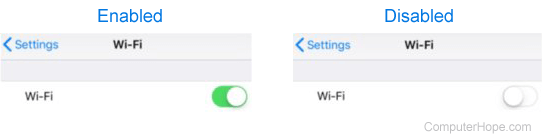
Follow the steps below to enable or disable Wi-Fi on an iPhone or iPad.
- Open the Settings utility on the iPhone or iPad.
- On the Settings screen, tap the Wi-Fi option.
- On the Wi-Fi screen, for the Wi-Fi entry, tap the toggle switch. Wi-Fi is enabled when the toggle switch is green and disabled when the toggle switch is white, as shown below.
Related information
How to switch WiFi state on/off with PowerShell & Windows 10?
I have a tiny .ps1 script which switches a network connection between Ethernet and WiFi. My script works well. I now want to know how to switch off WiFi without disabling the underlying network adapter. Here is my existing script:
$lanState = Get-NetAdapter -Name MyEthernetPort | where status -EQ 'up' if ( $lanState ) < write-host 'Enabled. Disable now' Get-NetAdapter -Name MyEthernetPort | ? status -NE disabled | Disable-NetAdapter -Confirm:$false # TODO switch on wifi netsh wlan connect name=SM-GUEST >else
I haven’t been able to find any guidance on how to switch off WiFi via PowerShell (in the same way as it would occur if you clicked the button in the Windows 10 info center). All scripts that I’ve found just disable the underlying adapter, which is not what I want. Can anybody suggest how to access this functionality from PowerShell?
4 Answers 4
I try to solve same problem, and thx for nandubhadu hints.
Comapre wifi off/on,then I found RegistryKeyword SoftwareRadioOff is different between two status.
powershell Set-NetAdapterAdvancedProperty -Name «Wi-Fi» -AllProperties -RegistryKeyword «SoftwareRadioOff» -RegistryValue «0»
powershell Set-NetAdapterAdvancedProperty -Name «Wi-Fi» -AllProperties -RegistryKeyword «SoftwareRadioOff» -RegistryValue «1»
I use it in my connect wifi script, it works on my Win10 notebook now.
I can’t find any way to do this programmatically, and as a result I think the answer might be that it’s (currently) not entirely possible.
What I have found is that when you use the button in the Windows action center to turn off Wifi, netsh shows the interface as «Hardware On» «Software Off»:
Netsh WLAN show interfaces There is 1 interface on the system: Name : WiFi State : disconnected Radio status : Hardware On Software Off However I can’t see any ability to trigger «Software Off» via netsh or any of the *-netadapter cmdlets. It might be that this is controlled via a switch in the registry but if so I can’t see which.
My recommendation would be to just continue controlling wifi by enabling/disabling the underlying adapter with Disable-NetAdapter and Enable-NetAdapter or if it’s the case that you need to keep the hardware enabled (perhaps in order to reconfigure it?) but want the wireless to be disconnected while you do so, you could connect/disconnect the network via:
netsh wlan disconnect netsh wlan connect