- Run Linux on Mac without rebooting
- How to Install Linux Ubuntu on Parallels Desktop
- I Want to Try Ubuntu but I’m Afraid to Lose My Legacy OS!
- Configuring Your Ubuntu VM
- The Exciting Ubuntu Linux Install
- Selecting Language Preference
- Making Sure It’s All Kosher…
- Allocating Drive Space for Ubuntu
- Setting Time, Keyboard Layout and Passwords
- You’re All Set!
- References
Run Linux on Mac without rebooting
We’ve outlined how to run Linux on Mac® and how easy it is to get started!
Linux is an incredibly versatile operating system that has been designed to run on a wide range of devices—from mobile devices, to desktop computers, and even servers. Due to the open-source nature that ensures code has active community support, Linux is widely loved by developers. Think of Linux as an operating system “of the people, by the people, for the people.” (Yes, we just quoted the Gettysburg Address to enable readers to understand Linux as a whole.)
Users online have expressed a desire to run Linux on their Mac computer without rebooting. This is where Parallels Desktop® for Mac enters as a solution. Virtualization of Linux is a powerful and easy installation process that allows for an interruption-free environment.
Parallels Desktop provides several popular distributions of Linux for free directly in the product itself. Additionally, Parallels Desktop users can download .ISO files of and install other Linux distributions (for example: Kali Linux & use Vagrant to download and setup Linux environments like a pro!)
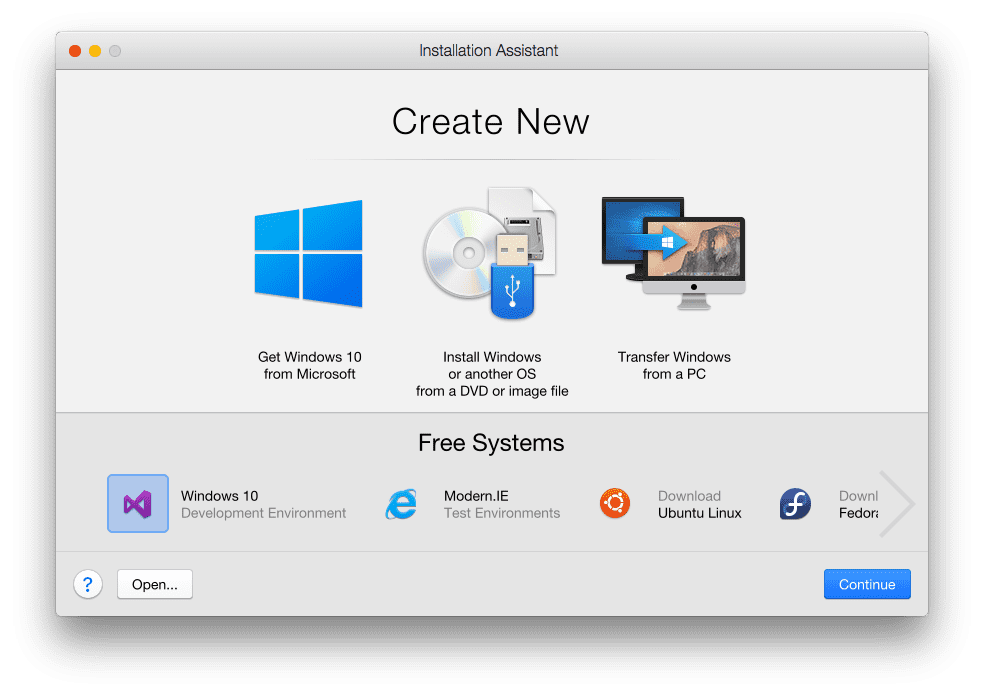
The free included systems are shown below. There’s no need to take any additional steps to find the right Linux distribution for you. We’ve made it very easy to run Linux on Mac!
Ubuntu: One of the most popular open-source softwares; based on the Debian GNU/Linux distribution.
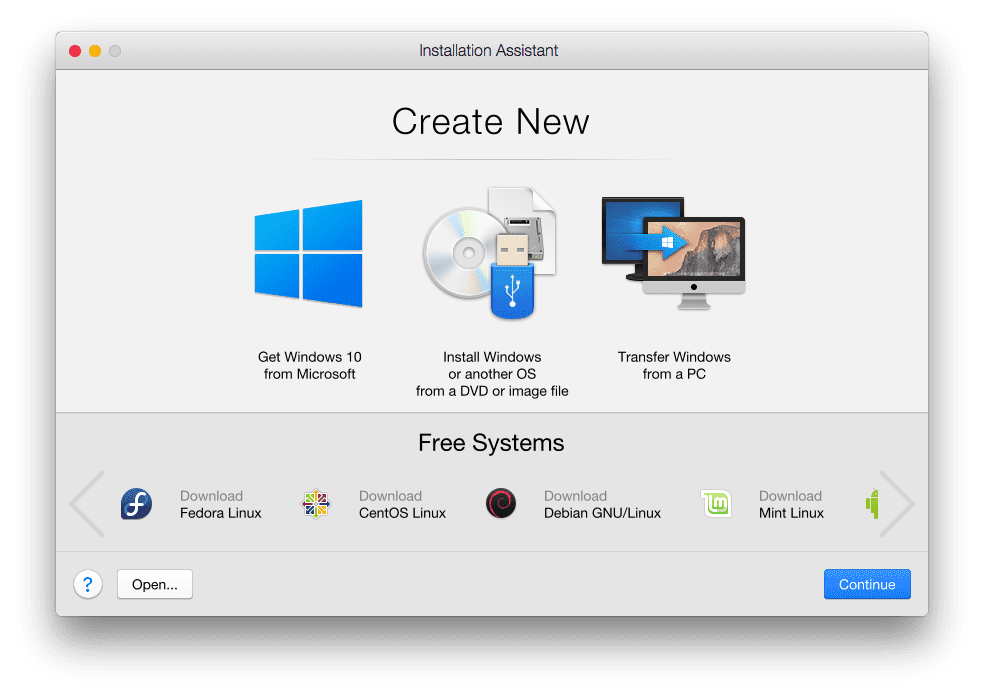
Fedora: Formerly Fedora Core. Based on the Linux kernel, developed by the community-supported Fedora project, and sponsored by Red Hat.
CentOS: Provides a stable, predictable, manageable, and reproducible platform.
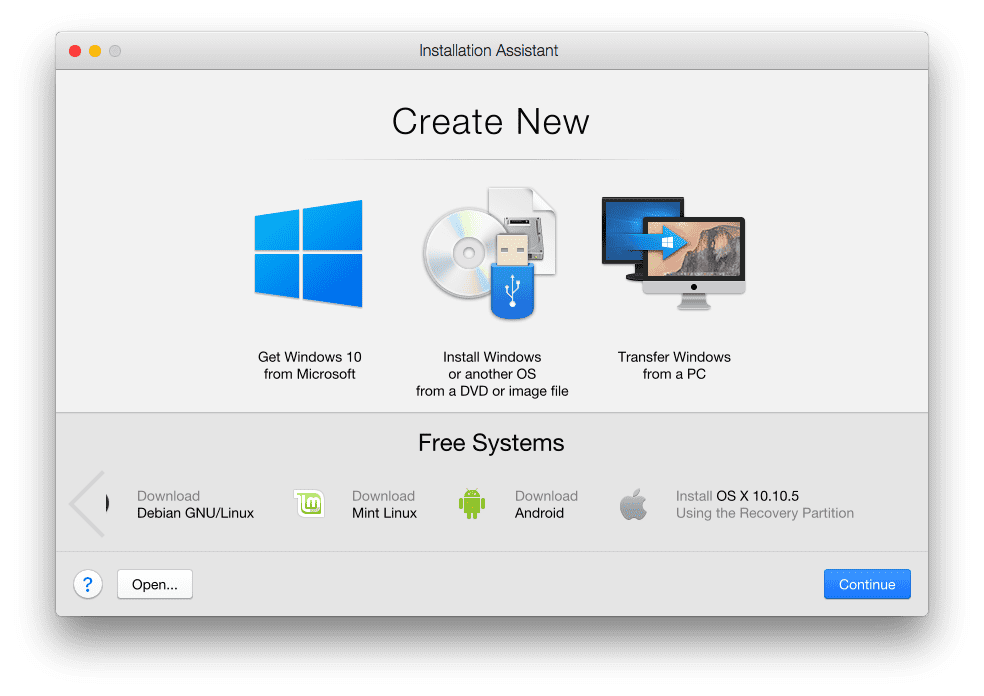
Debian GNU/Linux: A popular Unix-like operating system that is composed entirely of free software, which is utilized for personal computers and network servers.
Linux Mint: An easy-to-use free distribution that requires little maintenance and goes with full multimedia support.
Android: A Linux-based operating system for mobile devices, such as smartphones and tablet PCs.
All of these Linux distributions are free and easy to install as a virtual machine on your Mac through Parallels Desktop. Linux distributions can be located under the “Free Systems” options available to users within the Installation Assistant when creating a new virtual machine. See the full list of free systems below:
Get started with Linux on Mac with Parallels Desktop and try a free 14-day trial now.
How to Install Linux Ubuntu on Parallels Desktop

I Want to Try Ubuntu but I’m Afraid to Lose My Legacy OS!
So you want to try Ubuntu on your Intel based Mac but don’t feel confident going through the torturous procedure of partitioning your hard drive? Lucky for you, there are many programs that will allow you to run a virtual machine within your Mac OS X install. Our focus today will be running Ubuntu, within your Mac, through the popular Parallels Desktop virtual machine software. While Parallels is not free, it is a steal at its current price as it is easier to use on a Mac than the free options that are available.
As a side note, if you plan on using Ubuntu heavily, you may want to consider partitioning your hard disk for the install to avoid the performance hit you will experience running Ubuntu in a virtual machine. For a Windows PC, your can just slip in the install disk (or usb stick) and get going, the GRUB partition manager comes preconfigured to resize a NTFS partition (that’s a Windows partition to you non-techies out there). Mac users will need to create the partition separately using rEFIt boot manager. A separate comprehensive tutorial for configuring Ubuntu on a mac is available here on Bright Hub.
Configuring Your Ubuntu VM
Once you have installed the Parallels program, fire it up and select ‘‘New Virtual Machine’’.

Select ‘‘Custom Install’’, this will allow you to set how much RAM and hard disk space is devoted to your Ubuntu virtual machine. Specify ‘‘Linux’’ at the next prompt and allocate how much RAM you want devote to your Ubuntu install. Keep in mind that anything under 256 megs will run a bit slow, and most users report anything over 1 gig as not really giving much improvement. On most machines, allocating 512 megs will give you both a zippy VM and allow you to perform most tasks.

Choose ‘‘create new virtual hard disk’’ at the next prompt making sure you don’t allocate too much room to the VM (Virtual Machine), especially if you will be using the VM for primarily safe browsing. Between 5 and 10 GB should be plenty unless you plan on downloading Blu-ray movie images! Accept the default path, select ‘‘Bridged ethernet’’ on the next prompt and make sure to select the same adapter you are currently using in your primary operating system. This can always be changed at a later time if needed. Finally, name your machine and get ready to install Ubuntu!
The Exciting Ubuntu Linux Install

The first thing you need to do is to configure Parallels to look for your boot disk, the virtual machine software has it is set to CD-ROM by default, so if you are installing from a USB key or an Ubuntu ISO image make sure to choose that as the installation medium.
Once that is done, restart with either the boot disk or usb in your computer, and you should see a purple screen. Expect to see this for a while if you are on an older machine.

Selecting Language Preference

Once the welcome screen pops up, select your language preference and select ‘‘Install Ubuntu’’.
Making Sure It’s All Kosher…

On the preparing to install screen the program will check to see if you have sufficient hard drive space, whether you are connected to the Internet and if the computer is plugged in (for laptops). Being connected to the Internet is only necessary if you plan on installing updates during the install, I do not recommend this unless your Internet connection is fairly fast. Updates can easily be installed post-install at your leisure.
Allocating Drive Space for Ubuntu

This is the screen where we choose the drive space we created earlier. Set Ubuntu to install on the full hard drive here, don’t worry, its only using all of the virtual hard drive. If you need more room, remember you can always expand it later.
Setting Time, Keyboard Layout and Passwords
Once this operation is completed, the only things left to do are to choose your keyboard layout, set the time zone and set your user name and password. Each screen will prompt you in quick succession. Make sure that your password is easy to remember because you will need it to log in and every time you install or update a program.


You’re All Set!

Once installation is complete, shut down Parallels and restart it, choose your Ubuntu machine and get started by pressing the green play button! You are now ready to enjoy all of the features and benefits of this powerful operating system! The best thing about Ubuntu is that most of the programs for it are free. Learn how to make the most of this feature and you will soon have a very capable alternative desktop!
References
How to Install Linux Ubuntu on Parallels Desktop
I Want to Try Ubuntu but I’m Afraid to Lose My Legacy OS!
So you want to try Ubuntu on your Intel based Mac but don’t feel confident going through the torturous procedure of partitioning your hard drive? Lucky for you, there are many programs that will allow you to run a virtual machine within your Mac OS X install. Our focus today will be running Ubuntu, within your Mac, through the popular Parallels Desktop virtual machine software. While Parallels is not free, it is a steal at its current price as it is easier to use on a Mac than the free options that are available.
As a side note, if you plan on using Ubuntu heavily, you may want to consider partitioning your hard disk for the install to avoid the performance hit you will experience running Ubuntu in a virtual machine. For a Windows PC, your can just slip in the install disk (or usb stick) and get going, the GRUB partition manager comes preconfigured to resize a NTFS partition (that’s a Windows partition to you non-techies out there). Mac users will need to create the partition separately using rEFIt boot manager. A separate comprehensive tutorial for configuring Ubuntu on a mac is available here on Bright Hub.
Configuring Your Ubuntu VM
Once you have installed the Parallels program, fire it up and select ‘‘New Virtual Machine’’.
Select ‘‘Custom Install’’, this will allow you to set how much RAM and hard disk space is devoted to your Ubuntu virtual machine. Specify ‘‘Linux’’ at the next prompt and allocate how much RAM you want devote to your Ubuntu install. Keep in mind that anything under 256 megs will run a bit slow, and most users report anything over 1 gig as not really giving much improvement. On most machines, allocating 512 megs will give you both a zippy VM and allow you to perform most tasks.
Choose ‘‘create new virtual hard disk’’ at the next prompt making sure you don’t allocate too much room to the VM (Virtual Machine), especially if you will be using the VM for primarily safe browsing. Between 5 and 10 GB should be plenty unless you plan on downloading Blu-ray movie images! Accept the default path, select ‘‘Bridged ethernet’’ on the next prompt and make sure to select the same adapter you are currently using in your primary operating system. This can always be changed at a later time if needed. Finally, name your machine and get ready to install Ubuntu!
The Exciting Ubuntu Linux Install
The first thing you need to do is to configure Parallels to look for your boot disk, the virtual machine software has it is set to CD-ROM by default, so if you are installing from a USB key or an Ubuntu ISO image make sure to choose that as the installation medium.
Once that is done, restart with either the boot disk or usb in your computer, and you should see a purple screen. Expect to see this for a while if you are on an older machine.
Selecting Language Preference
Once the welcome screen pops up, select your language preference and select ‘‘Install Ubuntu’’.
Making Sure It’s All Kosher…
On the preparing to install screen the program will check to see if you have sufficient hard drive space, whether you are connected to the Internet and if the computer is plugged in (for laptops). Being connected to the Internet is only necessary if you plan on installing updates during the install, I do not recommend this unless your Internet connection is fairly fast. Updates can easily be installed post-install at your leisure.
Allocating Drive Space for Ubuntu
This is the screen where we choose the drive space we created earlier. Set Ubuntu to install on the full hard drive here, don’t worry, its only using all of the virtual hard drive. If you need more room, remember you can always expand it later.
Setting Time, Keyboard Layout and Passwords
Once this operation is completed, the only things left to do are to choose your keyboard layout, set the time zone and set your user name and password. Each screen will prompt you in quick succession. Make sure that your password is easy to remember because you will need it to log in and every time you install or update a program.
You’re All Set!
Once installation is complete, shut down Parallels and restart it, choose your Ubuntu machine and get started by pressing the green play button! You are now ready to enjoy all of the features and benefits of this powerful operating system! The best thing about Ubuntu is that most of the programs for it are free. Learn how to make the most of this feature and you will soon have a very capable alternative desktop!