- How to Check WiFi Signal Strength in Windows 10
- #1 – Check Wi-Fi Signal Strength or WiFi Signal Quality From Taskbar
- #2 – Check WiFi Signal Strength or WiFi Signal Quality in Command Prompt
- #3 – Determine Wi-Fi Signal Strength in Settings App
- #4 – Use Control Panel to Check WiFi Signal Strength or Signal Quality
- #5 – Check WiFi Signal Strength on Windows 10 in PowerShell
- Проверка сигнала сети Wi-Fi с помощью инструментов Windows 10
- Уровень сигнала Wi-Fi на панели задач
- Как проверить уровень сигнала Wi-Fi с помощью настроек
- Уровень сигнала Wi-Fi в панели управления
- Как проверить сигнал Wi-Fi с помощью командной строки
- Как проверить уровень сигнала Wi-Fi с помощью PowerShell
How to Check WiFi Signal Strength in Windows 10
Are you keen on knowing the Wi-Fi signal strength on your Windows 10 PC? Well, the signal strength of a wireless network being received on a PC depends on various factors. Although the distance between the computer and the WiFi router is considered the primary factor, other variables are also responsible for the signal’s strength.
Low WiFi signal reception on a Windows 10 laptop could hamper your work a lot. It can become frustrating when the signal strength is low, even when your PC is placed near the Wireless network router.
So, what are the other factors that could cause the wireless network signal strength to be weak? Well, Wireless network devices make use of radio waves for communicating data. And as we know, radio wave interference could be caused due to various factors. This includes interference from other electronic devices, walls, partitions, solid objects, or even the Wireless network router’s orientation.
Whatever the reason be behind weak Wi-Fi signal reception from the router, it is crucial to find a place where your Windows 10 PC is getting ample Wireless network signal from the router.
So, what could you do about it? If you have a laptop, the best thing that you can do is move around with it around the router to various spots and check for the best Wi-Fi signal strength that it can receive. But the question is, how to check the wireless network signal strength on Windows 10 desktop?
We will take a look at several methods through which you can determine the signal strength of a WiFI network on your PC.
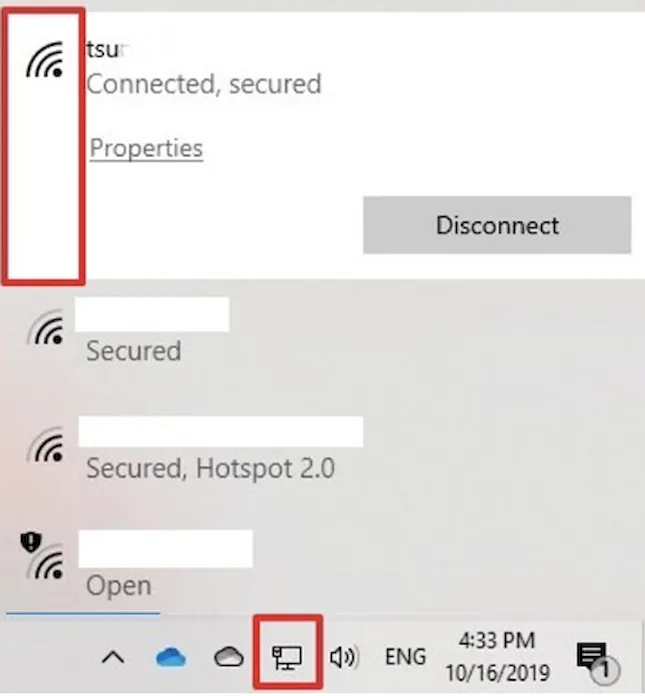
#1 – Check Wi-Fi Signal Strength or WiFi Signal Quality From Taskbar
One of the best ways to check Wi-Fi signal strength is through the Windows 10 Taskbar. The Taskbar is located at the bottom of the screen. Go to the extreme right of the Taskbar and click on the WiFi icon. This will open the list of wireless networks that your PC’s wireless adapter can detect. Here, you can vi the strength of the wireless network you are connected to along with the power of the other wireless networks around you.
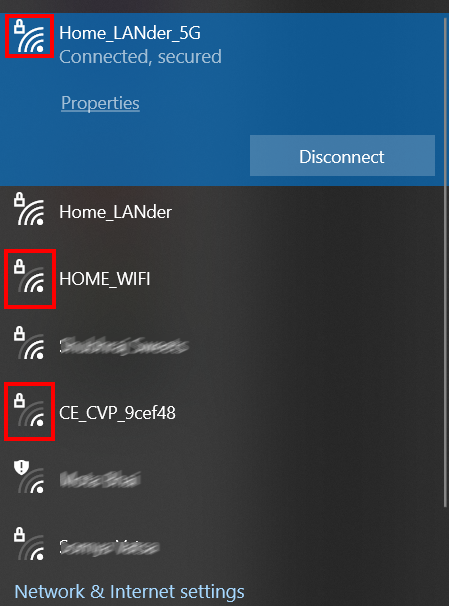
As you can see in the above screenshot, the signal strength bars of various wireless networks vary, and it is quite visible through the signal bars present along with the wireless networks’ names.
The signal bars give you an approx overview of the WiFi signal strength on Windows 10 PC. But what if you need an exact figure of signal strength? We find out in the following method.
#2 – Check WiFi Signal Strength or WiFi Signal Quality in Command Prompt
To view an exact figure of the wireless network signal strength, we recommend using the Command Prompt interface. Go through the steps provided below and find out how to:
Step 1: Launch the Command Prompt window on your Windows 10 PC. For this, press the Win + R keys. As the Run box opens, type cmd and click on the Ok button.
Step 2: As the Command Prompt interface opens, type the command provided below in it, then press the Enter key:
netsh wlan show interfaces
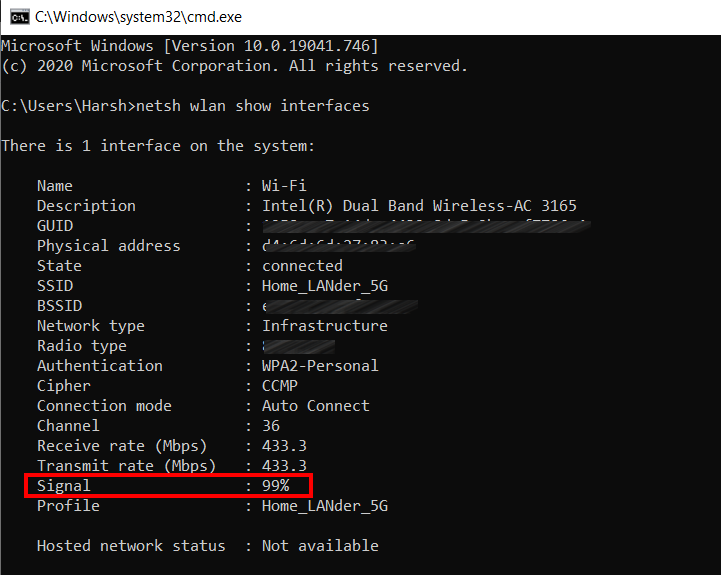
After running the above command, you will view a bunch of information regarding the wireless connection your PC is connected to. At the bottom of this information, there’s a section named Signal. You will view the exact WiFi Signal Strength in percentage on Windows 10 PC in front of this field.
Any percentage that is above 80% can be considered as good signal strength.
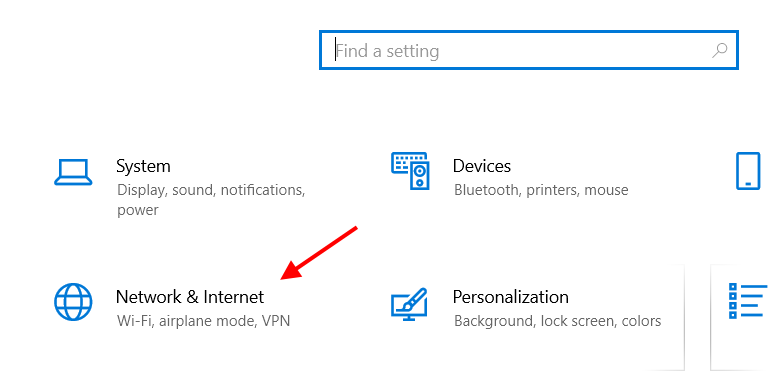
#3 – Determine Wi-Fi Signal Strength in Settings App
Here’s another way to check Wi-Fi Signal Strength or Signal Quality on your PC. It is a bit different from conventional methods but does the job. To view the signal strength, we will be using the Windows 10 Settings app. Here are the steps for you to follow:
Step 1: Launch the Settings app on your PC. To do so, you can press the following shortcut keys: Win + I
Step 2: In the Settings app, click on the option that says Network & Internet.
Step 3: When the Network & Internet settings window opens, click on the Status option present on the panel on the left. After the click, go to the right panel. Here, check the wireless connection icon. The number of solid bars in the signal icon represents the strength of the Wireless network signal. The lower the number of solid bars in the icon, the weaker is the network signal strength on Windows 10.
#4 – Use Control Panel to Check WiFi Signal Strength or Signal Quality
You can also access the Network and Sharing Center in the Control Panel of Windows 10 to check Wi-Fi signal strength. Go through the steps provided below to find out how:
Step 1: Press Start + R shortcut keys to launch the Run box. In the Run box interface, enter the control panel and press the Enter key to open Control Panel app.
Step 2: The Control Panel interface will open. Here, click on the option that reads Network and Internet.
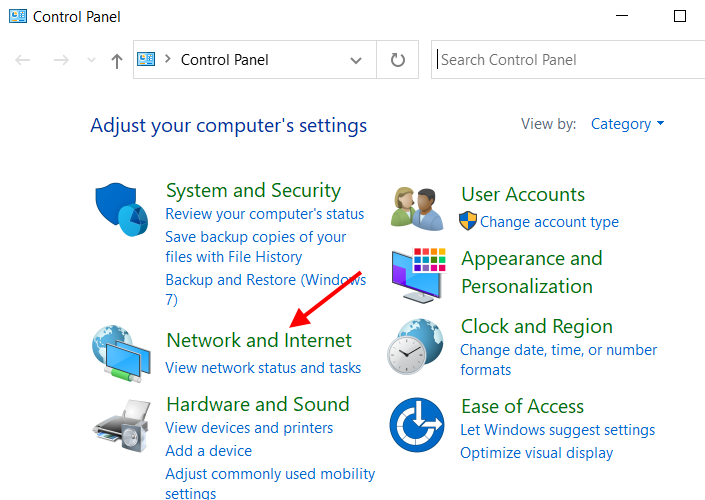
Step 3: On the next window that loads, click on the Network and Sharing Center option.
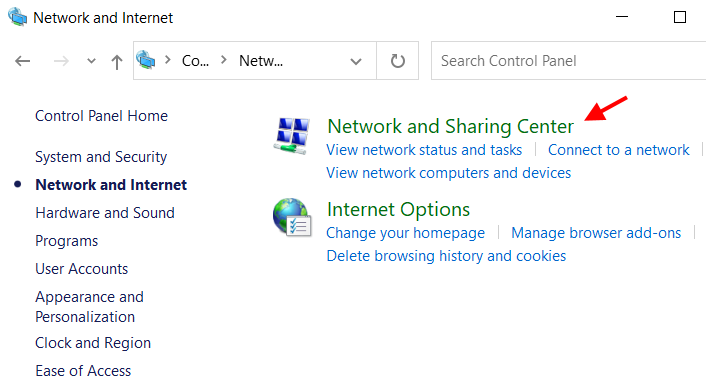
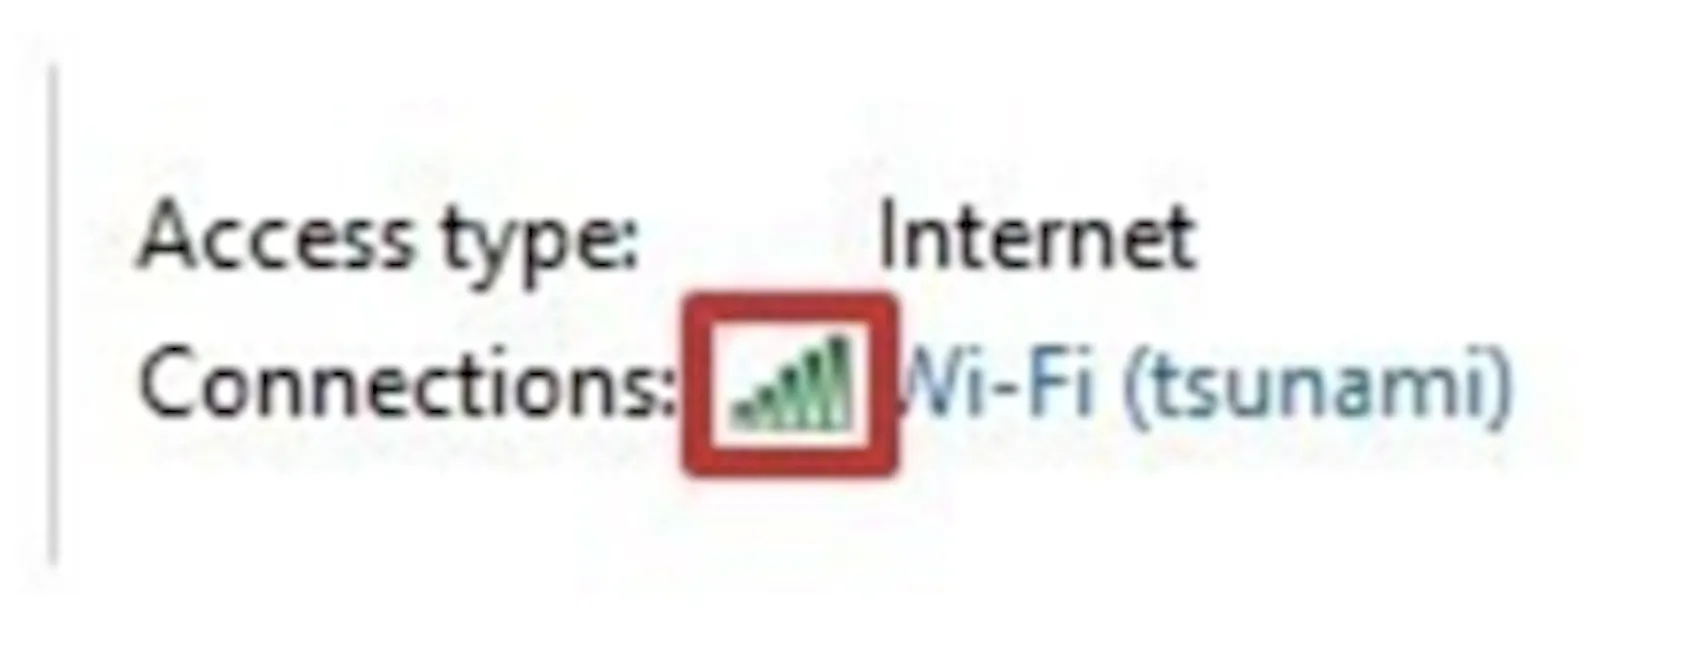
Step 4: On the Network and Sharing Center window, you will get a bunch of options. Here, look for the WiFi icon present along with the WiFi network name (refer to the screenshot below). You can determine the wireless network signal strength through the wireless icon.
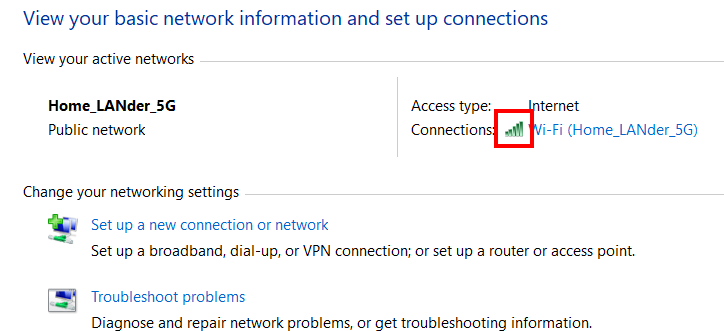
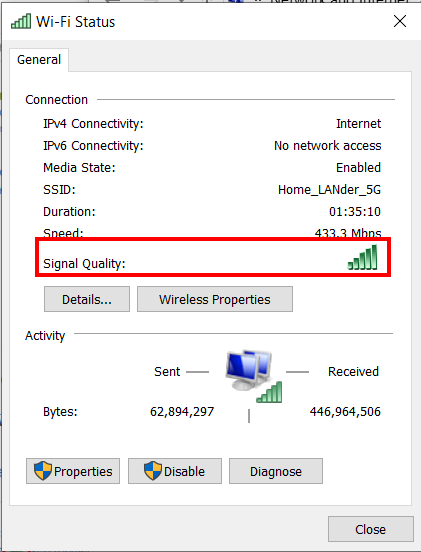
Step 5: If you want a clear view of the network signal strength, you can make a double-click on the wireless network’s name on the previous Control Panel screen. The following new window will open where you can view the signal strength.
#5 – Check WiFi Signal Strength on Windows 10 in PowerShell
Windows PowerShell is another tool in Windows 10 that will help you check wireless signal strength in Windows 10. Just like Command Prompt, all you need to do is enter a command, and you will be able to view the signal strength of the Wireless network you are connected to on your Windows 10 PC. Here are the steps to access signal strength in PowerShell:
Step 1: Launch the PowerShell interface on your PC. For this, press the Start button. Here, enter Powershell. From the search result, select the option that says Windows PowerShell.
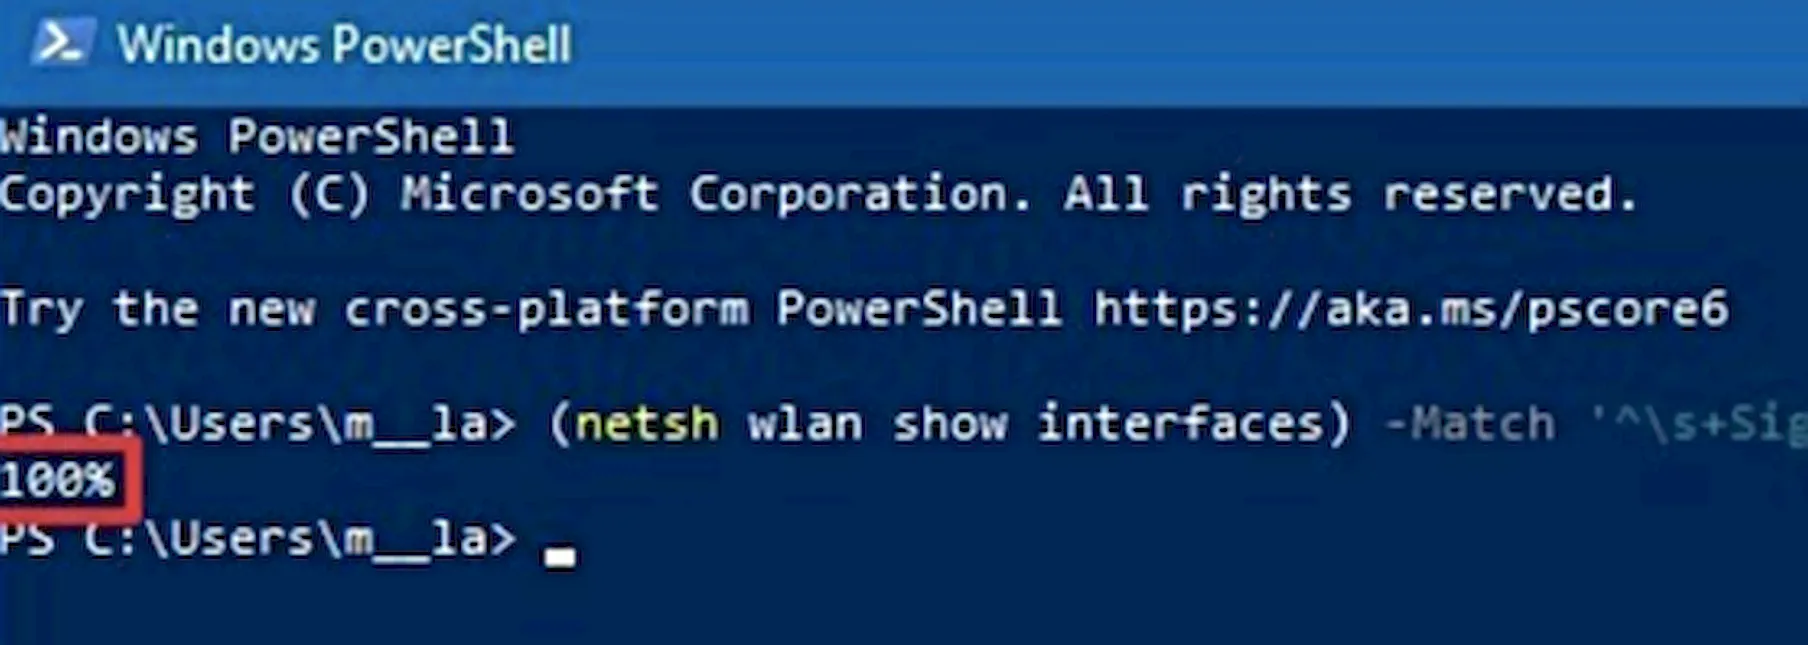
Step 2: When the PowerShell interface opens, type the following command, then hit the Enter key:
(netsh WLAN show interfaces) -Match ‘^\s+Signal’ -Replace ‘^\s+Signal\s+:\s+’,”
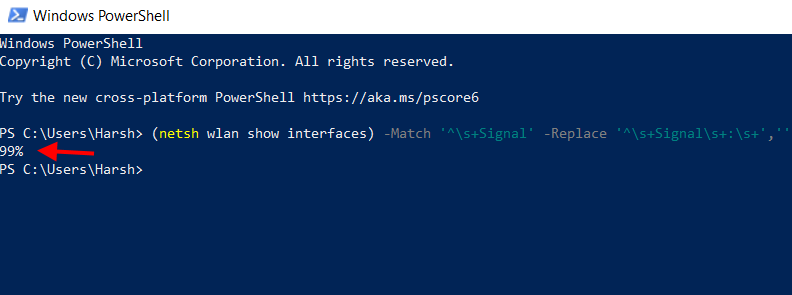
As you can see, after executing the above command, the PowerShell window shows the strength of the Wireless network signal you are connected to in percentage.
Alternatively, you can also use just the netsh WLAN show interfaces command in PowerShell, just like you did in Command Prompt, to view signal strength or signal quality along with various other information related to the wireless network you are connected to.
Johnny Crumley
A self-defined geek, Johnny Crumley comes from the USA. As a kid genius, he started DOS batch files at just five years old and was soon messing with BASIC in kindergarten. He was always into the bits and bytes. As luck would have it, Johnny became a freelance PC technician, something he’s genuinely passionate about. From his teenage years, he started writing about anime and games. He’s also an avid educator, spreading his knowledge and expertise in the tech sector. He has been a professional writer for six years and has written for several emerging tech publications.
Blog.rottenwifi.com is a participant in the Amazon Services LLC Associates Program which means we may get paid commissions on editorially chosen products purchased through our links to retailer sites. All names, logos, brands, and images are trademarks or copyrighted materials of their respective owners. Amazon and the Amazon logo are trademarks of Amazon.com, Inc., or its affiliates.
Проверка сигнала сети Wi-Fi с помощью инструментов Windows 10
В Windows 10 при подключении компьютера к домашней или офисной сети и Интернету с помощью адаптера Wi-Fi качество сигнала будет определять общую производительность соединения. Частично это связано с тем, что технология Wi-Fi использует радиоволны для подключения устройства к точке беспроводного доступа и, как и другие радиосигналы, имеет ограниченный диапазон и проблемы с помехами, а также прохождение через твердые объекты (например, стены).
Понимание уровня сигнала соединения Wi-Fi на вашем устройстве может помочь определить, что медленное подключение к сети или Интернету является проблемой сигнала, а не проблемой вашего интернет-провайдера (ISP) или точки беспроводного доступа.
Хотя вы можете использовать многие сторонние инструменты, в Windows 10 есть несколько способов проверки уровня сигнала беспроводного соединения с помощью приложения «Параметры», панели управления, панели задач, командной строки и даже с помощью PowerShell.
Из этого руководства по Windows 10 вы узнаете пять способов определения уровня сигнала вашего соединения Wi-Fi.
Уровень сигнала Wi-Fi на панели задач
Чтобы определить уровень сигнала соединения Wi-Fi в Windows 10, выполните следующие действия.
- Нажмите значок сети на панели задач.
- Посмотрите на значок беспроводной связи рядом с сетью. (Чем больше количество сплошных столбцов, тем сильнее сигнал.)
Один столбец указывает на слабый сигнал, два столбца означают, что сигнал является приемлемым, а три и четыре столбца представляют собой лучший сигнал, который вы можете получить.
Как проверить уровень сигнала Wi-Fi с помощью настроек
Чтобы определить уровень сигнала беспроводной сети с помощью приложения «Параметры», выполните следующие действия.
- Откройте Параметры → Сеть и Интернет → Состояние.
- В разделе «Состояние сети» значок беспроводной сети будет отображать текущий уровень сигнала. (Чем больше количество сплошных столбцов, тем сильнее сигнал.)
Кроме того, вы также можете проверить уровень сигнала на странице настроек Wi-Fi, выполнив следующие действия:
- Откройте Параметры → Сеть и Интернет → Wi-Fi.
- В разделе Wi-Fi уровень сигнала будет отображаться на значке беспроводной сети. (Чем больше количество сплошных столбцов, тем лучше сигнал.)
Выполнив эти шаги, вы получите лучшее представление о качестве беспроводного соединения с точкой доступа.
Уровень сигнала Wi-Fi в панели управления
Чтобы узнать качество сигнала беспроводного соединения с помощью панели управления, выполните следующие действия.
- Откройте Панель управления.
- Нажмите Сеть и Интернет.
- Нажмите Центр управления сетями и общим доступом.
- В разделе «Просмотр активных сетей» найдите значок беспроводной связи рядом с «Подключения», который будет указывать качество сигнала.
- (Необязательно) Щелкните название подключения, чтобы проверить качество сигнала, а также скорость, SSID и другую информацию.
Выполнив все действия, вы узнаете текущее качество соединения Wi-Fi.
Как проверить сигнал Wi-Fi с помощью командной строки
Чтобы проверить уровень сигнала соединения Wi-Fi с помощью командной строки, выполните следующие действия:
- Откройте командную строку.
- Введите следующую команду для просмотра уровня сигнала Wi-Fi и нажмите Enter : netsh wlan show interfaces
- Обратите внимание на поле Сигнал, чтобы определить качество сигнала. (Если значение равно или выше 80, то уровень сигнала хороший.)
Выполнив все действия, вы быстро узнаете, достаточно ли сильный у вас сигнал Wi-Fi.
Как проверить уровень сигнала Wi-Fi с помощью PowerShell
Чтобы просмотреть уровень сигнала подключения Wi-Fi с помощью PowerShell, выполните следующие действия:
- Откройте Пуск.
- Найдите PowerShell и щелкните по верхнему результату, чтобы открыть приложение.
- Введите следующую команду для просмотра уровня сигнала Wi-Fi и нажмите Enter : (netsh wlan show interfaces) -Match ‘^\s+Signal’ -Replace ‘^\s+Signal\s+:\s+’,» Совет: в PowerShell вы также можете запустить команду netsh wlan show interfaces для просмотра качества сигнала, как в командной строке.
- Выходное значение укажет вам на качество сигнала. (Процент изменяется от 0 до 100, где 100 процентов указывает на превосходное качество сигнала.)
После выполнения этих шагов, если вы видите качество сигнала от 80 до 100 процентов, то соединение надежное. Если вы видите сигнал выше 70 процентов, этого достаточно для просмотра веб-страниц и управления электронной почтой. Значение от 60% и ниже означают, что у вас слабый сигнал, и вам следует подумать о том, чтобы подойти ближе к точке доступа или переместить точку доступа в середину дома или офиса.
Если вы пытаетесь определить место в доме или офисе с наилучшим сигналом, используйте указанные выше команды в месте, в котором вы обычно используете свой компьютер, затем переместитесь в другое место или комнату и повторите команду, чтобы определить уровень сигнала в новом месте.
В случае, если вы просматриваете значок Wi-Fi, чтобы узнать производительность соединения, учтите, что каждая полоса (включая точку) представляет около 25 процентов мощности сигнала. Это означает, что три и четыре столбца указывают на хорошее качество сигнала, а всё, что ниже, указывает на слабый сигнал.