- Introduction
- Preparation
- Download the compressed image file
- Download and install programs
- Run md5summer
- Extract the image file
- Run 7-zip
- Self-extracting image file
- Run Win32 Disk Imager
- Ignore this warning
- Select file
- Check device and Write
- WARNING
- Write
- Confirm overwrite alias Final Warning
- Progress view
- Work done 🙂 Remember to eject the pendrive safely
- Re-use the pendrive
- Links
- Introduction
- MD5 Sums
- Windows
- Graphical Interface
- Command Line Interface
- Ubuntu
- Graphical Interface (up to 12.10, for later versions use mkusb or the commandline method below)
- mkusb
- Command Line Interface
- Mac OS X
- Command Line Interface
- Description of Win32 Disk Imager
- iso2usb
- compressed-image_2_USB-or-SD
Introduction
This is actually the same process as to clone/flash/restore/copy an ISO file. The method under the hood is the same as is described for linux in the wiki page about mkusb.
This method with Win32 Disk Imager works in Windows XP — Windows 10.
Preparation
Download the compressed image file
Download the compressed image file with your operating system using your web browser or download a torrent file and get the file faster that way. Typical extensions for compressed image files are
img.7z img.gz img.xz img.zip img.bz2
or download a self-extracting file, for example 9w-dus-i686-persist-live_2017-06-01_4GB.exe.
Download and install programs
Download the following help programs
Install the programs (which should be straight-forward in Windows).
Run md5summer
Check the md5sums of all the downloaded files versus the listed values at the web sites, where you downloaded them.
Extract the image file
Run 7-zip
7-zip is a free program. It is also possible to use WinZip, if you have that program. There is a demo video and screenshots at
If the image file is not compressed, you need not use 7-zip.
Self-extracting image file
The intention with 9w-dus-i686-grub_2017-05-25_1GB.exe is to provide a quick method to get a very small portable linux system with the tool dus (alias mkusb-dus alias guidus), that can create persistent live systems in Ubuntu and Debian and systems developed from them. It can also be used for other system tasks and can be a first step from Windows. This system expands to 1 GB and contains a live-only system.
The file 9w-dus-i686-persist-live_2017-06-01_4GB.exe expands to 4 GB and contains a corresponding persistent live system.
See more details including download links at /9W-DUS_i686.exe
Run Win32 Disk Imager
The following screenshots are ‘borrowed’ from the description of using it with ISO files, but if you replace ‘iso’ with ‘img’, they would be the same. (An ISO file is an image file with the ISO 9660 file system.)
Ignore this warning
There can be a warning, that you need to format the disk in drive
This is because Windows might not recognize the file system on the pendrive. But do not worry! The process to clone/flash/restore/copy the iso file will overwrite the target drive anyway, so it is completely meaningless to format it.
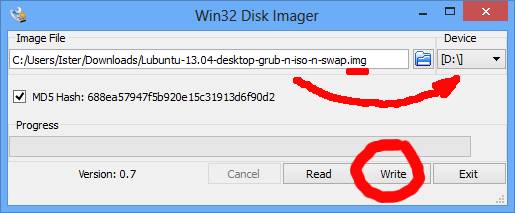
Select file
Select the img file (that you extracted and want to use) in the Win32 Disk Imager window. Click on the symbol, and get the file selector (in the right bottom corner). The default is to show image (IMG) files. If there is another extension, it will be displayed when you select all kinds of files *.*

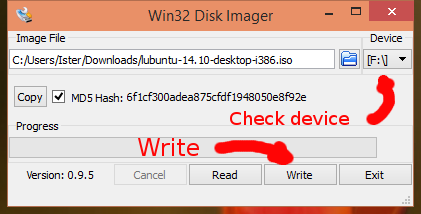
Check device and Write
WARNING
Check very carefully, that the device (F: in the picture) is really the USB pendrive, that you want to use. The best method is to have only the intended target USB drive connected to avoid the risk to overwrite a USB hard disk drive with all the family pictures and video clips .
Write
When you are sure, you can click on the Write button to start the process.
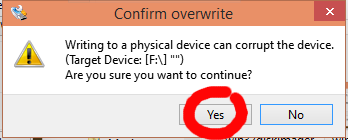
Confirm overwrite alias Final Warning
Progress view
This demo uses a Sandisk Cruzer Blade 4 GB as target drive. It is slow (5 MB/s) but reliable for booting. A USB 3 pendrive in a USB 2 port can be 6 times faster due to faster flash memory. See this link.

Work done 🙂 Remember to eject the pendrive safely
It is important to flush the buffers, to finish writing before pulling the pendrive. This is done with ‘Eject safely’. It is also done at a correct shutdown or reboot.
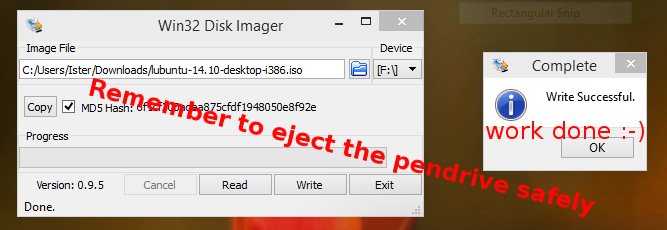
Good luck and welcome to the linux world!
Re-use the pendrive
In order to re-use the pendrive after installing the operating system, just format it completely (including MBR) using gparted in Ubuntu or Disk Management in Windows. See details in this link.
Links
You find more information at the following wiki page (and links from it)
Win32DiskImager/compressed-image_2_USB-or-SD (последним исправлял пользователь localhost 2017-06-02 21:44:09)
The material on this wiki is available under a free license, see Copyright / License for details.
Introduction
Note: Ubuntu is primarily distributed over the Internet as CD/DVD image files, called ISOs. If you have downloaded an ISO image, please refer instead to ../FromUSBStick (to install an ISO image on a USB flash drive) or BurningIsoHowto (to burn an ISO image onto a CD-ROM).
The Ubuntu 9.04 netbook remix and some specialized machine images are distributed as disk image files, called IMGs. A typical example is operating systems for Raspberry Pi. This page describes how to install from a .IMG file.
You need to write the downloaded IMG image to a device that your computer can boot from. For netbooks this is usually a flash memory device, such as a USB flash drive or SD memory card. You can also write the IMG file to an external USB hard drive, although these instructions use the term «flash media». The device must have sufficient capacity for the install (1 GB or larger is recommended), and you may need a USB adapter or SD card reader on your computer in order to write to it.
Warning: This will destroy all data on the destination device. Please backup all data to other media before proceeding.
Be sure to verify that your computer supports booting from the device you have selected for installation. Many computers can boot from a USB drive, and some from other sources. Check the documentation on your specific model of computer for the procedure to boot from the selected device.
The GettingUbuntu page has links to the IMG and ISO image files, as well as other methods of GettingUbuntu.
MD5 Sums
Before writing your flash, it is highly recommended that you verify the md5 sum (hash) of the .img file. For instructions, please see HowToMD5SUM. For the current list of Official Ubuntu MD5 hashes, see the MD5SUMS file for the release you’re using under http://releases.ubuntu.com (and optionally the PGP signatures in the MD5SUMS.gpg file), or see UbuntuHashes. This ensures that the file was not damaged during the download process and is 100% intact.
Windows
Graphical Interface
Links that describe the Win32 Disk Imager with more details:

- Visit the Ubuntu download site (for example, http://www.ubuntu.com/download/desktop ) and download the *.ISO file corresponding to the version of Ubuntu that you want (you probably want Ubuntu 12.04 for 64-bit PCs)
- Download Disk Imager from https://sourceforge.net/projects/win32diskimager/files/Archive/Win32DiskImager-0.9.5-install.exe/download and install the program. It will create a start menu entry under Image Writer, called ‘Win32DiskImager’. You should see a window like the screen shot above.
- Insert your flash media
- Note the drive letter assigned to your flash media
- Start Disk Imager. It will autodetect USB devices.
- Select the downloaded file and target device, and click «Write»
- Remove your flash media when the operation is complete
Command Line Interface
- Download the desired .img file
- Download flashnul from http://shounen.ru/soft/flashnul/index.html#download
- Attach your USB drive
- Run flashnul -p
- Note the physical device number for the USB drive
- Run flashnul -L \path\to\downloaded.img
- Answer «yes» if the selected destination device is correct
- Remove your USB drive when the command completes
Ubuntu
Graphical Interface (up to 12.10, for later versions use mkusb or the commandline method below)

- Download the desired .img file
- Install the usb-imagewriter package
- If your release does not include this, download it from Oliver’s PPA
- If imagewriter fails to launch, you may need to install python glade2 support. Install the python-glade2 package or Run sudo apt-get install python-glade2
- If your release does not include it and you are running 9.04 Jaunty Jackalope then run this command from the console:
- sudo apt-get install usb-imagewriter
- Open Applications -> Accessories -> Image Writer
- KDE users will find this in Applications -> Utilities -> Image Writer
- from the command line, from the console:
- sudo imagewriter
- on some usb-imagewriter versions (console command: imagewriter) the application fails to write if the image path contains blank spaces, exiting with «IndexError: list index out of range».
- Insert your flash media
- Select the downloaded file and flash device, and click «Write to Device»
- Remove your device when the operation is complete
mkusb

- Download the desired .img file
- Install mkusb from the PPA with the following command lines
- If you run standard Ubuntu, you need an extra instruction to get the repository Universe. (Kubuntu, Lubuntu . Xubuntu have the repository Universe activated automatically.)
sudo add-apt-repository universe # only for standard Ubuntu sudo add-apt-repository ppa:mkusb/ppa # and press Enter sudo apt-get update sudo apt-get install mkusb mkusb-nox usb-pack-efi
- View or download the quick start manual http://phillw.net/isos/linux-tools/mkusb/mkUSB-quick-start-manual.pdf
- Alternate link to the quick start manual version 11../../mkusb/mkUSB-quick-start-manual-11.pdf
- Alternate link to the quick start manual version 12 alias dus../../mkusb/mkUSB-quick-start-manual-12.pdf
Command Line Interface
- Download the desired .img file
- Open a terminal and insert your flash media
- Look at the output of sudo dmesg | tail -20 to determine the device node assigned to your flash media (ignore the device number; e.g. /dev/sdc, not sdc1)
- Example output of dmesg, where the device node is ‘sdc’:
- [ 5046.396364] usb-storage: device scan complete
- [ 5046.397075] scsi 10:0:0:0: Direct-Access USB Flash Memory 1.00 PQ: 0 ANSI: 0 CCS
- [ 5047.068761] sd 10:0:0:0: [sdc] Mode Sense: 23 00 00 00
- [ 5047.068769] sd 10:0:0:0: [sdc] Assuming drive cache: write through
- [ 5047.075021] sdc: sdc1
- [ 5047.076459] sd 10:0:0:0: [sdc] Attached SCSI removable disk
- Run sudo umount /dev/devicenode
- Run sudo dd if=/path/to/downloaded.img of=/dev/devicenode bs=1M
- Remove your flash media when the command completes (you may need to wait a few extra seconds for it to finish)
Mac OS X
Command Line Interface
- Download the desired .img file
- Open a Terminal (in /Applications/Utilities/)
- Run diskutil list to get the current list of devices
- Insert your flash media
- Run diskutil list again and determine the device node assigned to your flash media (e.g. /dev/disk2)
- Run diskutil unmountDisk /dev/diskN (replace N with the disk number from the last command; in the previous example, N would be 2)
- Execute sudo dd if=/path/to/downloaded.img of=/dev/rdiskNbs=1m (replace /path/to/downloaded.img with the path where the image file is located; for example, ./ubuntu.img, /dev/rdiskN is faster than /dev/diskN). If you see the error dd: Invalid number `1m', you are using GNU dd. Use the same command but replace bs=1m with bs=1M.
- Run diskutil eject /dev/diskN and remove your flash media when the command completes
Installation/FromImgFiles (последним исправлял пользователь h196n2 2017-01-28 11:15:12)
The material on this wiki is available under a free license, see Copyright / License for details
You can contribute to this wiki, see Wiki Guide for detailsDescription of Win32 Disk Imager
This is a Windows program for saving and restoring images from removable drives (USB drives, SD Memory cards, etc). It can be used to write boot images (i.e. ubuntu-12.04-preinstalled-desktop-armhf+omap4.img) to a SD Flash device or USB flash device, making it bootable. Newer examples are operating systems for Raspberry Pi.
Win32DiskImager supports writing an ISO image to USB too, which is very valuable right now with the Ubuntu releases 14.04 LTS — 15.10, because there are problems with the Ubuntu Startup Disk Creator.
The program and source code can be downloaded from here.
You can find also a self-extracting exe file, that helps you install Win32DiskImage, via this link to the archive, sourceforge.net/projects/win32diskimager/files/Archive
iso2usb
This tutorial subpage with screenshots illustrates how to create a USB boot drive from a Lubuntu ISO file. It works in the same way for all current Ubuntu family iso files including the Ubuntu mini.iso version 14.04 LTS (but mini.iso version 12.04 LTS is the only exception).
compressed-image_2_USB-or-SD
This tutorial subpage with screenshots illustrates how to create a USB or SD boot drive in order to boot a computer or device from an operating system in a compressed image file.
Win32DiskImager (последним исправлял пользователь localhost 2019-11-12 08:05:50)
The material on this wiki is available under a free license, see Copyright / License for details.
- If you run standard Ubuntu, you need an extra instruction to get the repository Universe. (Kubuntu, Lubuntu . Xubuntu have the repository Universe activated automatically.)