- Ctrl . blog
- How to run Windows 10 in GNOME Boxes (and fixes for common issues)
- Prerequisites
- Installing Windows 10 in GNOME Boxes
- Post-installation
- Запуск графических приложений Linux на подсистема Windows для Linux
- Установка поддержки приложений с графическим интерфейсом Linux
- Предварительные требования
- Новая установка — без предварительной установки WSL
- Существующая установка WSL
- Запуск приложений с графическим пользовательским интерфейсом Linux
- Обновление пакетов в дистрибутиве
- Установка текстового редактора Gnome
- Установка GIMP
- Установка Nautilus
- Установка VLC
- Установка приложений X11
- Установка Google Chrome для Linux
- Установка браузера Microsoft Edge для Linux
- Устранение неполадок
Ctrl . blog
How to run Windows 10 in GNOME Boxes (and fixes for common issues)
- Daniel Aleksandersen
- Updated: 2022-01-25
- Published: 2016-02-18
- 7 minute read
- Includes promotional links.
- Share
GNOME Boxes is a well-designed way to set up and manage virtualized guest systems from your Linux host system. It can also be used to connect and manage remote connections to screen-sharing or virtualized systems on remote machines.
I’ve been running Windows 10 in Boxes with good results. 3D acceleration isn’t yet supported, so graphical performance isn’t always great. Here’s how you can quickly get Windows 10 up and running in GNOME Boxes.
Prerequisites
You’ll need a few things ready before you begin:
- GNOME Boxes 3.16 or later installed. Version 3.18 resolves some compatibility issues with Windows 10.
- An Intel Virtualization Technology ( VT-x ) capable or similar virtualization capable processor. Only the very cheapest processors don’t have this, but you may need to enable it in BIOS first.
- At least 4 GB of system memory.
- A Windows 10 ISO installation media available for download from Microsoft
- A valid Windows Product Key for OEM installations. You can skip this during the install, but you will need to provide one within 30-days of installation.
All current Linux distributions offer the gnome-boxes package as part of their package repository. It can be installed separately and the GNOME desktop includes Boxes by default, but your Linux distribution may have removed it in favor of other options.
Boxes is very user-friendly and offer good performance built on standard Linux technologies, so please do consider switching to Boxes if you’ve used other virtualization options until now.
Installing Windows 10 in GNOME Boxes
- Launch GNOME Boxes and click the “New” button in the top left corner.
- Select the ISO for the operating system you want to install. If you’ve downloaded the Windows installation media (or any other ISO file) to your Home folder’s Download folder, it will be listed right there in Boxes.
- On the next screen, assign the Windows guest system at least 3 GB of memory, and 20 GB of disk space. The guest will run more comfortably with 6 GB of memory and 34 GB of disk space.
- Click the Create button the regular Windows installer will boot up.
- After choosing language and region, you’ll be asked to enter a Windows 10 product key. You’ve some options for how to proceed from here:
- Reuse a spare Windows 7 or 8 product key, if you’ve a boxed copy lying around that you’re not using anymore. Home, Pro, Premium, and Ultimate editions are eligible for a free update to Windows 10.
- Purchase a Windows 10 Pro product key as a download.
- Proceed with the installation without entering a product key by clicking “I don’t have a product key.” You can evaluate whether Windows 10 works well enough for you in GNOME Boxes and buy a product key later. You must login with a Microsoft Account if you don’t enter a product key now.
- Choose “Custom” you get the “Which type of installation do you want?” screen, but just click Next to proceed with the default options. You can just ignore the partitioning screen.
Let the installation run its course. When the installation is complete, you’ll be presented with the normal first-time start-up wizard for setting up a user account. You can watch a video of the complete installation process if you want to see GNOME Boxes in action.
Post-installation
Once you’ve got Windows 10 up and running, you’ll need to do a few more things to get Windows 10 and GNOME integration to work. You can skip this section, but you’ll have a worse experience with Windows 10 on Linux.
To enable screen resizing and clipboard sharing, you need to download and install the Windows guest tools for Spice. The download link is quite far down on the download page, and be wary of all the other downloads offered. You want the one called “Windows guest tools” under the “Guest” headline. Run the installer and you’re all set up. There’s no need to reboot the system unless your mouse cursor “jitters” after installing it.
The above link bundles most of the required virtualization drivers, but they’re out-of-date by several years. You can fetch newer drivers from stable VirtIO. You’ll want the one named virtio-win-gt.msi (for x64 or x86).
After installing the guest tools and the updated drivers, you can resize GNOME Boxes window or take it full screen and the guest system will adjust to the new screen dimensions automatically. Things you copy onto the clipboard will now also be shared between the two machines, so you can exchange links and other text data between the guest and host system.
Clipboard sharing even works between two guest systems – something that never works reliably with VirtualBox! You can disable clipboard sharing if you desire stronger system isolation by disabling the option in Boxes menu: Properties: General: Share Clipboard.
Audio might not work automatically if you’re using an older version of GNOME Boxes. Self-configuring audio for Windows 10 and 8 in GNOME Boxes didn’t work for many years pending on bug #761031. To get audio working in Boxes, you can use one of these two options:
Option 1: Modify your libvirt qemu files. Open Boxes, perform a full shut down of the virtual machine, and note the auto-assigned name given to the virtual machine. Open up the Terminal and type EDITOR=gedit virsh edit YOURBOXNAME . If you’ve modified the name after installing, you can find the file in ~/.config/libvirt/qemu/ , but don’t edit it directly — rather use the name with the previous command.
Locate the line that says within the file and replace it with . Save and close the file. The next time you boot up the virtual system, you’ll have working sound. In low memory environments, you should consider the next option instead.
Option 2: Use a USB audio card and pass it through to the guest system. Connect a USB audio card and open the Boxes menu: Properties: Devices. Locate the USB sound card and enable it. With any recent Linux Kernel, you should have no problem hot-swapping (connecting and disconnecting between running systems) such a card to share it between the Linux host and guest systems.
I’m using the cheapest USB CM108 sound card I could find, and I haven’t had any issues with it. It gives me a much better and less stuttery audio performance.
That’s it! You should be all set up now and can enjoy the Windows 10 experience. It might just remind you way you’re using Linux in the first place! 😉
Запуск графических приложений Linux на подсистема Windows для Linux
подсистема Windows для Linux (WSL) теперь поддерживает запуск приложений с графическим интерфейсом Linux (X11 и Wayland) в Windows в полностью интегрированном интерфейсе рабочего стола.
WSL 2 позволяет графическим приложениям Linux чувствовать себя собственными и естественными для использования в Windows.
- Запуск приложений Linux из меню «Пуск» Windows
- Закрепление приложений Linux на панели задач Windows
- Использование alt-tab для переключения между приложениями Linux и Windows
- Вырезать и вставить в приложениях Windows и Linux
Теперь вы можете интегрировать приложения Windows и Linux в рабочий процесс, чтобы обеспечить простой рабочий стол.
Установка поддержки приложений с графическим интерфейсом Linux
Предварительные требования
- Для доступа к этой функции необходимо использовать Windows 10 сборки 19044 или более поздней версии или Windows 11.
- Установленный драйвер для VGPU Чтобы запустить приложения с графическим интерфейсом Linux, необходимо сначала установить драйвер, соответствующий вашей системе. Это позволит использовать виртуальный GPU (vGPU), чтобы вы могли воспользоваться преимуществами аппаратного ускорения отрисовки OpenGL.
- Intel Драйвер GPU
- AMD Драйвер GPU
- NVIDIA Драйвер GPU
Новая установка — без предварительной установки WSL
Теперь вы можете установить все необходимое для запуска подсистемы Windows для Linux (WSL), введя эту команду в PowerShell от имени администратора или командной строке Windows, а затем перезапустив компьютер.
После завершения перезагрузки компьютера установка продолжится, и вам будет предложено ввести имя пользователя и пароль. Это будут ваши учетные данные Linux для дистрибутива Ubuntu.
Теперь вы готовы приступить к использованию графических приложений Linux в WSL!
Дополнительные сведения проверка установите WSL.
Существующая установка WSL
Если на компьютере уже установлен WSL, вы можете выполнить обновление до последней версии, которая включает поддержку графического пользовательского интерфейса Linux, выполнив команду update из командной строки с повышенными привилегиями.
- Выберите Пуск, введите PowerShell, щелкните правой кнопкой мыши Windows PowerShell и выберите Запуск от имени администратора.
- Введите команду WSL update:
Приложения с графическим интерфейсом Linux поддерживаются только в WSL 2 и не будут работать с дистрибутивом Linux, настроенным для WSL 1. Узнайте , как изменить дистрибутив с WSL 1 на WSL 2.
Запуск приложений с графическим пользовательским интерфейсом Linux
Вы можете выполнить следующие команды в терминале Linux, чтобы скачать и установить эти популярные приложения Linux. Если вы используете дистрибутив, отличный от Ubuntu, он может использовать диспетчер пакетов, отличный от apt. После установки приложения Linux его можно найти в меню Пуск под именем дистрибутива. Например: Ubuntu -> Microsoft Edge .
Поддержка графических приложений в WSL не обеспечивает полноценное взаимодействие с рабочим столом. В нем используется настольный компьютер Windows, поэтому установка средств или приложений, ориентированных на настольные компьютеры, может не поддерживаться. Чтобы запросить дополнительную поддержку, вы можете отправить ошибку в репозиторий WSLg на GitHub.
Обновление пакетов в дистрибутиве
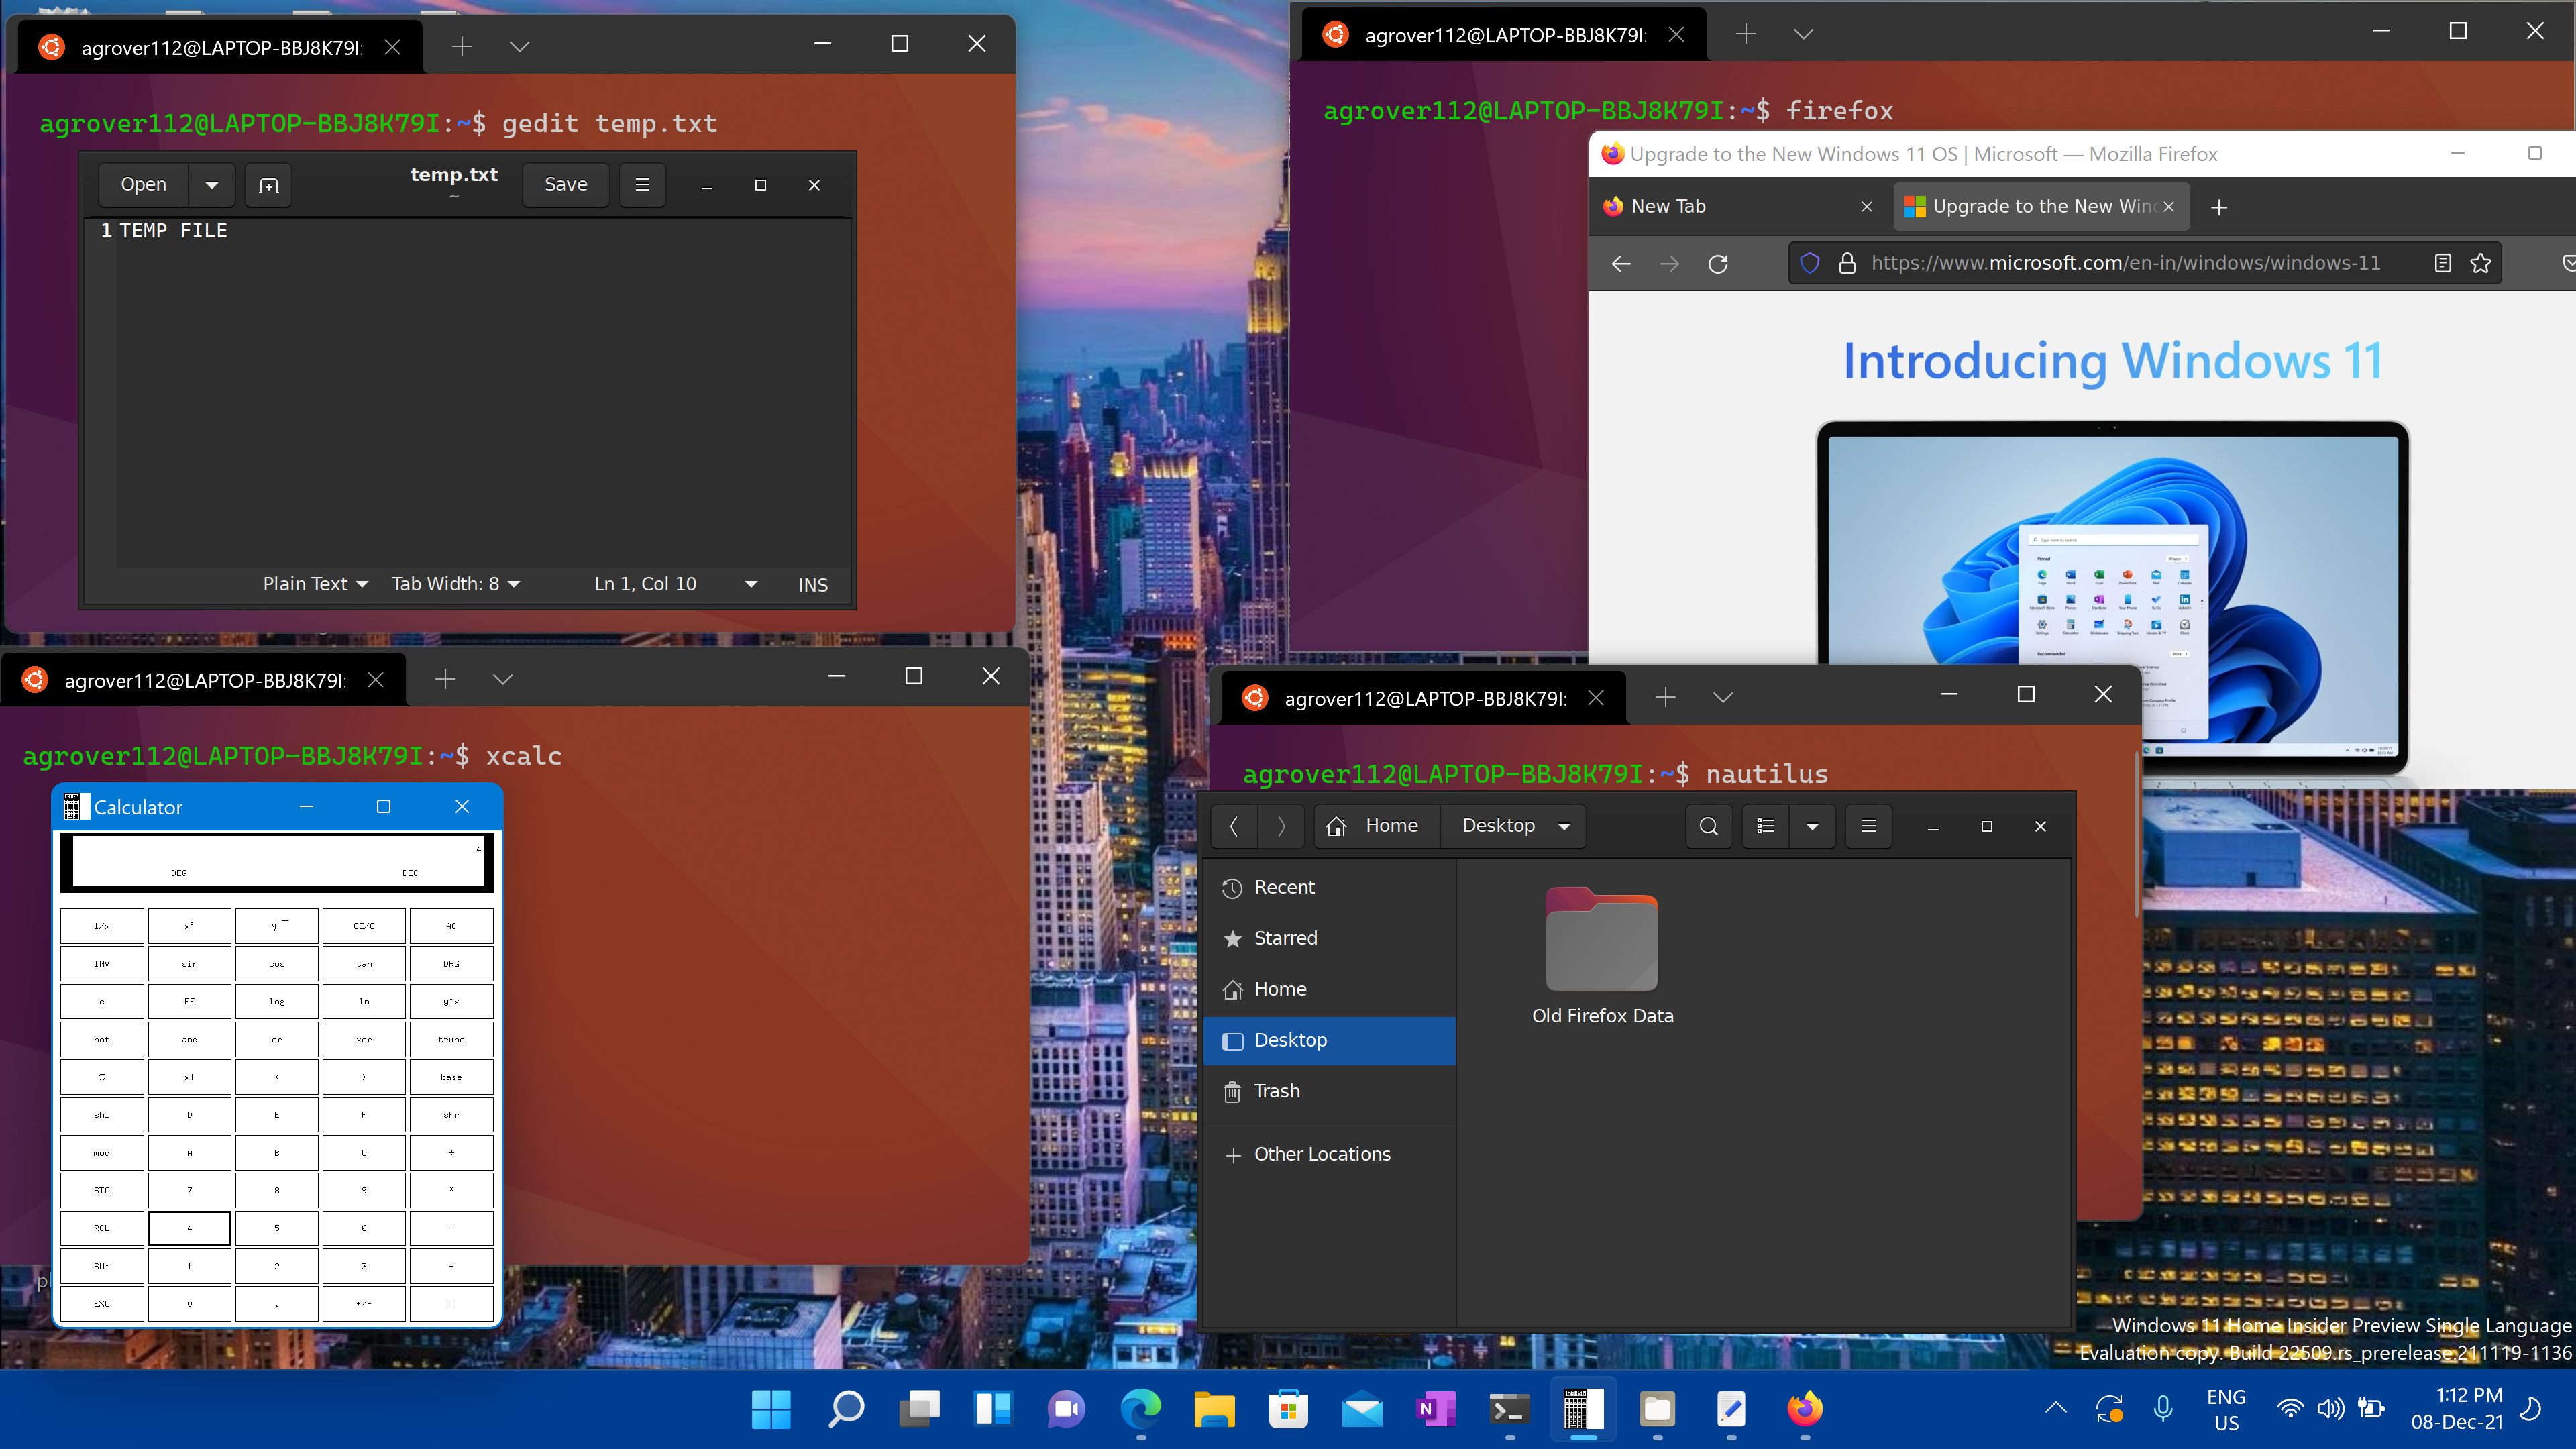
Установка текстового редактора Gnome
Текстовый редактор Gnome — это текстовый редактор по умолчанию в среде рабочего стола GNOME.
sudo apt install gnome-text-editor -yЧтобы запустить файл bashrc в редакторе, введите: gnome-text-editor ~/.bashrc
Установка GIMP
GIMP — это бесплатный редактор растровых графических изображений с открытым кодом, используемый для обработки изображений и редактирования изображений, рисования в свободной форме, перекодирования различных форматов файлов изображений и более специализированных задач.
Чтобы запустить, введите: gimp
Установка Nautilus
Nautilus, также известный как ФАЙЛЫ GNOME, является диспетчером файлов для рабочего стола GNOME. (Аналогично Windows проводник).
sudo apt install nautilus -yЧтобы запустить, введите: nautilus
Установка VLC
VLC — это бесплатный и открытый код кроссплатформенный мультимедийный проигрыватель и платформа, которая воспроизводит большинство мультимедийных файлов.
Чтобы запустить, введите: vlc
Установка приложений X11
X11 — это система управления окнами Linux, и это разное семейство приложений и средств, которые поставляются вместе с ней, такие как xclock, калькулятор xcalc, xclipboard для вырезания и вставки, xev для тестирования событий и т. д. Дополнительные сведения см. в документации по x.org .
sudo apt install x11-apps -yЧтобы запустить, введите имя средства, который вы хотите использовать. Пример:
Установка Google Chrome для Linux
Чтобы установить Google Chrome для Linux, выполните следующие действия.
- Измените каталоги во временную папку: cd /tmp
- Используйте wget, чтобы скачать его: sudo wget https://dl.google.com/linux/direct/google-chrome-stable_current_amd64.deb
- Получите текущую стабильную версию: sudo dpkg -i google-chrome-stable_current_amd64.deb
- Исправьте пакет: sudo apt install —fix-broken -y
- Настройте пакет: sudo dpkg -i google-chrome-stable_current_amd64.deb
Чтобы запустить, введите: google-chrome
Установка браузера Microsoft Edge для Linux
Сведения об установке браузера Microsoft Edge для Linux с помощью командной строки см. на сайте программы предварительной оценки Edge. Выберите Получить инструкции в разделе Установка из командной строки страницы.
Чтобы запустить, введите: microsoft-edge
Устранение неполадок
Если у вас возникли проблемы с запуском приложений графического интерфейса пользователя, сначала проверка это руководство: Диагностика проблем с типом «не удается открыть дисплей» в WSLg