- How to bridge WiFi and Ethernet adapters to share internet on Windows 11 or 10
- How to share internet using wifi adapter to Ethernet cable
- How To Share WiFi Over Ethernet on Windows 10
- Why is it Important? And Use Case.
- How to Share WiFI Over Ethernet on Windows 10
- Using Connectify Hotspot
- Using Windows 10 Internal Feature
- Creating an internet bridge
- Internet Connection Sharing Using Hosted Network Feature
- Conclusion
How to bridge WiFi and Ethernet adapters to share internet on Windows 11 or 10
Everybody is not using a router in their home to connect internet. Nowadays, when the Wifi adapter is almost in every laptop and PC (via Wireless adapter card); the users mostly ad hoc smartphone’s hotspots to share and use the internet. Another reason why the users started using Wifi over the ethernet connection; because nobody wants to run long Ethernet cables in their homes. That’s why Wifi adapters and WiFi hotspots are more popular nowadays. So, in such circumstances, if someone wants to share a computer’s WiFi Internet connection with other Ethernet devices, how will he do that?
You might be thinking, why would we do this? Just imagine you don’t have a router with a LAN ethernet port to connect some old devices. Since there are certain devices in home and offices that still do not offer WiFi connectivity option like smart TVs (old), media players, NAS devices, and more… Such kind of devices needs a wired Ethernet connection to connect to the Internet.
So, if you think without a router, how do you share the internet from a laptop or PC then here is the answer…
We don’t need any Virtual router to share an internet connection in Windows 7, 8, or 10. Just bridge Wifi to ethernet in Windows 10 or whatever Windows version you are on and that’s it. Not only Wifi adapter to Ethernet but also one can use this method for Ethernet adapter to Ethernet adapter too.
How to share internet using wifi adapter to Ethernet cable
Although there are a few software available online those let us create virtual routers on Windows to share the internet from PC to PC via ethernet. But actually, we don’t need them. Just follow the below steps… We are using Windows 10 here but the steps are the same for Windows 8 and Windows 7 too.
- Go to the search bar of Windows 10 or 7.
- Search for Control Panel.
- Click on the Control Panel to open it.
- Select the Network and Internet option.
- You will see View network status and task under Network and Sharing Center, click on that.
- From the left side panel, click on Change adapter settings.
- Now press the Shift button and without releasing it, click on the Wifi adapter and then on the Ethernet adapter for which you want to share the network connection.
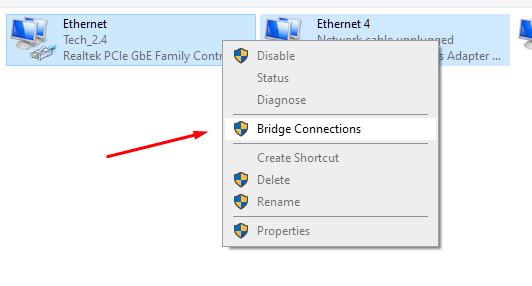
- Right-click on any of the adapters and select the Bridge connection option.
Above tutorial steps in detail:
Step 1: As I said in the above-mentioned steps that first you need to connect the ethernet cable to the computer or laptop from where your want to share the wireless network internet connection. For example, I want to share Wi-Fi internet from my PC to a NAS device that doesn’t have a WLAN card. Then, search and open the control panel on Windows 10 or Windows 7. When it appears just click on that.
How To Share WiFi Over Ethernet on Windows 10
Are you wondering how to share WiFi over Ethernet on Windows 10? if you do, then you have come to the right place as we will go through a quick guide on how to do so.
To get started with the guide, you first need a proper internet connection at your place. Make sure you are connected. Apart from that, you also need Windows 10. If you are using other Windows versions, then you may find it difficult to follow the guide.
But, before we go on and share the tutorial, let’s learn why it necessary to know how to connect or share Wifi over ethernet using Windows 10.
Why is it Important? And Use Case.
Modern desktop and laptops come with WiFi connectivity. This means that if you have a Wifi network at your home or work, you can easily connect with the network using the in-build WiFi solution.
However, not all device comes with a WiFi receiver. So, if you do not have an ethernet cable connected to that computer, you are not going to get the internet on that machine or device. Also, the machine that you want to connect should have an ethernet port so that the ethernet cable can be connected without any issue.
For example, there is an old TV that does have Wifi connectivity or maybe game consoles that are too old to have wireless connectivity. In all these cases, sharing your WiFi over ethernet is essential.
Also, ethernet cables are more reliable compared to WiFi connections as they do not suffer from any distortion and interference.
Now that we have understood the use case of sharing WiFi over ethernet and its importance let’s learn how to do it.
How to Share WiFI Over Ethernet on Windows 10
There are many ways you can share your WiFi over ethernet. Let’s go through them one by one below.
Using Connectify Hotspot
You can also use third-party solutions to connect WiFi over ethernet. One such solution is Connectify Hotspot. It is a virtual router software that enables you to share WiFi over Ethernet on Windows 7, 8, and 10. Apart from that, it also comes with a lot of features.
To get started, you first need to download it on your machine. You can download it from here: https://www.connectify.me/.
Also, it enables you to share almost all types of internet connection, including LTE, 3G, 4G, and so on!
Once you have the Connectify hotspot installed, you need to run the program. From there, you now need to click on the Wired Router tab.
From there, you need to select the internet that you want to share by choosing it to “Wi-Fi.”
Also, you need to choose the Ethernet adapter under the Share Over Option.
Lastly, you need to click on “Start Hotspot” to start the network and share the internet, creating a wireless ethernet cable setup.
Using Windows 10 Internal Feature
If you are not comfortable using a third-party solution, then you can also do it using Windows 10 features.
Below are the steps to do so.
- Step 1: Right Click on the Windows start button, and you will see a menu pop up.
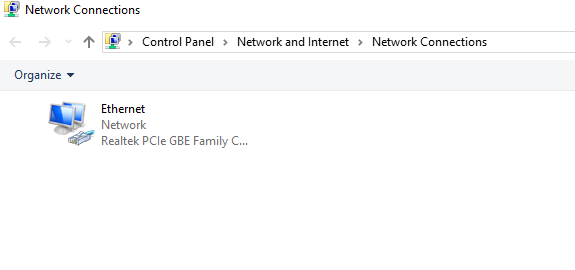
- Step 2: From there, you need to click on Network Connections.
- Step 3: Once you do so, you will be redirected to the network windows. From there, click on change adapter settings.
- Step 4: Now, you will be redirected to the list of all the network connections available online.
- Step 5: From there, right-click on your Wi-Fi adapter and then go to properties.
- Step 6. Now you need to toggle the option “Allow other network users to connect.”
Once done, then you need also to select the Ethernet port through which you want to allow the connection.
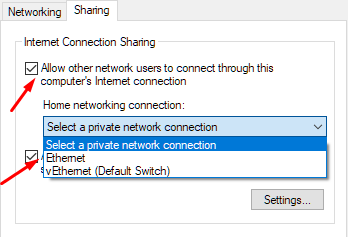
Once done, you will be able to share your internet connection(share internet) through the ethernet over WiFi.
Also, make sure that you choose the right ethernet to share the internet. If you do not make the right choice, then your connection sharing will fail. This is specifically true for those who have VPN software installed as it can create virtual ethernet ports and list them there.
Creating an internet bridge
You can also create Wifi to ethernet bridge and share the internet using the bridge connection. To do so, you need to right-click on the start button or simply press Windows Key + X and then select network connections.
Now, you need to select the networks that are related to the WiFi and the ethernet adapter that you will be connecting. Once selected, right-click on them and then click on “Bridge Connections.”
Internet Connection Sharing Using Hosted Network Feature
You can also use the hosted network to share the network connection, i.e., the internet connection. Hosted Network is available within the Windows Network Shell utility. It creates a virtual wireless adapter and hence enables you to share the internet using software-based access points.
However, before you start configuring, you need to learn if your wireless adapter supports the Hosted Network feature or not.
To do so, you need to open the command prompt with admin priveledges.
Now, you need to type the following command in the command prompt and then press enter.
NETSH WLAN show drivers
Once done, it will output a detailed report containing an IP address. There, check out if the Hosted network supported feature is YES or not. If it is YES, then your computer supports the feature, and you can create a network connection using the adapter.
To create the Hosted Network, you need to type the following command in the command prompt.
NETSH WLAN set hostednetwork mode= allow ssid= key= “
Here, you can change the name of the virtual network and choose the key according to your requirement.
Once this is done, you will now be able to see the new virtual adapter being created in the Local Area Connection.
It’s now time to sharing an internet connection using the Hosted Network. Right-click on the newly created adapter and then click on connection properties.
Now go to the “Sharing” tab and then click the box where you allow other users to connect to the internet.
Once done, click on the home network connection and select the newly created virtual adapter.
Click on “OK,” and you are done!
Conclusion
This leads us to the end of our sharing WiFi over ethernet on Windows 10. So, are you able to follow the guide? Comment below and let us know.
Johnny Crumley
A self-defined geek, Johnny Crumley comes from the USA. As a kid genius, he started DOS batch files at just five years old and was soon messing with BASIC in kindergarten. He was always into the bits and bytes. As luck would have it, Johnny became a freelance PC technician, something he’s genuinely passionate about. From his teenage years, he started writing about anime and games. He’s also an avid educator, spreading his knowledge and expertise in the tech sector. He has been a professional writer for six years and has written for several emerging tech publications.
Blog.rottenwifi.com is a participant in the Amazon Services LLC Associates Program which means we may get paid commissions on editorially chosen products purchased through our links to retailer sites. All names, logos, brands, and images are trademarks or copyrighted materials of their respective owners. Amazon and the Amazon logo are trademarks of Amazon.com, Inc., or its affiliates.