- Доступ к сетевым приложениям с помощью WSL
- Доступ к сетевым приложениям Linux из Windows (localhost)
- Доступ к сетевым приложениям Windows из Linux (IP-адрес основной системы)
- Подключение через удаленные IP-адреса
- Доступ к дистрибутиву WSL 2 из локальной сети (LAN)
- Доступ по протоколу IPv6
- Accessing network applications with WSL
- Accessing Linux networking apps from Windows (localhost)
- Accessing Windows networking apps from Linux (host IP)
- Connecting via remote IP addresses
- Accessing a WSL 2 distribution from your local area network (LAN)
- IPv6 access
- How to share files between a Linux and Windows computer
- Create a shared folder on Windows
- Access a Windows shared folder from Linux using Konqueror
- Access a Windows shared folder from Linux using Nautilus
- Access a Windows shared folder from Linux using the command line
- Related information
Доступ к сетевым приложениям с помощью WSL
При работе с сетевыми приложениями (будь то получение доступа к сетевому приложению Linux из приложения Windows или получение доступа к сетевому приложению Windows из приложения Linux) необходимо учитывать несколько моментов. Вам может потребоваться определить IP-адрес используемой виртуальной машины, который будет отличаться от IP-адреса локального физического компьютера.
Доступ к сетевым приложениям Linux из Windows (localhost)
Если вы создаете сетевое приложение (например, приложение, работающее на NodeJS или SQL Server) в дистрибутиве Linux, вы можете получить к нему доступ из приложения Windows (например, используя Microsoft Edge или Chrome) с помощью localhost (как обычно это и происходит).
Доступ к сетевым приложениям Windows из Linux (IP-адрес основной системы)
Если вы хотите получить доступ к сетевому приложению, работающему в Windows (например, к приложению, работающему на NodeJS или SQL Server) из дистрибутива Linux (напр., Ubuntu), необходимо использовать IP-адрес основной системы. Хотя это происходит и нечасто, для этого можно выполнить следующие действия.
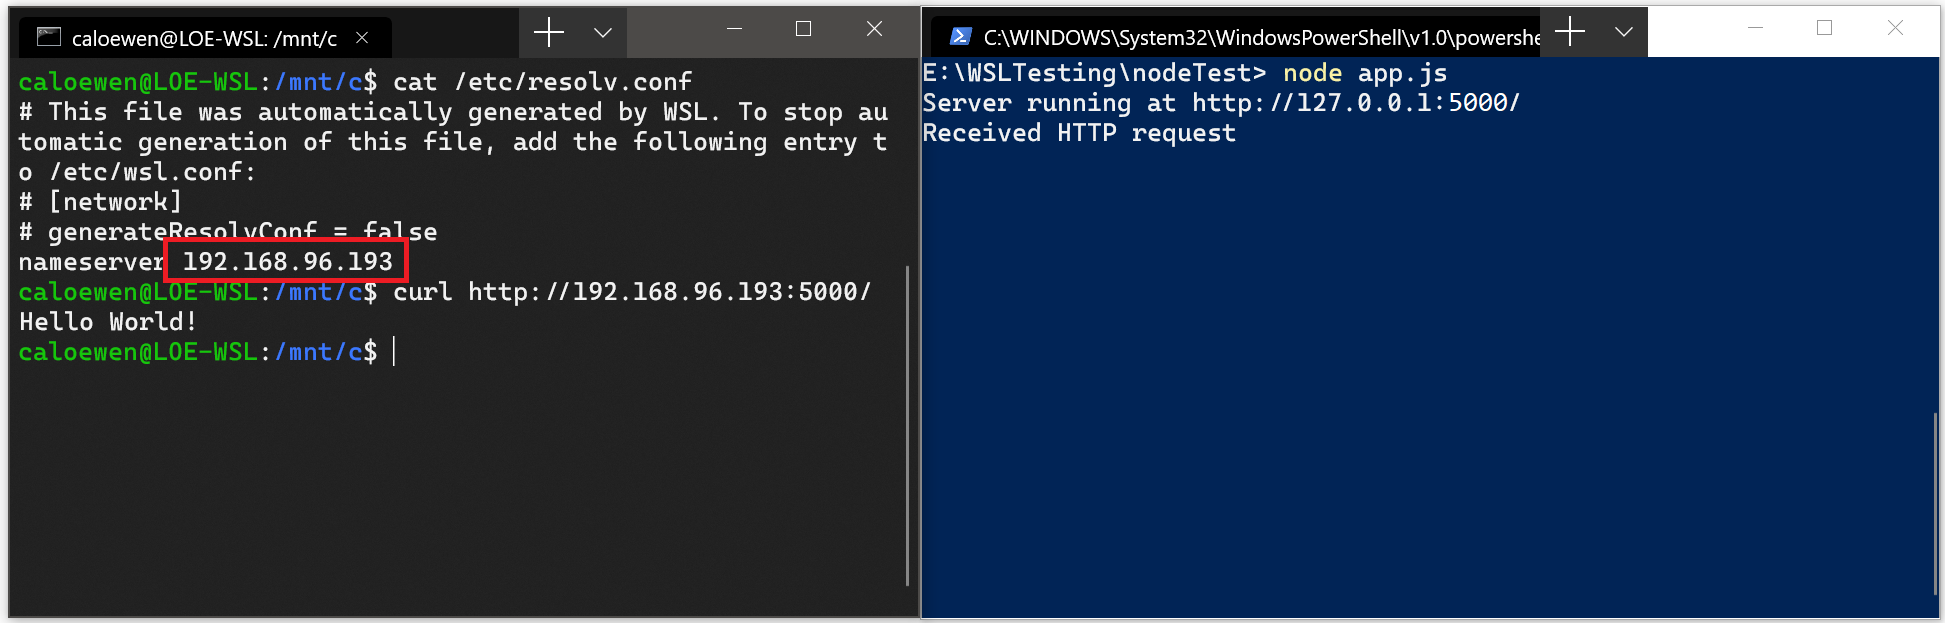
- Получите IP-адрес основной системы, выполнив следующую команду из дистрибутива Linux: cat /etc/resolv.conf
- Скопируйте IP-адрес в строке, начинающейся с nameserver .
- Подключитесь к любому серверу Windows, используя скопированный IP-адрес.
На изображении ниже показан пример подключения к серверу Node.js под управлением Windows через cURL.
Подключение через удаленные IP-адреса
При использовании удаленных IP-адресов для подключения к приложениям они будут рассматриваться как подключения из локальной сети (LAN). Это означает, что необходимо убедиться, что приложение может принимать подключения по локальной сети.
Например, может потребоваться привязать приложение к 0.0.0.0 вместо 127.0.0.1 . В примере приложения Python, использующего Flask, это можно сделать с помощью команды app.run(host=’0.0.0.0′) . При внесении этих изменений не забывайте о безопасности, так как это позволит устанавливать подключения из вашей локальной сети.
Доступ к дистрибутиву WSL 2 из локальной сети (LAN)
При использовании дистрибутива WSL 1, если к компьютеру можно получить доступ из локальной сети, то приложения, работающие в WSL, могут быть также доступны в локальной сети.
Это нетипичная ситуация в WSL 2. В WSL 2 имеется виртуализированный адаптер Ethernet с собственным уникальным IP-адресом. В настоящее время для включения этого рабочего процесса необходимо выполнить те же действия, что и для обычной виртуальной машины. (Мы ищем способы улучшить это взаимодействие.)
Ниже приведен пример команды Windows для добавления прокси-сервера порта, который прослушивает порт 4000 на узле и подключает его к порту 4000 к виртуальной машине WSL 2 с IP-адресом 192.168.101.100.
netsh interface portproxy add v4tov4 listenport=4000 listenaddress=0.0.0.0 connectport=4000 connectaddress=192.168.101.100 Доступ по протоколу IPv6
В настоящее время дистрибутивы WSL 2 не могут обращаться к IPv6-адресам. Мы работаем над добавлением этой возможности.
Accessing network applications with WSL
There are a few considerations to be aware of when working with networking apps, whether you are accessing a Linux networking app from a Windows app or accessing a Windows networking app from a Linux app, you may need to identify the IP address of the virtual machine you are working with, which will be different than the IP address of your local physical machine.
Accessing Linux networking apps from Windows (localhost)
If you are building a networking app (for example an app running on a NodeJS or SQL server) in your Linux distribution, you can access it from a Windows app (like your Edge or Chrome internet browser) using localhost (just like you normally would).
Accessing Windows networking apps from Linux (host IP)
If you want to access a networking app running on Windows (for example an app running on a NodeJS or SQL server) from your Linux distribution (ie Ubuntu), then you need to use the IP address of your host machine. While this is not a common scenario, you can follow these steps to make it work.
- Obtain the IP address of your host machine by running this command from your Linux distribution: cat /etc/resolv.conf
- Copy the IP address following the term: nameserver .
- Connect to any Windows server using the copied IP address.
The picture below shows an example of this by connecting to a Node.js server running in Windows via curl.

Connecting via remote IP addresses
When using remote IP addresses to connect to your applications, they will be treated as connections from the Local Area Network (LAN). This means that you will need to make sure your application can accept LAN connections.
For example, you may need to bind your application to 0.0.0.0 instead of 127.0.0.1 . In the example of a Python app using Flask, this can be done with the command: app.run(host=’0.0.0.0′) . Please keep security in mind when making these changes as this will allow connections from your LAN.
Accessing a WSL 2 distribution from your local area network (LAN)
When using a WSL 1 distribution, if your computer was set up to be accessed by your LAN, then applications run in WSL could be accessed on your LAN as well.
This isn’t the default case in WSL 2. WSL 2 has a virtualized ethernet adapter with its own unique IP address. Currently, to enable this workflow you will need to go through the same steps as you would for a regular virtual machine. (We are looking into ways to improve this experience.)
Here’s an example Windows command to add a port proxy that listens on port 4000 on the host and connects it to port 4000 to the WSL 2 VM with IP address 192.168.101.100.
netsh interface portproxy add v4tov4 listenport=4000 listenaddress=0.0.0.0 connectport=4000 connectaddress=192.168.101.100 IPv6 access
WSL 2 distributions currently cannot reach IPv6-only addresses. We are working on adding this feature.
How to share files between a Linux and Windows computer

The easiest and most reliable way to share files between a Linux and Windows computer on the same local area network is to use the Samba file-sharing protocol. All modern versions of Windows come with Samba installed, and Samba is installed by default on most distributions of Linux.
Create a shared folder on Windows
First, create a shared folder on your Windows computer.
Following the steps below, creates a shared folder on your Windows computer that lets you access files in that folder on your Linux computer. With the right permissions you can also copy, edit, and delete files in that folder from your Linux computer.
- Open the Control Panel.
- Select the Network and Sharing Options or Network and Sharing Center option.
- Click the Change advanced sharing settings link in the left navigation menu.
- Click the Turn on Network Discovery and Turn on File and Print Sharing options.
- Click the Save changes button at the bottom of the Advanced sharing settings window.
Now, create a new folder to share or choose an existing folder that you want to share.
- Right-click the folder and select Properties.
- Go to the Sharing tab.
- If you want to share the folder with another Windows account, click the Share button, add the account to grant permission to access the shared folder, and click the Share button.
If you shared the folder with another Windows account, you need to click the Advanced Sharing button, then click the Permissions button. Select the account, check the Allow box for the Change or Modify permission, and click OK.
- Click the Advanced Sharing button.
- On the Advanced Sharing window, check the box for Share this folder and click OK.
- The network path for the folder is now displayed above the Share button, indicating that it is now a shared folder. For example, it may look something like \\YOURCOMPUTERNAME\Users\YourUserName\ShareFolderName. Make a note of this network folder path to use later on your Linux machine.
Access a Windows shared folder from Linux using Konqueror
Many Linux distributions use the KDE desktop environment and the Konqueror file manager/browser. If you’re using this, you can follow these steps to access your Windows shared folder.
- Click the K menu icon.
- Select Internet ->Konqueror.
- In the Konqueror window that opens, click the Network Folders link, or type remote:/ in the address bar and press Enter .
- Click the Samba Shares icon.
- Click the icon of your Windows Home workgroup.
- Click the Workgroup icon.
- Click the icon for your computer.
- When prompted, enter the username and password for the Windows account that created the share.
- Click OK.
Access a Windows shared folder from Linux using Nautilus
Many Linux distributions, especially those that use the GNOME desktop environment, use the Nautilus file manager. If you’re using this, you can follow these steps to access your Windows shared folder.
- Open Nautilus.
- From the File menu, select Connect to Server.
- In the Service type drop-down box, select Windows share.
- In the Server field, enter the name of your computer.
- Click Connect.
Alternatively, in the Nautilus address bar, you can type smb://ComputerName/ShareName and press Enter . For example, when you created your Windows Share if the share name was listed as:
\\YOURCOMPUTERNAME\Users\YourUserName\ShareFolderName
Type smb://YOURCOMPUTERNAME/Users/YourUserName/ShareFolderName and press Enter . Note the smb: at the beginning, in Linux, use forward slashes instead of backslashes.
Access a Windows shared folder from Linux using the command line
You can also access your Windows shared folder from the Linux command line using the smbclient program.
- Open a terminal.
- Type smbclient at the command prompt.
- If you receive a «Usage:» message, smbclient is installed, and you can skip to the next step. However, if the command is not found, you need to install smbclient. Follow these steps to install it.
- If you use the apt package manager, the default on Linux systems such as Ubuntu or Debian, you can use the sudo apt-get install smbclient command.
- If you use the yum package manager, the default on Linux systems, such as CentOS, you can use the sudo yum install samba-client command.
- You can also download the Samba client directly at www.samba.org/samba/download/, which might be useful to you if you need or want to compile the program from the source code.