- Установка дистрибутива на компьютер с EFI
- how to install
- Управление списком загрузки
- Удаляем запись Windows Boot Manager
- Удаляем запись Linux
- Редактируем паузу
- How to Install Ubuntu Alongside Windows Boot Manager?
- Prerequisites: System Requirements
- Make a Bootable USB With Ubuntu ISO
- Step 1: Download the iso File of Ubuntu
- Step 2: Launch the Balena Etcher
- Install Ubuntu on the Computer
- Step 1: Boot from USB
- Step 2: Start the Installation
- Step 3: Choose the Keyboard Layout
- Step 4: Connect to Wifi (Optional)
- Step 5: Choose the Variant of Installation
- Step 6: Select the Installation Type
- Step 7: Select the Location
- Step 8: Set the Information of Computer and User
- Step 9: Restart the Computer
- Boot the Ubuntu on a computer
- Conclusion
Установка дистрибутива на компьютер с EFI
Сначала немного теории. Extensible Firmware Interface (EFI) — интерфейс между операционной системой и микропрограммами, управляющими низкоуровневыми функциями оборудования, его основное предназначение: корректно инициализировать оборудование при включении системы и передать управление загрузчику операционной системы. EFI предназначен для замены BIOS — интерфейса, который традиционно используется всеми IBM PC-совместимыми персональными компьютерами
Что это значит? Значит что способ описанный в Установка Ubuntu может не сработать. Кроме того, большие диски требуют использования GPT (вместо старой версии таблицы разделов в MBR, которая имеет ограничение адресуемого на диске пространства в 2,2 ТБ = 2,2 × 10¹² байт)
Не возможно гарантировать универсальность приведенной ниже инструкции, но автор этой статьи прочитал несколько русско- и англоязычных тем форумов и на вторые сутки смог установить ubuntu 12.04.1 на Lenovo B570. Есть надежда, что эта статья поможет и вам.
Поскольку EFI представляет собой специфический загрузчик, то он должен где то храниться, в нашем случае для него выделено отдельное место на жёстком диске с GPT таблицей разделов. Когда компьютер проходит процедуру POST, BIOS обнаруживает на подключённом носителе EFI раздел с установленным загрузчиком. Как следствие в самом BIOS в меню BOOT(У вас может называться по другому, там находиться порядок загрузки устройств) на ровне с устройствами появятся и дистрибутивы.
how to install
A. В начале нам понадобиться LiveCD(почему именно LiveCD? Смотри ниже) установочный образ , how to написано тут получение_ubuntu. Если у вас уже есть установочный диск/флешка, вам ниже.
B. Загружаемся, всё как при обычной установке → загрузка_с_livecd. Затем, если у кого то всё нормально и графический режим с выбором языка работает, то хорошо, у некоторых может появиться незнамо что (экран в пикселях, видно как ленточка выбора перемещается для выбора варианта загрузки)
P.S. //Лично у меня при загрузке с текстового alternative образа, всё время было такое, даже во время попытки установки//
Порядок надписей следующий:
Попробовать без установки Установить Проверить диск на наличие ошибок
Как следствие выбираем первую и загружаемся в графическом режиме.
C. Открываем центр приложений, ищем grub-pc удаляем, ищем grub-efi под нужную разрядность (64 или 32) ставим его.
UPD. можно оставить только grub-common остальные грабы он сам во время установки догрузит (у меня на всех работало (12.04-12.10 альфа 3),12.10 бета 1 «невозможно установить загрузчик….»)\\ Вариант не нужен и может даже навредить установке на 12.04.1 и 12.10 бета 2 и старше.
E. запускаем саму установку, выбираем «другой вариант» и вручную размечаем диск «разметка_диска». Так всё по плану:
Первый раздел "тык" - загрузочный раздел efi - если у вас всёго одна система 100 МиБ достаточно. Второй ext4, форматировать, точка монтирования "/". -Системный создаём угодных нам размеров. Третий linux-swap (раздел подкачки) ~ RAM + несколько МиБ Четвёртый, ФС какую пожелаете (у меня ext4), точка монтирования "/home"
Отлично, фарс почти закончился, в самом низу выбирается путь установки загрузчика (там должно быть что то вроде /dev/sda/
Устанавливаем, по окончанию перезагружаем, заходим в BIOS, там boot menu. Должны были появиться новые пункты «Linux» «Ubuntu», первым можно поставить Ubuntu
Управление списком загрузки
Способ подходит как для редактирования из установленной системы, так и с LiveCD Нам понадобиться следующая консольная утилита bootmgr.
sudo apt-get install efibootmgr
bootmgr — это пользовательское приложение для редактирования Intel Extensible Firmware Interface (EFI) Boot Manager. Оно позволяет добавлять, изменять и удалять опции загрузки.
После установки открываем терминал и вбиваем туда:
Вот что оно вам выдаст.(С моими комментариями)
BootCurrent: 000A #текущая загруженная запись Timeout: 1 seconds #пауза для показа меню выбора, прежде чем будет произведена загрузка по порядку BootOrder: 000A,0002,0009,000B,0003,0004,0005,0006,0007,0008 #текущая очередь загрузки Boot0000 Setup #вкладка перехода в BIOS не трогаем Boot0001 Boot Menu #Меню выбора, тоже не трогаем. BootXXXX это разделы Boot0002* USB FDD: #нас интересуют именно цифры т.е. 0003 и т.д. Boot0003* ATA SSD: Boot0004* ATA HDD: WDC WD5000BPVT-24HXZT3 Boot0005* ATAPI CD: TSSTcorp CDDVDW TS-L633F Boot0006* USB HDD: Kingston DT 101 G2 Boot0007* USB CD: Boot0008* PCI LAN: Realtek PXE B03 D00 Boot0009* Windows Boot Manager Boot000A* Ubuntu Boot000B* Linux
Как видно из этого у меня 2 ненужных записи(Windows, Linux), заглянем в официальную инструкцию.
хм.. я ничего не понял , но поковырявшись ещё немного вот что получилось: Чтобы удалить какую-либо запись нужно ввести команду вида:
sudo efibootmgr --bootnum xxxx --delete-bootnum
Удаляем запись Windows Boot Manager
Где xxxx Это hex номер загрузочной записи, его можно сокращать, вот например в моём случае для удаления Windows нужно ввести:
sudo efibootmgr --bootnum 9 --delete-bootnum
Сразу после этого консоль отрапортует результат:
BootNext: 0009 BootCurrent: 000A Timeout: 1 seconds BootOrder: 000A,0002,000B,0003,0004,0005,0006,0007,0008 Boot0000 Setup Boot0001 Boot Menu Boot0002* USB FDD: Boot0003* ATA SSD: Boot0004* ATA HDD: WDC WD5000BPVT-24HXZT3 Boot0005* ATAPI CD: TSSTcorp CDDVDW TS-L633F Boot0006* USB HDD: Kingston DT 101 G2 Boot0007* USB CD: Boot0008* PCI LAN: Realtek PXE B03 D00 Boot000A* Ubuntu Boot000B* Linux
Удаляем запись Linux
Теперь удаляем запись Linux
sudo efibootmgr --bootnum B --delete-bootnum
После перезагрузки получим вот такую красоту:
BootCurrent: 0009 Timeout: 1 seconds BootOrder: 0009,0004,0005,0008,0002,0003,0006,0007 Boot0000 Setup Boot0001 Boot Menu Boot0002* USB FDD: Boot0003* ATA SSD: Boot0004* ATA HDD: WDC WD5000BPVT-24HXZT3 Boot0005* ATAPI CD: TSSTcorp CDDVDW TS-L633F Boot0006* USB HDD: Boot0007* USB CD: Boot0008* PCI LAN: Realtek PXE B03 D00 Boot0009* ubuntu
Редактируем паузу
Если необходимо отредактировать паузу то делаем следующее:
BootNext: 0009 BootCurrent: 000A Timeout: 5 seconds #как видно значение изменилось BootOrder: 000A,0002,000B,0003,0004,0005,0006,0007,0008 Boot0000 Setup Boot0001 Boot Menu Boot0002* USB FDD: Boot0003* ATA SSD: Boot0004* ATA HDD: WDC WD5000BPVT-24HXZT3 Boot0005* ATAPI CD: TSSTcorp CDDVDW TS-L633F Boot0006* USB HDD: Kingston DT 101 G2 Boot0007* USB CD: Boot0008* PCI LAN: Realtek PXE B03 D00 Boot0009* ubuntu

Эта статья не окончена. Пожалуйста, если вы располагаете соответствующими знаниями и небольшим количеством свободного времени, попробуйте улучшить эту статью. * grub-efi должен инсталлироваться автоматически но с ним могут быть глюки и 12.10 бету 1, я вообще не смог установить (она не могла поставить загрузчик), потому вообще лучше его устанавливать через центр приложений ручками *
How to Install Ubuntu Alongside Windows Boot Manager?
Using the boot manager, we can install Ubuntu alongside Windows in the dual boot. Boot manager is the software in Windows which tells the computer kernel to load the operating system. It defines the behavior and other properties of booting the operating system.
We can install Ubuntu on a computer which is already has installed Windows operating system.
This blog will elaborate on the installation method of Ubuntu alongside Windows 10. The blog’s content is:
- Prerequisites: System Requirements
- Make a Bootable USB With Ubuntu ISO
- Install Ubuntu on the Computer
- Boot the Ubuntu on a computer
Prerequisites: System Requirements
Before proceeding with this guide, you have to ensure that the system is equipped with at least the minimum requirements written in the table.
| Processor | 2 GHz dual-core processor or better |
| RAM | 4 GB system memory |
| Hard Disk | 20 GB Minimum |
| Internet | Internet access either with ethernet or WiFi |
| USB Port | To plug the bootable USB for installation of Ubuntu |
Let’s start with the guide!
Make a Bootable USB With Ubuntu ISO
A bootable USB is used to boot up the operating system when it is plugged in to install it on the computer. For the installation of Ubuntu, we will first make the USB bootable with the ISOfile of Ubuntu.
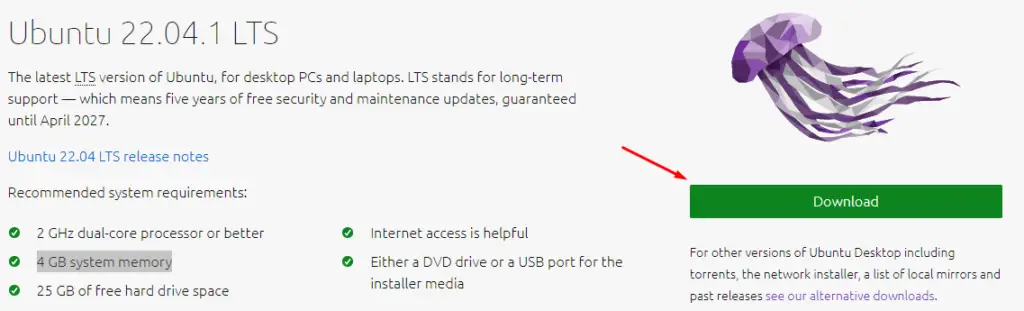
Step 1: Download the iso File of Ubuntu
Visit the official website and download the ISO file of Ubuntu. Click on the “Download” button to start downloading the ISO file of Ubuntu:
The download will start automatically, but if it is not started, then you can start it manually by clicking on the “download now”:
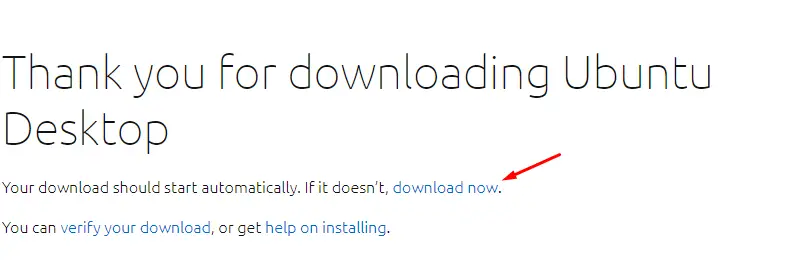
The file will be downloaded in the “Downloads” folder, or it may be downloaded in any other folder if you specified the location.
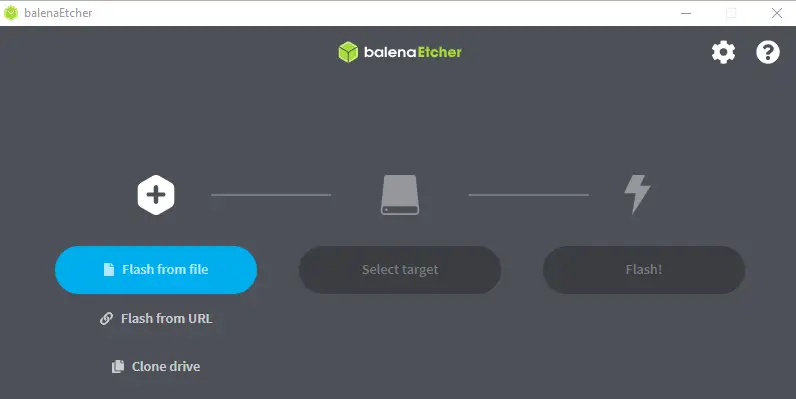
Step 2: Launch the Balena Etcher
To write the downloaded iso file on the USB to make it bootable, we will launch the “Balena Etcher,” which can be downloaded from its website easily.
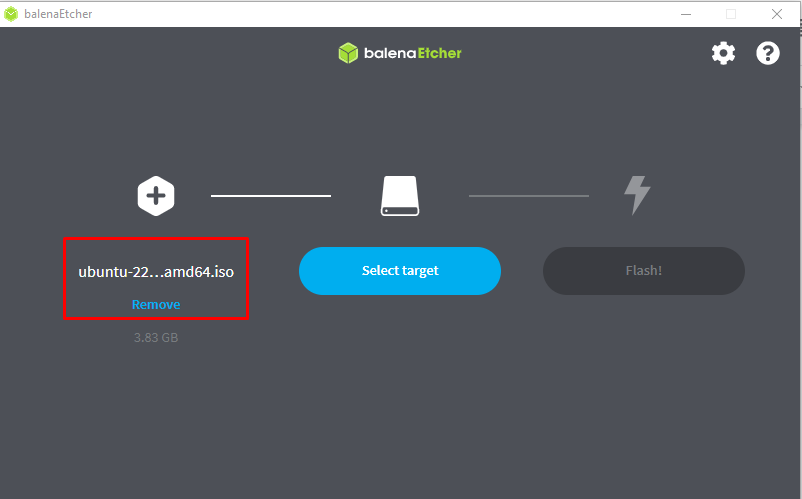
Now, choose the “iso file” after clicking on the “Flash from File”:
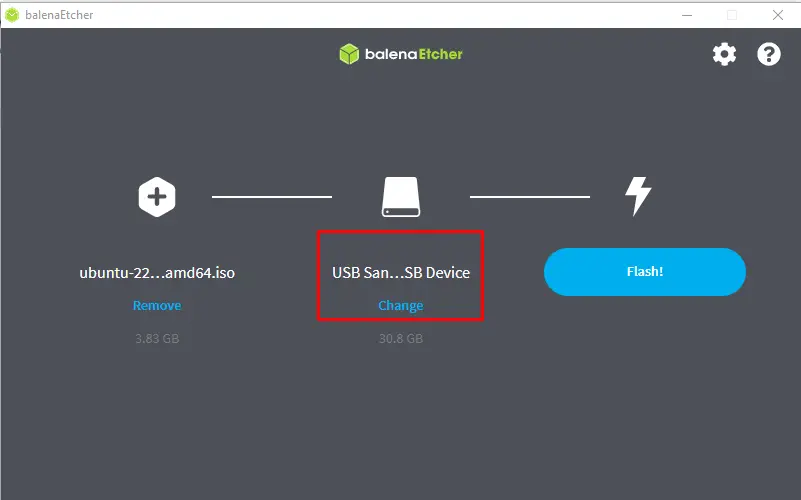
Now, choose the USB by clicking on the “Select target”:
The USB will be loaded with the name as can be seen below:
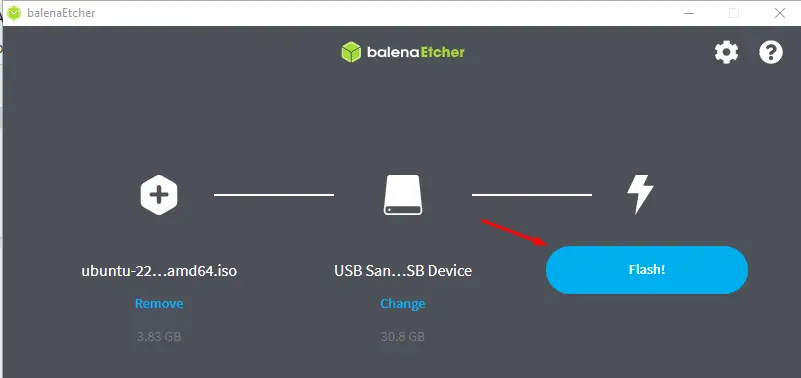
Finally, click on the “Flash!” button to start the process of flashing the iso file of Ubuntu on the USB:
When the USB is booted with the iso file of the Ubuntu, then a message will pop up on the screen “Flash Complete!”:

Remove the USB from the computer.
Install Ubuntu on the Computer
Plug in the bootable USB with the computer, restart the PC and then follow the steps provided below.
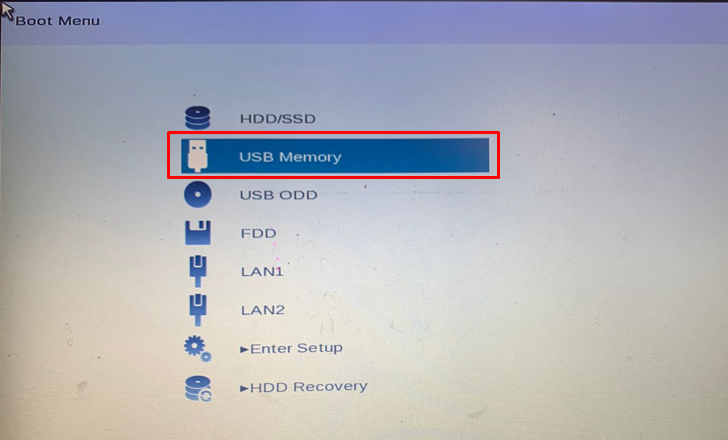
Step 1: Boot from USB
Open the boot menu with the help of the boot key and select the USB from which you want to boot:
It will boot Ubuntu from the “Bootable USB” and will launch Ubuntu installation:
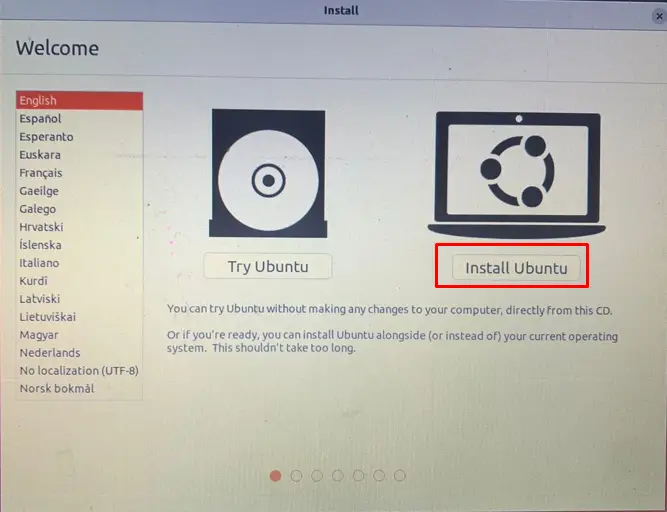
Step 2: Start the Installation
When the Ubuntu is booted form the USB, it will display two options:
- Try Ubuntu: when you only want to see the interface and working of Ubuntu on a test basis
- Install Ubuntu: will run Ubuntu after installing it on the computer.
We will click on “Install Ubuntu” because we want to install it on the computer:
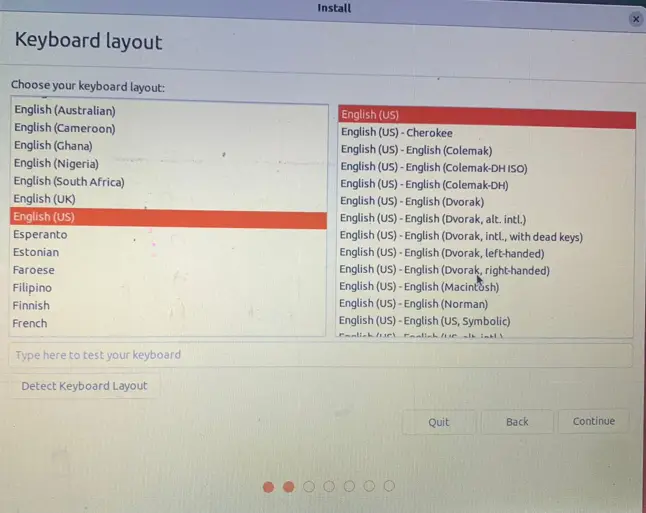
Step 3: Choose the Keyboard Layout
Choose the Keyboard layout and click on “Continue”.
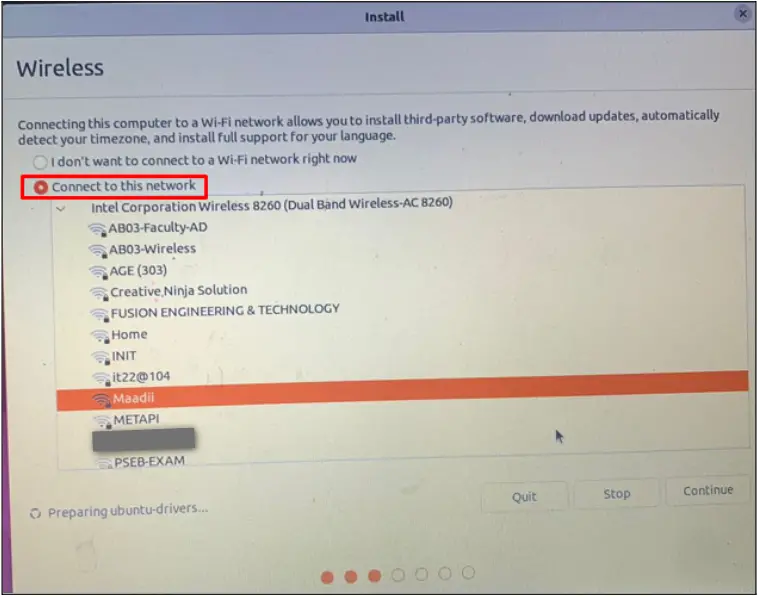
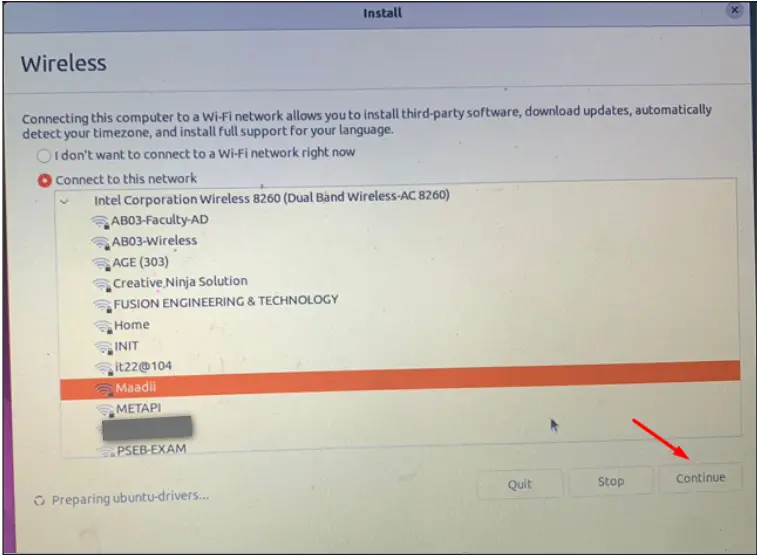
Step 4: Connect to Wifi (Optional)
The next step will ask you to connect to WIFI, it is recommended to perform this as it will assist in getting updates while installing:
It will ask for the password of the network for the authentication purpose, after entering the password click on “Connect”:
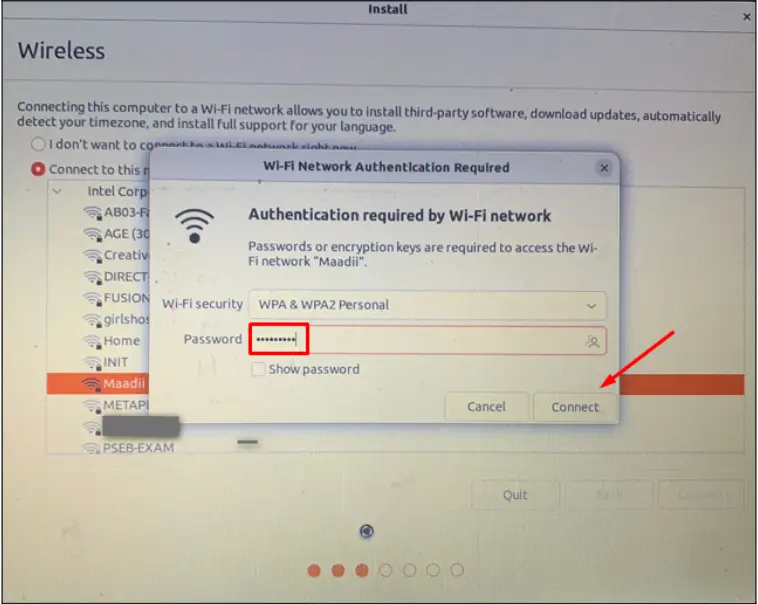
Then, click on the “Continue” button to proceed to the next step:
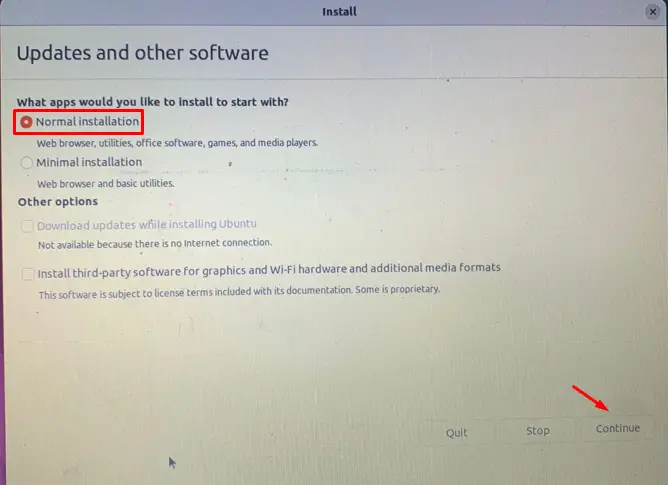
Step 5: Choose the Variant of Installation
You can install the full Ubuntu, or if you have memory issues, then you can install the “Minimal installation” of Ubuntu as well. In the “Minimal installation”, Ubuntu will contain only a web browser and basic need utility packages. We will choose the “Normal installation” and then will click on the “Continue” button:
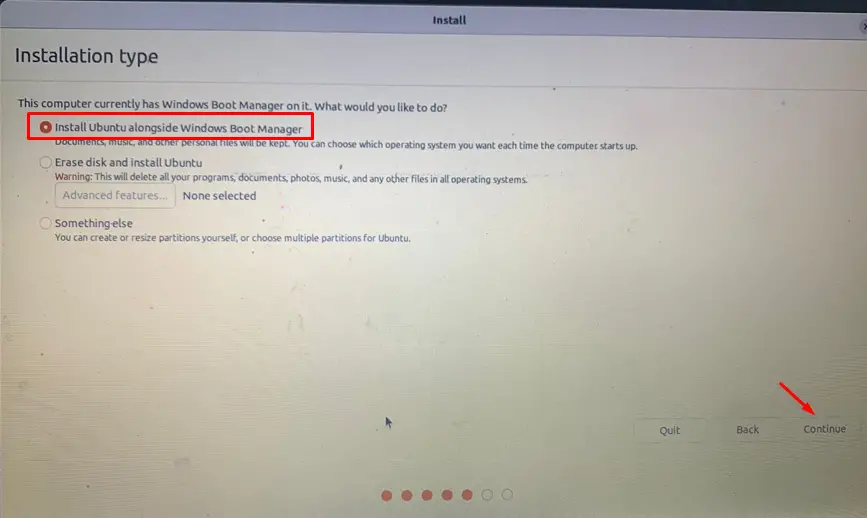
Step 6: Select the Installation Type
Now, it will ask you the “Installation type” by providing you with three different options:
- In “Install Ubuntu alongside Windows Boot Manager”, it will not delete the data from the computer and make install Ubuntu in the assigned memory space.
- The other option is to “Erase disk and install Ubuntu”, which will delete all the data from the computer.
- The last option is “Something else”, in which you can create your own partition and can install Ubuntu in it.
We want to run Ubuntu with the already installed Windows, so we have to choose “Install Ubuntu alongside Windows Boot Manager”.
When you choose “Install Ubuntu alongside Windows Boot Manager”, it will ask you to manage the memory by assigning “Ubuntu” and installing “Windows‘:
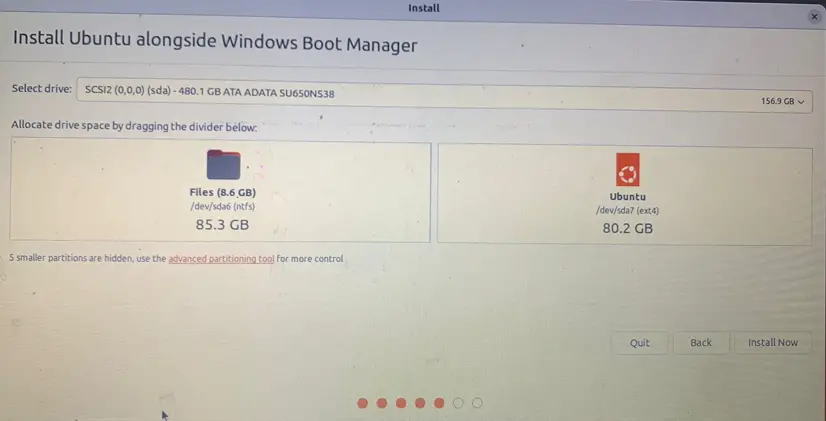
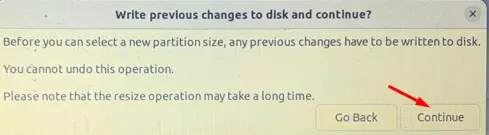
You can set the memory by “dragging” the “divider” to either the left or right of the screen and then click on the “Continue” button to proceed the installation method:
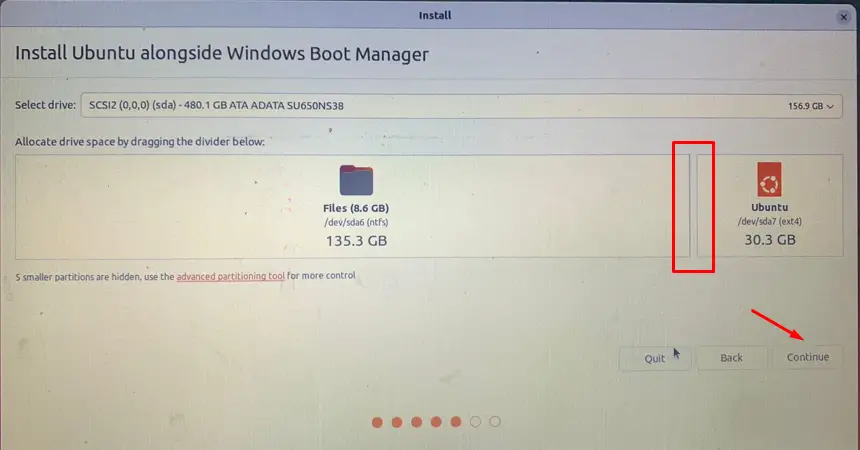
Click on the “Continue” button:
Step 7: Select the Location
Then it will ask you to set the geographical location where you are using the computer:

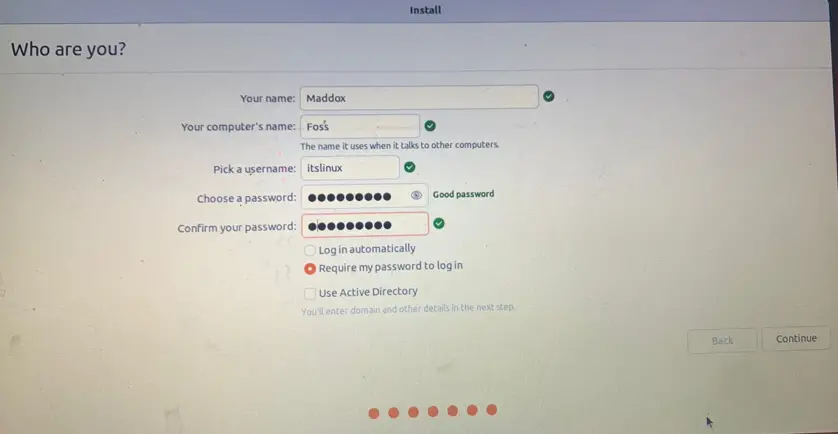
Step 8: Set the Information of Computer and User
Provide your information, including the computer name and create a new user with a strong password:
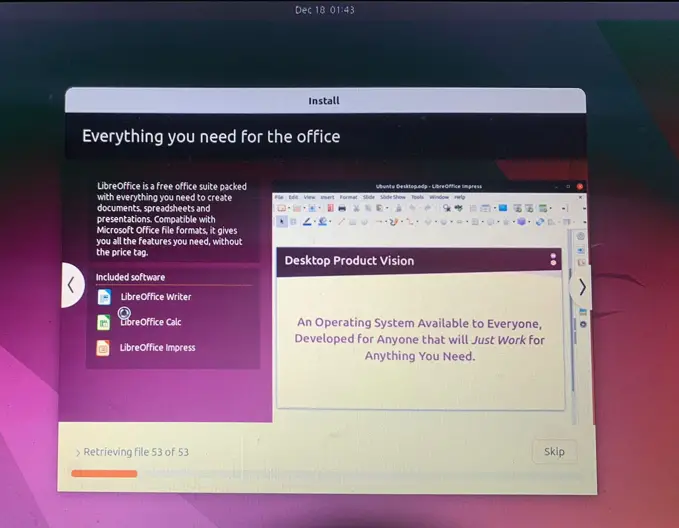
The installation will start and be complete in few minutes:
Step 9: Restart the Computer
When the installation is completed, a message will be displayed on the screen which will say you to “Restart Now”:
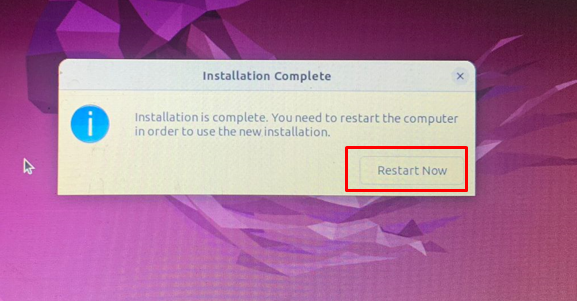
The computer will be restarted as the installation of Ubuntu is completed.
Boot the Ubuntu on a computer
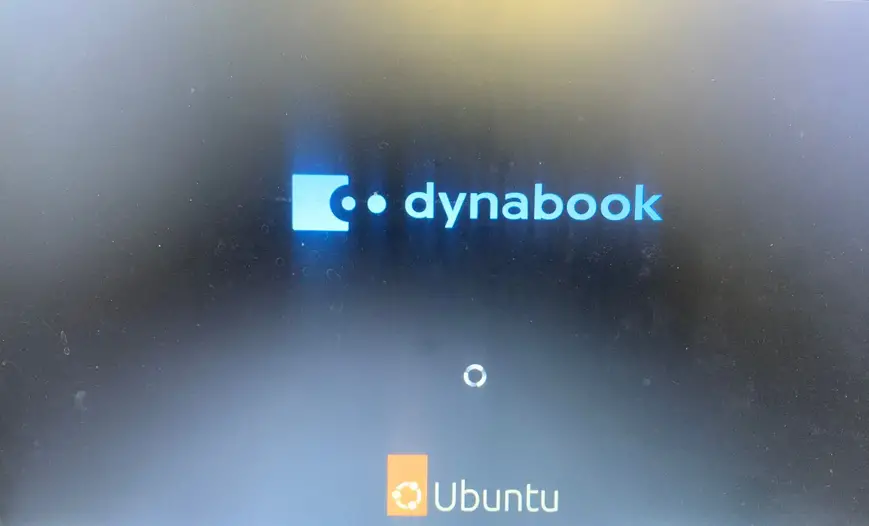
After installing Ubuntu and restarting the computer, choose “Ubuntu” from the boot menu:
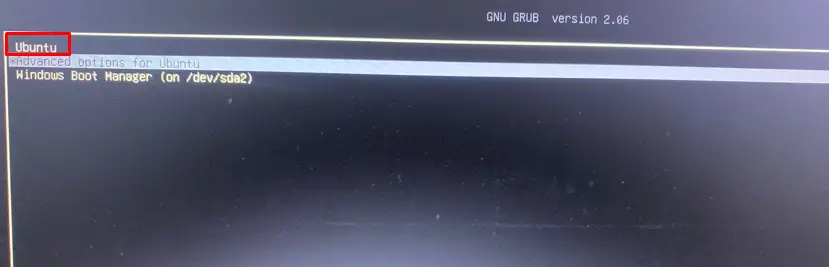
Ubuntu will start booting:

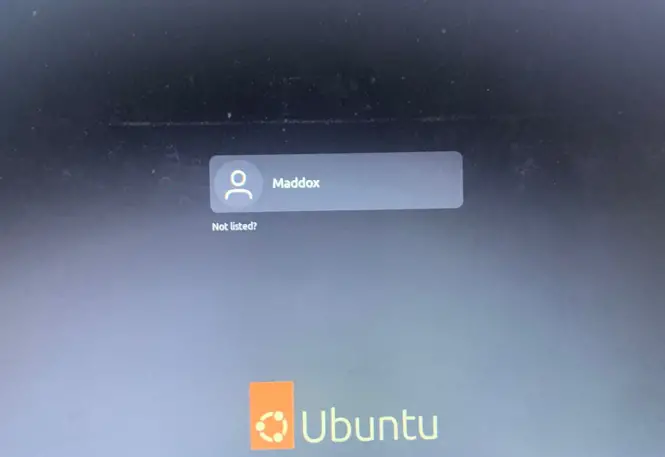
Log in to the computer by providing the password of the user “Maddox”:
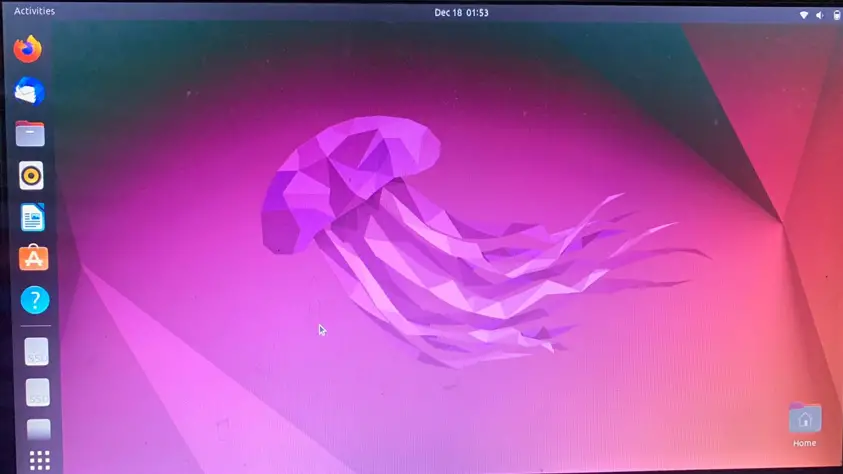
This is the way you can install Ubuntu with the already installed Windows on the computer.
Conclusion
To install Ubuntu alongside Windows Boot Manager, click the installation type concerning it during installation and install it by assigning it some space. In this blog, we have explained in detail the method of installing Ubuntu with the already installed Windows on the computer.