- how connect to a wireless network connection via command prompt in windows?
- 3 Answers 3
- Командная строка Windows: подключение к беспроводной сети
- Как просматривать и подключаться к беспроводным сетям из командной строки
- How to use Netsh WLAN Commands to manage Wireless networks?
- Netsh WLAN Show Profiles
- View Wireless Network Password
- Changing Wireless Network Settings with Netsh WLAN
- Change Connection Mode
- Changing Connection Priority
- Delete Wireless Network Profile
- Export and Import Wireless Network Profiles
- Import the wireless network profiles
- Netsh WLAN Show Interfaces
- Netsh WLAN Show Networks
- Netsh WLAN Connect / Disconnect
- Wrapping Up
- Как включить WIFI с помощью cmd?
how connect to a wireless network connection via command prompt in windows?
I searched a lot related to netsh and ipconfig /renew and ipconfig /release . My idea is to write a batch file that would automatically connect to a particular wireless local area network using a network interface . I tried using ipconfig /renew release . but it cannot be used as my intention is to keep the media in a disconnected state before running the batch file .. any suggestions ? Edit: Narrowed it down to
connect name=Profile2 ssid=SSID2 interface="Wireless Network Connection" 3 Answers 3
Hi Peehaa thanks for quick reply 🙂 . I tried that too .. the same poster says that the method has been lost and has been downgraded .
@HelloWorld_Always: The poster says the reason the method got lost is because he downgraded his OS from Vista -> XP. So I don’t know what clients you want to support with the batch file, but I you use >= Vista you should be ok. What error did you get when trying the method or are you on XP?
@HelloWorld_Always: No problem. Glad I could resolve your issue. And thanks for accepting the answer so other users know it works 🙂
Usage: connect [name=] [[ssid=]] [[interface=]] but Scott Hanselman provides good information on most netsh wlan commands.
D:\>netsh wlan The following commands are available: Commands in this context: ? - Displays a list of commands. add - Adds a configuration entry to a table. connect - Connects to a wireless network. delete - Deletes a configuration entry from a table. disconnect - Disconnects from a wireless network. dump - Displays a configuration script. export - Saves WLAN profiles to XML files. help - Displays a list of commands. refresh - Refresh hosted network settings. reportissues - Generate WLAN smart trace report. set - Sets configuration information. show - Displays information. start - Start hosted network. stop - Stop hosted network. To view help for a command, type the command, followed by a space, and then type ?. Командная строка Windows: подключение к беспроводной сети

Мы всегда находимся в поисках гениальных способов произвести впечатление на наших друзей, и недавно мы нашли способ подключиться к нашей беспроводной сети из командной строки, поэтому сегодня мы покажем вам, как это сделать.
Как просматривать и подключаться к беспроводным сетям из командной строки
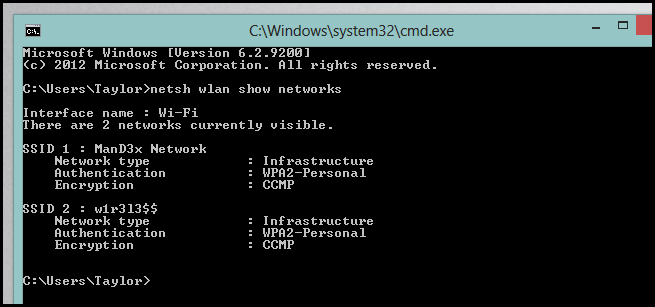
Для просмотра доступных беспроводных сетей из командной строки требуется только одна команда:
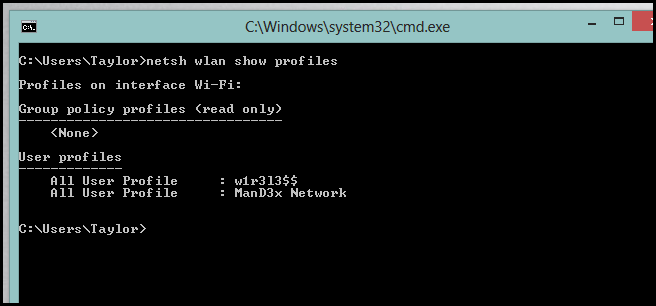
К сожалению, для подключения к сети вам необходим сетевой профиль. Это означает, что вам нужно подключиться к нему хотя бы один раз до этого. Чтобы узнать, какие профили доступны на вашем компьютере, используйте следующую команду:
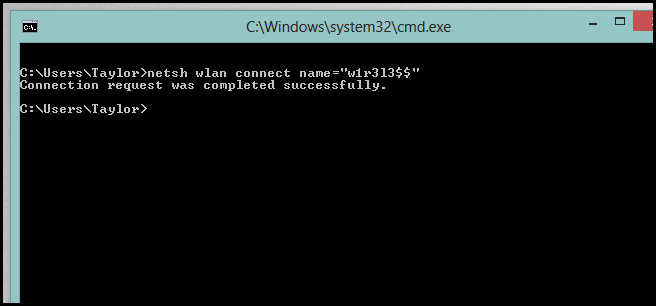
После того, как вы убедитесь, что у вас есть профиль для сети, к которой вы хотите подключиться, вы можете легко подключиться к ней, используя имя сетевого профиля:
netsh wlan connect name=”w1r3l3$$”
Насколько публикация полезна?
Нажмите на звезду, чтобы оценить!
Средняя оценка / 5. Количество оценок:
Оценок пока нет. Поставьте оценку первым.
How to use Netsh WLAN Commands to manage Wireless networks?
The Netsh WLAN command can be used to show and manage wireless network profiles. It even allows you to read the stored wireless network password and import or export all stored wireless networks.
Managing wireless networks can also be done through the settings menu in Windows. But the advantage of the netsh WLAN command is that you can use it in scripts or deployments as well.
In this article, we are going to take a look at how to use the netsh WLAN command in Windows.
Netsh WLAN Show Profiles
You can use the Netsh WLAN command in command prompt, Windows PowerShell and Windows Terminal. It’s however important that you run it with elevated permissions. To do this for Windows PowerShell for example:
- Right-click on Start (or press Windows key + X)
- Choose Windows PowerShell (admin)
- Click Yes on the UAC prompt
We are going to start with listing all stored WLAN profiles on our computer. WLAN profiles are wireless network that you have used on your computer. Windows will store the wireless network name (SSID) and password (keyphrase), so it can automatically reconnect.
netsh wlan show profiles # Result Profiles on interface Wi-Fi: Group policy profiles (read only) --------------------------------- User profiles ------------- All User Profile : Mohito All User Profile : CABIN-17 All User Profile : LinkTest All User Profile : Uplink
So in this example, we have stored 4 wireless networks on the computer. It will only show the name of the wireless networks.
To view more details of a wireless network, we can specify the name of the network in the netsh wlan show profile command. For example, to view the details of the wireless network LinkTest, we can do:
netsh wlan show profile name=LinkTest
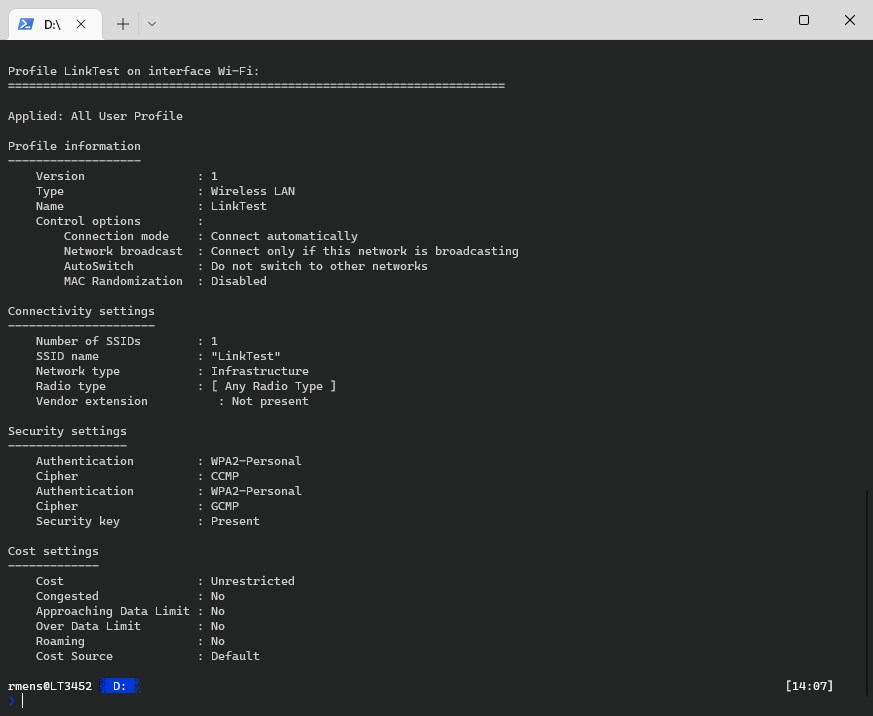
This command will give you a lot more valuable information about the stored wireless network. We can see for example that the connection mode is set to automatically.
View Wireless Network Password
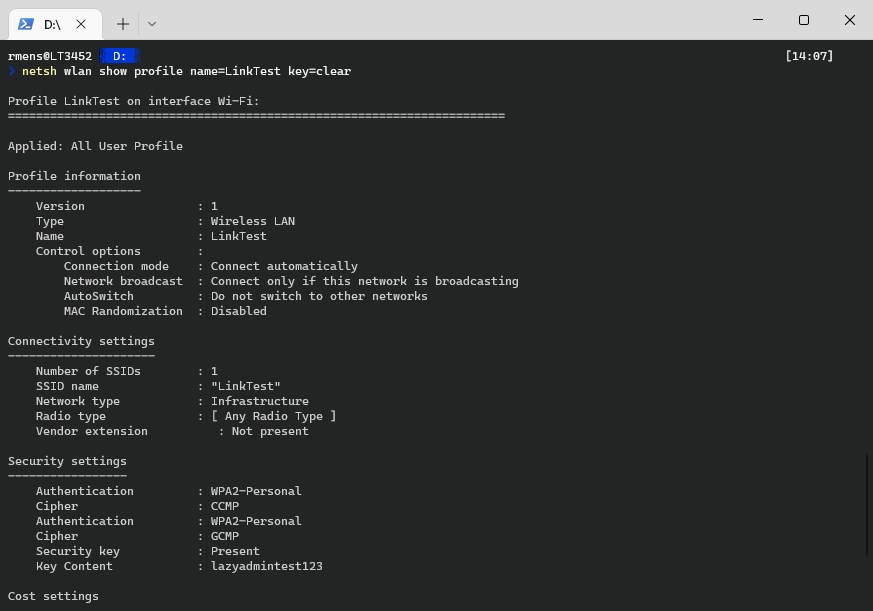
The netsh WLAN show profiles command also allows us to view the stored password of a wireless network. This can be really convenient if you don’t know the wireless password anymore but have a connected Windows device.
We can also use this command to export the wireless networks so we can automatically import them into another computer. To view the wlan password we only need to add the parameter key=clear to the command:
netsh wlan show profile name=LinkTest key=clear
If you look at the screenshot below, you will now see key content in the security settings block:
Changing Wireless Network Settings with Netsh WLAN
The Netsh WLAN command doesn’t only allow you to list wireless network information. You can also modify the settings of the wireless network. All these settings can also be done through the Windows settings screen, but the advantage of the command is you can easily update settings on multiple computers.
Change Connection Mode
By default, Windows will automatically connect to a wireless network. You can change this in the wireless network settings, or use the netsh wlan command for this with the parameter connectionmode .
Note that we are starting the command with netsh wlan set profileparameter, instead of show profile.
# Set the connection mode the manual netsh wlan set profileparameter name=LinkTest connectionmode=manual # Set the connection mode the automatic netsh wlan set profileparameter name=LinkTest connectionmode=auto
Changing Connection Priority
Another common setting to change is the connection priority. Windows will by default connect to the best wireless network in reach. We can control this behavior by setting the wireless network priority.
Again, note that we will be using netsh wlan set profileorder this time. We also need to enter the interface name which you can look up with netsh wlan show interfaces.
netsh wlan set profileorder name=LinkTest priority=1 interface="Wi-Fi"
Delete Wireless Network Profile
We can also delete a wireless network profile with the netsh WLAN command tool. Deleting a profile we remote all information of the wireless network and make sure that users can’t connect to that network again, without re-entering the wireless network password.
netsh wlan delete profile name=LinkTest
Export and Import Wireless Network Profiles
I personally use the netsh command mostly to export and import wireless network profiles. When deploying new notebooks I want all the wireless networks to be preconfigured for our users. We can do this by first exporting the stored profiles from a notebook to an XML.
When exporting the profiles it’s important to export the wireless network keys as well. Keep in mind that the wireless network keys are stored in plain text in the XML file. You will need to export each wireless network profile separately.
# Export a single wireless network netsh wlan export profile name=LinkTest key=clear folder=C:\temp\wlanprofiles # Export all wireless networks netsh wlan export profile key=clear folder=C:\temp\wlanprofiles
Each wireless network profile will have its own XML file
LinkTest 4C696E6B54657374 LinkTest ESS manual WPA2PSK AES false passPhrase false lazyadmintest123 false 1198958294
Import the wireless network profiles
For importing the profiles we have a couple of options. The most common way to import to profile is for all users and all wireless network interfaces. But it’s also possible to import the profile only for the current users or a specific network interface.
To simply import a single WLAN profile we can use the following command:
netsh wlan add profile filename="LinkTest.xml"
This will import the wireless network profile for all users and all wireless network interfaces. To import the profile only for the current user we can add the parameter user=current to the command:
netsh wlan add profile filename="LinkTest.xml" user=current
To import multiple wireless network profiles with netsh we can use the PowerShell script below. This script will import each XML file from the given directory:
#Import all WLAN Xml-files from specified directory $XmlDirectory = «c:\temp\wlanprofiles» # Loop through each XML file in the directory Get-ChildItem $XmlDirectory | Where-Object | ForEach-Object
Netsh WLAN Show Interfaces
The netsh WLAN command can be used for more than managing wireless network profiles. We could use it for example also to read out the wireless network interfaces with the command netsh wlan show interfaces .
This command will give you information about the available wireless network interfaces and their status. This can be useful if you want to debug connection issues remotely through the command line.
netsh wlan show interfaces

A good use case for the Netsh WLAN Show Interfaces command is to find the access point to which a device is connected. Knowing the access point to which a device is connected can really help with debugging network issues.
In the output of the show interface command, you will find the BSSID, which will contain the MAC address of the access point the device is connected.
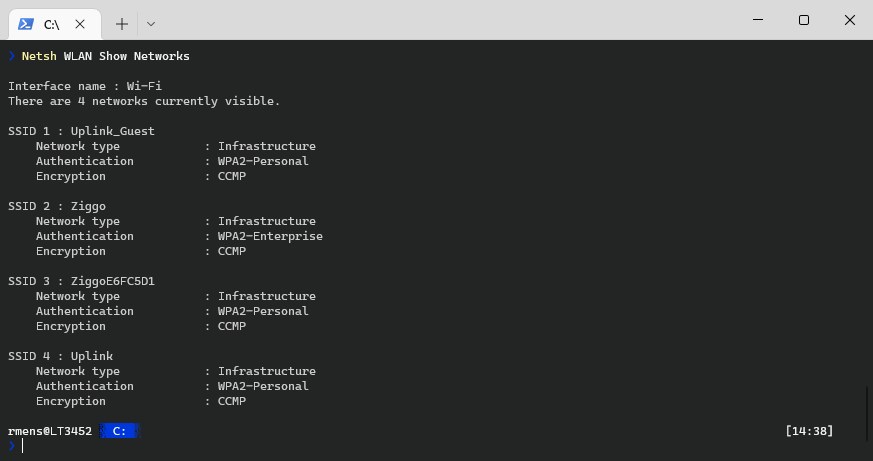
Netsh WLAN Show Networks
Another useful command for remote debugging is netsh wlan show networks. This command will list all wireless networks in range of the clients.
Netsh WLAN Connect / Disconnect
We could then use the command netsh wlan connect followed by the network name to connect to a wireless network from the command line:
netsh wlan connect name=Uplink
If you have multiple wireless network cards (interfaces), then you can also specify which interface you want to use by using the parameter interface=»interfacename» .
Disconnecting from a wireless network from the command line is done by simply using the command
Wrapping Up
The netsh wlan command is a really useful command to manage wireless networks from the command line. I often use the command to update or add new wireless network profiles remotely to multiple devices.
I hope you found this article useful, if you have any questions, just drop a comment below.
Как включить WIFI с помощью cmd?

Добрый день,
как с помощью cmd (например netsh) включить переключатель Wi-Fi в windows 10?
Просьба не отвечать, если не протестировали сами на своем пк. Так как уже многое пробовал.
Заранее благордарю.

Узнаем список доступных интерфейсов сети
netsh wlan show interface
Выводим список Wifi сетей
netsh wlan show networks
Для подключения к WiFi сети служит команда
netsh wlan connect name=ИмяПрофиляСети
Можно указать конкретный интерфейс, при помощи которого выполнять подключение. Синтаксис таков: netsh wlan connect name=ИмяПрофиляСети interface=ИмяИнтерфейса
У меня бы это выглядело так:
netsh wlan connect name=TRENDnet interface=»Wireless Network Connection 3″
Отключение от WiFi сети Чтобы отключиться от WiFi сети, необходимо выполнить следующую команду
netsh wlan disconnect
Или указать конкретный интерфейс
netsh wlan disconnect interface=ИмяИнтерфейса
При помощи netsh можно просмотреть все доступные профили:
netsh wlan show profile
И, собственно, подключиться к сети с выбранным профилем:
netsh wlan connect ssid=ИмяСети name=ИмяПрофиляСети