- Client Access — Browsing SMB shares
- Windows Clients (XP,Server,Vista, Win7)
- Samba Client — Manual Configuration
- Connecting to a Samba File Server from the command line
- Connecting using CIFS
- Allow non-root users to mount SMB shares
- Automagically mount SMB shares
- Connecting using SMBFS (deprecated)
- Ubuntu Client
- Windows Client
- Доступ к сетевым приложениям с помощью WSL
- Доступ к сетевым приложениям Linux из Windows (localhost)
- Доступ к сетевым приложениям Windows из Linux (IP-адрес основной системы)
- Подключение через удаленные IP-адреса
- Доступ к дистрибутиву WSL 2 из локальной сети (LAN)
- Доступ по протоколу IPv6
Client Access — Browsing SMB shares
Alternate: From the menu at the top select «Location» -> «Connect to a server». In the «Service type» pull down select «Windows share». Enter the server ip address in the «Server:» box and the share name in the «Share:» box. Click «Connect» and then «Connect» again on the second dialog box
Alternate 12.04: Double clicking on ‘Windows network’ did not work for me. So I went to ‘Go’ menu in the nautilus file browser and clicked ‘Location’. I got an address bar at the top of the window. I entered «smb://192.168.2.148» (substitute the IP address of your Samba server) — I was presented with user/password window — After typing in user/passwd I was able to see the samba shares on the server and browse the files/folders.
Note: The default installation of Samba does not synchronize passwords. You may have to run «smbpasswd» for each user that needs to have access to his Ubuntu home directory from Microsoft Windows.
Windows Clients (XP,Server,Vista, Win7)
Microsoft Windows clients connect and browse through their corresponding network interface.
Example: XP clients can open Windows Network Neighborhood or My Network Places to browse available SMB shares.
Samba Client — Manual Configuration
This section covers how to manually configure and connect to a SMB file server from an Ubuntu client. smbclient is a command line tool similar to a ftp connection while smbfs allows you to mount a SMB file share. Once a SMB share is mounted it acts similar to a local hard drive (you can access the SMB share with your file browser (nautilus, konqueror, thunar, other).
Connecting to a Samba File Server from the command line
Connecting from the command line is similar to a ftp connection.
List public SMB shares with
smbclient -L //server -U user
Connect to a SMB share with
smbclient //server/share -U user
You can connect directly with
smbclient //server/share -U user%password
but your password will show on the screen (less secure).
Once connected you will get a prompt that looks like this :
Type «help» , without quotes, at the prompt for a list of available commands.
Connecting using CIFS
CIFS is included in the smbfs package and is a replacement for smbfs (I know, the terminology here is a little confusing).
As above, install by any method, smbfs, on Ubuntu 12.10, smbfs has been replaced by cifs-utils.
Allow non-root users to mount SMB shares
By default only root may mount SMB shares on the command line. To allow non-root users to mount SMB shares you could set the SUID, but I advise you configure sudo. You should configure sudo with visudo
You may either allow the group «users» to mount SMB shares, or add a group, samba, and add users you wish to allow to mount SMB shares to the samba group.
sudo groupadd samba sudo adduser user samba
Change «user» to the username you wish to add to the samba group.
In the «group» section add your group you wish to allow to mount SMB shares
Add a line in the "group" section : ## Members of the admin group may gain root privileges %admin ALL=(ALL) ALL %samba ALL=(ALL) /bin/mount,/bin/umount,/sbin/mount.cifs,/sbin/umount.cifs
Change «%samba» to «%users» if you wish to allow members of the users group to mount SMB shares.
The following will mount the myshare folder on myserver to ~/mnt (it will be in your home directory):
mkdir ~/mnt sudo mount -t cifs //myserver_ip_address/myshare ~/mnt -o username=samb_user,noexec
Note : «samba_user» = the user name on the samba server (may be different from your log-in name on the client).
The «noexec» option prevents executable scripts running from the SMB share.
You will be asked for BOTH your sudo and then your samba_user password.
Automagically mount SMB shares
In order to have a share mounted automatically every time you reboot, you need to do the following:
With any editor, create a file containing your Windows/Samba user account details:
KDE users must use kdesu rather than gksu and instead of Gedit they can use Kwrite as editor.
. it should contain two lines as follows:
username=samba_user password=samba_user_password
Note : «samba_user» = the user name on the samba server (may be different from your log-in name on the client). «samba_user_password» is the password you assigned to the samba_user on the samba server.
Save the file and exit gedit.
Change the permissions on the file for security:
sudo chmod 0400 /etc/samba/user # permissions of 0400 = read only
Now create a directory where you want to mount your share (e.g. /media/samba_share):
sudo mkdir /media/samba_share
Now, using any editor, and add a line to /etc/fstab for your SMB share as follows:
sudo cp /etc/fstab /etc/fstab.bak gksu gedit /etc/fstab
Add a line for your SMB share:
//myserver_ip_address/myshare /media/samba_share cifs credentials=/etc/samba/user,noexec 0 0
The share will mount automatically when you boot. The «noexec» option prevents executable scripts running from the SMB share.
To mount the share now, without rebooting,
sudo mount /media/samba_share
You can unmount the share with :
sudo umount /media/samba_share
If you wish to increase security at the expense of convenience, use this line in /etc/fstab
//myserver_ip_address/myshare /media/samba_share cifs noauto,credentials=/etc/samba/user,noexec 0 0
The noexec» option prevents executable scripts running from the SMB share.
Edit /etc/samba/user, remove the password (leave just the samba user).
Now the share will NOT automatically mount when you boot and you will be asked for your samba password.
sudo mount /media/samba_share
CIFS may cause a shutdown error.
CIFS VFS: Server not responding.
Connecting using SMBFS (deprecated)
Note : This method still works, but as outlined under the «CIFS» section above is «deprecated» (no longer maintained and pending removal from the kernel).
Mounting a share on the local filesystem allows you to work around programs that do not yet use GnomeVFS to browse remote shares transparently. To mount a SMB share, first install smbfs:
sudo apt-get update sudo apt-get install smbfs
To allow non root accounts to mount shares, change the permissions on the smbmnt program thus:
sudo chmod u+s /usr/bin/smbmnt /usr/bin/smbumount
Note : This may be a security risk as after setting the SUID bit anyone can mount a SMB share. I advise you configure sudo, as above.
The working line in /etc/sudoers is as follows (see CIFS section above):
%samba ALL=(ALL) /bin/mount,/bin/umount,/sbin/mount.cifs,/sbin/umount.cifs,/usr/bin/smbmount,/usr/bin/smbumount
This allows any user in the samba group to mount SMB shares (you will need to create a samba group and add users).
The following will mount the myshare folder on myserver to ~/mnt (it will be in your home directory):
mkdir ~/mnt smbmount //myserver/myshare ~/mnt
In order to have a share mounted automatically every time you reboot, you need to do the following:
Create a file containing your Windows/Samba user account details:
. it should contain two lines as follows:
username=george password=secret
Change the permissions on the file for security:
Now create a directory where you want to mount your share (e.g. /mnt/data):
Now edit the file system table (/etc/fstab) and add a line as follows:
//server/share /mnt/data smbfs credentials=/etc/samba/user,rw,uid=bob 0 0
. where ‘bob’ is the non-root user you log into ubuntu with, ‘server’ is the name or address of the Windows machine and ‘share’ is the name of the share.
To mount the share now, just use the following command as root. It will mount automatically on subsequent reboots.
Ubuntu Client
On the Ubuntu client using the menu at the top, go to «Places» -> «Network». You will see an icon «Windows network» and should be able to browse to your shared folder. You will be asked for a password, leave it blank. Click the «Connect button.
If you would like to mount your SMB share using your (server) hostname rather than the IP Address, edit /etc/hosts and add your samba server (syntax IP Address hostname).
Where «hostname» = the name of your samba server.
Windows Client
On Windows open «My Computer» and navigate to «My Network Places». Navigate to your Ubuntu server and your share will be available without a password.
Alternate : From the menu at the top select «Tools» -> «Map Network Drive». Select an available letter for your SMB share (Default is z: ). In the «Folder:» box enter \\samba_server_ipaddress\share. Tic (Select with the mouse) the option «Reconnect at login» if you want the share to be automatically mounted when you boot Windows. Click the «Finish» box. A dialog box will appear, enter your samba user name and password. Click «OK».
If you would like to mount your SMB share using your (server) hostname rather than the IP Address, edit C:\WINDOWS\system32\drivers\etc\hosts and add your samba server (syntax IP Address hostname).
Where «hostname» = the name of your samba server.
Samba/SambaClientGuide (последним исправлял пользователь adsl-065-007-157-036 2014-01-07 20:02:19)
The material on this wiki is available under a free license, see Copyright / License for details
You can contribute to this wiki, see Wiki Guide for details
Доступ к сетевым приложениям с помощью WSL
При работе с сетевыми приложениями (будь то получение доступа к сетевому приложению Linux из приложения Windows или получение доступа к сетевому приложению Windows из приложения Linux) необходимо учитывать несколько моментов. Вам может потребоваться определить IP-адрес используемой виртуальной машины, который будет отличаться от IP-адреса локального физического компьютера.
Доступ к сетевым приложениям Linux из Windows (localhost)
Если вы создаете сетевое приложение (например, приложение, работающее на NodeJS или SQL Server) в дистрибутиве Linux, вы можете получить к нему доступ из приложения Windows (например, используя Microsoft Edge или Chrome) с помощью localhost (как обычно это и происходит).
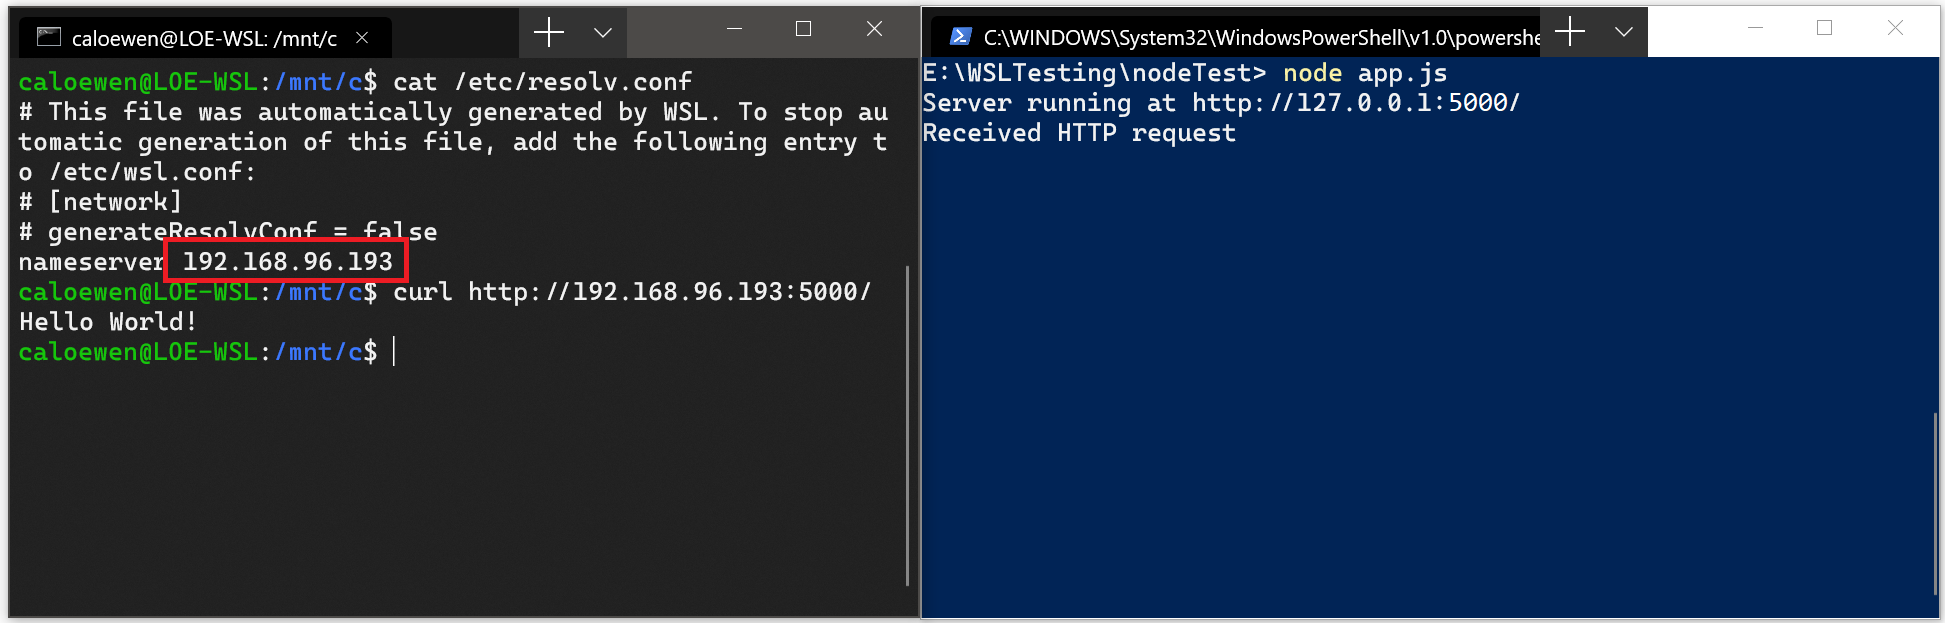
Доступ к сетевым приложениям Windows из Linux (IP-адрес основной системы)
Если вы хотите получить доступ к сетевому приложению, работающему в Windows (например, к приложению, работающему на NodeJS или SQL Server) из дистрибутива Linux (напр., Ubuntu), необходимо использовать IP-адрес основной системы. Хотя это происходит и нечасто, для этого можно выполнить следующие действия.
- Получите IP-адрес основной системы, выполнив следующую команду из дистрибутива Linux: cat /etc/resolv.conf
- Скопируйте IP-адрес в строке, начинающейся с nameserver .
- Подключитесь к любому серверу Windows, используя скопированный IP-адрес.
На изображении ниже показан пример подключения к серверу Node.js под управлением Windows через cURL.
Подключение через удаленные IP-адреса
При использовании удаленных IP-адресов для подключения к приложениям они будут рассматриваться как подключения из локальной сети (LAN). Это означает, что необходимо убедиться, что приложение может принимать подключения по локальной сети.
Например, может потребоваться привязать приложение к 0.0.0.0 вместо 127.0.0.1 . В примере приложения Python, использующего Flask, это можно сделать с помощью команды app.run(host=’0.0.0.0′) . При внесении этих изменений не забывайте о безопасности, так как это позволит устанавливать подключения из вашей локальной сети.
Доступ к дистрибутиву WSL 2 из локальной сети (LAN)
При использовании дистрибутива WSL 1, если к компьютеру можно получить доступ из локальной сети, то приложения, работающие в WSL, могут быть также доступны в локальной сети.
Это нетипичная ситуация в WSL 2. В WSL 2 имеется виртуализированный адаптер Ethernet с собственным уникальным IP-адресом. В настоящее время для включения этого рабочего процесса необходимо выполнить те же действия, что и для обычной виртуальной машины. (Мы ищем способы улучшить это взаимодействие.)
Ниже приведен пример команды Windows для добавления прокси-сервера порта, который прослушивает порт 4000 на узле и подключает его к порту 4000 к виртуальной машине WSL 2 с IP-адресом 192.168.101.100.
netsh interface portproxy add v4tov4 listenport=4000 listenaddress=0.0.0.0 connectport=4000 connectaddress=192.168.101.100 Доступ по протоколу IPv6
В настоящее время дистрибутивы WSL 2 не могут обращаться к IPv6-адресам. Мы работаем над добавлением этой возможности.