- Using the Linux Subsystem (WSL) in Windows 10
- Installing the Linux Subsystem
- SSH Server Installation and Operation
- Connecting from Xshell
- Quick Deployment Guide
- Как подключиться по SSH к WSL 2 в Windows 10 с внешнего компьютера
- Шаг 1. Установить сервер OpenSSH в дистрибутиве WSL 2
- Шаг 2. Настроить сервер OpenSSH в дистрибутиве WSL 2
- Шаг 3. Проброс порта в WSL 2
- Шаг 3. Создание правила в брандмауэре Windows 10
- Шаг 4. Проверяем SSH-соединение с WSL 2
- Enable SSH in WSL system
- 3 Answers 3
Using the Linux Subsystem (WSL) in Windows 10
The following article will be a comprehensive guide for setting up and using the Linux Subsystem in Windows 10 with Xshell. (If you know what you’re doing and only want the quick step-by-steps, scroll down to Quick Deployment Guide near the bottom).
Using the SSH protocol, you can connect to the Windows system by either installing the SSH server program for Windows or you can take advantage of the Linux Subsystem recently provided in Windows 10. This subsystem was initially supported as a Linux System in Windows 10 RedStone 1 (RS1, 1607) Beta. Your options are as follows:
- Connect by installing a 3rd party SSH server for Windows
- Installing Windows 10’s SSH Proxy and Connecting to the CMD Console
- Connect after installing the Linux Subsystem of Windows 10
As of October 1, 2018 the most recent official Windows Build is Redstone 4. However, the Windows used to create this article is Redstone 3 (1709). The following guide is related to using SSH and the installation of the Linux Subsystem mentioned in point 3 above.
Installing the Linux Subsystem
- First, you’ll want to check your Version of Windows 10 and upgrade to a Version that supports the Linux Subsystem.
Settings -> System -> About

Once you’re updated, Run the ‘appwiz.cpl’ command from the Run dialog box (Windows Key + R) which will open up your ‘Programs and Features’.
Open ‘Turn Windows features on or off’ which is located on the left side of the explorer window.
Find ‘Windows Subsystem for Linux’ and install it.

Restart the system to finish setting up the Linux Subsystem installation.
Run the ‘bash’ command from the Run dialog box (Windows Key + R)

As you can see, the subsystem package is not actually installed. You’ll need to visit https://aka.ms/wslstore to finish installing the package.

We’ll focus on Ubuntu Linux in this article, but feel free to select your desired Linux flavor.
Select Ubuntu to continue the installation.

After installation is complete you’ll need to set a username and password. It does not have to be your Windows username.
The user created here becomes the default administrator for Ubuntu and will be used for the sudo command.


SSH Server Installation and Operation
For this article, I am using Ubuntu version 18.04 LTS (Bionic Beaver). OpenSSH is installed during installation, but we still need to tweak some settings.
- Host Key Generation
Using the ‘ssh-keygen -A’ command create a host key in the /etc/ssh path.

test@DESKTOP-B38MLS1:/etc/ssh$ sudo /etc/init.d/ssh stop test@DESKTOP-B38MLS1:/etc/ssh$ sudo ssh-keygen -A
test@DESKTOP-B38MLS1:/etc/ssh$ sudo vi /etc/ssh/sshd_config … # To disable tunneled clear text passwords, change to no here! PasswordAuthentication yes … test@DESKTOP-B38MLS1:/etc/ssh$ sudo /etc/init.d/ssh start

You may see a message stating that the rsa key and ecdsa key were not created as host keys and were not able to be loaded. This message will not appear if you create and insert the key or if you change the settings in ssdh_config to not use these keys. This message will not affect your use of SSH.
Connecting from Xshell
For testing purposes, I am using Xshell 6 which is the latest version of Xshell available at the time of this article’s writing.
- Initialize the connection
[C:\~]$ ssh localhost Host 'localhost' resolved to ::1. Connecting to ::1:22. Connection established. To escape to local shell, press 'Ctrl+Alt+]'. …

You’ll be prompted to enter your username and password. This is the username and password you created during the Ubuntu installation. Remember, the ‘Password’ field is enabled because we allowed password authentication when we were configuring the sshd_config above.

You should see the following screen after login is completed.

Note that the Windows file system is mounted in /mnt/c
test@DESKTOP-B38MLS1:~$ df -h Filesystem Size Used Avail Use% Mounted on rootfs 40G 15G 25G 38% / none 40G 15G 25G 38% /dev none 40G 15G 25G 38% /run none 40G 15G 25G 38% /run/lock none 40G 15G 25G 38% /run/shm none 40G 15G 25G 38% /run/user C: 40G 15G 25G 38% /mnt/c test@DESKTOP-B38MLS1:~$
Quick Deployment Guide
- Update to at least Windows 10 Redstone 1
- Open ‘Programs and Features’ => Click ‘Turn Windows features on or off’ and install ‘Windows subsystem for Linux’
- Open your web browser and navigate to https://aka.ms/wslstore.
Select Ubuntu to begin installation. A bash shell window will appear to complete the installation. - Create a host key from in the bash shell. DO NOT enter a password.
test@DESKTOP-B38MLS1:$ sudo ssh-keygen -t ed25519 Generating public/private ed25519 key pair. Enter file in which to save the key (/root/.ssh/id_ed25519): /etc/ssh/ssh_host_ed25519_key Enter passphrase (empty for no passphrase): Enter same passphrase again: …
test@DESKTOP-B38MLS1:$ sudo vi /etc/ssh/sshd_config … # To disable tunneled clear text passwords, change to no here! PasswordAuthentication yes …
test@DESKTOP-B38MLS1:$ sudo /etc/init.d/ssh start
[C:\~]$ ssh localhost Host 'localhost' resolved to ::1. Connecting to ::1:22. Connection established. To escape to local shell, press 'Ctrl+Alt+]'. …
Как подключиться по SSH к WSL 2 в Windows 10 с внешнего компьютера
Решается задача по передаче определенных файлов с Linux-машины на Windows-машину в одной локальной сети (решение подойдет и для внешнего соединения при условии настройки доступов за NAT). Для того, чтобы все настраивать в одной экосистеме (Linux), на Windows-машине будет использоваться уже установленная WSL 2. Да, да, да, есть портированные версии OpenSSH для версий Windows отличных от 10-ки, а SSH-сервер можно настроить и на самой Windows 10 стандартно без заморочек с WSL, но интереснее поиграться с подсистемой, ведь подобный способ подключения к WSL могут использовать и различные веб-приложения. Вопросы безопасности не поднимаются, рассматривается сам механизм получения доступа по SSH к дистрибутиву WSL 2 внутри локальной сети (LAN).
Шаг 1. Установить сервер OpenSSH в дистрибутиве WSL 2
sudo apt install openssh-server
Шаг 2. Настроить сервер OpenSSH в дистрибутиве WSL 2
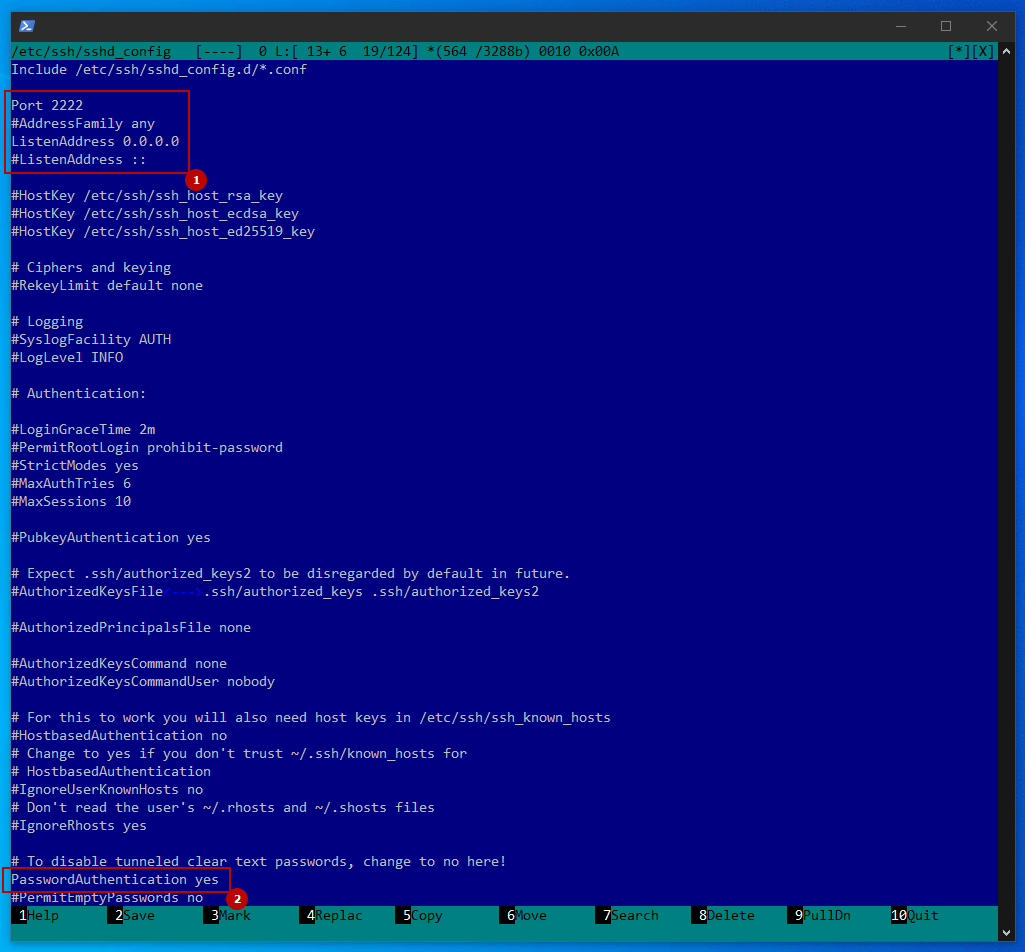
Все настройки расположены в конфигурационном файле /etc/ssh/sshd_config. SSH обычно эксплуатирует 22 порт, я предпочитаю использовать 2222, его легко запомнить и он отличается от аналогичного порта на «материнской» Windows-машине. Если указано 0.0.0.0 — то подразумевается подключение с любого IP. Если аутентификация будет проходить по паролю (лично мне не захотелось в этом случае заморачиваться с настройкой пары ключей), тогда нужно указать yes в строке с PasswordAuthentication.
В итоге сам сервис надо запустить.
Шаг 3. Проброс порта в WSL 2
В WSL 2 имеется виртуализированный адаптер Ethernet с собственным уникальным IP-адресом. Узнать его можно по команде из под WSL — ip addr.
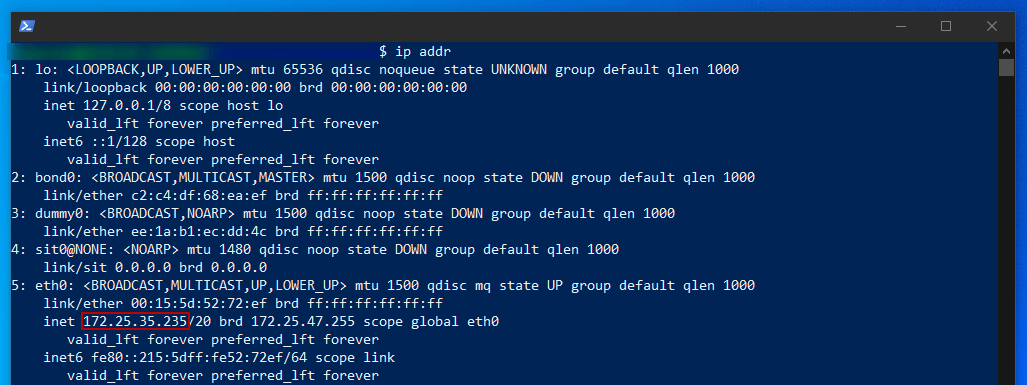
Ниже приводится пример команды PowerShell (запускать с административными правами), которая добавляет прокси-сервер портов, ожидающий передачи данных на порту узла 2222 и перенаправляющий все подключения на порт 2222 виртуальной машины WSL 2 с IP-адресом 172.25.35.235
netsh interface portproxy add v4tov4 listenaddress=0.0.0.0 listenport=2222 connectaddress=172.25.35.235 connectport=2222
Все записи прокси-сервера можно посмотреть по команде:
netsh interface portproxy show v4tov4

Их можно все удалить с помощью:
netsh int portproxy reset all
Шаг 3. Создание правила в брандмауэре Windows 10
В данном случае опять запускать PowerShell от имени администратора.
netsh advfirewall firewall add rule name=”Open Port 2222 for WSL2” dir=in action=allow protocol=TCP localport=2222
Шаг 4. Проверяем SSH-соединение с WSL 2
Сперва пробуем подключиться к WSL 2 из под «материнской» Windows (подразумевается что это 10-ка и стоит SSH-клиент). С WSL у меня уже настроена пара ключей, так что запроса пароля не последует.
ssh -p 2222 ваш_логин_wsl@172.25.35.235
Теперь попробуем подключиться со сторонней Linux-машины, в данном случае я уже обращаюсь не к виртуальному IP-адресу WSL, а к локальному адресу «материнской» Windows-машины, который у меня 192.168.0.4
ssh -p 2222 ваш_логин_wsl@192.168.0.4
Так как для стороннего компьютера у меня не настроен доступ по ключу, поэтому придется ввести пароль от WSL. Сразу оговорюсь, если используется такой метод подключения в Shell-скриптинге, то проще и безопаснее настроить пару ключей, также для ввода ключа можно перейти в интерактивный режим (expect) или использовать утилиту sshpass, что я и сделал.
Теперь можно подключиться в одну строчку так:
sshpass -p ваш_пароль_wsl ssh -p 2222 ваш_логин_wsl@192.168.0.4
Далее все, что душе угодно! Можно использовать scp, rsync, скриптинг…
Enable SSH in WSL system
Since WSL does not use systemd you will need to launch the ssh as a service instead. sudo service ssh start .
3 Answers 3
Update note #1: Systemd is now supported on WSL2. Please see this answer for details on how to enable it. Once Systemd is enabled, the SSH server can now be started automatically with sudo systemctl enable ssh and queried with sudo systemctl status ssh .
A few things to note when trying to use SSH on WSL2:
As others have mentioned, since WSL does not yet support the systemd init system and infrastructure, you’ll need to rely on other methods. The WSL version of Ubuntu still provides the old init.d style scripts for most services. So sudo service ssh start (or restart , or status , or stop , etc.) is what you’ll use.
In addition to enabling SSH, however, you likely want to be able to connect to it from a remote system. WSL2 runs in a VM with a virtual network interface that is NAT’d, so you won’t be able to ssh into the WSL instance from any other machine on the network without additional effort. WSL does provide automatic localhost forwarding, though, so you can ssh in from Windows on the same machine, or from another WSL instance on the same machine.
Update note #2: The method below no longer works on recent WSL releases which are installed from the Microsoft Store. The Store version of WSL has a known limitation that does not allow it to be started from a remote SSH session. Leaving the answer here for now, but I’ll update it soon with a different (less optimal, unfortunately, solution).
If you just need terminal access to WSL from a remote machine, then here’s a far easier solution:
- Install OpenSSH server in Windows (instructions).
- Access your WSL instance remotely using ssh -t windows_user@windows_host wsl . That just connects to the Windows host, allocates a pseudo-terminal with -t , and runs the wsl command using that pseudo-terminal.
If, on the other hand, you need real SSH access to the WSL instance, then the «usual answer» is fairly complicated still. See this Github comment and thread and my summary of your general options for port forwarding here.
That’s «in general» though. For ssh we can make it easier by using an ssh server in both the Windows host and the WSL instance. See a «short version» of this in my answer here and (far) more details if you need them in this answer.
The «far more details» answer also includes a solution to starting the ssh server remotely, since it won’t automatically run at boot time under WSL.