- Установка и настройка Linux Ubuntu 10.04 LTS под Hyper-V в Windows Server 2008 R2
- Windows Server Installation Guide
- Install WSL on Windows Server 2022
- Install WSL on previous versions of Windows Server
- Enable the Windows Subsystem for Linux
- Download a Linux distribution
- Extract and install a Linux distribution
- Руководство по установке Windows Server
- Установка WSL в Windows Server 2022
- Установка WSL в предыдущих версиях Windows Server
- Включение подсистемы Windows для Linux
- Скачивание дистрибутива Linux
- Извлечение и установка дистрибутива Linux
- How to Run Linux with WSL on Windows Server 2019
- Prerequisites:
- 1) How to enable the Windows Subsystem for Linux (WSL) feature
- 2) How to Install your Linux Distribution of Choice
Установка и настройка Linux Ubuntu 10.04 LTS под Hyper-V в Windows Server 2008 R2
Выдалось немного свободного времени, поэтому сегодня я решил написать, как обстоят дела с работой Ubuntu 10.04 под Hyper-V.
Не смотря на то, что Ubuntu не входит в список официально поддерживаемых Linux дистрибутивов работает он под Hyper-V отлично. Более того никаких дополнительных компонентов интеграции ставить не пришлось. Все что нужно для работы с Hyper-V давно находится в свежих ядрах Linux.
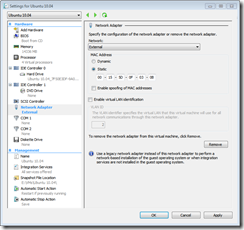
Берем Linux Ubuntu 10.04 LTS. Подойдет как 64-х битная, так и 32-x битная версия. Создаем стандартную виртуальную машину, подключаем DVD с ОС и начинаем установку. Обратите внимание, что мы оставляем синтетический сетевой интерфейс, созданный по умолчанию внутри виртуальной машины. Больше нет необходимости использовать устаревший и более медленный сетевой интерфейс Legacy. Рекомендуется использовать статический Mac адрес сетевого интерфейса, если эта виртуальная машина будет мигрировать между физическими узлами кластера с помощью механизма Live migration.
Выполнять установку можно в текстовом или в графическом режиме. Я рекомендую делать это с помощью графики т.к в текстовом режиме перерисовка каждого меню занимает секунд 20-30. Это довольно сильно раздражает, хотя и не мешает завершить установку удачно.
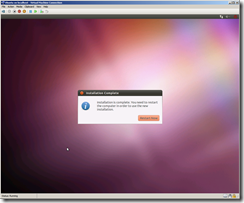
Сразу же после старта установки в течение минуты, другой можно наблюдать ворох предупредительны сообщений о нестандартном BIOS. Смело игнорируем их и продолжаем установку до тех пор пока не увидим следующее лаконичное сообщение.
После первой перезагрузки смотрим с помощью lsmod список загруженных модулей. Обнаруживаем, что загружен лишь модуль шины Hyper-V под названием hv_vmbus.
Этого недостаточно, поэтому редактируем файл /etc/initramfs—tools/modules и добавляем в него строки разрешающие загрузку остальных необходимых нам модулей.
hv_vmbus
hv_storvsc
hv_blkvsc
hv_netvsc
hv_utils
Сохраняем файл и выполняем команду:
$ sudo update-initramfs -u
Прописываем в /etc/network/interfaces ваш новый синтетический сетевой интерфейс seth0. Если бы у вас использовался устаревший сетевой интерфейс Legacy, то он назывался бы eth0.
Для статической адресации:
Auto seth0
iface seth0 inet static
address x.x.x.x
netmask x.x.x.x
Gateway x.x.x.x
Для получения адреса по DHCP:
Auto seth0
iface seth0 inet dhcp
Я проверял оба способа сетевой адресации, они работают.
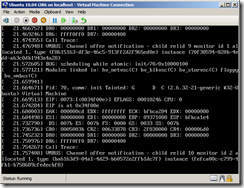
Перезагружаемся и в процессе видим вот такие сообщения о том что устройства связанные с vmbus найдены.
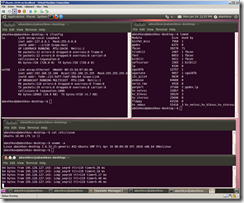
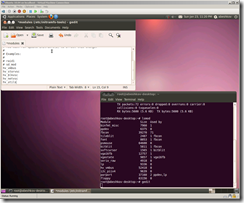
После загрузки с помощью lsmod проверяем загруженные модули и смотрим, какие сетевые интерфейсы у нас есть в системе.
Как видите, сетевой интерфейс seth0 работает вполне нормально. 
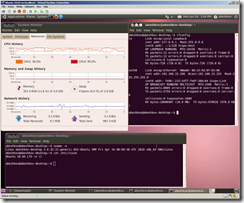
Так же стоит отметить, что Ubuntu нормально работает как в однопроцессорной, так и в многопроцессорной конфигурации. Система без проблем масштабируется до 4-х процессоров.

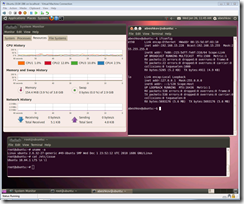
К сожалению, ресурсы ОЗУ моего тестового сервера ограниченны, поэтому дать более 14 ГБ ОЗУ виртуальным машинам с Ubuntu я не смог. Впрочем, для большинства задач такого объема вполне достаточно.
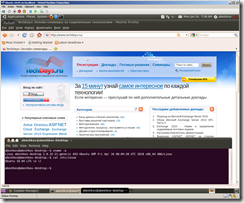
Стоит отметить, что поддержки синтетической мыши в Ubuntu нет, а проект Satori пока что не портирован под этот дистрибутив, поэтому для удаленного управления в графическом режиме я использовал VNC.
На всякий случай внутри виртуальных машин с Ubuntu я настроил веб сервер и FTP сервер. В течение нескольких дней с помощью скриптов периодически скачивал с них довольно большие объемы данных. Деградации быстродействия, каких либо проблем и сбоев замечено не было.
Вывод – несмотря на то, что официально о поддержке Ubuntu не заявлено этот дистрибутив работает под Hyper-V весьма надежно и, по моему мнению, может использоваться в производственной среде.
Windows Server Installation Guide
The Windows Subsystem for Linux (WSL) is available for installation on Windows Server 2019 (version 1709) and later. This guide will walk through the steps of enabling WSL on your machine.
Install WSL on Windows Server 2022
Windows Server 2022 now supports a simple WSL installation using the command:
You can now install everything you need to run WSL on Windows Server 2022 by entering this command in an administrator PowerShell or Windows Command Prompt and then restarting your machine.
This command will enable the required optional components, download the latest Linux kernel, set WSL 2 as your default, and install a Linux distribution for you (Ubuntu by default).
See the standard WSL docs for more information on how to:
Install WSL on previous versions of Windows Server
To install WSL on Windows Server 2019 (version 1709+), you can follow the manual install steps below.
Enable the Windows Subsystem for Linux
Before you can run Linux distributions on Windows, you must enable the «Windows Subsystem for Linux» optional feature and reboot.
Open PowerShell as Administrator and run:
Enable-WindowsOptionalFeature -Online -FeatureName Microsoft-Windows-Subsystem-Linux Download a Linux distribution
See the Downloading distributions section of the manual installation page for instructions and links to download your preferred Linux distribution.
Extract and install a Linux distribution
Now that you’ve downloaded a Linux distribution, in order to extract its contents and manually install, follow these steps:
- Extract the .appx package’s contents, using PowerShell:
Rename-Item .\Ubuntu.appx .\Ubuntu.zip Expand-Archive .\Ubuntu.zip .\Ubuntu Add-AppxPackage .\app_name.appx Installation failed with error 0x8007007e: If you receive this error, then your system doesn’t support WSL. Ensure that you’re running Windows build 16215 or later. Check your build. Also check to confirm that WSL is enabled and your computer was restarted after the feature was enabled.
3.Add your Linux distribution path to the Windows environment PATH ( C:\Users\Administrator\Ubuntu in this example), using PowerShell:
$userenv = [System.Environment]::GetEnvironmentVariable("Path", "User") [System.Environment]::SetEnvironmentVariable("PATH", $userenv + ";C:\Users\Administrator\Ubuntu", "User") You can now launch your distribution from any path by typing .exe . For example: ubuntu.exe .
Руководство по установке Windows Server
Подсистема Windows для Linux (WSL) доступна для установки на Windows Server 2019 (версия 1709) и более поздних версий. В этом руководстве рассматриваются действия по включению WSL на компьютере.
Установка WSL в Windows Server 2022
Теперь Windows Server 2022 поддерживает простую установку WSL с помощью команды:
Теперь вы можете установить все необходимые компоненты для запуска WSL в Windows Server 2022. Для этого введите эту команду в PowerShell от имени администратора или в командной строке Windows и перезапустите компьютер.
Эта команда позволяет включить необходимые дополнительные компоненты, скачать последнюю версию ядра Linux, установить WSL 2 в качестве компонента по умолчанию и установить дистрибутив Linux (по умолчанию Ubuntu).
Из стандартной документации по WSL вы узнаете, как выполнять следующие задачи:
Установка WSL в предыдущих версиях Windows Server
Чтобы установить WSL в Windows Server 2019 (версия 1709+), выполните действия, описанные ниже.
Включение подсистемы Windows для Linux
Перед запуском дистрибутивов Linux в Windows необходимо включить дополнительный компонент «Подсистема Windows для Linux» и перезагрузить компьютер.
Запустите PowerShell от имени администратора и выполните следующую команду:
Enable-WindowsOptionalFeature -Online -FeatureName Microsoft-Windows-Subsystem-Linux Скачивание дистрибутива Linux
Инструкции и ссылки для скачивания нужного дистрибутива Linux см. в разделе Скачивание дистрибутивов в статье по выполнению установки вручную.
Извлечение и установка дистрибутива Linux
После загрузки дистрибутива Linux для извлечения его содержимого и установки вручную выполните следующие действия.
- Извлеките содержимое пакета .appx , с помощью PowerShell:
Rename-Item .\Ubuntu.appx .\Ubuntu.zip Expand-Archive .\Ubuntu.zip .\Ubuntu Add-AppxPackage .\app_name.appx Сбой установки с ошибкой 0x8007007e. При возникновении этой ошибки система не поддерживает WSL. Убедитесь, что вы используете сборку Windows 16215 или более позднюю версию. Проверьте используемую сборку. Также убедитесь, что WSL включен и ваш компьютер перезагружен после включения этой функции.
3. Добавьте путь к дистрибутиву Linux в переменную PATH в Windows (в этом примере C:\Users\Administrator\Ubuntu ) с помощью PowerShell:
$userenv = [System.Environment]::GetEnvironmentVariable("Path", "User") [System.Environment]::SetEnvironmentVariable("PATH", $userenv + ";C:\Users\Administrator\Ubuntu", "User") Теперь вы можете запустить дистрибутив из любого пути, введя .exe . Например: ubuntu.exe .
How to Run Linux with WSL on Windows Server 2019
How to Run Linux with WSL on Windows Server 2019. Windows Subsystem for Linux stands for WSL , which is included in Windows Server 2019. Using WSL, you can run Linux distributions as well as run some Linux programs directly on Windows without creating and launching a virtual machine.
In this tutorial , we will learn how to run Linux on Windows Server 2019 using WSL, stay tuned.
Prerequisites:
Install Windows Server 2019
1) How to enable the Windows Subsystem for Linux (WSL) feature
Before you can install any Linux distribution for WSL, you must ensure that the Windows Subsystem for Linux feature is enabled:
A. Open PowerShell as Administrator.
B. Run the following command to enable WSL:
Enable-WindowsOptionalFeature -Online -FeatureName Microsoft-Windows-Subsystem-LinuxC. Agree to restart your computer when prompted:

Note: You can do the same from the Server Graphical Interfaces:
Server Manager >> Add roles and features >> Select features
2) How to Install your Linux Distribution of Choice
There are various ways in which you can install WSL Linux distros via the Microsoft Store. In this guide, we will use download and install one from the Command-Line .
a- Launch PowerShell and download the distro with use the Invoke-WebRequest cmdlet or using curl.exe . Here’s a sample instruction to download Ubuntu 18.04:
curl.exe -L -o ubuntu-1804.appx https://aka.ms/wsl-ubuntu-1804b- After the download, extract and install a Linux distro.
Rename-Item ubuntu-1804.appx ubuntu-1804.zip Expand-Archive ubuntu-1804.zip ubuntu1804c- Change your working directory to ubuntu 1804 and run the installer to finish your distro installation:
cd ubuntu1804 .\ubuntu1804.exed- Similar to the image below, the installer will prompt you to provide a username and password for the UNIX user to be created:
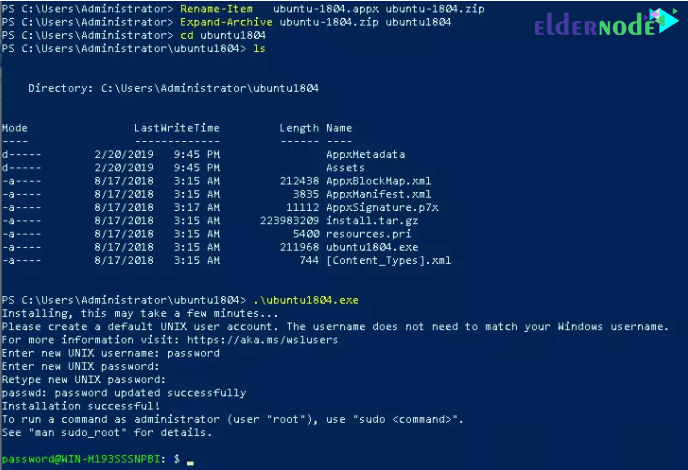
e- The sudo command can be used for privileged operations.
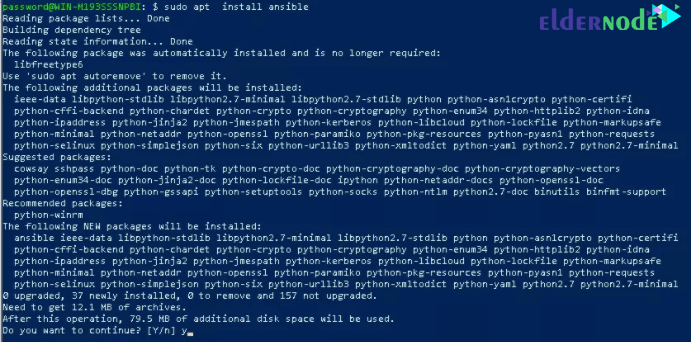
sudo apt update && sudo apt upgrade sudo apt install ansibleSample output:
f- Add your distro path to the Windows environment PATH using Powershell:
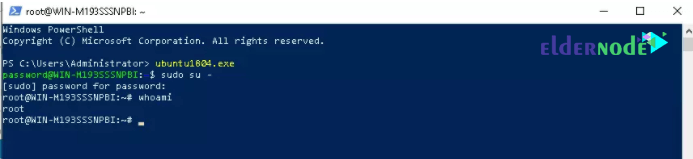
$userenv = [System.Environment]::GetEnvironmentVariable("Path", "User") [System.Environment]::SetEnvironmentVariable("PATH", $userenv + "C:\Users\Administrator\ubuntu1804", "User")g- This will enable you to launch your distro from any path by typing the .exe launcher . For example, using ubuntu1804.exe. Note that this will require closing and relaunching PowerShell.
You will see the following image:
Note: Other Linux distributions that you can run are:
– Ubuntu 18.04 ARM
– Ubuntu 16.04
– Debian GNU/Linux
– Kali Linux
You can also, see:
Dear user, we hope you would enjoy this tutorial, you can ask questions about this training in the comments section, or to solve other problems in the field of Eldernode training, refer to the Ask page section and raise your problem in it as soon as possible. Make time for other users and experts to answer your questions.
Click on a star to rate it!
Average rating 0 / 5. Vote count: 0
No votes so far! Be the first to rate this post.