- Wi-Fi (WLAN, IEEE 802.11)
- 802.11 Standards
- History
- 802.11 vs. «fake Ethernet» captures
- Protocol dependencies
- Example traffic
- Wireshark
- Preference Settings
- Example capture file
- Display Filter
- Capture Filter
- External links
- How to Capture Wi-Fi Traffic Using Wireshark
- Setup Check
- Wi-Fi Interface
- Support for Monitor Mode
- Check Wireshark Software
- Configuring Monitor Mode
- Step 1: Enter Superuser Mode
- Step 2: Create Monitor Mode
- Step 3: Configure Wi-Fi Sniffing Channel
- Step 4: Launch Wireshark and Start Capturing
- Conclusion
- About the author
- Bamdeb Ghosh
Wi-Fi (WLAN, IEEE 802.11)
Wi-Fi, or IEEE 802.11, is the standard for wireless LANs, or WLANs. The abbreviation Wi-Fi stands for Wireless Fidelity, and resembles the Hi-Fi acronym. It represents a whole collection of protocols within the same family of Ethernet and Token Ring.
IEEE 802.11 sends network packets from the sending host to one (Unicast) or more (Multicast/Broadcast) receiving hosts.
The 802.11 protocols specify a wireless shared network, which means that the maximum bandwidth is only available to one user at a time.
See the CaptureSetup/WLAN page for instructions how to capture from WLAN’s (including monitor mode), and see the CaptureSetup page for general information on capturing on WLAN’s and other media.
802.11 Standards
The basic 802.11 standards are:
- 802.11 (2MBit/s 2.4GHz) First generation of WLAN equipment; allows 1 and 2 Mbps.
- 802.11b (11MBit/s 2.4GHz) Second generation of WLAN equipment, and the first generation to receive widespread use; allows 1, 2, 5.5 and 11 Mbps.
- 802.11a (54MBit/s 5GHz)
- 802.11g (54MBit/s 2.4GHz)
- 802.11n Enhancements for Higher Throughput
Some additional 802.11 standards are:
- 802.11i (Security WPA1 and WPA2) No change to data rate. Improvement in security.
- 802.11h (Spectrum and Transmit Power Management)
- 802.11e (Quality of service, packet busting)
- 802.11d International (country-to-country) roaming extensions
- 802.11f Inter-Access Point Protocol (IAPP)
- 802.11j Extensions for Japan
History
XXX — add a brief description of 802.11 history
802.11 vs. «fake Ethernet» captures
When capturing with Wireshark (or other tools using libpcap/WinPcap, such as TcpDump / WinDump) there are two ways in which 802.11 can be supplied by the system and stored in a capture file:
- «real» 802.11: the hardware/driver provides the actual protocol data that travels over the air, complete with 802.11 headers. (There are variants of this in which «radio information» such as signal strength can be provided as well.)
- «fake» Ethernet: the hardware/driver translates the 802.11 headers into Ethernet headers so that the whole packet looks like a normal Ethernet packet. If the hardware/driver is doing this, all 802.11-specific management and control frames are usually discarded, as there’s no equivalent to them in Ethernet (although some drivers might use a non-standard way of making them look like Ethernet packets, such as using a special Ethernet packet type).
Detailed information about how to capture 802.11 traffic can be found at the CaptureSetup/WLAN page.
Protocol dependencies
Example traffic
One ICMP Ping Request and response session from Station(STA1 to station(STA2) via Access point(AP)
ICMP ECHO request
- ICMP Echo request (802.11 data packet with source STA1, Destination STA2, To DS bit set) This packet is transmitted from STA1 and received by AP
- ACK(802.11 control packet, dest STA1) This packet is transmitted by AP and recieved by STA1
- ICMP Echo request (802.11 data packet with source STA1, Destination STA2, From DS bit set) This packet is transmitted by AP and received by STA2.
- ACK(802.11 control packet Dest AP) This packet is sent to AP by STA2 to acknowledge reciept of the Echo request packet.
- ICMP Echo response(802.11 data packet with source STA2, Destination STA1, To DS bit set) This packet is transmitted from STA2 and received by AP
- ACK(802.11 control packet, dest STA2) This packet is transmitted by AP and recieved by STA2
- ICMP Echo response (802.11 data packet with source STA2, Destination STA1, From DS bit set) This packet is transmitted by AP and received by STA1.
- ACK (802.11 control packet Dest AP) This packet is sent to AP by STA1 to acknowledge reciept of the Echo response packet.
XXX — Add example traffic here (as Wireshark screenshot).
Wireshark
The 802.11 dissector is fully functional. It supports WEP and WPA/WPA2 decryption (see HowToDecrypt802.11 for details) and 802.11n.
Capturing 802.11 traffic can be tricky, see CaptureSetup page for instructions how to capture from WLAN’s (including monitor mode) and other media.
Preference Settings
802.11 is a complex protocol and Wireshark has a variety of 802.11-related preferences as a result.
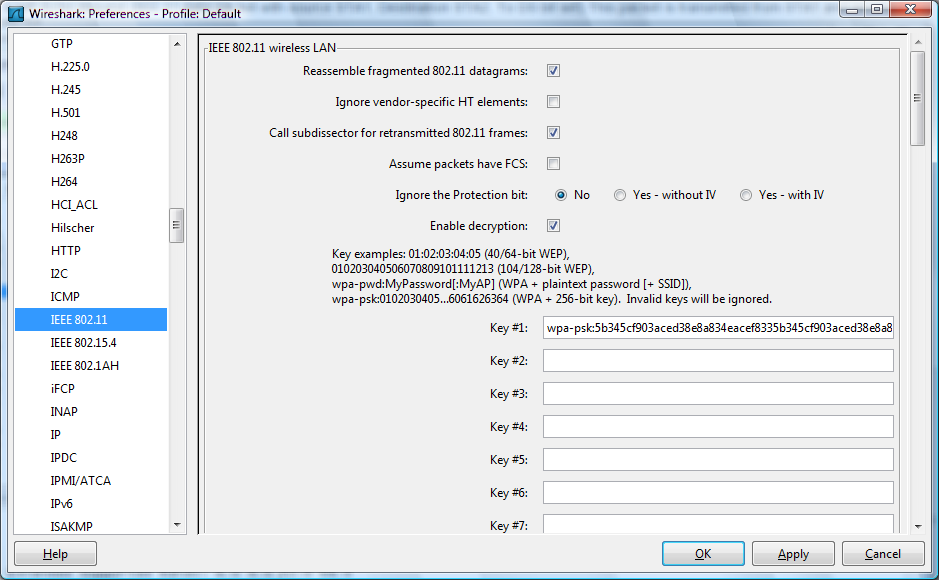
The reassembly and retransmission settings can affect the way that higher-layer information is dissected and displayed. The FCS and Protection bit settings can affect how frames are decrypted. For detailed information about the decryption settings, see HowToDecrypt802.11.
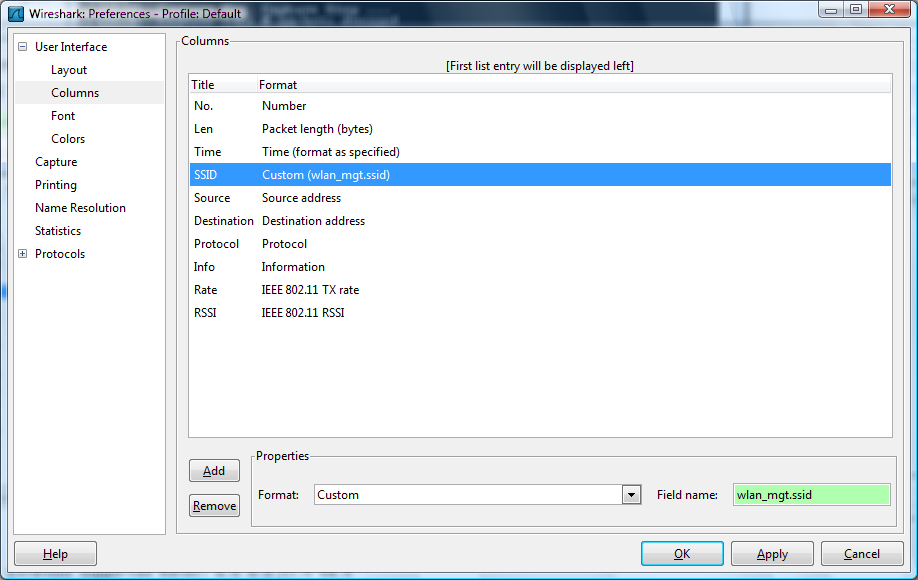
You can also add 802.11-specific information to the packet list.
Example capture file
Display Filter
A complete list of 802.11 display filter fields can be found in the wlan, wlan_mgt, and wlan_aggregate display filter references.
Show only the 802.11-based traffic:
Show only the 802.11-based traffic to and from 802.11 MAC address 08:00:08:15:ca:fe:
Show management frames for a specific SSID:
wlan_mgt.ssid == "Spatula City" Capture Filter
Newer versions of libpcap support raw 802.11 headers via the «wlan» link type. Older versions must use «ether» or «link» via fake Ethernet headers, and might not support 802.11 capture at all.
- Capture only the 802.11-based traffic to and from 802.11 MAC address 08:00:08:15:ca:fe:
See CaptureSetup/WLAN page for instructions on how to capture from WLANs (including monitor mode).
External links
How to Capture Wi-Fi Traffic Using Wireshark
![]()
In this article, you will learn how to capture wireless frames using Wireshark in Linux (Example: Ubuntu. To follow this article, first, you should learn the basics of WireShark in the Wireshark Basic article, and then you can come back here.
There are some steps to be followed to achieve this.
Setup Check
Below are the requirements for capturing Wi-Fi packets using Wireshark.
Wi-Fi Interface
To check whether you meet this requirement, open the terminal using the shortcut Alt+Ctrl+T and run the command “iwconfig.” This output should show if there is an operable Wi-Fi interface. The following screenshot shows the output of this command:

In this example “wlp2s0” is the interface name for the Wi-Fi card.
- “IEEE 802.11” is the indication for the Wi-Fi interface.
- By default, the mode is “Managed,” which means that it is a client or station mode.
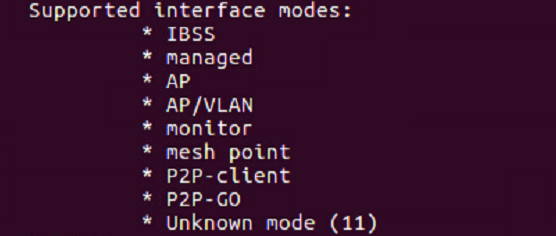
Support for Monitor Mode
The Wi-Fi card must support monitor mode to be able to sniff out wireless packets. This is a must, or you cannot sniff wireless packets using Wireshark. Open the terminal and run the command “iw phy0 info” or “iw list.” There is a huge list of information available here, but we just have to check the section for “monitor.” If the device does not support monitor mode, then it will not be possible to sniff the wireless packet using Wireshark.
Check Wireshark Software
Open the terminal and run the command “wireshark –version.” If Wireshark is installed, then there should be a version name with many details, as in the following screenshot:
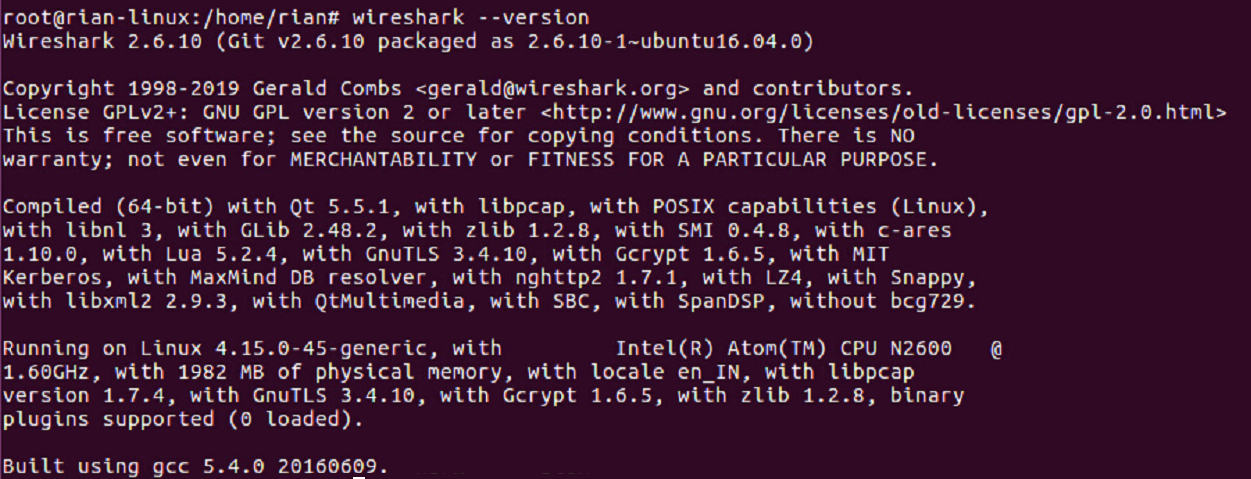
If it is not installed, then use the commands “apt-get update” and “apt-get install wireshark” to install Wireshark on your system.
Configuring Monitor Mode
In previous sections, you saw that the Wi-Fi interface default mode is “managed.” To capture a wireless packet, we need to convert the “managed” mode to “monitor” mode. There are different commands that you can use, but to use a simple method first, we will try using the “iwconfig” command to create monitor mode.
Let us assume that the name of the Wi-Fi interface is “wlp2s0,” as shown in the screenshot.
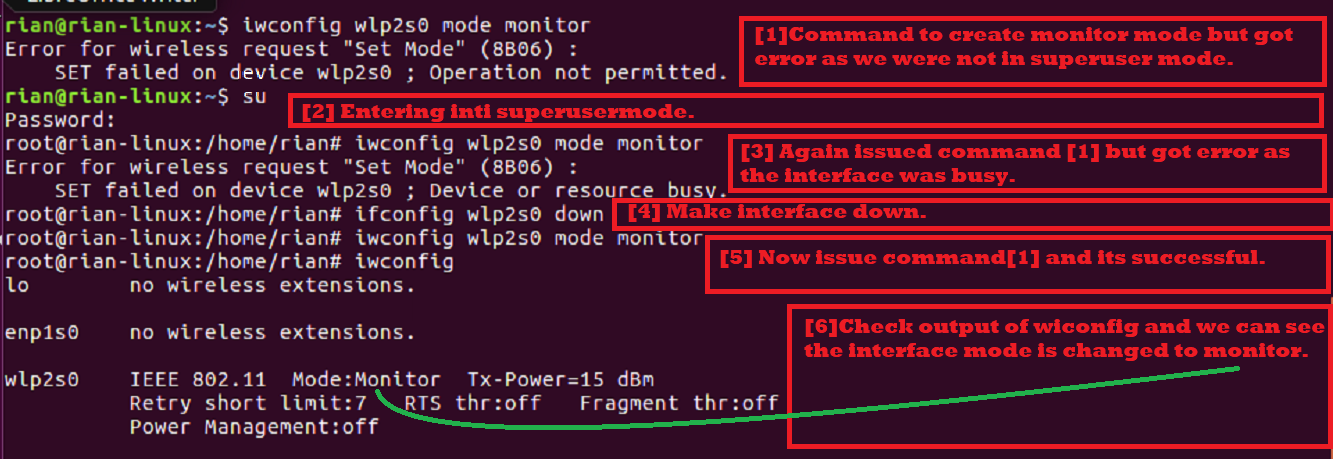
Step 1: Enter Superuser Mode
First, enter into superuser mode; otherwise, we will get permission to do this.
Command: “su”
Step 2: Create Monitor Mode
Command: “iwconfig wlps20 mode monitor”
Output: If the interface is up and active, you will get the “Device or resource busy” error.
So, make interface down using the following command.
Command: “ifconfig wlsp2s0 down”
Then, execute the first command again.
Finally, check whether the interface is in monitor mode using the “iwocnfig” command.
Here is the screenshot to explain all the above steps:
Step 3: Configure Wi-Fi Sniffing Channel
In wireless protocol, there are two radio frequency bands:
If your wireless card supports 1 and 2, that means that the Wi-Fi card can sniff both bandwidth configured channels. Let us see what our card supports.
Using the command “iw list,” we can check this capability. We are looking for the section below in the command output screenshot:
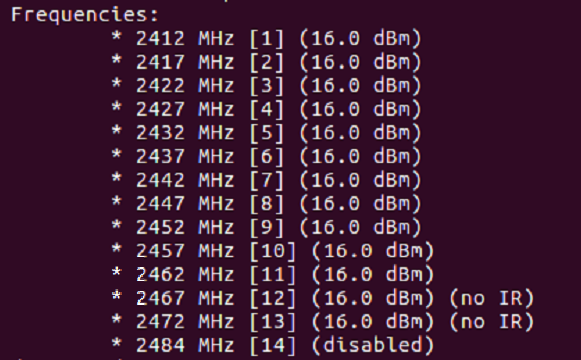
As yu can see in the above list, this Wi-Fi chip supports only 2.4Ghz [Check the frequency range].
Each frequency is known as channel number. For example, 2412MHz is considered channel 1 [Shown in [] ].
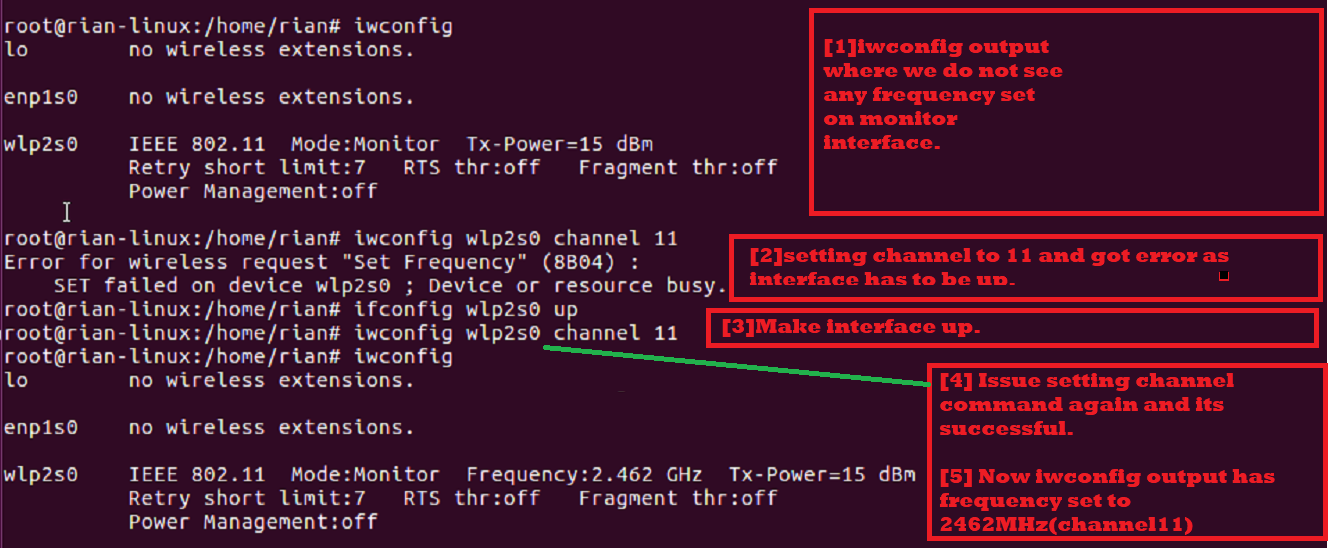
Now, we need to configure one channel for our monitor mode interface. Let us try to set channel 11 [frequency is 2462MHz].
Command: “iwconfig wlp2s0 channel 11”
If above command outputs an error, this makes the interface up [“ifconfig wlp2s0 up”] and then executes the “iwconfig wlp2s0 channel 11” command. Finally, execute the “iwconfig” command to ensure that the channel is set up properly.
The following screenshot explains the steps given above:
Step 4: Launch Wireshark and Start Capturing
Now, we are all set to capture wireless packets. You can start Wireshark in the background using the following command:

In the startup window of Wireshark, you should see the following screen. Here, you can see a list of interfaces.
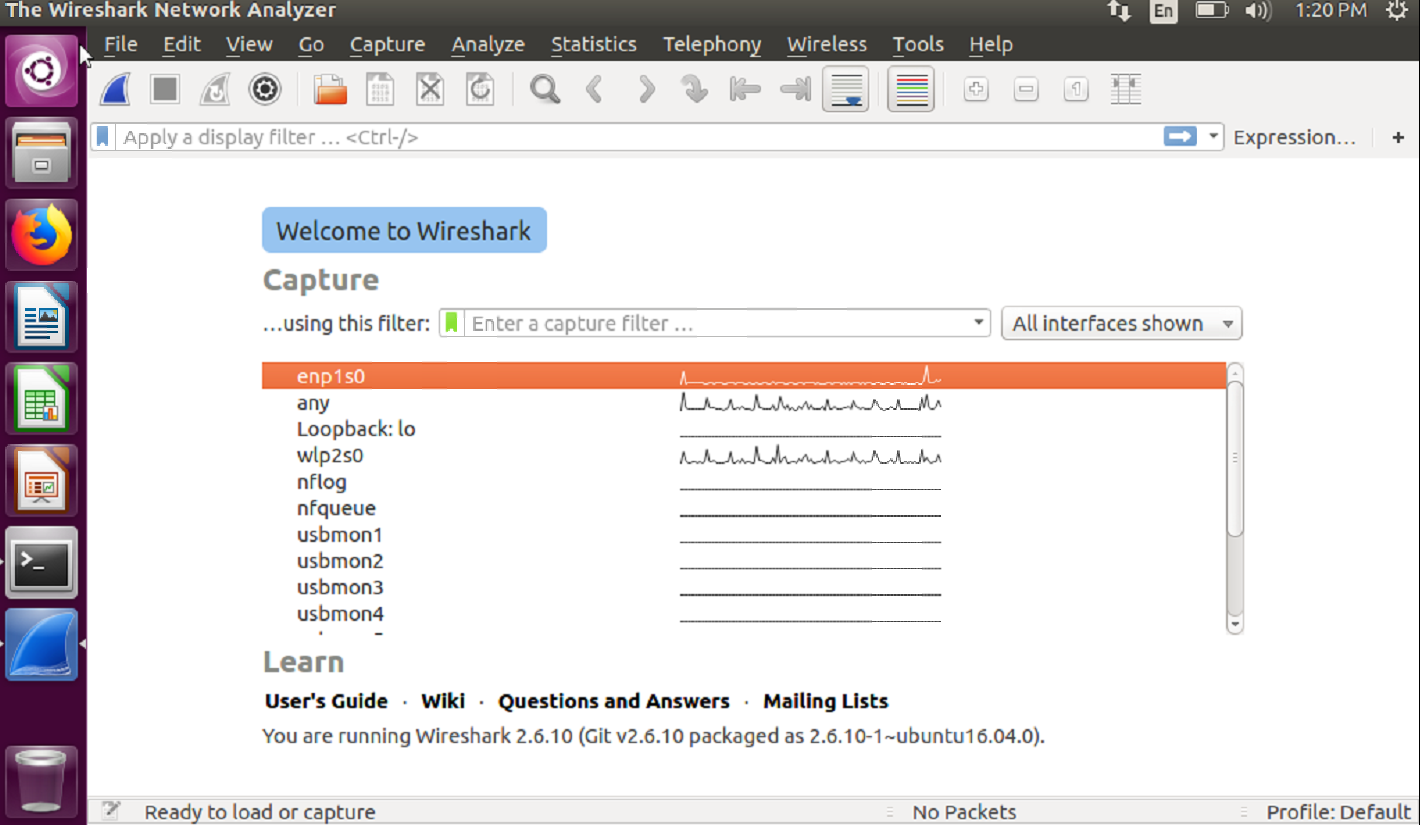
Next, choose your monitor mode interface, which is “wlp2s0.” Select this interface and then double-click on it.
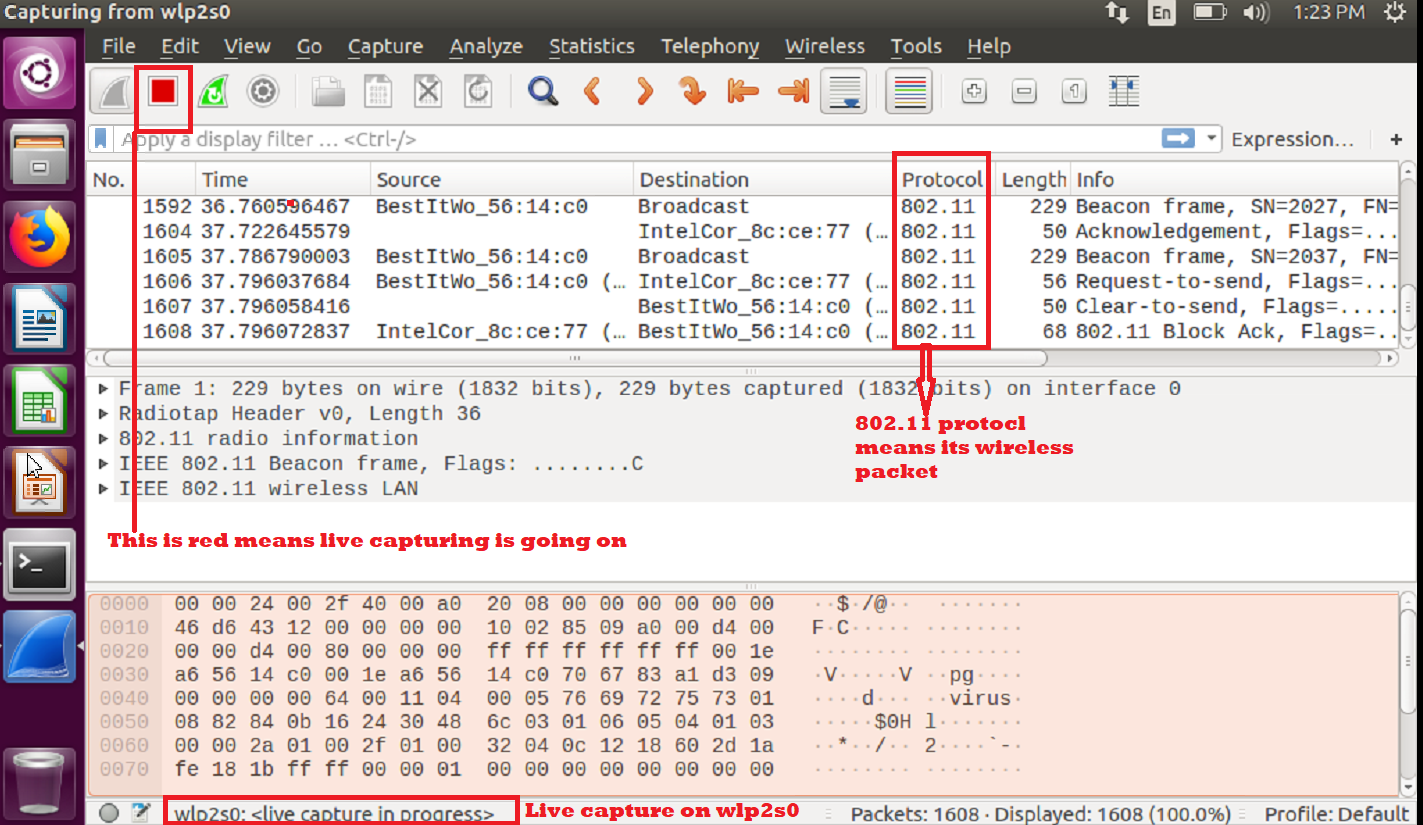
You can see that live capturing is currently going on.
The following include some hints about wireless packets:
You should see the protocol section, which generally shows 802.11, which is wireless IEEE standard.
You should also see the “Beacon,” “Probe Request,” and “Probe Response” frames under the info section of any frame.
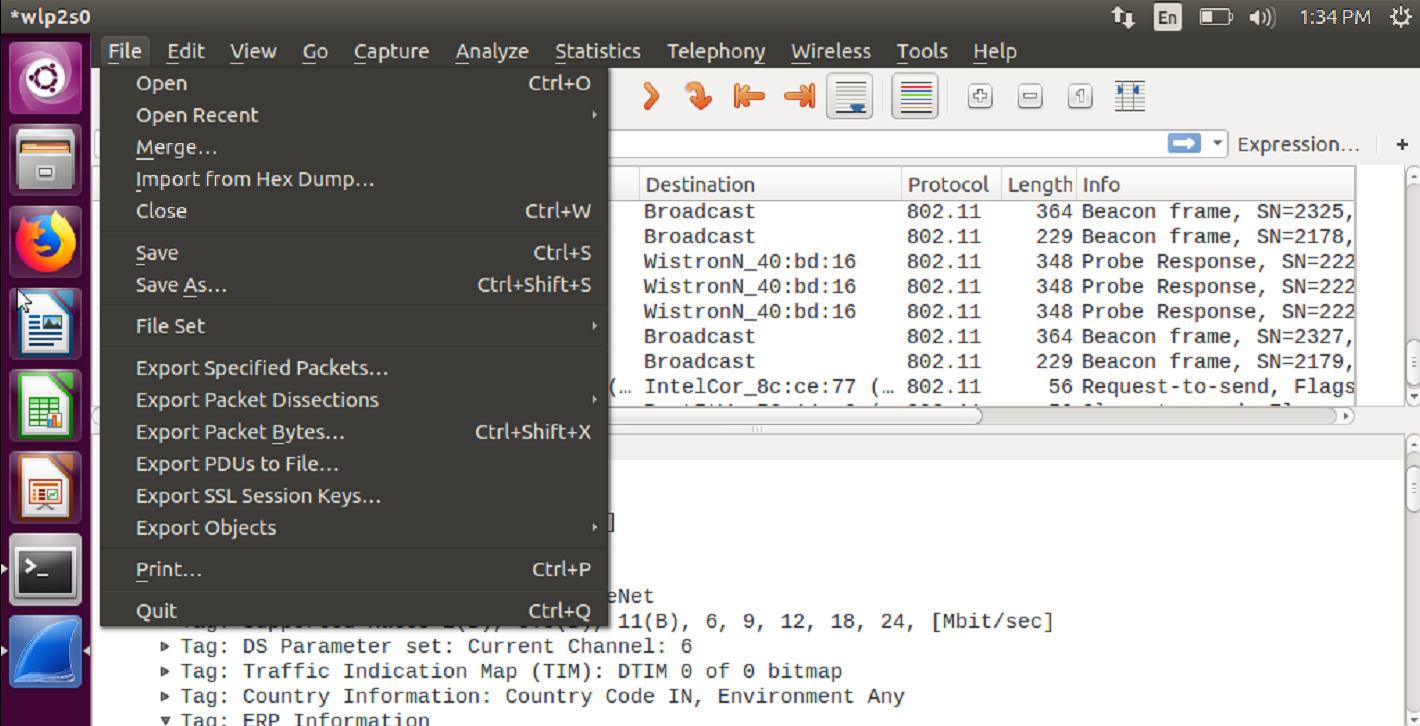
If you wish to save the capture and check it later, then select “save” or “save as” and save it for later analysis.
As long as the interface is in monitor mode you can capture wireless packet. Remember if you reboot the system the wireless interface will come up as “Managed” mod again.
Conclusion
In this article, you learned how to capture wireless packets using Wireshark in Linux. This is very easy to do in Linux using the built-in Wi-Fi card without installing any extra third-party software. You can make a shell script containing all these commands and run that single shell script to configure your system’s Wi-Fi card as monitor mode, set the preferred channel, and start using Wireshark.
About the author
Bamdeb Ghosh
Bamdeb Ghosh is having hands-on experience in Wireless networking domain.He’s an expert in Wireshark capture analysis on Wireless or Wired Networking along with knowledge of Android, Bluetooth, Linux commands and python. Follow his site: wifisharks.com