- Manual installation steps for older versions of WSL
- Step 1 — Enable the Windows Subsystem for Linux
- Step 2 — Check requirements for running WSL 2
- Step 3 — Enable Virtual Machine feature
- Step 4 — Download the Linux kernel update package
- Step 5 — Set WSL 2 as your default version
- Step 6 — Install your Linux distribution of choice
- Troubleshooting installation
- Downloading distributions
- Install Windows Terminal (optional)
- Начало работы с Linux и Bash
- Установка и обновление программного обеспечения
- Работа с файлами и каталогами
- Использование каналов и операторов перенаправления
- Рекомендуемое содержимое
Manual installation steps for older versions of WSL
For simplicity, we generally recommend using the wsl —install to install Windows Subsystem for Linux, but if you’re running an older build of Windows, that may not be supported. We have included the manual installation steps below. If you run into an issue during the install process, check the installation section of the troubleshooting guide.
Step 1 — Enable the Windows Subsystem for Linux
You must first enable the «Windows Subsystem for Linux» optional feature before installing any Linux distributions on Windows.
Open PowerShell as Administrator (Start menu > PowerShell > right-click > Run as Administrator) and enter this command:
dism.exe /online /enable-feature /featurename:Microsoft-Windows-Subsystem-Linux /all /norestart We recommend now moving on to step #2, updating to WSL 2, but if you wish to only install WSL 1, you can now restart your machine and move on to Step 6 — Install your Linux distribution of choice. To update to WSL 2, wait to restart your machine and move on to the next step.
Step 2 — Check requirements for running WSL 2
To update to WSL 2, you must be running Windows 10.
- For x64 systems: Version 1903 or later, with Build 18362.1049 or later.
- For ARM64 systems: Version 2004 or later, with Build 19041 or later.
Builds lower than 18362 do not support WSL 2. Use the Windows Update Assistant to update your version of Windows. The Windows version 1903 support is also only for x64 systems. If you are using an Arm64 version of Windows, you will need to upgrade to Windows 10 version 2004 or later for full access to WSL 2. For more info, see WSL 2 support coming to Windows 10 Versions 1903 and 1909.
To check your version and build number, select Windows logo key + R, type winver, select OK. Update to the latest Windows version in the Settings menu.
If you are running Windows 10 version 1903 or 1909, open «Settings» from your Windows menu, navigate to «Update & Security» and select «Check for Updates». Your Build number must be 18362.1049+ or 18363.1049+, with the minor build # over .1049. Read more: WSL 2 Support is coming to Windows 10 Versions 1903 and 1909.
Step 3 — Enable Virtual Machine feature
Before installing WSL 2, you must enable the Virtual Machine Platform optional feature. Your machine will require virtualization capabilities to use this feature.
Open PowerShell as Administrator and run:
dism.exe /online /enable-feature /featurename:VirtualMachinePlatform /all /norestart Restart your machine to complete the WSL install and update to WSL 2.
Step 4 — Download the Linux kernel update package
If you’re using an ARM64 machine, please download the ARM64 package instead. If you’re not sure what kind of machine you have, open Command Prompt or PowerShell and enter: systeminfo | find «System Type» . Caveat: On non-English Windows versions, you might have to modify the search text, translating the «System Type» string. You may also need to escape the quotations for the find command. For example, in German systeminfo | find ‘»Systemtyp»‘ .
Once the installation is complete, move on to the next step — setting WSL 2 as your default version when installing new Linux distributions. (Skip this step if you want your new Linux installs to be set to WSL 1).
Step 5 — Set WSL 2 as your default version
Open PowerShell and run this command to set WSL 2 as the default version when installing a new Linux distribution:
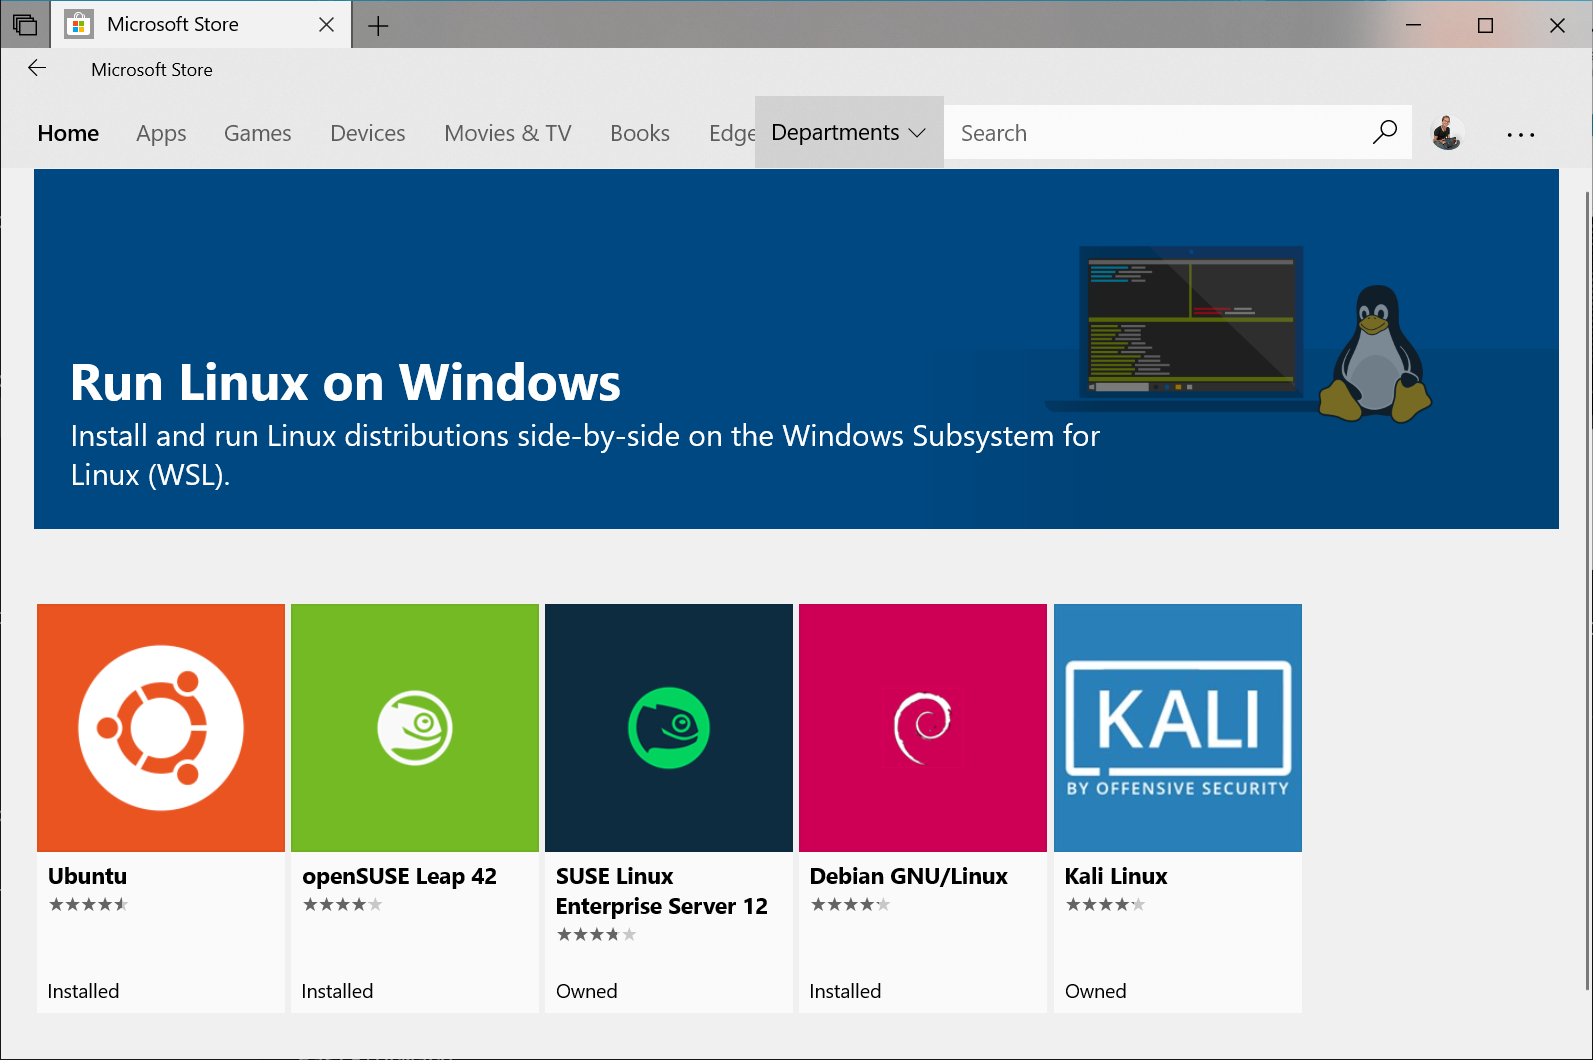
Step 6 — Install your Linux distribution of choice
- Open the Microsoft Store and select your favorite Linux distribution.
 The following links will open the Microsoft store page for each distribution:
 - Ubuntu 18.04 LTS
- Ubuntu 20.04 LTS
- Ubuntu 22.04 LTS
- openSUSE Leap 15.1
- SUSE Linux Enterprise Server 12 SP5
- SUSE Linux Enterprise Server 15 SP1
- Kali Linux
- Debian GNU/Linux
- Fedora Remix for WSL
- Pengwin
- Pengwin Enterprise
- Alpine WSL
- Raft(Free Trial)
- From the distribution’s page, select «Get».
 The following links will open the Microsoft store page for each distribution:
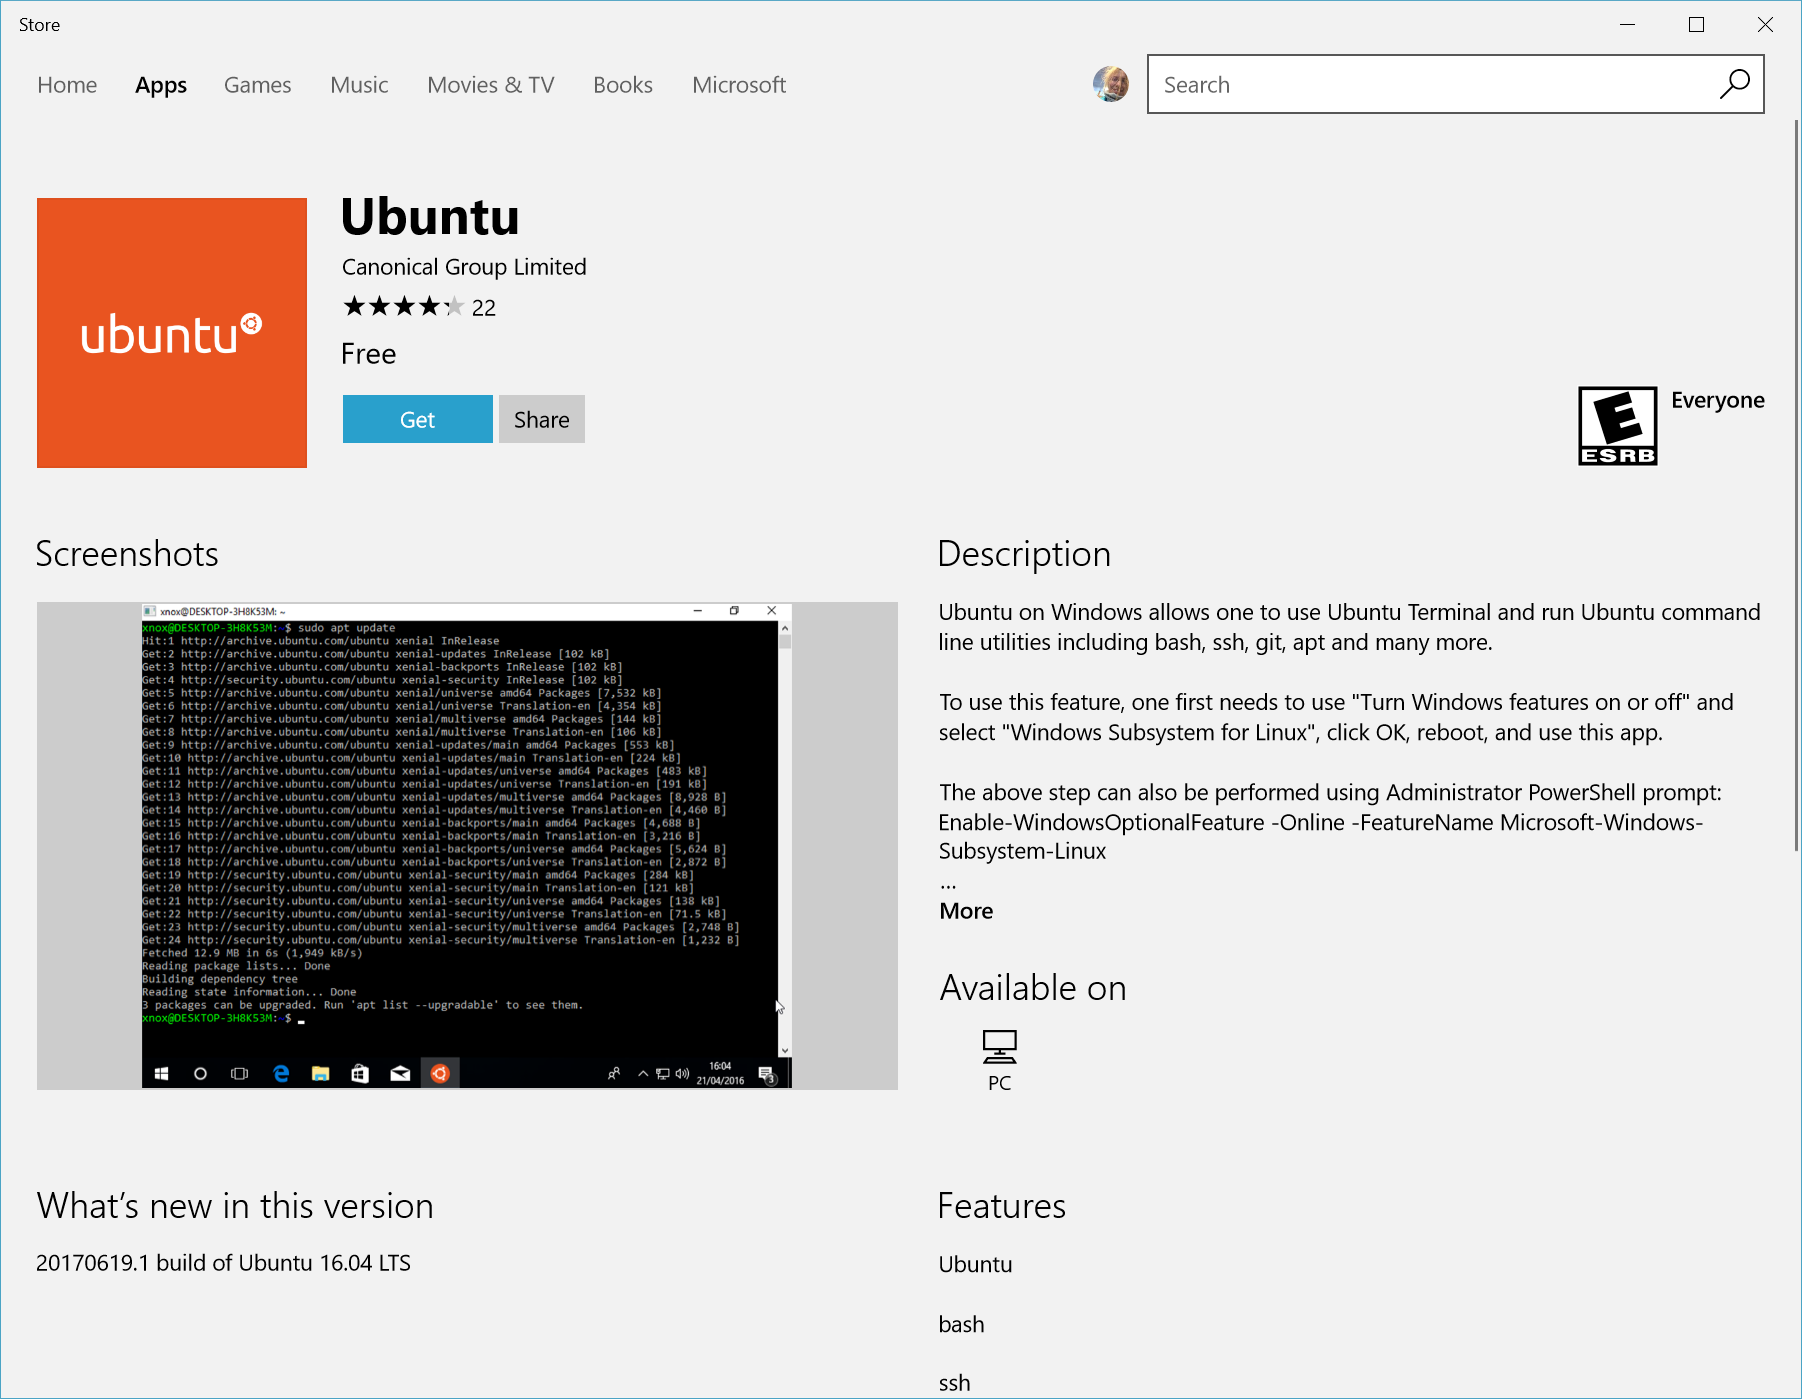
The first time you launch a newly installed Linux distribution, a console window will open and you’ll be asked to wait for a minute or two for files to de-compress and be stored on your PC. All future launches should take less than a second.

CONGRATULATIONS! You’ve successfully installed and set up a Linux distribution that is completely integrated with your Windows operating system!
Troubleshooting installation
If you run into an issue during the install process, check the installation section of the troubleshooting guide.
Downloading distributions
There are some scenarios in which you may not be able (or want) to, install WSL Linux distributions using the Microsoft Store. You may be running a Windows Server or Long-Term Servicing (LTSC) desktop OS SKU that doesn’t support Microsoft Store, or your corporate network policies and/or admins do not permit Microsoft Store usage in your environment. In these cases, while WSL itself is available, you may need to download Linux distributions directly.
If the Microsoft Store app is not available, you can download and manually install Linux distributions using these links:
- Ubuntu
- Ubuntu 22.04 LTS
- Ubuntu 20.04
- Ubuntu 20.04 ARM
- Ubuntu 18.04
- Ubuntu 18.04 ARM
- Ubuntu 16.04
- Debian GNU/Linux
- Kali Linux
- SUSE Linux Enterprise Server 12
- SUSE Linux Enterprise Server 15 SP2
- SUSE Linux Enterprise Server 15 SP3
- openSUSE Tumbleweed
- openSUSE Leap 15.3
- openSUSE Leap 15.2
- Oracle Linux 8.5
- Oracle Linux 7.9
- Fedora Remix for WSL
This will cause the .appx packages to download to a folder of your choosing.
If you prefer, you can also download your preferred distribution(s) via the command line, you can use PowerShell with the Invoke-WebRequest cmdlet. For example, to download Ubuntu 20.04:
Invoke-WebRequest -Uri https://aka.ms/wslubuntu2004 -OutFile Ubuntu.appx -UseBasicParsing If the download is taking a long time, turn off the progress bar by setting $ProgressPreference = ‘SilentlyContinue’
You also have the option to use the curl command-line utility for downloading. To download Ubuntu 20.04 with curl:
curl.exe -L -o ubuntu-2004.appx https://aka.ms/wslubuntu2004 In this example, curl.exe is executed (not just curl ) to ensure that, in PowerShell, the real curl executable is invoked, not the PowerShell curl alias for Invoke-WebRequest.
Once the distribution has been downloaded, navigate to the folder containing the download and run the following command in that directory, where app-name is the name of the Linux distribution .appx file.
Add-AppxPackage .\app_name.appx Once the Appx package has finished downloading, you can start running the new distribution by double-clicking the appx file. (The command wsl -l will not show that the distribution is installed until this step is complete).
If you are using Windows server, or run into problems running the command above you can find the alternate install instructions on the Windows Server documentation page to install the .appx file by changing it to a zip file.
Once your distribution is installed, follow the instructions to create a user account and password for your new Linux distribution.
Install Windows Terminal (optional)
Using Windows Terminal enables you to open multiple tabs or window panes to display and quickly switch between multiple Linux distributions or other command lines (PowerShell, Command Prompt, Azure CLI, etc). You can fully customize your terminal with unique color schemes, font styles, sizes, background images, and custom keyboard shortcuts. Learn more.
Начало работы с Linux и Bash
Это руководство поможет новым пользователям Linux приступить к установке и обновлению пакетов с помощью дистрибутива Ubuntu linux, который устанавливается по умолчанию с помощью WSL, а также с помощью некоторых базовых команд в командной строке Bash.
Установка и обновление программного обеспечения
Вы можете устанавливать и обновлять программные программы непосредственно из командной строки с помощью предпочтительного диспетчера пакетов для используемого дистрибутива.
Например, в Ubuntu сначала обновите список доступных программ, запустив sudo apt update. Затем вы можете напрямую получить программное обеспечение с помощью команды sudo apt-get install, за которой следует указать имя программы, которую вы хотите установить:
Чтобы обновить уже установленные программы, можно выполнить следующую команду:
sudo apt update && sudo apt upgrade В разных дистрибутивах Linux часто используются разные диспетчеры пакетов, и для них требуется использовать команду установки, относящийся к соответствующему диспетчеру пакетов. Например, диспетчер пакетов main для Arch Linux называется pacman, а команда установки — sudo pacman -S . Диспетчер пакетов main для OpenSuse называется Zypper, а команда установки — sudo zypper install . Диспетчер пакетов main для Alpine называется apk, а команда установки — sudo apk add . Двумя main диспетчерами пакетов для дистрибутивов Red Hat, такими как CentOS, являются YUM и RPM, а командой установки может быть sudo yum install или sudo rpo -i . Ознакомьтесь с документацией по дистрибутиву, с которым вы работаете, чтобы узнать, какие средства доступны для установки и обновления программного обеспечения.
Работа с файлами и каталогами
Чтобы просмотреть путь к каталогу, в который вы находитесь в данный момент, используйте команду pwd:
Чтобы создать каталог, используйте команду «mkdir», за которой следует имя каталога, который вы хотите создать:
Чтобы изменить каталоги, используйте команду «cd», за которой следует указать имя каталога, к которому вы хотите перейти:
Чтобы просмотреть содержимое каталога, в который вы находитесь, введите ls в командной строке:
По умолчанию команда ls выводит только имена всех файлов и каталогов. Чтобы получить дополнительные сведения, такие как время последнего изменения файла или разрешения файла, используйте флаг «-l»:
Вы можете создать новый файл с помощью команды touch и имени файла, который вы хотите создать:
Вы можете редактировать файлы с помощью любого загруженного графического текстового редактора или расширения VS Code Remote — WSL. Дополнительные сведения о начале работы с VS Code см. здесь.
Если вы предпочитаете редактировать файл непосредственно из командной строки, необходимо использовать редактор командной строки, например vim, emacs или nano. Многие дистрибутивы поставляются с одной или несколькими из этих программ, но вы всегда можете установить эти программы, следуя инструкциям по установке, описанным в руководстве выше.
Чтобы изменить файл с помощью предпочтительного метода редактирования, просто выполните имя программы, за которым следует имя файла, который вы хотите изменить:
notepad.exe hello_world.txt Чтобы просмотреть содержимое файла в командной строке, используйте команду cat, за которой следует файл, который вы хотите прочитать:
Использование каналов и операторов перенаправления
Канал «|» перенаправляет выходные данные одной команды в качестве входных данных в другую команду. Например, lhscmd | rhscmd направляет выходные данные из lhscmd в rhscmd. Каналы можно использовать различными способами для быстрого выполнения задач с помощью командной строки. Ниже приведено лишь несколько простых примеров использования каналов.
Представьте, что вы хотите быстро отсортировать содержимое файла. Рассмотрим следующий пример fruits.txt:
cat fruits.txt Orange Banana Apple Pear Plum Kiwi Strawberry Peach Этот список можно быстро отсортировать с помощью канала:
$ cat fruits.txt | sort Apple Banana Kiwi Orange Peach Pear Plum Strawberry По умолчанию выходные данные команды cat отправляются в стандартные выходные данные; однако «|» позволяет вместо этого перенаправлять выходные данные в качестве входных данных в другую команду , «sort».
Другой вариант использования — поиск. Вы можете использовать grep, которая является полезной командой, которая выполняет поиск входных данных для определенной строки поиска.
cat fruits.txt | grep P Pear Plum Peach Вы также можете использовать операторы перенаправления, такие как «>», для передачи выходных данных в файл или поток. Например, если вы хотите создать файл .txt с отсортированным содержимым fruit.txt:
cat fruits.txt | sort > sorted_fruit.txt $ cat sorted_fruit.txt Apple Banana Kiwi Orange Peach Pear Plum Strawberry По умолчанию выходные данные команды сортировки отправляются в стандартные выходные данные; однако оператор «>» позволяет вместо этого перенаправлять выходные данные в новый файл с именем sorted_fruits.txt.
Каналы и операторы перенаправления можно использовать многими интересными способами для более эффективного выполнения задач непосредственно из командной строки.