- How to Install Zabbix Agent on CentOS/RHEL 7/6
- Step 1 – Add Required Repository
- Step 2 – Install Zabbix Agent
- Step 3 – Zabbix Agent Configuration
- Step 4 – Open Port
- Step 5 – Restarting Zabbix Agent
- Related Posts
- How to Install Zabbix Agent on Ubuntu 22.04
- How to Install and Configure Nagios NRPE Client on Ubuntu 22.04
- How To Install and Configure Zabbix Server on Ubuntu 22.04
- 23 Comments
- How to Install and Configure Zabbix Agents on Remote Linux – Part 3
- Requirements
- Step 1: Install Zabbix Agents in Linux Systems
- Install Zabbix Agent in Debian
- Install Zabbix Agent in Ubuntu
- Install Zabbix On RHEL-based Systems
- Step 2: Configure and Test Zabbix Agent in Linux
- Step 3: Add Zabbix Agent Monitored Host to Zabbix Server
How to Install Zabbix Agent on CentOS/RHEL 7/6
Zabbix Agent is required to install on all remote systems needs to be monitor through Zabbix server. The Zabbix Agent collects resource utilization data and applications data on the client system and provides such information to the Zabbix server on their requests.
There are two types of checks between Zabbix Server and Client.
- Passive Check – Zabbix Agent sent data to server on their request.
- Active Check – Zabbix Agent sends data periodically to server.
After installing zabbix server on your server, Now we are moving to install agent on remote system’s. This article will help you to install zabbix agent on CentOS/RHEL 7/6/5 systems. After completing this step go to next article add Host in Zabbix Server.
Step 1 – Add Required Repository
Before installing Zabbix Agent first configure Zabbix yum repository using following commands as per your required version and operating system.
CentOS/RHEL 7: rpm -Uvh https://repo.zabbix.com/zabbix/4.0/rhel/7/x86_64/zabbix-release-4.0-2.el7.noarch.rpmCentOS/RHEL 6: rpm -Uvh https://repo.zabbix.com/zabbix/4.0/rhel/6/x86_64/zabbix-release-4.0-2.el6.noarch.rpm
Step 2 – Install Zabbix Agent
After installing yum repository packages in our system. Use the following command to install Zabbix agent on your CentOS and Red Hat systems using the yum package manager.
yum install zabbix zabbix-agent
Step 3 – Zabbix Agent Configuration
As Zabbix agent has been successfully installed on our remote system. Now we just need to configure Zabbix agent by adding Zabbix server IP to the configuration file /etc/zabbix/zabbix_agentd.conf
#Server=[zabbix server ip] #Hostname=[ Hostname of client system ] Server=192.168.1.100 Hostname=Server1
Step 4 – Open Port
Zabbix agent uses 10050/tcp port. You are required to open this port to allow the Zabbix server with the agent. Execute command to open port in iptables firewall where 192.168.1.100 is IP of Zabbix server.
iptables -A INPUT -p tcp -s 192.168.1.100 --dport 10050 -m state --state NEW,ESTABLISHED -j ACCEPT
Step 5 – Restarting Zabbix Agent
After adding Zabbix server IP to the configuration file, now restart agent service to reload the new settings, using the following command.
service zabbix-agent restart
To start and stop zabbix-agent service anytime use following commands.
service zabbix-agent start service zabbix-agent stop
Congratulation’s! You have successfully installed Zabbix Agent. Lets add host in zabbix server to be monitory.
Related Posts
How to Install Zabbix Agent on Ubuntu 22.04
How to Install and Configure Nagios NRPE Client on Ubuntu 22.04
How To Install and Configure Zabbix Server on Ubuntu 22.04
23 Comments
Bonjour, Merci pour cet article, j’ai réussi à installé l’agent Zabbix. En revanche, je rencontre une difficulté pour rendre persistent l’ouverture du port dans Iptable. Est-ce qu’il y a une manière éviter la suppression de cette ligne ? Merci pour votre retour
Hello, When i start zabbix server, im getting Failed to start zabbix-server.service: Unit not found.. I have installed everything, but its not coming up.
I faced the same problem. Just use
service zabbix-agent2 start
and
systemclt enable zabbix-agent2
to start it automatically (Note: this post is for newcomers to this blog post, like me)
Hello Sir, I am new to linux and I tried installing zabbix for my server by following the tutorial on this site. I was able to install it however I am having problems installing zabbix-agent for my client. I ran the command to add the repository and install zabbix and zabbix-agent but I got the results below. I can see that there was a conflict between zabbix and zabbix-agent but not sure how to resolve. Dependencies Resolved ======================================================================================
Package Arch Version Repository Size
======================================================================================
Installing:
zabbix-agent x86_64 4.0.12-1.el7 zabbix 412 k
zabbix40 x86_64 4.0.11-1.el7 epel 348 k Transaction Summary
======================================================================================
Install 2 Packages Total size: 760 k
Total download size: 412 k
Installed size: 3.0 M
Downloading packages:
zabbix-agent-4.0.12-1.el7.x86_64.rpm | 412 kB 00:00:01
Running transaction check
Running transaction test Transaction check error:
file /etc/zabbix/zabbix_agentd.conf conflicts between attempted installs of zabbix40-4.0.11-1.el7.x86_64 and zabbix-agent-4.0.12-1.el7.x86_64 Error Summary
————-
Hi, very good and simple explanation on how to install and setup zabbix agent on CentOS/RHEL, but, here I’m trying to install the agent on my CentOS 7.2, but it isn’t going as simple as you describe.
See:
I run:
# rpm -Uvh http://repo.zabbix.com/zabbix/3.5/rhel/7/x86_64/zabbix-release-3.5-1.el7.noarch.rpm
Retrieving http://repo.zabbix.com/zabbix/3.5/rhel/7/x86_64/zabbix-release-3.5-1.el7.noarch.rpm
warning: /var/tmp/rpm-tmp.llfFqY: Header V4 RSA/SHA512 Signature, key ID a14fe591: NOKEY
Preparing… ################################# [100%]
Updating / installing…
1:zabbix-release-3.5-1.el7 ################################# [100%] Everything ok, but:
# yum repolist
Loaded plugins: fastestmirror
Loading mirror speeds from cached hostfile
* base: http://ftp.unicamp.br
* epel: mirror.uta.edu.ec
* extras: http://ftp.unicamp.br
* updates: http://ftp.unicamp.br
repo id repo name status
base/7/x86_64 CentOS-7 – Base 0+9,591
epel/x86_64 Extra Packages for Enterprise Linux 7 – x86_64 0+12,507
extras/7/x86_64 CentOS-7 – Extras 0+448
updates/7/x86_64 CentOS-7 – Updates 0+2,416
zabbix/x86_64 Zabbix Official Repository – x86_64 0+248
zabbix-non-supported/x86_64 Zabbix Official Repository non-supported – x86_64 0+4
repolist: 0 And,:
# yum install zabbix-agent
Loaded plugins: fastestmirror
Loading mirror speeds from cached hostfile
* base: http://ftp.unicamp.br
* epel: mirror.uta.edu.ec
* extras: http://ftp.unicamp.br
* updates: http://ftp.unicamp.br
No package zabbix-agent available.
Error: Nothing to do What I’m doing wrong?
Firstly thanks for the great and simple steps to configure the zabbix.
my issues zabbix agent is running but i am not able to use it i tried to access it using
127.0.0.1:10050/zabbix
localhost:/10050/zabbix getting this page is not Please help.
At REHL 7/CentOS 7, /etc/init.d/zabbix-agent start is old dated and not available anymore use
systemctl restart zabbix-agent and to auto-start it after a reboot
systemctl enable zabbix-agent If you use incoming connections open the firewall…
hi guys can you help with my agent. i cant edit my config file for “agent” (access denied for super user)
How to Install and Configure Zabbix Agents on Remote Linux – Part 3
Continuing the Zabbix series, this tutorial will guide you on how you can install and configure Zabbix agents on Linux (Debian-based systems and RHEL-based distros) in order to actively monitor local resources on remote systems.
The main job of Zabbix agents consists in gathering local information from the targets where they run and sending the data to a central Zabbix server to be further processed and analyzed.
Requirements
Install and Configure Zabbix on Debian/Ubuntu and RHEL/CentOS/Fedora and Rocky Linux/AlmaLinux.
Step 1: Install Zabbix Agents in Linux Systems
1. Depending on the Linux distribution you are running, go to the Zabbix download page, grab the latest version of the available agent’s binary packages using a tool such as wget or curl and install it on your machine using the distribution-specific package manager – Yum, Rpm or Dpkg.
For Debian/Ubuntu systems (including latest releases) use the following steps to download and install Zabbix Agent:
Install Zabbix Agent in Debian
----------------- On Debian 11 ----------------- $ wget https://repo.zabbix.com/zabbix/5.4/debian/pool/main/z/zabbix/zabbix-agent2_5.4.6-1+debian11_amd64.deb $ sudo dpkg -i zabbix-agent2_5.4.6-1+debian11_amd64.deb ----------------- On Debian 10 ----------------- $ wget https://repo.zabbix.com/zabbix/5.4/debian/pool/main/z/zabbix/zabbix-agent2_5.4.6-1+debian10_amd64.deb $ sudo dpkg -i zabbix-agent2_5.4.6-1+debian10_amd64.deb
Install Zabbix Agent in Ubuntu
----------------- On Ubuntu 20.04 ----------------- $ wget https://repo.zabbix.com/zabbix/5.4/ubuntu/pool/main/z/zabbix/zabbix-agent_5.4.7-1+ubuntu20.04_amd64.deb $ sudo dpkg -i zabbix-agent_5.4.7-1+ubuntu20.04_amd64.deb ----------------- On Ubuntu 18.04 ----------------- $ wget https://repo.zabbix.com/zabbix/5.4/ubuntu/pool/main/z/zabbix/zabbix-agent_5.4.7-1+ubuntu18.04_amd64.deb $ sudo dpkg -i zabbix-agent_5.4.7-1+ubuntu18.04_amd64.deb
Install Zabbix On RHEL-based Systems
For RHEL alike systems, download the .rpm packaged for the distribution-specific release number, using the same page as above, and install it using rpm package manager.
In order to automatically manage missing dependency issues and install the agent using one-shot use the yum command followed by the binary package download link, as in the example below used for installing the agent on CentOS 8:
----------------- On RHEL 8 ----------------- # rpm -Uvh https://repo.zabbix.com/zabbix/5.4/rhel/8/x86_64/zabbix-agent-5.4.6-1.el8.x86_64.rpm ----------------- On RHEL 7 ----------------- # rpm -Uvh https://repo.zabbix.com/zabbix/5.4/rhel/7/x86_64/zabbix-agent-5.4.6-1.el7.x86_64.rpm
Step 2: Configure and Test Zabbix Agent in Linux
2. The next logical step after installing the packages on the system is to open the Zabbix agent configuration file located in /etc/zabbix/ system path on both major distributions and instruct the program to send all the collected information to the Zabbix server in order to be analyzed and processed.
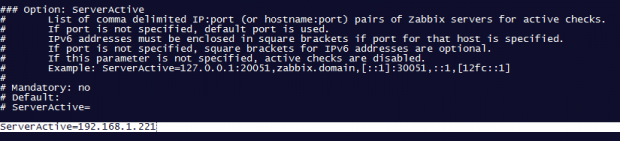
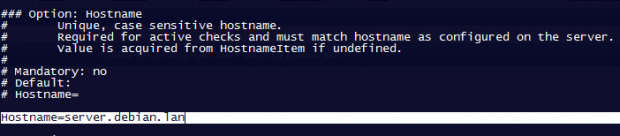
Therefore, open the zabbix_agentd.conf file with your favorite text editor, find the below lines (use the screenshots as a guide), uncomment them and make the following changes:
# nano /etc/zabbix/zabbix_agentd.conf
add Zabbix server IP address and hostname as shown below.
Server=IP of Zabbix Server ServerActive=IP of Zabbix Server Hostname=use the FQDN of the node where the agent runs

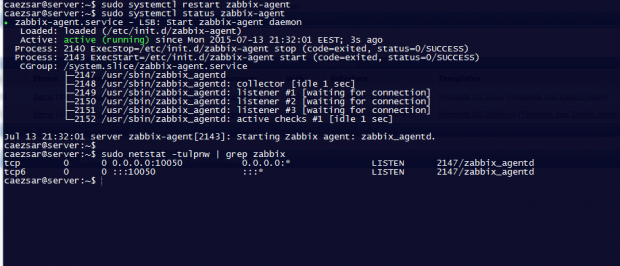
3. Once you’ve finished editing the Zabbix agent configuration file with the required values, restart the daemon using the following command, then use the netstat command to verify if the daemon has been started and operates on the specific port – 10050/tcp:
$ sudo systemctl restart zabbix-agent $ sudo netstat -tulpn|grep zabbix
For older distributions use the service command to manage Zabbix agent daemon:
$ sudo service zabbix-agent restart $ sudo netstat -tulpn|grep zabbix
4. If your system is behind a firewall then you need to open 10050/tcp port on the system in order to reach through the Zabbix server.
For Debian based systems, including Ubuntu, you can use the ufw tool to open the port and on RHEL-based, you can use Firewalld utility to manage the firewall rules as the below examples:
$ sudo ufw allow 10050/tcp [On Debian based systems]
$ sudo firewall-cmd --add-port=10050/tcp --permanent [On RHEL based systems]
For older distributions such as RHEL/CentOS 6 or unmanaged firewalls through specific utilities use the powerful iptables command to open ports:
# iptables -A INPUT -p tcp -m tcp --dport 10050 -j ACCEPT
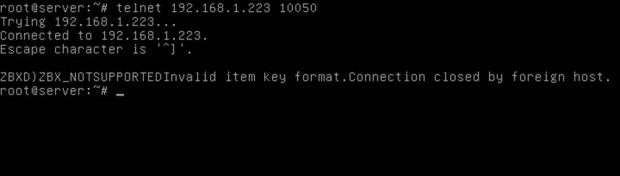
5. Finally, in order to test if you can reach Zabbix Agent from Zabbix Server, use Telnet command from Zabbix server machine to the IP addresses of the machines that run the agents, as illustrated below (don’t worry about the thrown error from agents):
# telnet zabbix_agent_IP 10050
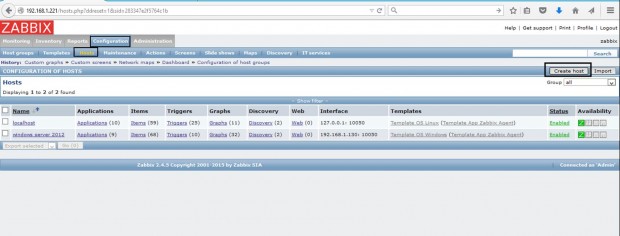
Step 3: Add Zabbix Agent Monitored Host to Zabbix Server
6. On the next step it’s time to move to the Zabbix server web console and start adding the hosts which run zabbix agent in order to be monitored by the server.
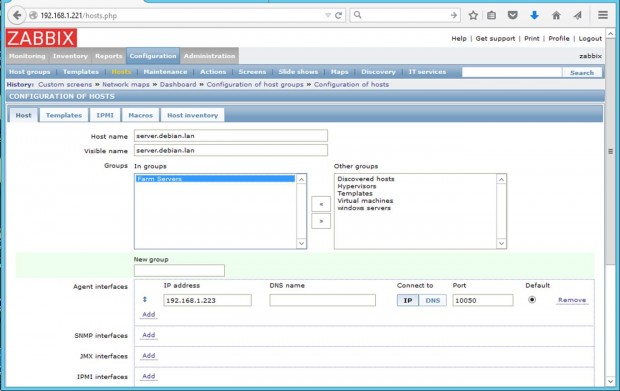
Go to Configuration -> Hosts -> Create Host -> Host tab and fill the Hostname field with the FQDN of the monitored Zabbix agent machine, use the same value as above for the Visible name field.
Next, add this host to a group of monitored servers and use the IP Address of the monitored machine at the Agent interfaces field – alternatively you can also use DNS resolution if it’s the case. Use the below screenshots as a guide.
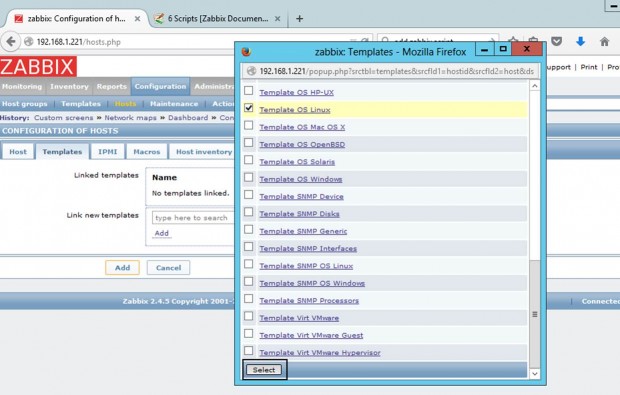
7. Next, move to the Templates tab and hit Select. A new window with templates should open. Choose Template OS Linux then scroll down and hit on Select button to add it and automatically close the window.
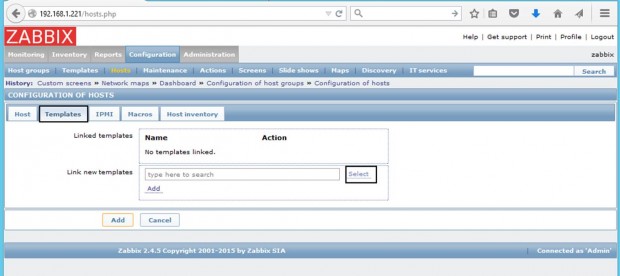
8. Once the template appears to Link the new template box, hit on Add text to link it to Zabbix server, then hit on the lower Add button to finish the process and completely add the monitored host. The visible name of the monitored host should now appear hosts window.


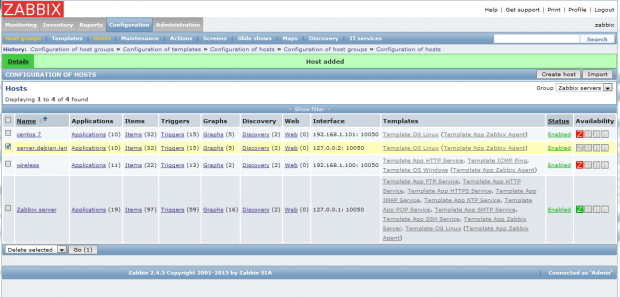
That’s all! Just assure that the host Status is set to Enabled and wait a few minutes in order for the Zabbix server to contact the agent, process the received data, and inform or eventually alert you if something goes bad on the monitored target.