- How to Install and Configure Zabbix Agents on Remote Linux – Part 3
- Requirements
- Step 1: Install Zabbix Agents in Linux Systems
- Install Zabbix Agent in Debian
- Install Zabbix Agent in Ubuntu
- Install Zabbix On RHEL-based Systems
- Step 2: Configure and Test Zabbix Agent in Linux
- Step 3: Add Zabbix Agent Monitored Host to Zabbix Server
- Установка и настройка Zabbix-агента на CentOS
- Шаг 1. Добавляем репозиторий
- Шаг 2. Устанавливаем Zabbix-agent
- Шаг 3. Настраиваем агента
- Шаг 4. Настраиваем брандмауэр
- а) Firewalld
- Download and install Zabbix
- Download and install Zabbix
How to Install and Configure Zabbix Agents on Remote Linux – Part 3
Continuing the Zabbix series, this tutorial will guide you on how you can install and configure Zabbix agents on Linux (Debian-based systems and RHEL-based distros) in order to actively monitor local resources on remote systems.
The main job of Zabbix agents consists in gathering local information from the targets where they run and sending the data to a central Zabbix server to be further processed and analyzed.
Requirements
Install and Configure Zabbix on Debian/Ubuntu and RHEL/CentOS/Fedora and Rocky Linux/AlmaLinux.
Step 1: Install Zabbix Agents in Linux Systems
1. Depending on the Linux distribution you are running, go to the Zabbix download page, grab the latest version of the available agent’s binary packages using a tool such as wget or curl and install it on your machine using the distribution-specific package manager – Yum, Rpm or Dpkg.
For Debian/Ubuntu systems (including latest releases) use the following steps to download and install Zabbix Agent:
Install Zabbix Agent in Debian
----------------- On Debian 11 ----------------- $ wget https://repo.zabbix.com/zabbix/5.4/debian/pool/main/z/zabbix/zabbix-agent2_5.4.6-1+debian11_amd64.deb $ sudo dpkg -i zabbix-agent2_5.4.6-1+debian11_amd64.deb ----------------- On Debian 10 ----------------- $ wget https://repo.zabbix.com/zabbix/5.4/debian/pool/main/z/zabbix/zabbix-agent2_5.4.6-1+debian10_amd64.deb $ sudo dpkg -i zabbix-agent2_5.4.6-1+debian10_amd64.deb
Install Zabbix Agent in Ubuntu
----------------- On Ubuntu 20.04 ----------------- $ wget https://repo.zabbix.com/zabbix/5.4/ubuntu/pool/main/z/zabbix/zabbix-agent_5.4.7-1+ubuntu20.04_amd64.deb $ sudo dpkg -i zabbix-agent_5.4.7-1+ubuntu20.04_amd64.deb ----------------- On Ubuntu 18.04 ----------------- $ wget https://repo.zabbix.com/zabbix/5.4/ubuntu/pool/main/z/zabbix/zabbix-agent_5.4.7-1+ubuntu18.04_amd64.deb $ sudo dpkg -i zabbix-agent_5.4.7-1+ubuntu18.04_amd64.deb
Install Zabbix On RHEL-based Systems
For RHEL alike systems, download the .rpm packaged for the distribution-specific release number, using the same page as above, and install it using rpm package manager.
In order to automatically manage missing dependency issues and install the agent using one-shot use the yum command followed by the binary package download link, as in the example below used for installing the agent on CentOS 8:
----------------- On RHEL 8 ----------------- # rpm -Uvh https://repo.zabbix.com/zabbix/5.4/rhel/8/x86_64/zabbix-agent-5.4.6-1.el8.x86_64.rpm ----------------- On RHEL 7 ----------------- # rpm -Uvh https://repo.zabbix.com/zabbix/5.4/rhel/7/x86_64/zabbix-agent-5.4.6-1.el7.x86_64.rpm
Step 2: Configure and Test Zabbix Agent in Linux
2. The next logical step after installing the packages on the system is to open the Zabbix agent configuration file located in /etc/zabbix/ system path on both major distributions and instruct the program to send all the collected information to the Zabbix server in order to be analyzed and processed.
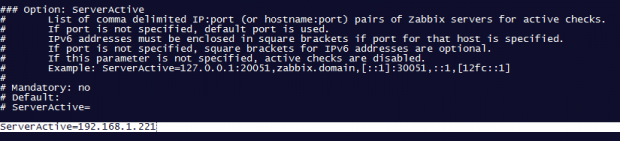
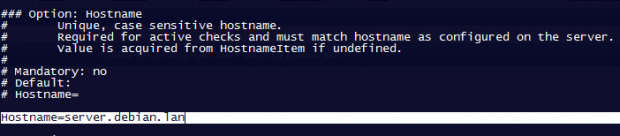
Therefore, open the zabbix_agentd.conf file with your favorite text editor, find the below lines (use the screenshots as a guide), uncomment them and make the following changes:
# nano /etc/zabbix/zabbix_agentd.conf
add Zabbix server IP address and hostname as shown below.
Server=IP of Zabbix Server ServerActive=IP of Zabbix Server Hostname=use the FQDN of the node where the agent runs

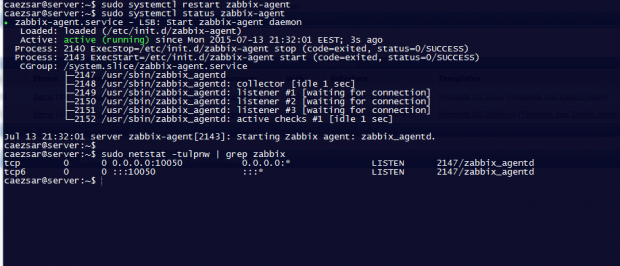
3. Once you’ve finished editing the Zabbix agent configuration file with the required values, restart the daemon using the following command, then use the netstat command to verify if the daemon has been started and operates on the specific port – 10050/tcp:
$ sudo systemctl restart zabbix-agent $ sudo netstat -tulpn|grep zabbix
For older distributions use the service command to manage Zabbix agent daemon:
$ sudo service zabbix-agent restart $ sudo netstat -tulpn|grep zabbix
4. If your system is behind a firewall then you need to open 10050/tcp port on the system in order to reach through the Zabbix server.
For Debian based systems, including Ubuntu, you can use the ufw tool to open the port and on RHEL-based, you can use Firewalld utility to manage the firewall rules as the below examples:
$ sudo ufw allow 10050/tcp [On Debian based systems]
$ sudo firewall-cmd --add-port=10050/tcp --permanent [On RHEL based systems]
For older distributions such as RHEL/CentOS 6 or unmanaged firewalls through specific utilities use the powerful iptables command to open ports:
# iptables -A INPUT -p tcp -m tcp --dport 10050 -j ACCEPT
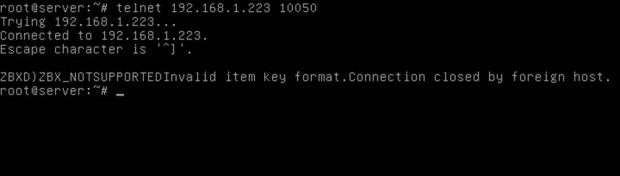
5. Finally, in order to test if you can reach Zabbix Agent from Zabbix Server, use Telnet command from Zabbix server machine to the IP addresses of the machines that run the agents, as illustrated below (don’t worry about the thrown error from agents):
# telnet zabbix_agent_IP 10050
Step 3: Add Zabbix Agent Monitored Host to Zabbix Server
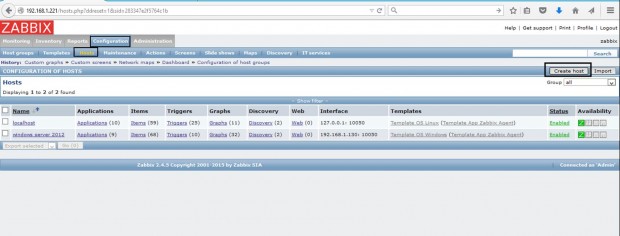
6. On the next step it’s time to move to the Zabbix server web console and start adding the hosts which run zabbix agent in order to be monitored by the server.
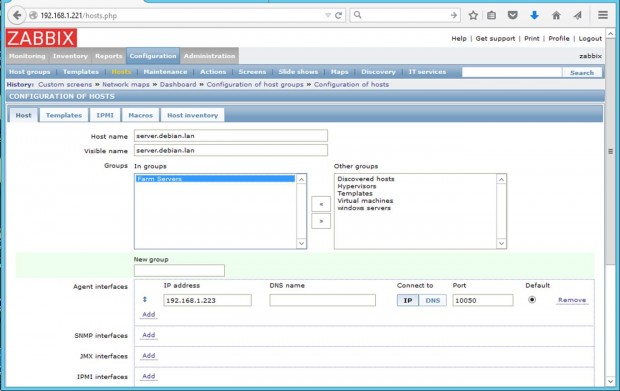
Go to Configuration -> Hosts -> Create Host -> Host tab and fill the Hostname field with the FQDN of the monitored Zabbix agent machine, use the same value as above for the Visible name field.
Next, add this host to a group of monitored servers and use the IP Address of the monitored machine at the Agent interfaces field – alternatively you can also use DNS resolution if it’s the case. Use the below screenshots as a guide.
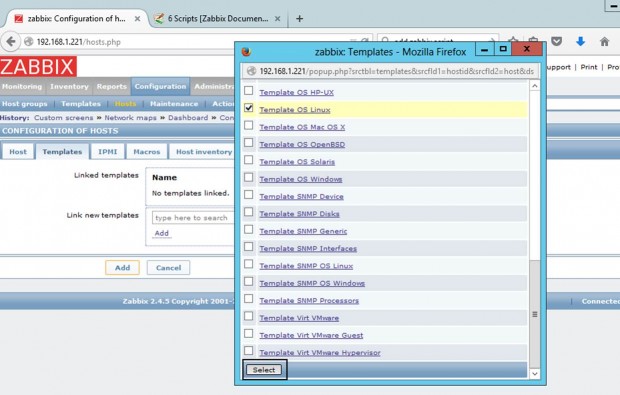
7. Next, move to the Templates tab and hit Select. A new window with templates should open. Choose Template OS Linux then scroll down and hit on Select button to add it and automatically close the window.
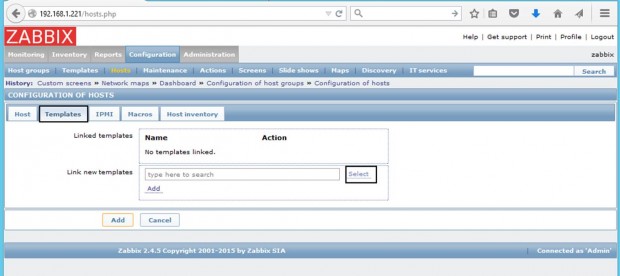
8. Once the template appears to Link the new template box, hit on Add text to link it to Zabbix server, then hit on the lower Add button to finish the process and completely add the monitored host. The visible name of the monitored host should now appear hosts window.


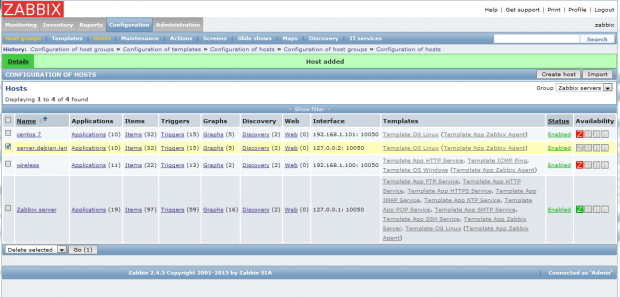
That’s all! Just assure that the host Status is set to Enabled and wait a few minutes in order for the Zabbix server to contact the agent, process the received data, and inform or eventually alert you if something goes bad on the monitored target.
Установка и настройка Zabbix-агента на CentOS

Обновлено: 18.01.2022 Опубликовано: 17.02.2017
Мы рассмотрим универсальный метод установки агента Zabbix на операционные системы Linux RPM — Rocky Linux, CentOS, Red Hat и другие.
Шаг 1. Добавляем репозиторий
По умолчанию, в репозитории Linux CentOS нет пакета zabbix-agent, поэтому необходимо добавить репозиторий от Zabbix. Для этого переходим на страницу Zabbix Official Repository и переходим в каталог, соответствующий нужной версии агента (последней или такой же, как версия сервера) — затем в rhel — после мажорную версию Linux RHEL (6, 7, 8) — x86_64 — наконец, копируем ссылку на последнюю версию релиза:

* предпочтительнее устанавливать агент той же версии, что и сервер. Но, в некоторых случаях, вам могут потребоваться возможности более свежих версий — просто убедитесь, что они будут корректно работать с сервером.
Используя данную ссылку, устанавливаем репозиторий следующей командой:
yum install https://repo.zabbix.com/zabbix/4.3/rhel/8/x86_64/zabbix-release-4.3-3.el8.noarch.rpm
* в данном примере мы устанавливаем репозиторий для Zabbix версии 4.3 и CentOS (Rocky Linux) 8.
Шаг 2. Устанавливаем Zabbix-agent
Установка выполняется одной командой:
Отвечаем на все вопросы утвердительно (Y). Будет установлена самая последняя версия из выбранной нами ветки (в нашем примере, 4.3). Но если мы хотим установить версию ниже, которая есть в репозитории, то указываем ее при установке:
yum install zabbix-agent-4.3.1
* требуется, чтобы пакет версии 4.3.1 присутствовал в репозитории.
Шаг 3. Настраиваем агента
Открываем конфигурационный файл:
По умолчанию, достаточно просто прописать IP-адрес сервера мониторинга:
* в данном примере сервер имеет IP 192.168.0.15. Также мы можем указать его DNS-имя.
Но, желательно, также указать имя хоста, на котором будет работать агент:
Шаг 4. Настраиваем брандмауэр
Начина с версии 7 в системах на базе RPM, преимущественно, для управления брандмауэром используется firewalld. Но мы рассмотрим также вариант открытия портов с помощью iptables.
а) Firewalld
Создаем следующее правило:
firewall-cmd —permanent —new-service=zabbix
firewall-cmd —permanent —service=zabbix —add-port=10050/tcp
firewall-cmd —permanent —service=zabbix —set-short=»Zabbix Agent»
* в данном примере, мы создали для брандмауэра службу zabbix. По умолчанию, работает на TCP порту 10050.
Теперь разрешаем доступ для созданной службы:
firewall-cmd —permanent —add-service=zabbix
И не забываем применить настройки:
Download and install Zabbix

Get assistance in better understanding the benefits and potential from using Zabbix
Technical Support
Get access to the team of Zabbix experts that know every little bit of the source code
Training
- Features
- What’s new in Zabbix 6.4
- Screenshots
- System requirements
- Lifecycle & Release Policy
- License
- Documentation
- Roadmap
- By Topic
- By Industry
- For Enterprises
- Case studies
- Customers and Users
- Integrations & Templates
- Support
- Consulting
- Turn-Key Solution
- Template building
- Upgrade
- Development
- Remote troubleshooting
- Integration
- Certified User
- Certified Specialist
- Certified Professional
- Certified Expert
- Testimonials
- Training FAQ
- Application form
- Webinars
- Partner Program
- Become a Partner
- Strategic Partners
- Distributors
- Map of Partners
- Events
- Forum
- Blog
- Bugs and Feature Requests
- Developers
- Community templates
- Newsletters
- About Us
- Career
- Contacts
- Press Releases
- Trademark
Join us! We’re hiring!
© 2001-2023 by Zabbix LLC. All rights reserved.
Download and install Zabbix
Get assistance in better understanding the benefits and potential from using Zabbix
Technical Support
Get access to the team of Zabbix experts that know every little bit of the source code
Training
- Features
- What’s new in Zabbix 6.4
- Screenshots
- System requirements
- Lifecycle & Release Policy
- License
- Documentation
- Roadmap
- By Topic
- By Industry
- For Enterprises
- Case studies
- Customers and Users
- Integrations & Templates
- Support
- Consulting
- Turn-Key Solution
- Template building
- Upgrade
- Development
- Remote troubleshooting
- Integration
- Certified User
- Certified Specialist
- Certified Professional
- Certified Expert
- Testimonials
- Training FAQ
- Application form
- Webinars
- Partner Program
- Become a Partner
- Strategic Partners
- Distributors
- Map of Partners
- Events
- Forum
- Blog
- Bugs and Feature Requests
- Developers
- Community templates
- Newsletters
- About Us
- Career
- Contacts
- Press Releases
- Trademark
Join us! We’re hiring!
© 2001-2023 by Zabbix LLC. All rights reserved.