- Monitor Disk IO Stats with Zabbix
- Create UserParameters in Zabbix to Query /proc/diskstats
- Zabbix AutoDiscovery
- Create a Regular Expression in Zabbix
- Create a New Template in Zabbix
- Create a new UserParameter for Disk Discovery
- Create a Zabbix Discovery Rule
- Add Item Prototypes to Discovery Rule
- Create Graph Prototypes to Plot the Above Items
- Check out the Graphs
- backnet — ответы на простые вопросы и не очень
- Мониторинг дискового пространства активным Zabbix-агентом
- Дано.
- Решение.
- Создаём шаблон.
- Назначаем шаблон компьютеру
- Аренда серверов.
- 1С:Предприятие «в облаке».
- IP-телефония в офис.
- How to Use Zabbix to Monitor Linux Disk Space
Monitor Disk IO Stats with Zabbix
I wanted to get a feel how much IO my machines are doing each day. As I was going through the zabbix graphs I noticed that IO statistics are not included. I did some research and I came across these forums:
Both use the same technique of querying the /proc/diskstats file and plotting that information. So let’s start setting that up.
Create UserParameters in Zabbix to Query /proc/diskstats
Both of the above links used the following UserParameters:
UserParameter=custom.vfs.dev.read.ops[*],cat /proc/diskstats | grep $1 | head -1 | awk '' UserParameter=custom.vfs.dev.read.ms[*],cat /proc/diskstats | grep $1 | head -1 | awk '' UserParameter=custom.vfs.dev.write.ops[*],cat /proc/diskstats | grep $1 | head -1 | awk '' UserParameter=custom.vfs.dev.write.ms[*],cat /proc/diskstats | grep $1 | head -1 | awk '' UserParameter=custom.vfs.dev.io.active[*],cat /proc/diskstats | grep $1 | head -1 | awk '' UserParameter=custom.vfs.dev.io.ms[*],cat /proc/diskstats | grep $1 | head -1 | awk '' UserParameter=custom.vfs.dev.read.sectors[*],cat /proc/diskstats | grep $1 | head -1 | awk '' UserParameter=custom.vfs.dev.write.sectors[*],cat /proc/diskstats | grep $1 | head -1 | awk '' Add those to your /etc/zabbix/zabbix_agentd.conf file. Here is how my file looked like:
kerch:~>tail /etc/zabbix/zabbix_agentd.conf UserParameter=custom.vfs.dev.read.ops[*],cat /proc/diskstats | grep $1 | head -1 | awk '' UserParameter=custom.vfs.dev.read.ms[*],cat /proc/diskstats | grep $1 | head -1 | awk '' UserParameter=custom.vfs.dev.write.ops[*],cat /proc/diskstats | grep $1 | head -1 | awk '' UserParameter=custom.vfs.dev.write.ms[*],cat /proc/diskstats | grep $1 | head -1 | awk '' UserParameter=custom.vfs.dev.io.active[*],cat /proc/diskstats | grep $1 | head -1 | awk '' UserParameter=custom.vfs.dev.io.ms[*],cat /proc/diskstats | grep $1 | head -1 | awk '' UserParameter=custom.vfs.dev.read.sectors[*],cat /proc/diskstats | grep $1 | head -1 | awk '' UserParameter=custom.vfs.dev.write.sectors[*],cat /proc/diskstats | grep $1 | head -1 | awk '' Then go ahead and restart the zabbix-agent service:
kerch:~>sudo service zabbix-agent restart zabbix-agent stop/waiting zabbix-agent start/running, process 26720 At this point you can query disk information. To make sure all of them work fine run the following:
kerch:~$ for i in $(grep '^UserParameter' /etc/zabbix/zabbix_agentd.conf | cut -d = -f 2 | cut -d [ -f 1); do echo $i; zabbix_get -s 192.168.1.100 -p 10050 -k "$i[sda]"; done custom.vfs.dev.read.ops 93292 custom.vfs.dev.read.ms 1214540 custom.vfs.dev.write.ops 3328812 custom.vfs.dev.write.ms 480210476 custom.vfs.dev.io.active 2 custom.vfs.dev.io.ms 42178164 custom.vfs.dev.read.sectors 2968840 custom.vfs.dev.write.sectors 161623584 All of that looks good. At this point the above links just create a graph for each disk separately and plot the above data. I had different types and number of disks on each machine, so I didn’t want to create a graph per device.
Zabbix AutoDiscovery
Zabbix has call feature called Discovery, where it can discover devices for you. I ran into this forum:
It had examples of how to discover services, process and lastly hard disks (which is what I was looking for). The above forum had a Perl script that output VM Name and it’s corresponding disks. I edited the file so it just showed disks. I put the script under /usr/local/bin and I made sure zabbix could execute the script:
kerch:~>ls -l /usr/local/bin/discover_disk.pl -rwxr-x--- 1 elatov zabbix 498 Jun 2 15:57 /usr/local/bin/discover_disk.pl After all of that was done, here is how the output looked like:
kerch:~>/usr/local/bin/discover_disk.pl < "data":[ , < "":"loop1", > , < "":"sda", > , < "":"sda1", > , < "":"sda2", > , < "":"sda3", > , < "":"sda4", > , < "":"sr0", > ] > It spit out the partitions as well, I left it that way in case I might use them later.
Create a Regular Expression in Zabbix
I didn’t want disk statistics per partition but per disk, so let’s add a rule to just catch the disk without the partitions. Login to zabbix and then go to “Administration” -> General -> “Regular Expression”:

Then click “Create New Regular Expression” and under “Expressions”, click “New” and add the following:

Save that and on the left side, name the Regular Expression and do a test to make sure it works:

and also put in a partition to make sure it fails:

Save that and if you go back to the regular expression list you will see yours there:

Create a New Template in Zabbix
Let’s create a new template for our items and graphs. Go to “Configuration” -> “Template” -> “Create Template”. Fill out the information and add your hosts to the template:

Create a new UserParameter for Disk Discovery
Add the following into /etc/zabbix/zabbix_agentd.conf:
kerch:~>tail -1 /etc/zabbix/zabbix_agentd.conf UserParameter=custom.disks.discovery_perl,/usr/local/bin/discover_disk.pl Restart the agent one more time:
kerch:~>sudo service zabbix-agent restart zabbix-agent stop/waiting zabbix-agent start/running, process 29357 Lastly make sure, we get the our disks from this User parameter:
kerch:~>zabbix_get -s 192.168.1.100 -k custom.disks.discovery_perl < "data":[ , < "":"ram0", > , < "":"ram1", The list kept going, but we now know that works.
Create a Zabbix Discovery Rule
Go to “Configuration” -> “Templates”:

Scroll down and you will see the template that you created earlier. Click on “Discovery” -> “Create Discovery Rule”. Here we will name the rule, query the UserParameter we created, and apply a filter (regular expression) to get just the disk. Here is how my configuration looked like:

Save that and if you go back to the discovery rules you will see the following:

Add Item Prototypes to Discovery Rule
Go to “Configuration” -> “Templates” -> Template_Linux_Disk -> “Discovery” -> “Item Prototypes” -> “Create Item Prototype”. Fill out the information. Here is my latency item:

I added both read and write latency. Here is my Disk Rate in Bps:

I added both read and write disk rates. I also added disk operations (read and write). I ended up defining 6 items in total, here is the list:

Create Graph Prototypes to Plot the Above Items
Go to “Configuration” -> “Templates” -> Template_Linux_Disk -> “Discovery” -> “Graph Prototypes” -> “Create Graph Prototype”. Add both read and write like so:

Using the same technique I created 3 graph prototypes:

Check out the Graphs
Go to “Monitoring” -> “Graphs”. Then pick a host and make sure only it’s corresponding disks show. For example here is what I saw for my Fedora Box which had an LVM setup:


And here are the available graphs for my Ubuntu which just had one drive in it:

and here is latency for the disk:

Everything looked perfect.
backnet — ответы на простые вопросы и не очень
По сути ничего сложного нет, но поиск по интернету ничего хорошего не нашел (может быть я плохо искал), и так, как это сделал я?! Как добавлять триггеры и шаблоны можно посмотреть в постах ранее, по этому сразу к делу. Мне нужно было мониторить 5 дисков (кол-во не важно, но для наглядности). 1. Создаем шаблон (к примеру Windows Disk) 2. Создаем группу данных (к примеру DiskSize) 3. Далее создаем элемент данных, вот тут то самая и суть (вот так должен выглядеть "элемент данных") 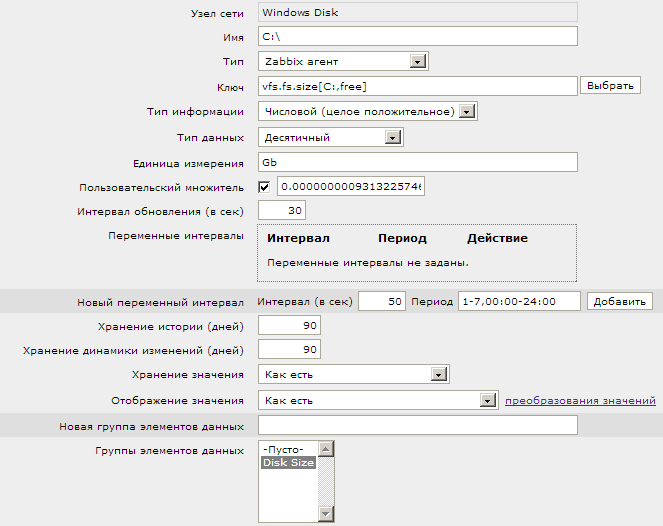 - первое это ключ (vfs.fs.size[C:,free]) по которую забикс будет проверять место на диске. C: - это имя диска, free - это свободное место (по умолчанию забикс это будет отдавать в килобайтах), это не удобно, по этому делаем пользовательский множитель 0.000000000931322574615478515625 - почему именно такой? (на сколько я понял, раз множитель, значит надо умножить и кроме как число в строчку вставить нельзя, а чтобы из КБ перевести в ГБ, надо несколько раз разделить на 1024 или умножить на вот это самое число). В итоге получаем элемент данных в ГБ (что намного удобнее). Далее делаем триггер который будет срабатывать когда на диске остается меньше 20 ГБ. Сам триггер выглядит вот так (см.ниже).
 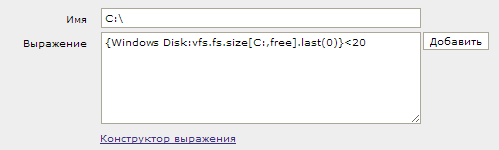 В нем добавляем выражение "
Мониторинг дискового пространства активным Zabbix-агентом

Для того, чтобы при помощи активного агента Zabbix следить за дисковым пространством компьютера, как оказалось, не нужно писать скриптов. Совсем. 🙂 Все уже умеет делать активный Zabbix-агент «из коробки». Достаточно создать шаблон и назначить его компьютеру. Всё.
Дано.
Сферический компьютер в вакууме. Нужно следить за заполненностью системного диска Windows. Предположим, что у нас всё стандартно, поэтому в качестве буквы системного диска используется «C:».
Решение.
При помощи активного агента Zabbix будем собирать 4 параметра диска «C:»:
- общий размер диска
- размер занятого места
- размер свободного места
- процент свободного места.
На основании этих параметров создадим 4 триггера:
- Предупреждение. Свободно менее 20%
- Средняя важность. Свободно менее 10%
- Высокая важность. Свободно менее 1 Гб.
- Чрезвычайная важность. Свободно менее 100 Мб.
Создаём шаблон.
Имя шаблона: Active Computer — SystemDrive
Группа данных: Filesystems
Элементы данных:
- SystemDriveSizeFree — vfs.fs.size[«c:»,free]
- SystemDriveSizePFree — vfs.fs.size[«c:»,pfree]
- SystemDriveSizeTotal — vfs.fs.size[«c:»,total]
- SystemDriveSizeUsed — vfs.fs.size[«c:»,used]
Теперь то же самое, но в картинках.


Назначаем шаблон компьютеру
И начинаем получать данные… 🙂

Аренда серверов.

Надёжные сервера с Pro-бегом
У ВАС В ОФИСЕ!
1С:Предприятие «в облаке».

Безопасный доступ к своей 1С из офиса, командировки и т.п.!
IP-телефония в офис.

IP-телефония давно перестала быть роскошью в офисах.
Хотите себе в офис цифровую АТС - обращайтесь. !
How to Use Zabbix to Monitor Linux Disk Space

This article omits the installation of zabbix server and client. For the zabbix server and client installation, you can check my previous article. Here, the centos system is used as an example to monitor the disk usage. The zabbix version is 3.2. For other versions, please test it yourself.
Currently, the zabbix server and client can communicate normally. To monitor the disk usage, you only need to configure it on the zabbix server.
Configuration – Template – Create Template – Set Template Name
The vfs.fs.size[fs,] key value is required to monitor disk usage.
Fs: file system
Mode: mode
Total default all, free idle, used, pfree free percentage, used percentage
3, create a monitoring item
Just set a name and key value, and the rest are default.
The name I set here is disk-space-total
Key value vfs.fs.size[/data,total], my disk is mounted under /data, modify it according to the situation
PS: My data update interval is 30 seconds. In the actual production environment, the data update time can be set longer, depending on individual circumstances.

Next continue to create free, used, create methods and total the same as total
| 1 2 | 名称disk – space – free 键值vfs . fs . size [ / data , free ] 名称disk – space – used 键值vfs . fs . size [ / data , used ] |
Add pfree, pused, note that these two information types need to choose floating point number, unit %
| 1 2 | 名称disk – space – pfree 键值vfs . fs . size [ / data , pfree ] 名称disk – space – pused 键值vfs . fs . size [ / data , pused ] |


The template has been added, and finally it will be linked to the host.
