- 1. Monitor Linux with Zabbix agent
- Install Zabbix agent
- Configure Zabbix for monitoring
- Passive checks
- Zabbix frontend
- Zabbix agent
- Active checks
- Zabbix frontend
- Zabbix agent
- View collected metrics
- Set up problem alerts
- Test your configuration
- Установка и начальная настройка сервера мониторинга Zabbix 6 на Ubuntu Server
- Подготовка сервера
- 1. Правильное время
- 2. Настройка брандмауэра
- Установка веб-сервера
- СУБД
- Веб-сервер
- PHP и PHP-FPM
- NGINX + PHP
- Установка и настройка сервера Zabbix
- Установка
1. Monitor Linux with Zabbix agent
This page walks you through the steps required to start basic monitoring of Linux machines with Zabbix. The steps described in this tutorial can be applied to any Linux-based operating system.
Who this guide is for
This guide is designed for new Zabbix users and contains the minimum set of steps required to enable basic monitoring of your Linux machine. If you are looking for deep customization options or require more advanced configuration, see Configuration section of Zabbix manual.
Prerequisites
Before proceeding with this installation guide, you must download and install Zabbix server and Zabbix frontend according to instructions for your OS.
Install Zabbix agent
Zabbix agent is the process responsible for gathering data.
Check your Zabbix server version:
Install Zabbix agent of the same version (recommended) on the Linux machine that you want to monitor. Based on your monitoring needs, it may be the same machine, where Zabbix server is installed, or a completely different machine.
Choose the most suitable installation method:
- Run as a Docker container — see the list of available images in Zabbix Docker repository.
- Install from Zabbix packages (available for Alma Linux, CentOS, Debian, Oracle Linux, Raspberry Pi OS, RHEL, Rocky Linux, SUSE Linux Enterprise Server, Ubuntu).
- Compile from sources.
Configure Zabbix for monitoring
Zabbix agent can collect metrics in active or passive mode (simultaneously).
A passive check is a simple data request. Zabbix server or proxy asks for some data (for example, CPU load) and Zabbix agent sends back the result to the server. Active checks require more complex processing. The agent must first retrieve from the server(s) a list of items for independent processing and then bulk send the data back. See Passive and active agent checks for more info.
Monitoring templates provided by Zabbix usually offer two alternatives — a template for Zabbix agent and a template for Zabbix agent (active). With the first option, the agent will collect metrics in passive mode. Such templates will deliver identical monitoring results, but using different communication protocols.
Further Zabbix configuration depends on whether you select a template for active or passive Zabbix agent checks.
Passive checks
Zabbix frontend
1. Log into Zabbix frontend.
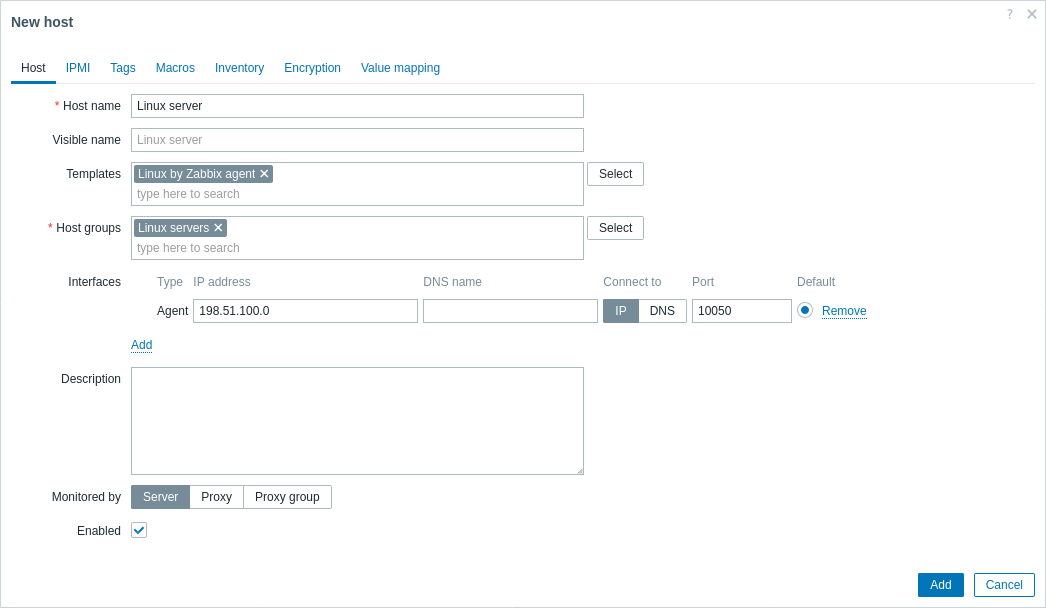
2. Create a host in Zabbix web interface.
This host will represent your Linux machine.
3. In the Interfaces parameter, add Agent interface and specify the IP address or DNS name of the Linux machine where the agent is installed.
4. In the Templates parameter, type or select Linux by Zabbix agent.
Zabbix agent
Open Zabbix agent configuration file (by default, the path is /usr/local/etc/zabbix_agentd.conf):
sudo vi /usr/local/etc/zabbix_agentd.confAdd the IP address or DNS name of your Zabbix server to the Server parameter.
Active checks
Zabbix frontend
1. Log in to Zabbix frontend.
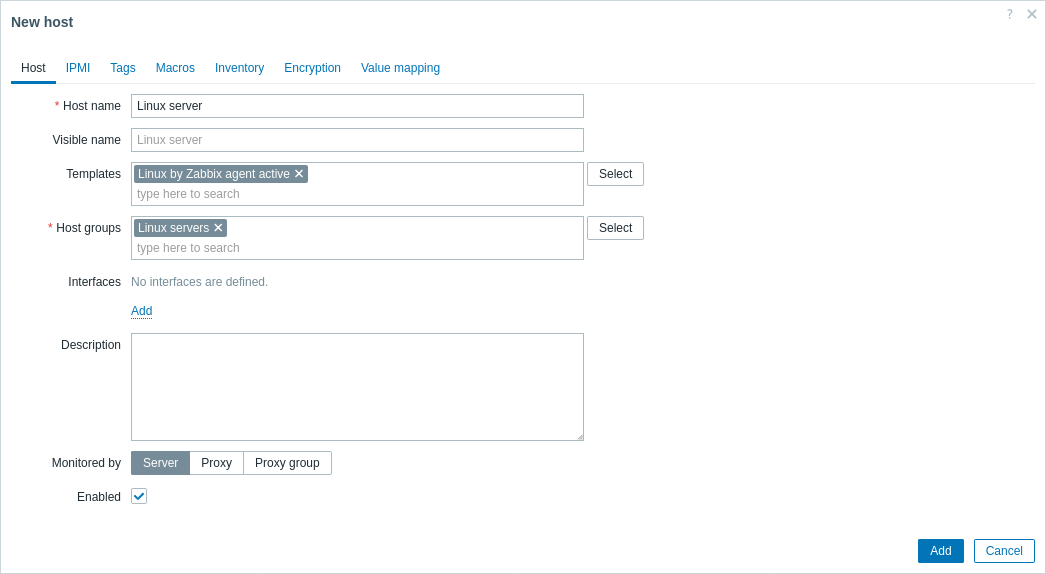
2. Create a host in Zabbix web interface.
This host will represent your Linux machine.
3. In the Templates parameter, type or select Linux by Zabbix agent active.
Zabbix agent
Open Zabbix agent configuration file (by default, the path is /usr/local/etc/zabbix_agentd.conf):
sudo vi /usr/local/etc/zabbix_agentd.conf- The name of the host you created in Zabbix web interface to the Hostname parameter.
- The IP address or DNS name of your Zabbix server to the ServerActive parameter.
ServerActive= 192.0.2.22 Hostname=Linux serverView collected metrics
Congratulations! At this point, Zabbix is already monitoring your Linux machine.
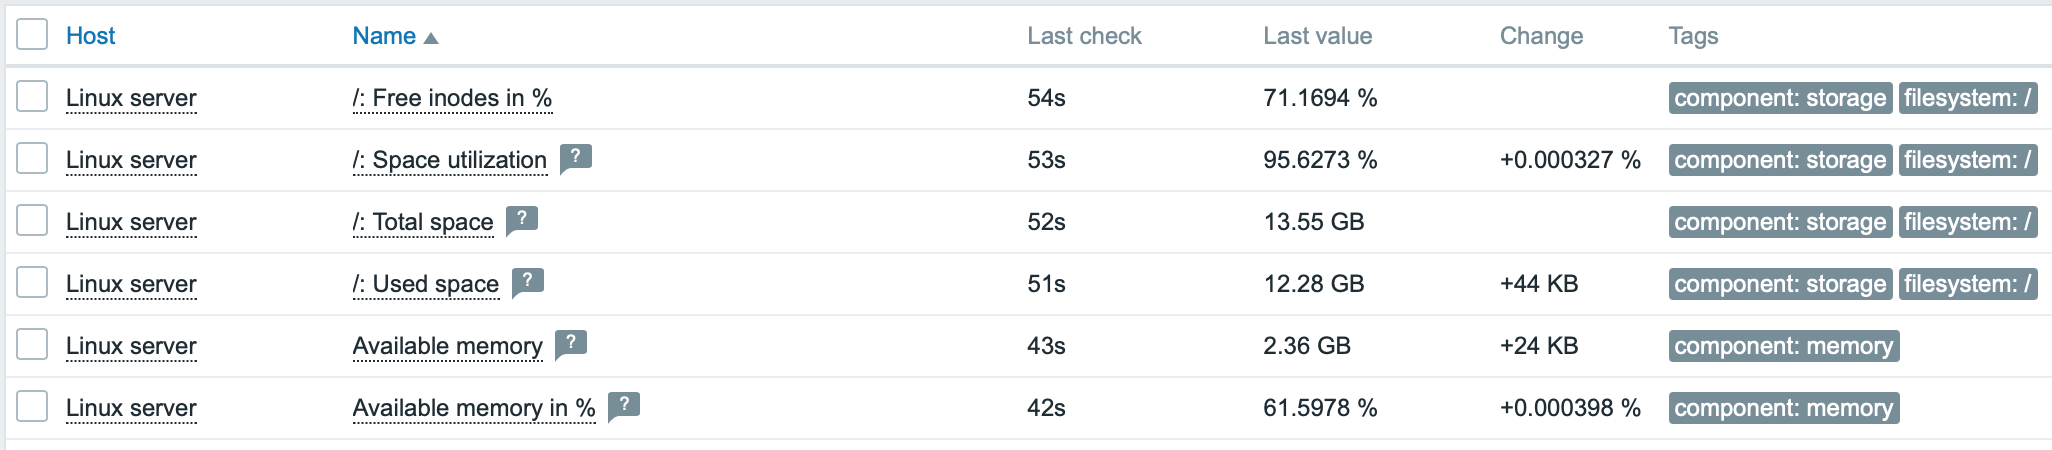
To view collected metrics, open the Monitoring->Hosts menu section and click on the Latest data next to the host.

This action will open a list of all the latest metrics collected from Linux server host.
Set up problem alerts
Zabbix can notify you about a problem with your infrastructure using a variety of methods. This guide provides configuration steps for sending email alerts.
1. Go to the User settings -> Profile, switch to the tab Media and add your email.
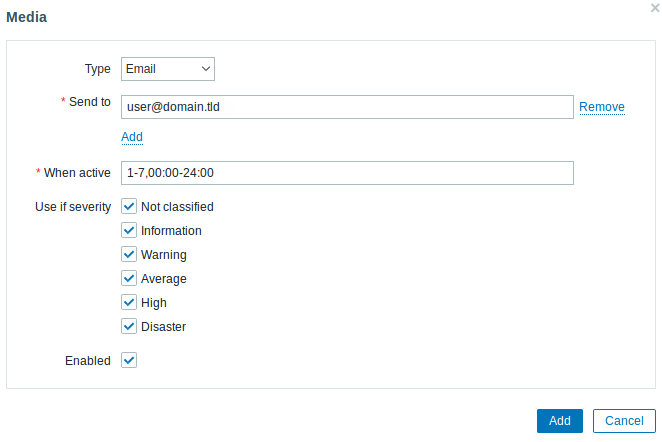
Next time, when Zabbix detects a problem you should receive an alert via email.
Test your configuration
On Linux, you can simulate high CPU load and as a result receive a problem alert by running:
You may need to run several md5sum processes for CPU load to exceed the threshold.
When Zabbix detects the problem, it will appear in the Monitoring->Problems section.

If the alerts are configured, you will also receive the problem notification.
- Creating an item — how to start monitoring additional metrics (custom monitoring without templates).
- Zabbix agent items, Zabbix agent items for Windows — full list of metrics you can monitor using Zabbix agent on Windows.
- Problem escalations — how to create multi-step alert scenarios (e.g., first send message to the system administrator, then, if a problem is not resolved in 45 minutes, send message to the data center manager).
Установка и начальная настройка сервера мониторинга Zabbix 6 на Ubuntu Server

Обновлено: 15.11.2022 Опубликовано: 23.05.2019
Тематические термины: Zabbix, MariaDB, MySQL, PHP, NGINX. Сервер Zabbix используется для сбора и анализа информации о состоянии узлов сети. В данной статье будет рассмотрен процесс его установки и развертывания веб-интерфейса для его управления. В качестве сервера баз данных мы будем использовать MariaDB/MySQL. Версия операционной системы, которая использовалась для написания инструкции — 20.04 LTS (также протестировано на 22.04), версия устанавливаемого Zabbix — 6.
Подготовка сервера
1. Правильное время
Для получения актуальной информации необходимо, чтобы на сервере было правильное время. Для этого сначала задаем правильную временную зону:
* в данном примере задается московское время. Затем устанавливаем и запускаем сервис синхронизации времени:
2. Настройка брандмауэра
* где 80 — порт для http запросов (веб-интерфейс); 443 — для https запросов (веб-интерфейс); 10050 — порты для получения информации от zabbix агентов. Для сохранения правил используем
Если наша система чистая и на ней не работают критически важные сервисы, стоит обновить установленные пакеты:
Установка веб-сервера
Управление сервером Zabbix будет осуществляться посредством веб-интерфейса. Для этого необходимо установить и настроить веб-сервер, СУБД и PHP.
СУБД
В данному инструкции мы будем использовать сервер баз данных mariadb. Zabbix версии 6 требует MariaDB версии 10.05.00 и выше. Но слишком свежая версия также может не поддерживаться сервером заббикс. Необходимо уточнить системные требования на официальной странице. В репозитории Ubuntu может не оказаться нужной версии СУБД, поэтому мы подключим репозиторий разработчика. Для этого переходим по ссылке downloads.mariadb.org/mariadb/repositories и выбираем нашу версию операционной системы, последний стабильный и поддерживаемый релиз mariadb и геолокацию репозитория, например:  Ниже появится инструкция по добавлению репозитория и установке СУБД:
  Согласно инструкции, создаем файл:
# MariaDB 10.8 repository list — created UTC
# https://mariadb.org/download/
deb [arch=amd64,arm64,ppc64el,s390x] https://mirror.docker.ru/mariadb/repo/10.8/ubuntu focal main
deb-src https://mirror.docker.ru/mariadb/repo/10.8/ubuntu focal main
Веб-сервер
Открываем веб-браузер и переходим по ссылке http:/// — мы должны увидеть окно приветствия:
PHP и PHP-FPM
Интерфейс zabbix разработан на PHP — наш веб-сервер должен обрабатывать скрипты, написанные на нем. Zabbix версии 6 требует PHP версии 7.2 и выше. Устанавливаем php и необходимые компоненты:
apt install php php-fpm php-mysql php-pear php-cgi php-common php-ldap php-mbstring php-snmp php-gd php-xml php-bcmath
* где 7.4 — версия PHP. В вашем случае это может быть другая версия. Проверить можно командой php -v. Редактируем следующие параметры:
date.timezone = «Europe/Moscow»
.
max_execution_time = 300
.
post_max_size = 16M
.
max_input_time = 300
.
max_input_vars = 10000
- date.timezone — временная зона. В нашем примере выставлено московское время.
- max_execution_time — разрешенное время выполнения скрипта. Если последний будет выполняться дольше, система прервет его работу.
- post_max_size — максимальные объем передачи данных методом POST.
- max_input_time — время в секундах, за которое PHP должен разобрать входные данные GET и POST.
- max_input_vars — ограничение на количество входных переменных, которые могут быть переданы на сервер в одном запросе.
Разрешим запуск php-fpm и перезапустим его:
systemctl enable php7.4-fpm
systemctl restart php7.4-fpm
NGINX + PHP
Для того, чтобы NGINX обрабатывал PHP, открываем конфигурационный файл:
В секции location добавляем параметр index:
Внутри секции server добавим следующее:
location ~ \.php$ set $root_path /var/www/html;
fastcgi_buffer_size 32k;
fastcgi_buffers 4 32k;
fastcgi_pass unix:/run/php/php7.4-fpm.sock;
fastcgi_index index.php;
fastcgi_param SCRIPT_FILENAME $root_path$fastcgi_script_name;
include fastcgi_params;
fastcgi_param DOCUMENT_ROOT $root_path;
>
* где /var/www/html — корневой путь хранения скриптов; /run/php/php7.4-fpm.sock — путь до сокетного файла php-fpm (точное расположение файла можно посмотреть в конфигурационном файле /etc/php/7.4/fpm/pool.d/www.conf).
Проверяем настройки nginx:
Создаем index.php со следующим содержимым:
Открываем веб-браузер и переходим по ссылке http:/// — теперь мы должны увидеть сводную информацию по PHP и его настройкам:

* в нашем примере мы работаем с php7.4, а на скриншоте 7.2. Это не принципиально. Для нас важно, что страница отдает phpinfo — значит веб-сервер настроен корректно.
Веб-сервер готов для работы с Zabbix Web.
Установка и настройка сервера Zabbix
Переходим к установке самого Zabbix сервера.
Установка
Сначала установим репозиторий последней версии Zabbix. Для этого переходим на страницу https://repo.zabbix.com/zabbix/ и переходим в раздел с самой последней версией пакета — затем переходим в ubuntu/pool/main/z/zabbix-release/ — копируем ссылку на последнюю версию релиза:

Обратите внимание, что необходимо скопировать ссылку на файл для своей версии Ubuntu — в нашем примере это 20.04. Посмотреть свою версию операционной системы можно командой:
cat /etc/os-release | grep VERSION_ID
Скачиваем файл репозитория командой: